Why Choose My Files in the Eolas App?
Explore the advantages of My Files and learn the simple steps to upload your files efficiently.
The My Files feature in our app provides an intuitive and limitless file organization system tailored to the specific needs of healthcare professionals. Say goodbye to clutter and chaos as you take control of your valuable work materials with ease.
Well, here's why it's a top pick!
Unlimited Storage.
With My Files, you'll never have to worry about running out of space for your important files. Our unlimited storage ensures you can store all your medical records, important documents images, videos, and more without restrictions.
Offline Accessibility.
As a healthcare professional, you need access to critical documents even when you're offline. Our feature allows you to download and view your files without an internet connection, ensuring you're always prepared, no matter where you are.
Effortless Organization.
The intuitive file organization system makes it simple to upload, delete, and update your files. Whether you're managing images, portfolio evidence, PDFs, or MS Office files, you'll find our interface user-friendly and efficient.
Security.
We prioritise the security and privacy of your sensitive medical data. Rest assured that your files are encrypted and protected with industry-standard security measures.
Compatibility.
My Files supports a wide range of file formats, including PDFs, images, videos, and Microsoft Office files.
Mobile - File Uploading.
To upload files using your mobile device, follow these steps:
-
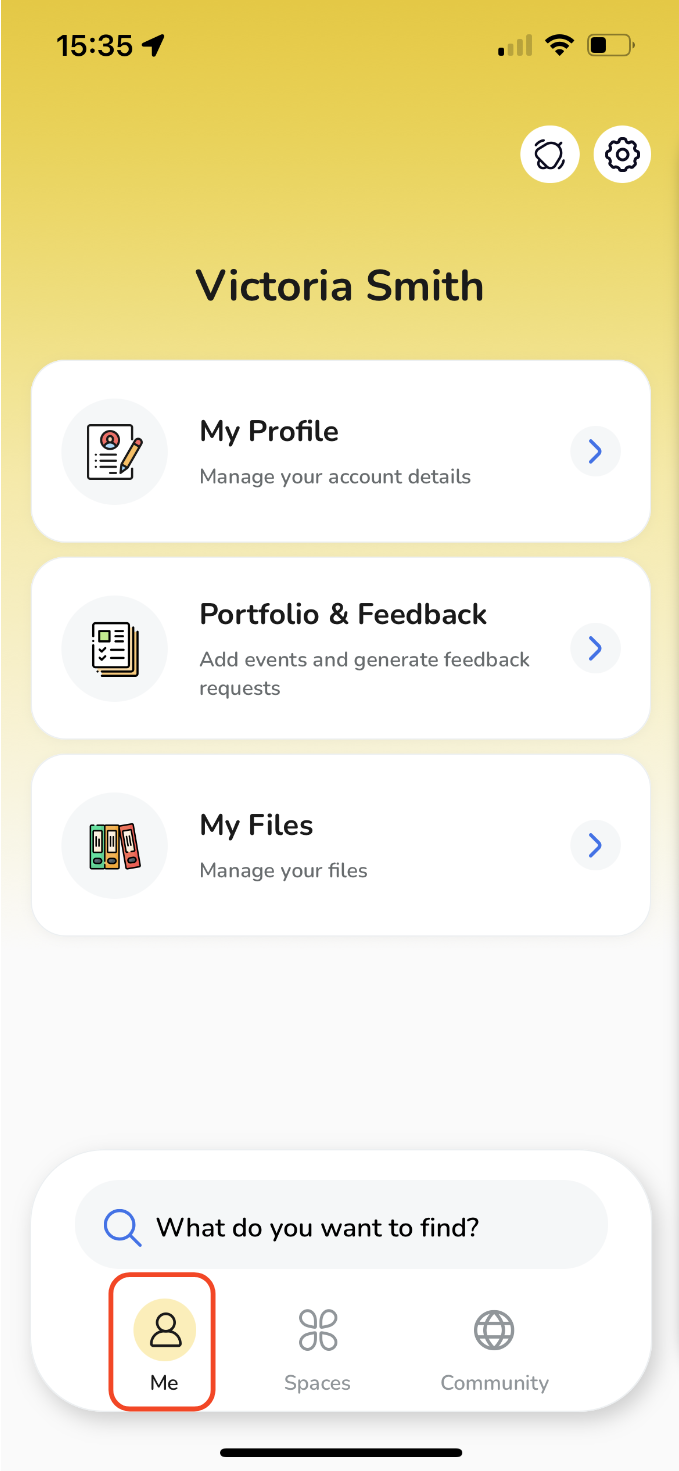
Begin by opening the app and navigating to the "Me" tab.
-
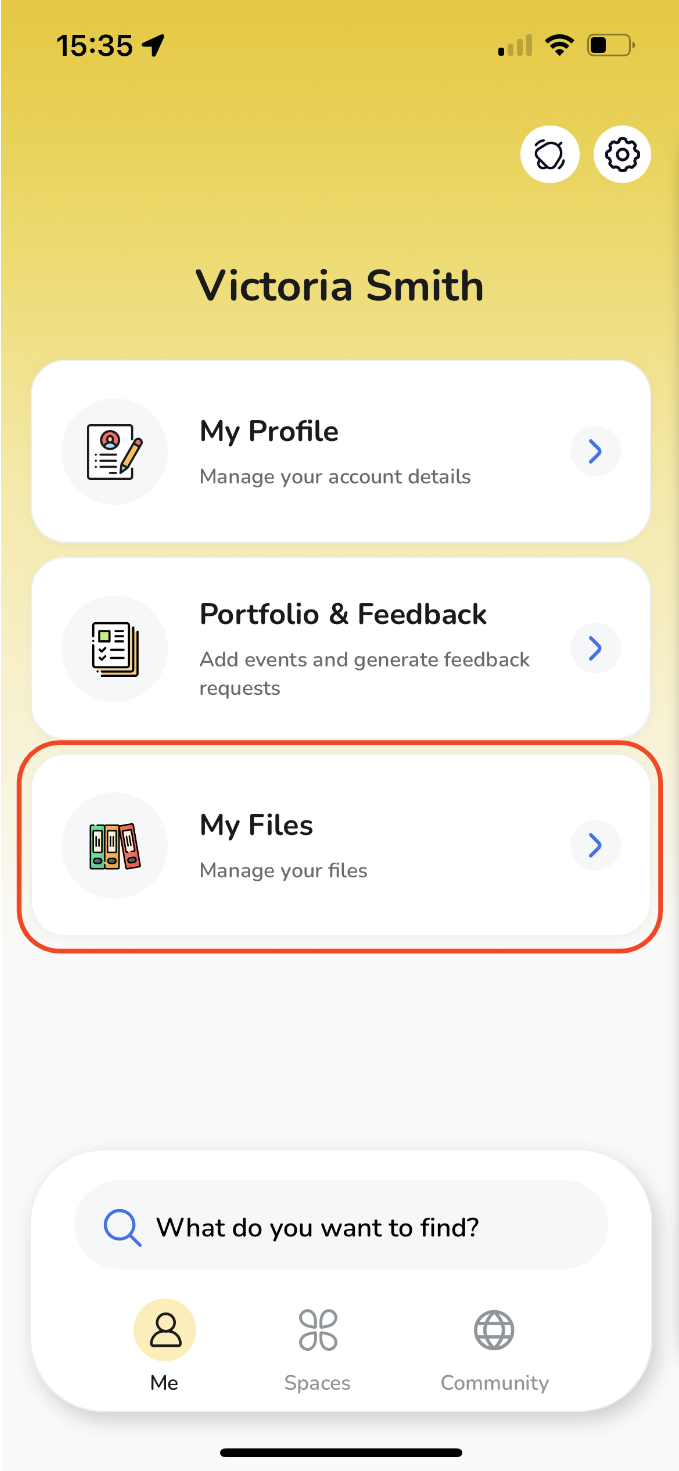
Within the "Me" tab, locate and select "My Files".
-
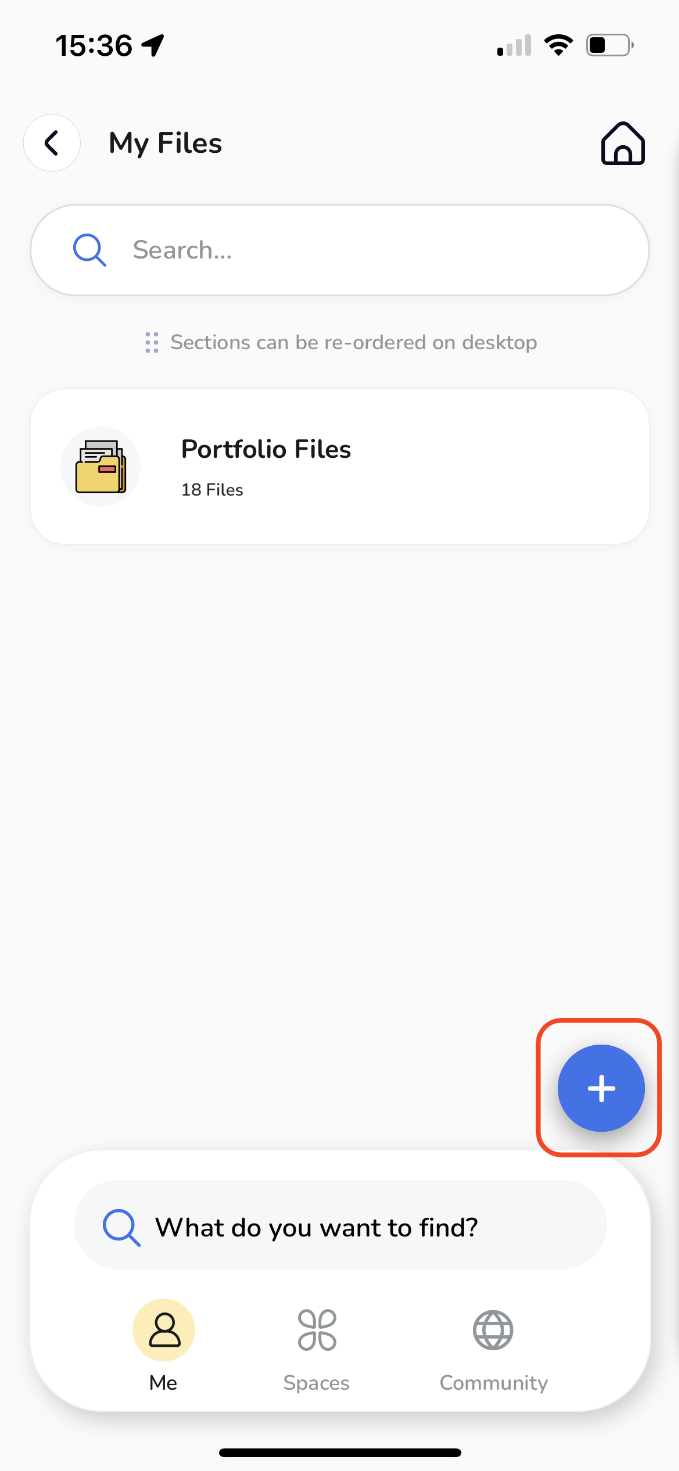
When you begin, there's already a "Portfolio Files" section set up to contain files related to your portfolio events.
However, to upload a new file and effectively organize your materials into folders for better categorisation, you'll need to create a folder. To achieve this, simply tap the blue "+" button.
-
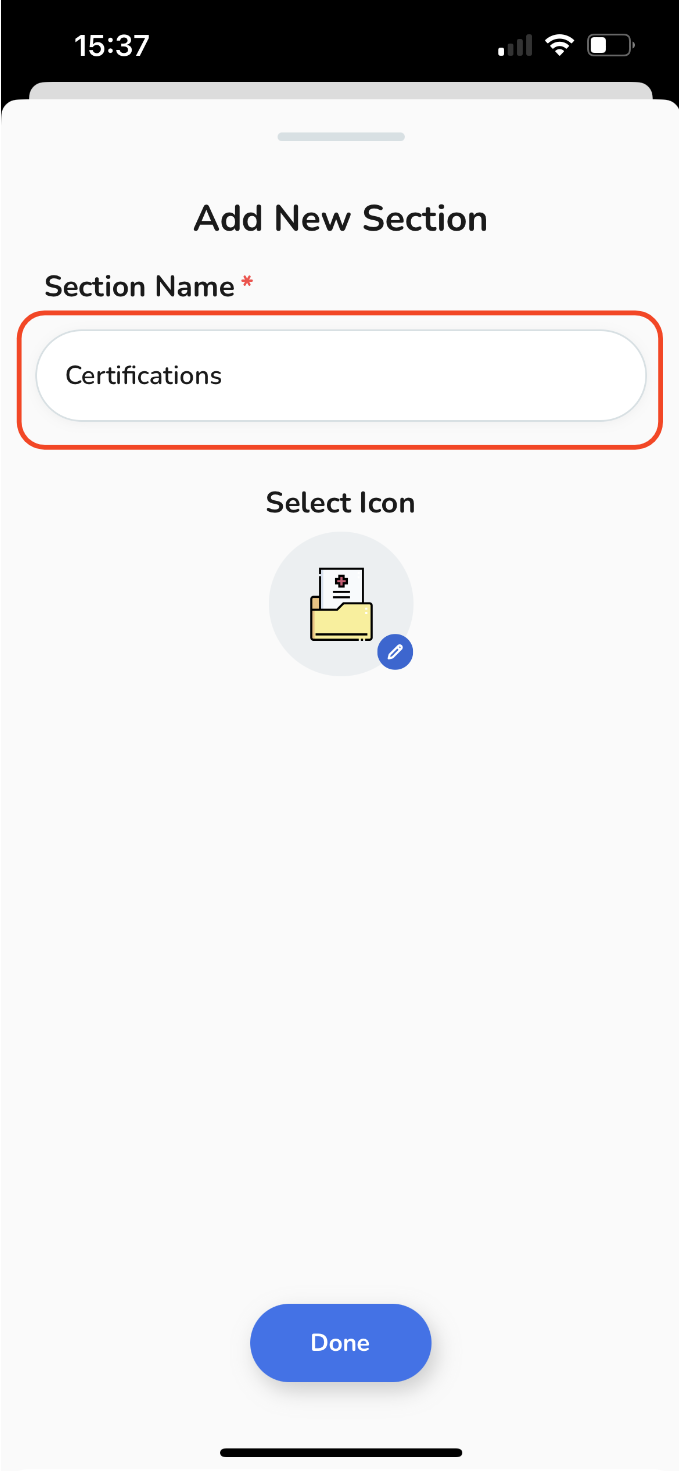
A pop-up window will appear, allowing you to name your new section. Provide a relevant name for the section.
-
Choose an icon that most accurately represents the folder's content.
-
When you finish, tap "Done".
-
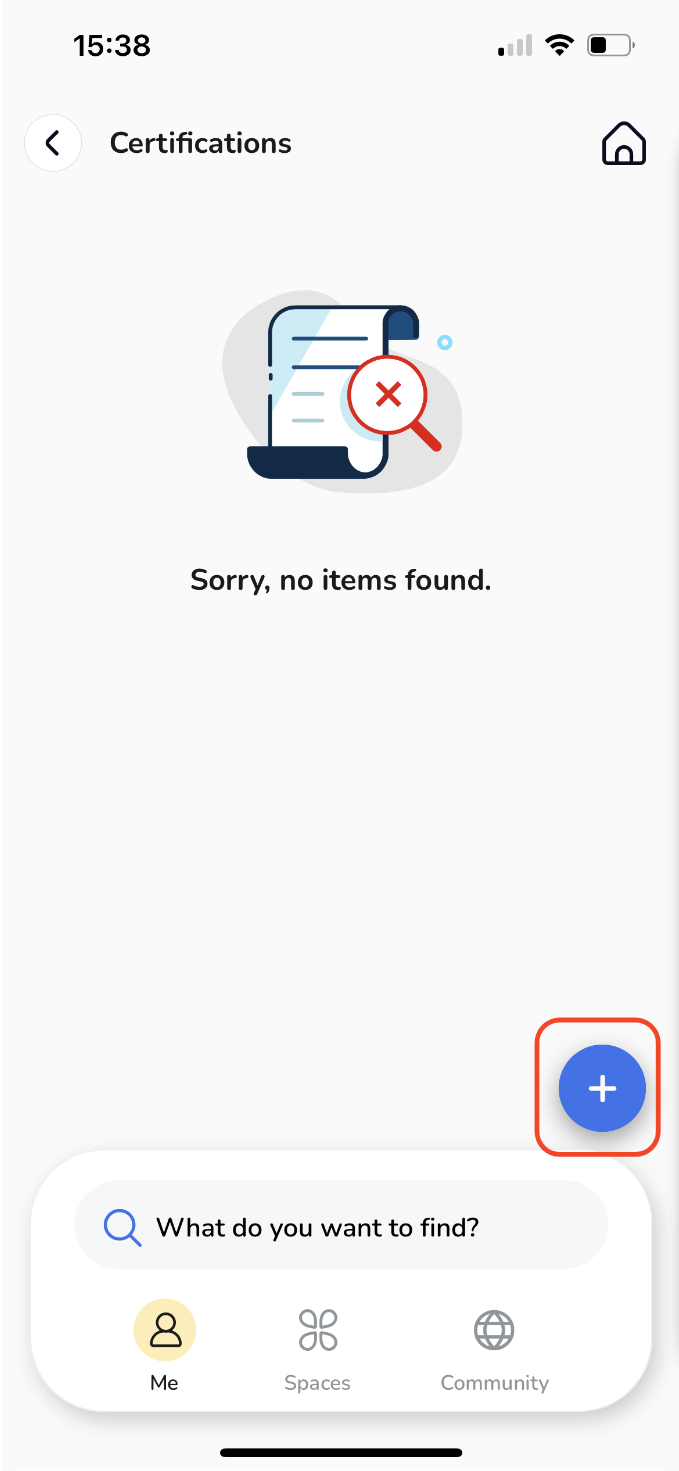
Your newly created section will initially be empty. Don't worry; we will now guide you through adding a file to it. To begin, tap the blue "+" button.
-
Another pop-up will appear, giving you the option to add a new file. You can upload various file types, including MS Office documents, PDFs, images, videos, and web links.
-
For a new file upload,
-
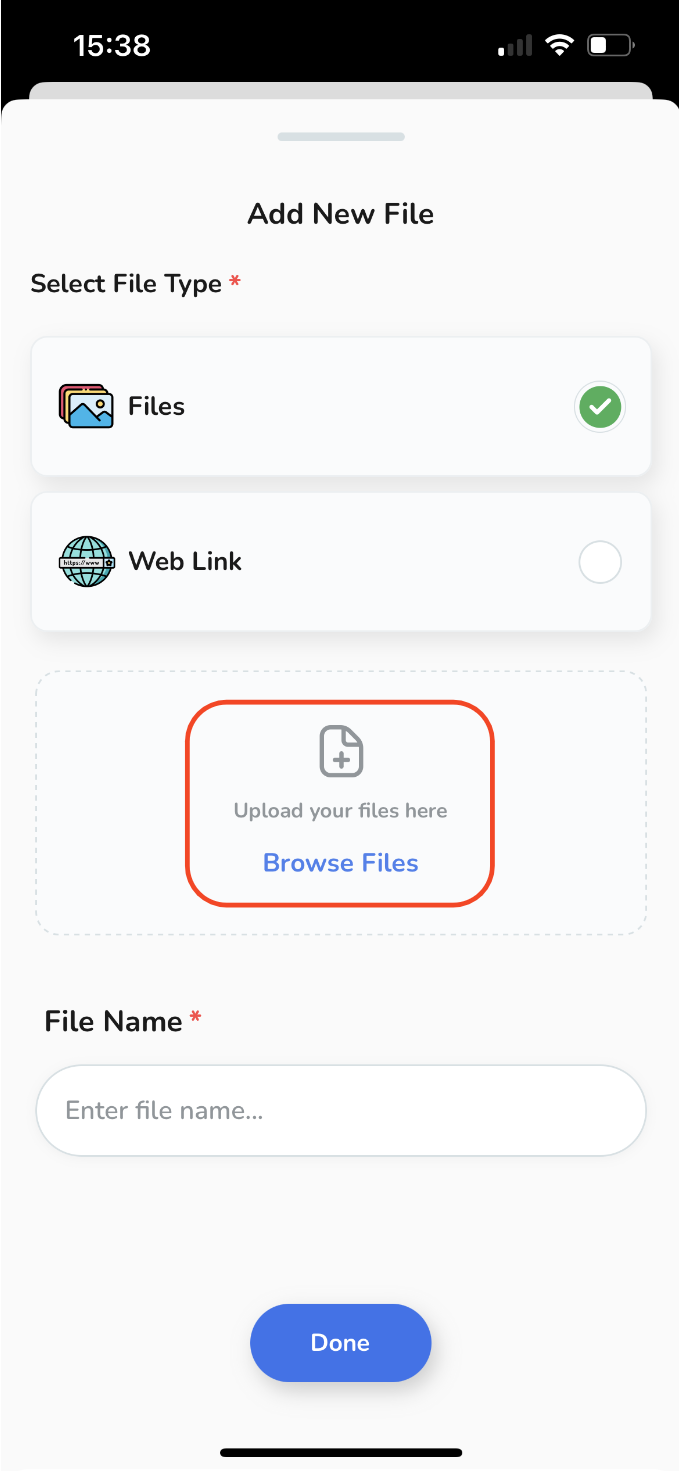
Select "Files" and then tap on "Browse Files" to access your device's file system. Next, choose the desired file you wish to upload.
-
If necessary, provide a relevant name for the file, and then tap "Done".
-
-
To add a weblink, select "Web Link",
-
Congratulations! The file you selected has now been successfully uploaded and is a part of your personal storage files.
Begin by opening the app and navigating to the "Me" tab.
Within the "Me" tab, locate and select "My Files".
When you begin, there's already a "Portfolio Files" section set up to contain files related to your portfolio events.
However, to upload a new file and effectively organize your materials into folders for better categorisation, you'll need to create a folder. To achieve this, simply tap the blue "+" button.
A pop-up window will appear, allowing you to name your new section. Provide a relevant name for the section.
Choose an icon that most accurately represents the folder's content.
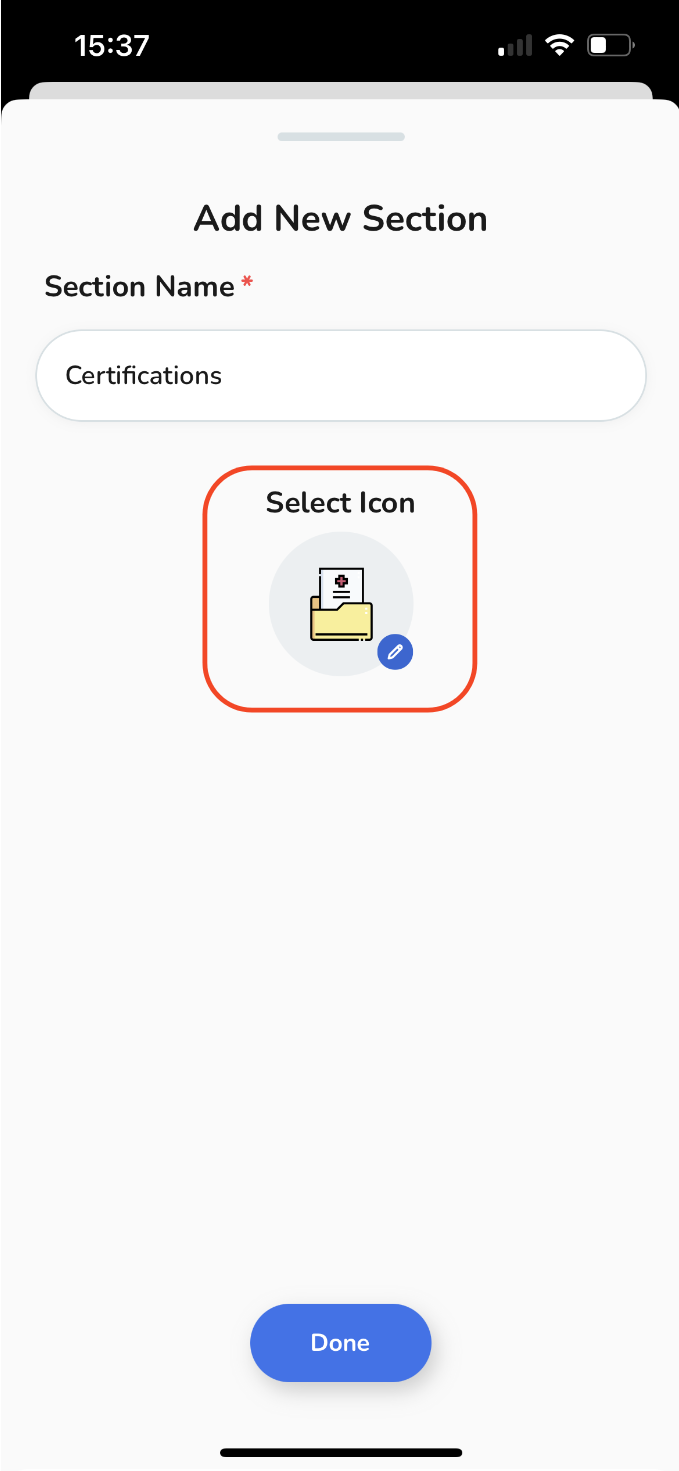
When you finish, tap "Done".
Your newly created section will initially be empty. Don't worry; we will now guide you through adding a file to it. To begin, tap the blue "+" button.
Another pop-up will appear, giving you the option to add a new file. You can upload various file types, including MS Office documents, PDFs, images, videos, and web links.
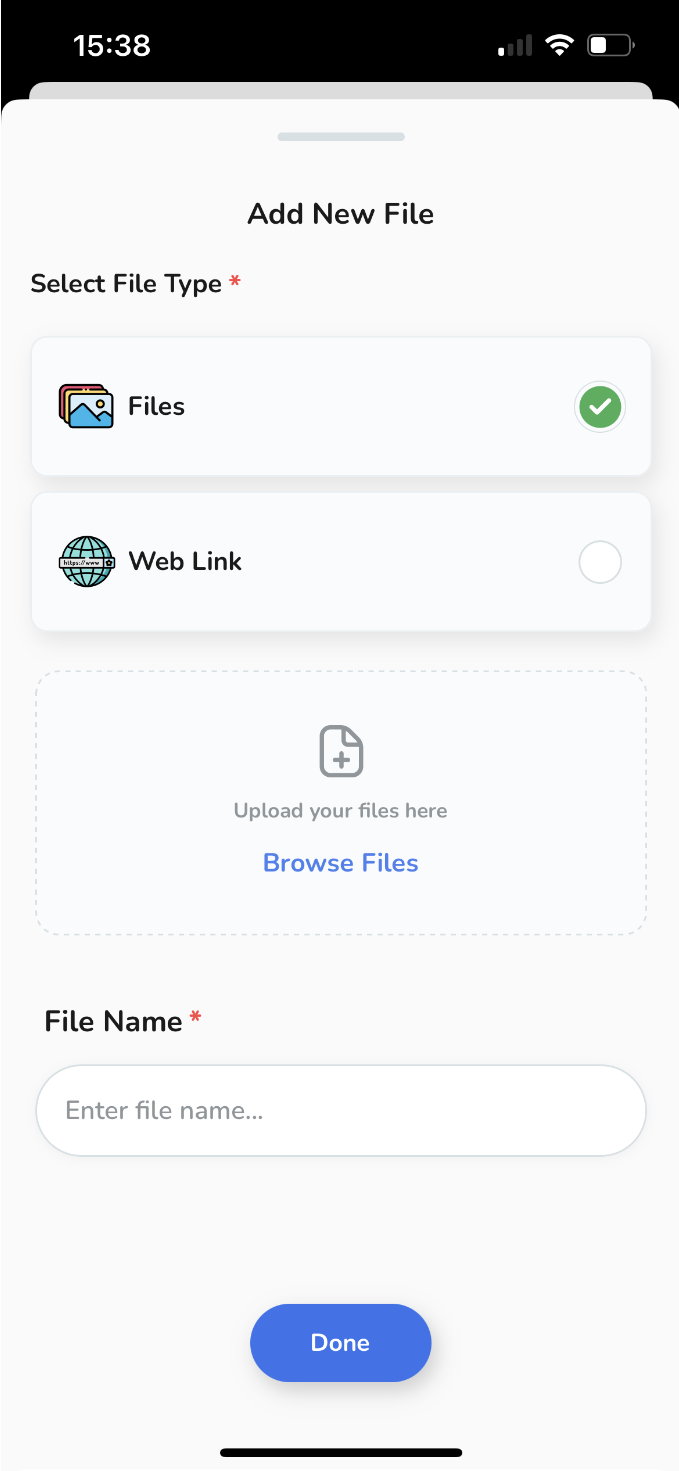
For a new file upload,
-
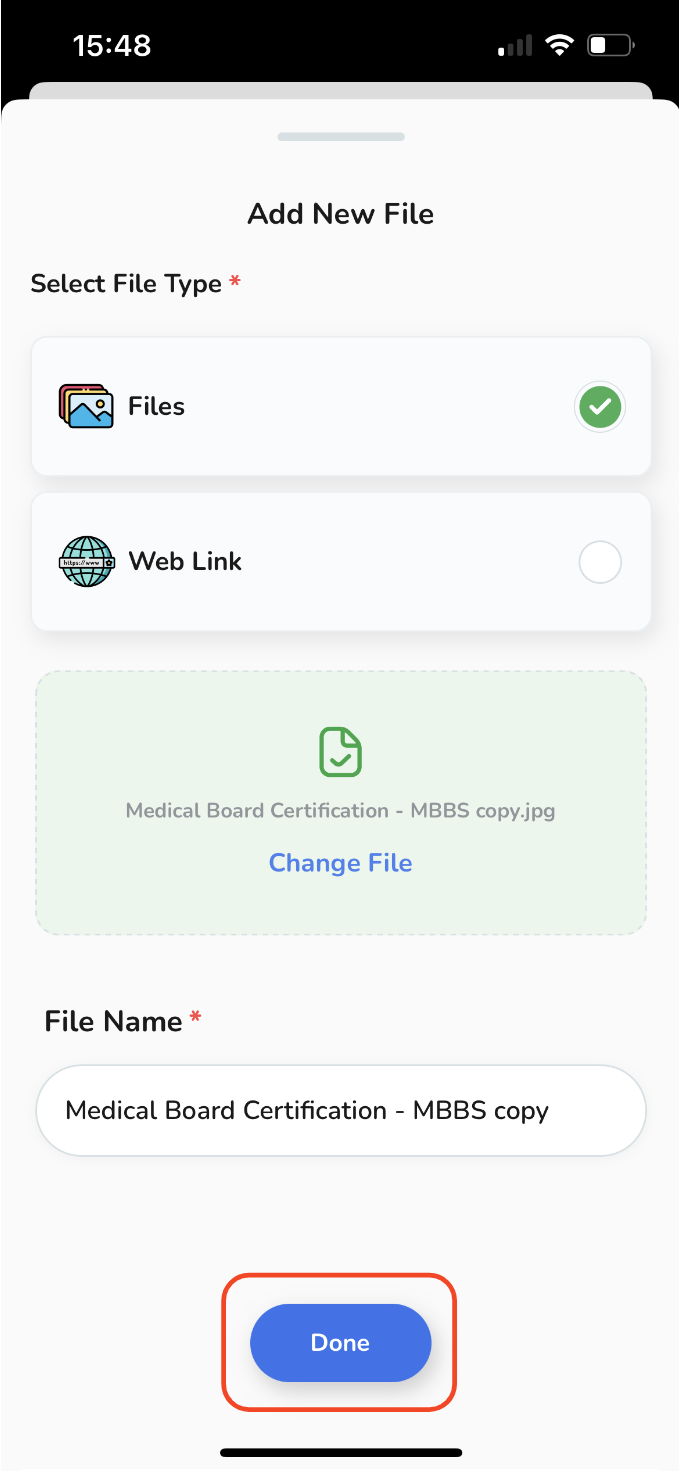
Select "Files" and then tap on "Browse Files" to access your device's file system. Next, choose the desired file you wish to upload.
Select "Files" and then tap on "Browse Files" to access your device's file system. Next, choose the desired file you wish to upload.
-
If necessary, provide a relevant name for the file, and then tap "Done".
If necessary, provide a relevant name for the file, and then tap "Done".
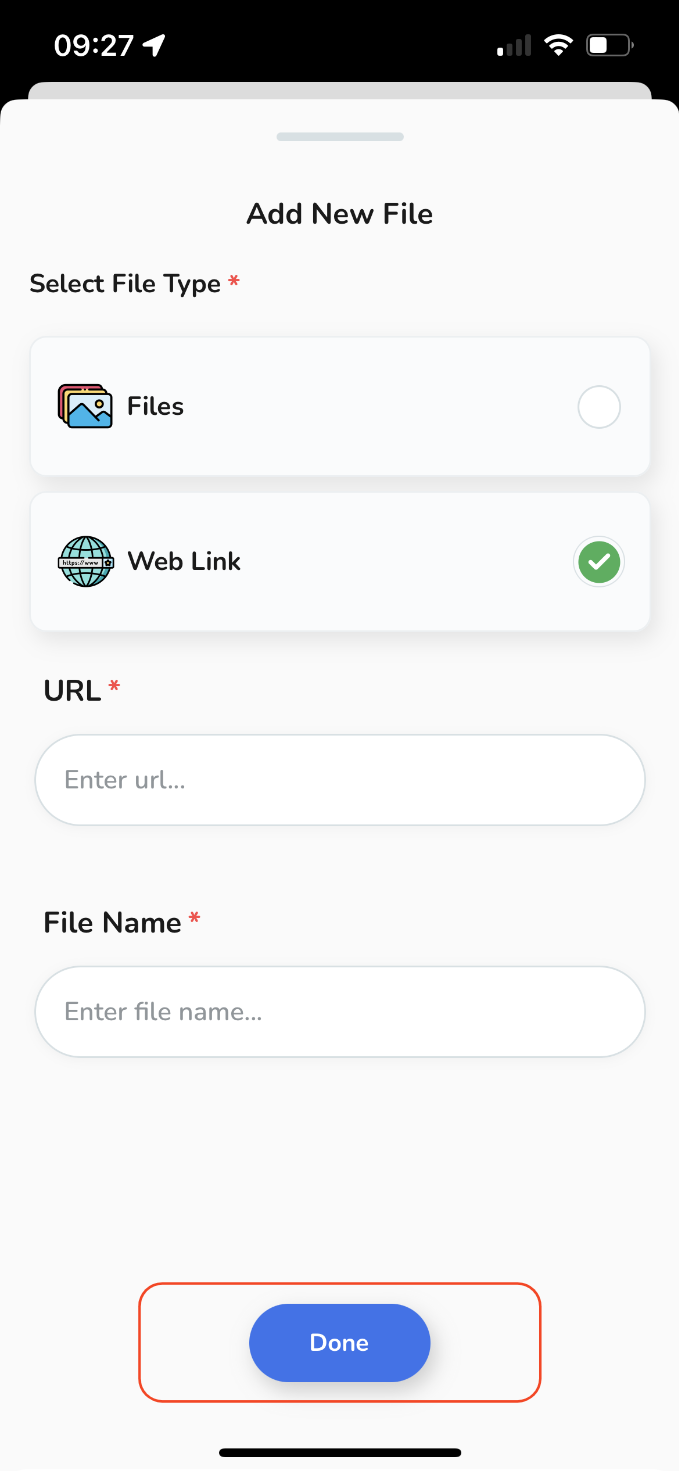
To add a weblink, select "Web Link",
-
Provide the URL link along with a File Name, and then tap "Done"
Provide the URL link along with a File Name, and then tap "Done"
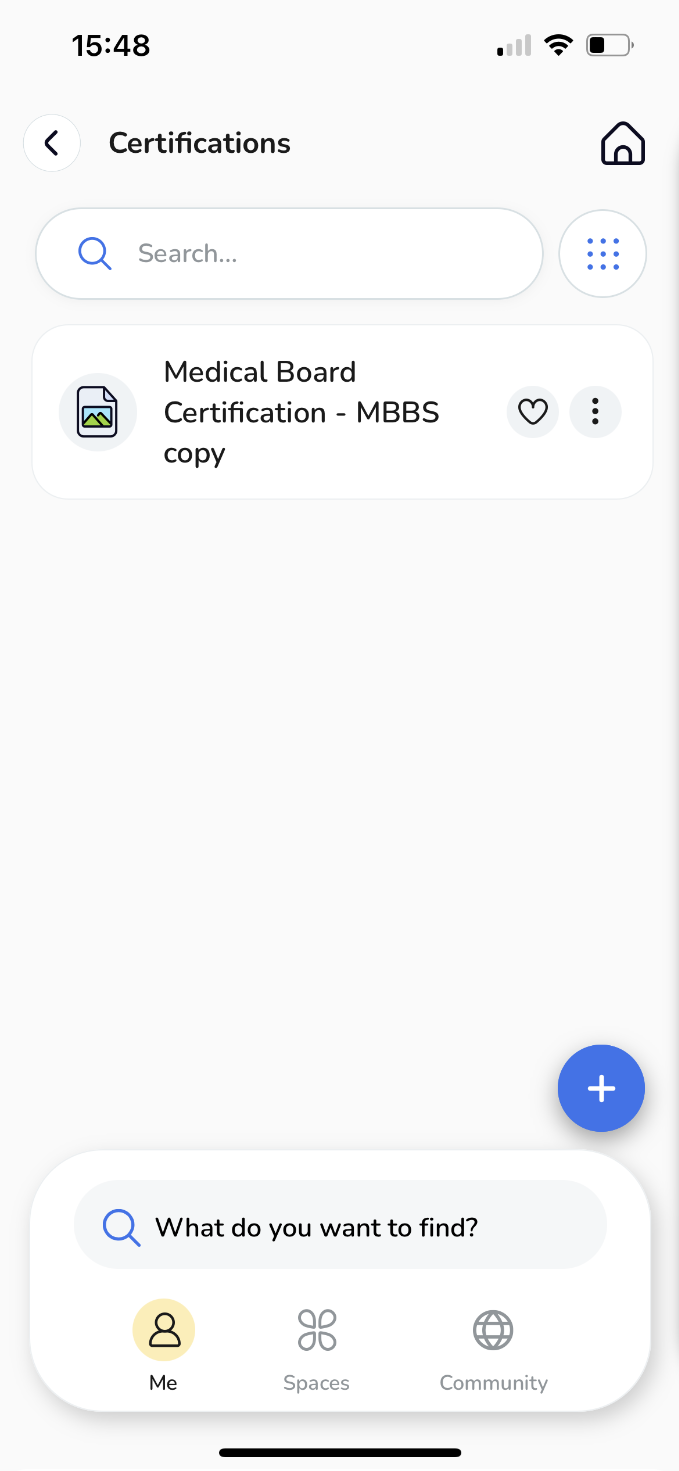
Congratulations! The file you selected has now been successfully uploaded and is a part of your personal storage files.
Finding Your Files.
When it comes to locating a specific file, you have two convenient options:
-
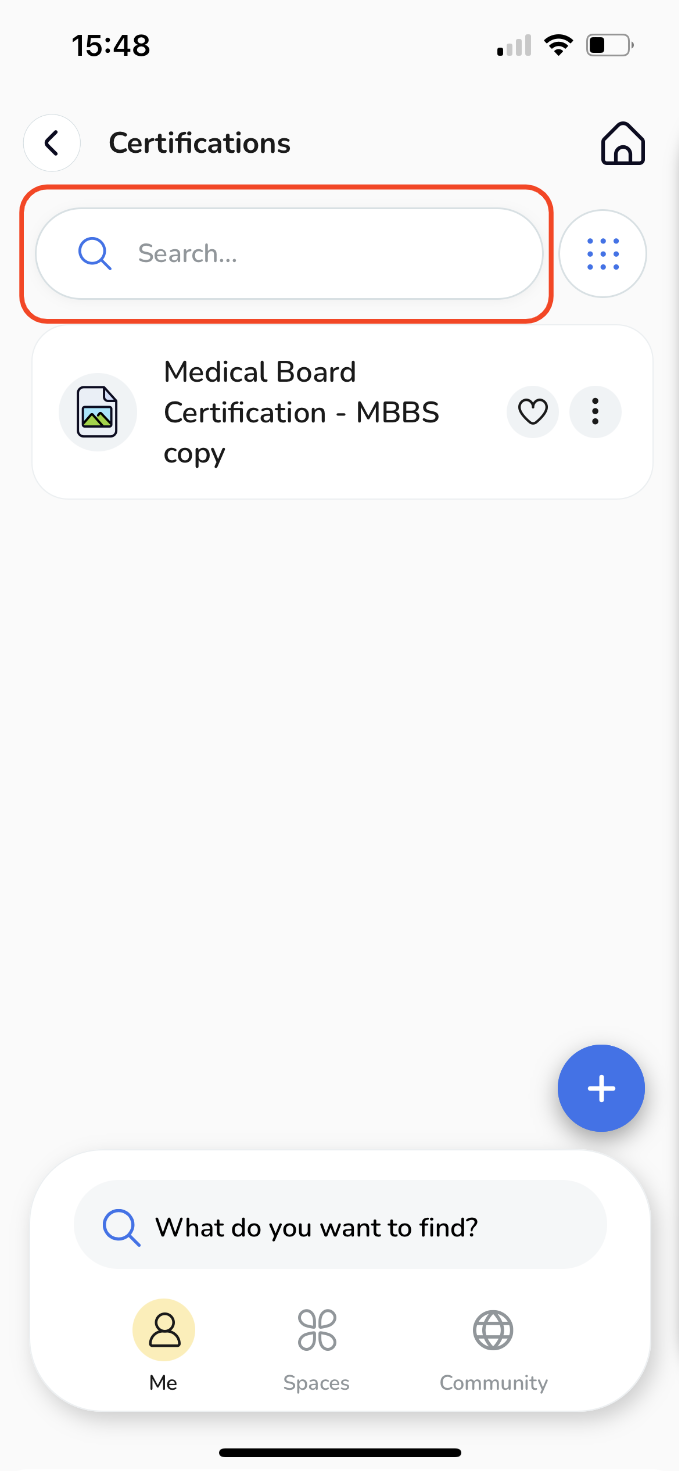
Utilise the Search Feature: Quickly retrieve specific documents using the search function.
-
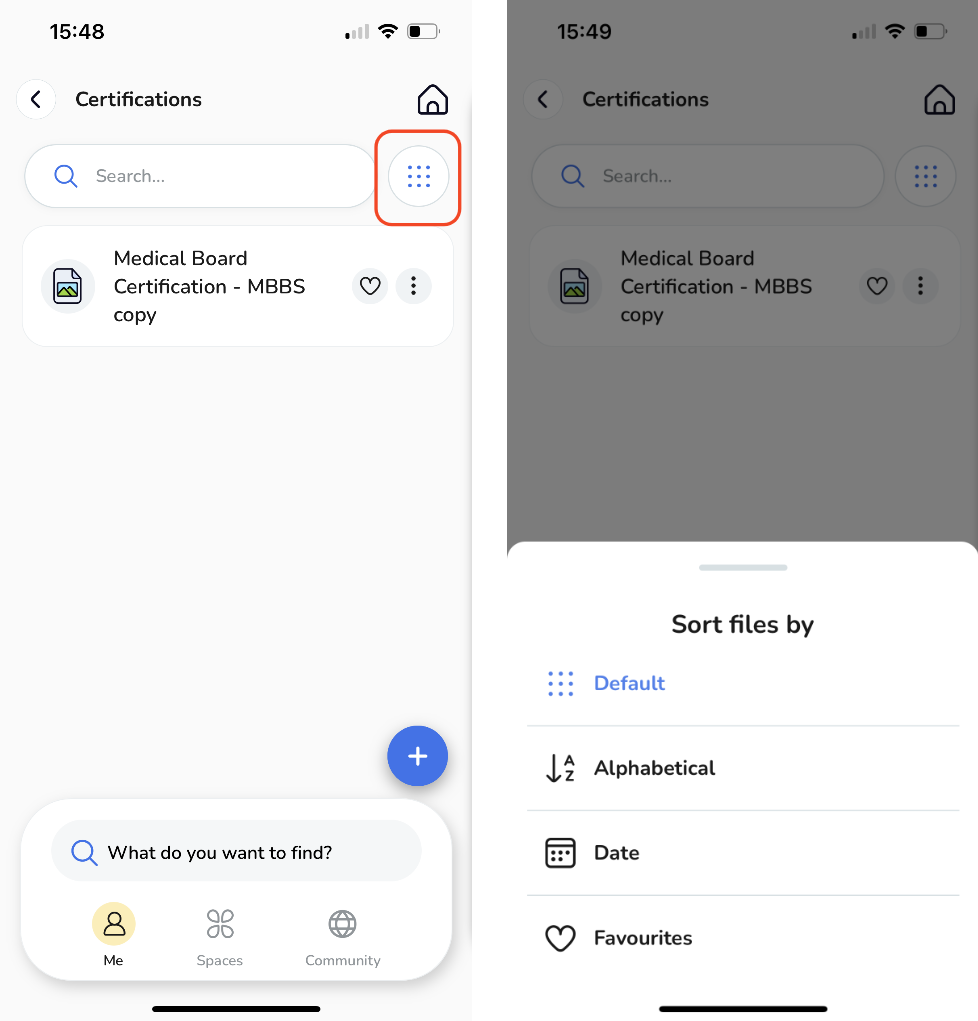
Sort Your Files. Alternatively, sort your files by alphabetical order, date, or favourites for easy access.
Utilise the Search Feature: Quickly retrieve specific documents using the search function.
Sort Your Files. Alternatively, sort your files by alphabetical order, date, or favourites for easy access.
💡
To customise the order of your files aligning them with your personal needs and preferences, you have the freedom to do so. All it takes is a quick log-in to the web app, and you can start organising your files in a way that suits you best. It's that simple!
Web - File Uploading.
To upload files using your mobile device, follow these steps:
-
Begin by logging into your account on the web app.
-
Once logged in, navigate to the "Me Tab".
-
Within the "Me" tab, locate and select "My Files".
-
Upon arriving at the My Files page, you'll immediately see a "Portfolio Files" section ready to house files associated with your portfolio events.
However, if you wish to upload a new file and enhance the organization of your materials into folders for improved categorisation, you'll need to create a folder. You can easily accomplish this by clicking on "Add New Section".
-
A pop-up window will appear, Please provide a relevant name for the section and click "Next".
-
Choose an icon that most accurately represents the folder's content.
-
When you finish, tap "Done".
-
Your section has been created, now click on the tile to add a file.
-
The section will initially be empty. Don't worry; we will now guide you through adding a file to it. To begin, click on "Add File".
-
Another pop-up will appear, giving you the option to add a new file. You can upload various file types, including MS Office documents, PDFs, images, videos, and web links.
-
For a new file upload,
-
To add a weblink,
-
Select "Web Link", enter the URL link and a File Name, then click "Save".
-
-
Congratulations! The file you selected has now been successfully uploaded and is a part of your personal storage files.
Begin by logging into your account on the web app.
Once logged in, navigate to the "Me Tab".
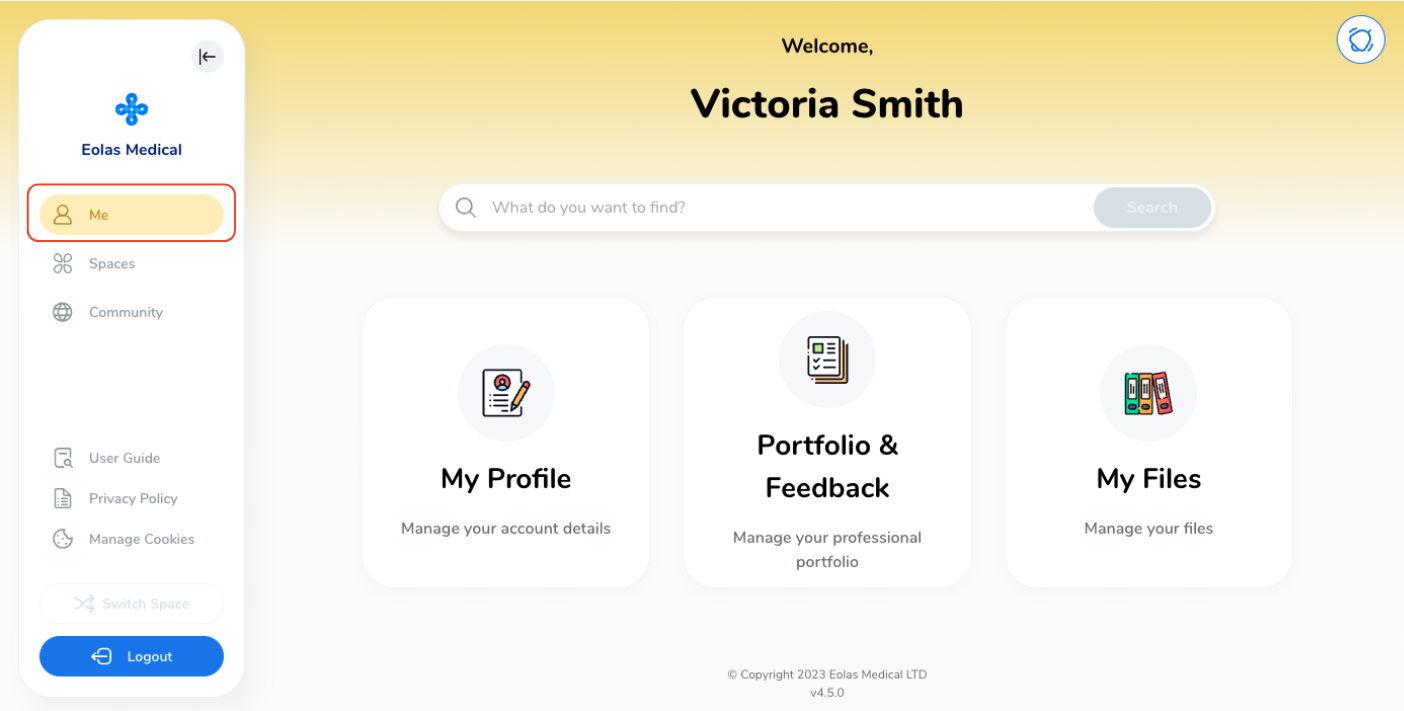
Within the "Me" tab, locate and select "My Files".
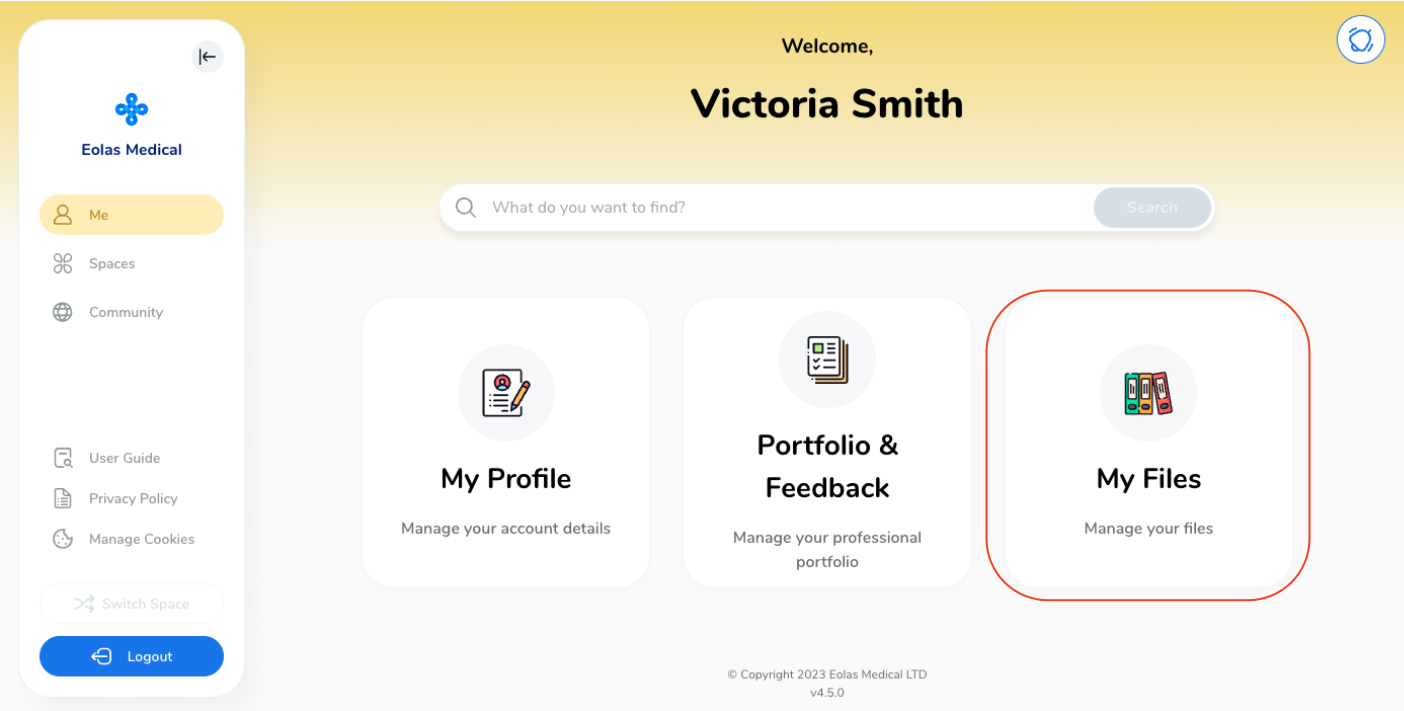
Upon arriving at the My Files page, you'll immediately see a "Portfolio Files" section ready to house files associated with your portfolio events.
However, if you wish to upload a new file and enhance the organization of your materials into folders for improved categorisation, you'll need to create a folder. You can easily accomplish this by clicking on "Add New Section".
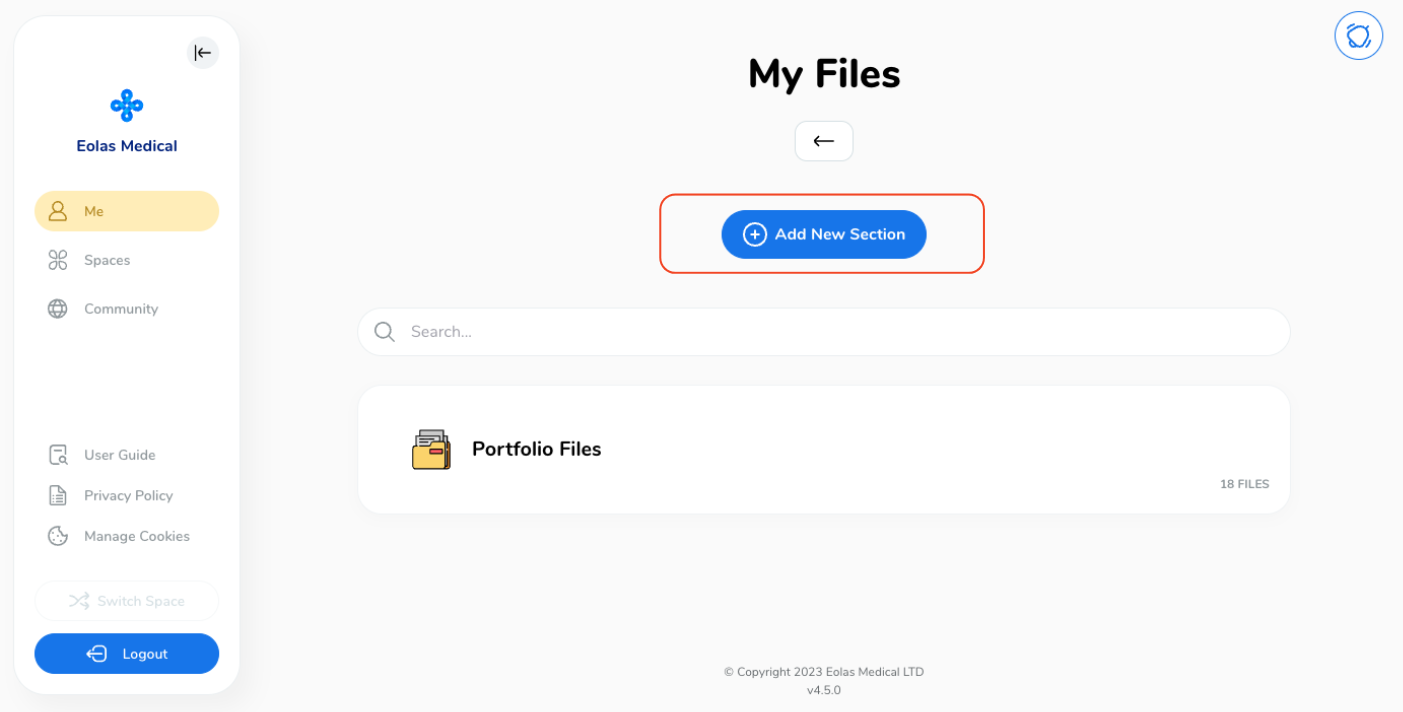
A pop-up window will appear, Please provide a relevant name for the section and click "Next".
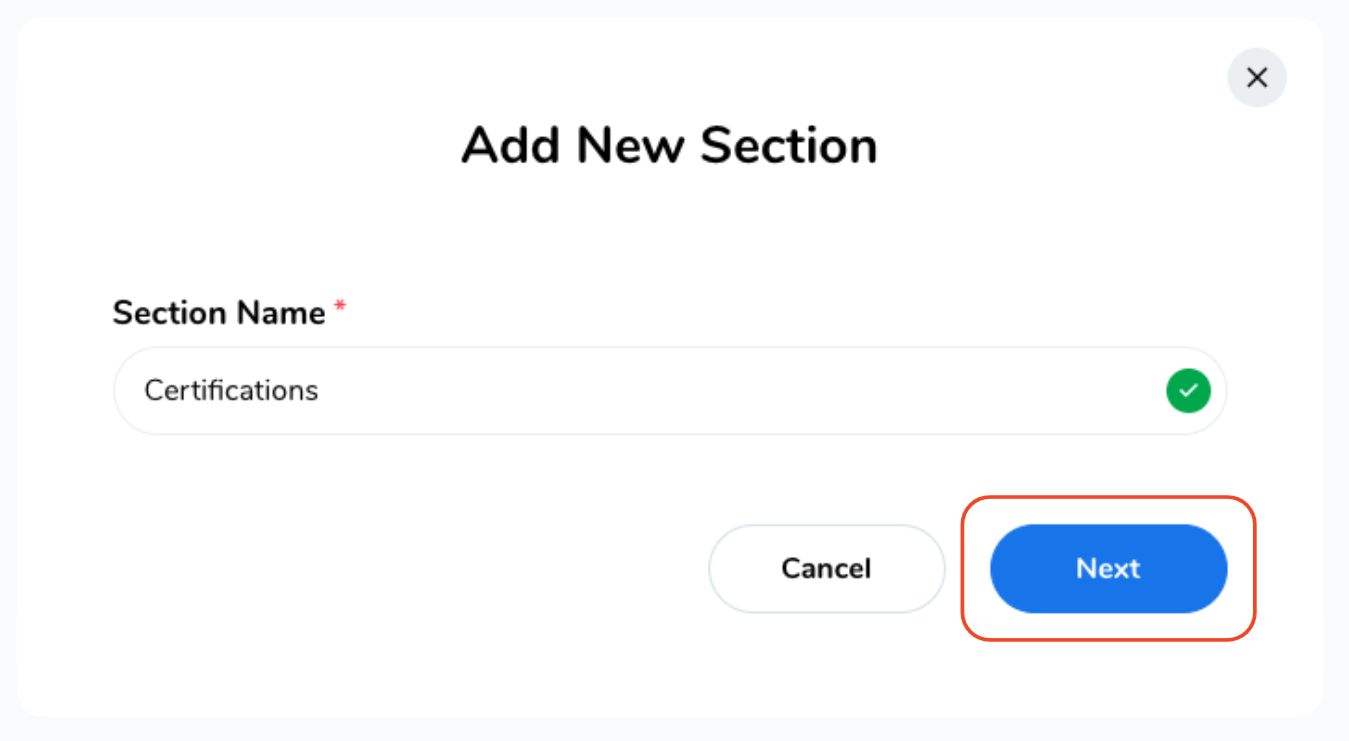
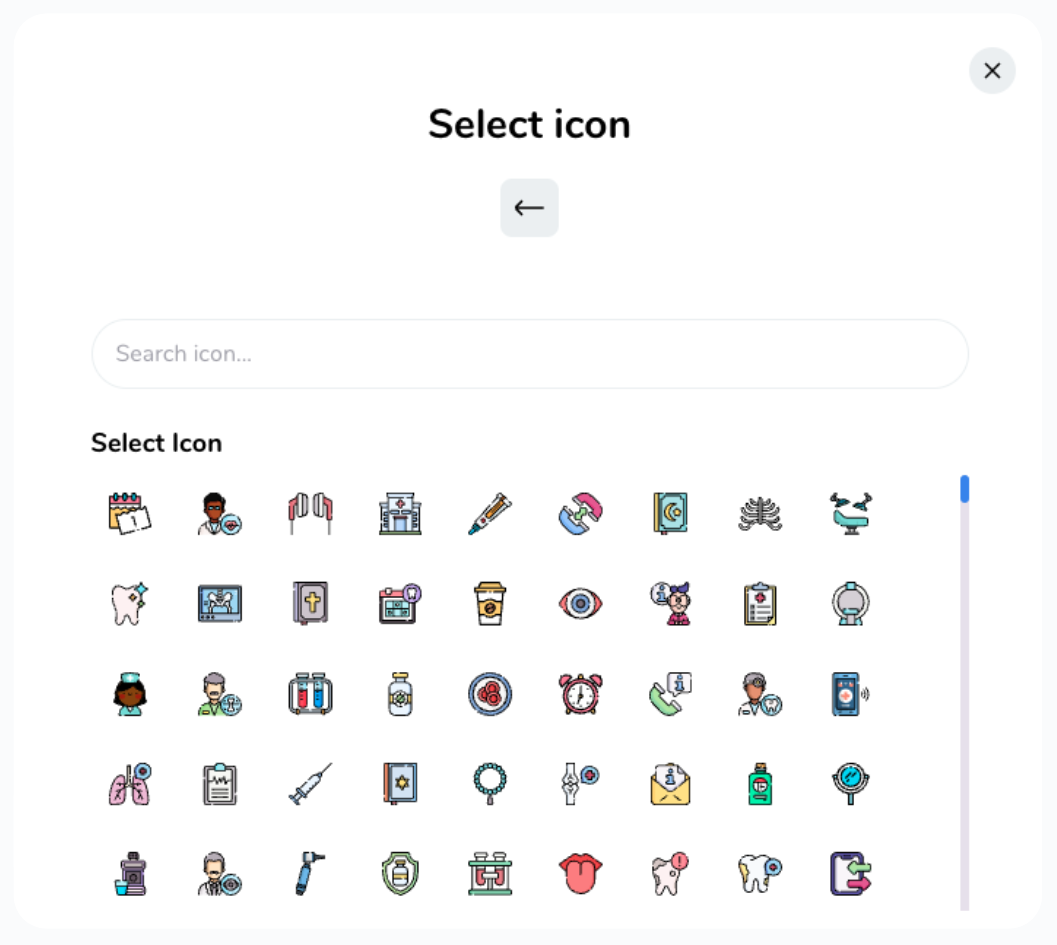
Choose an icon that most accurately represents the folder's content.
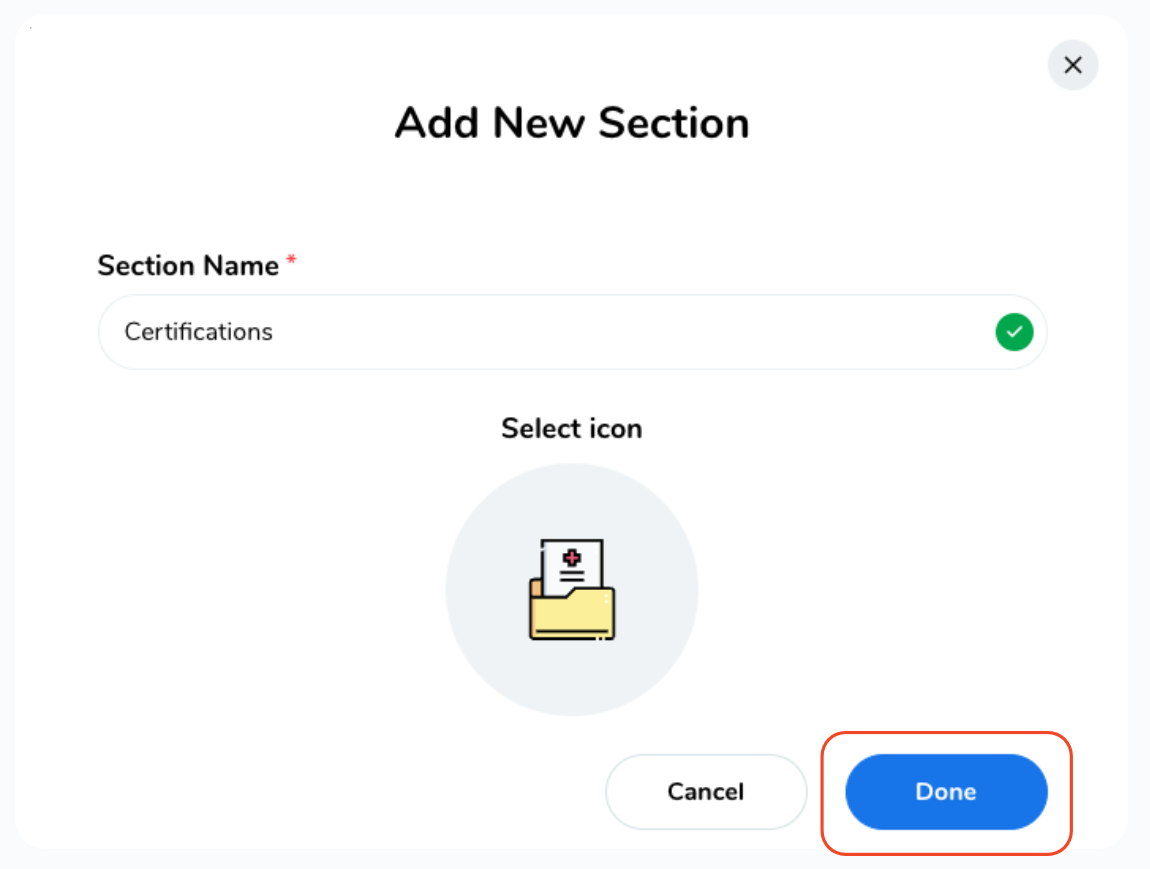
When you finish, tap "Done".
Your section has been created, now click on the tile to add a file.
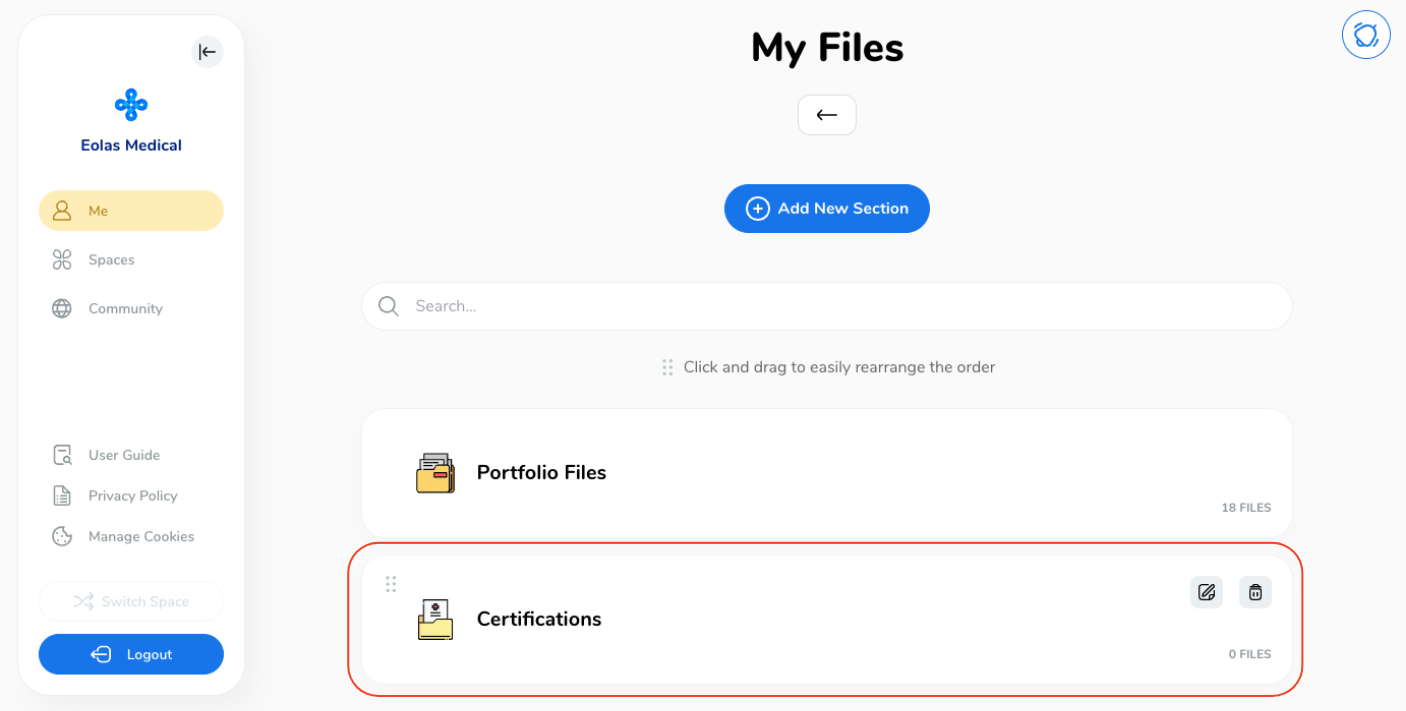
The section will initially be empty. Don't worry; we will now guide you through adding a file to it. To begin, click on "Add File".
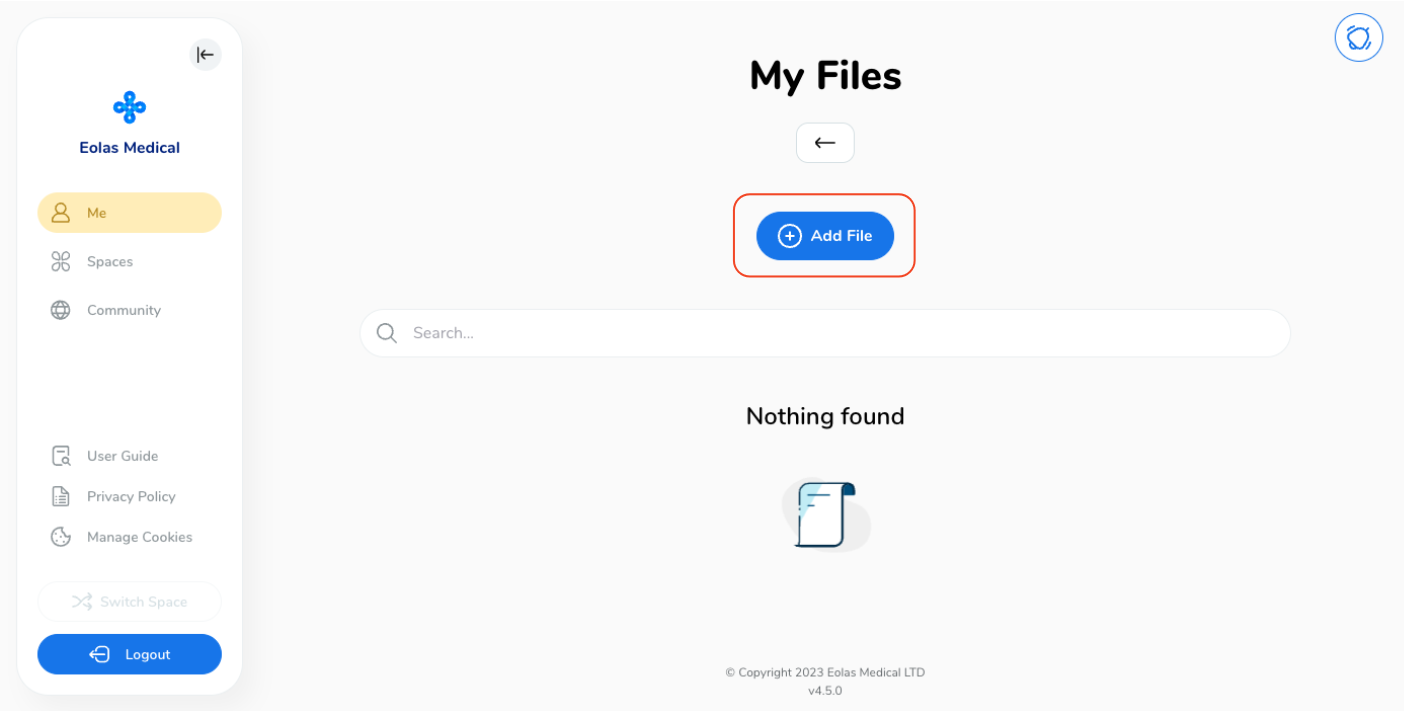
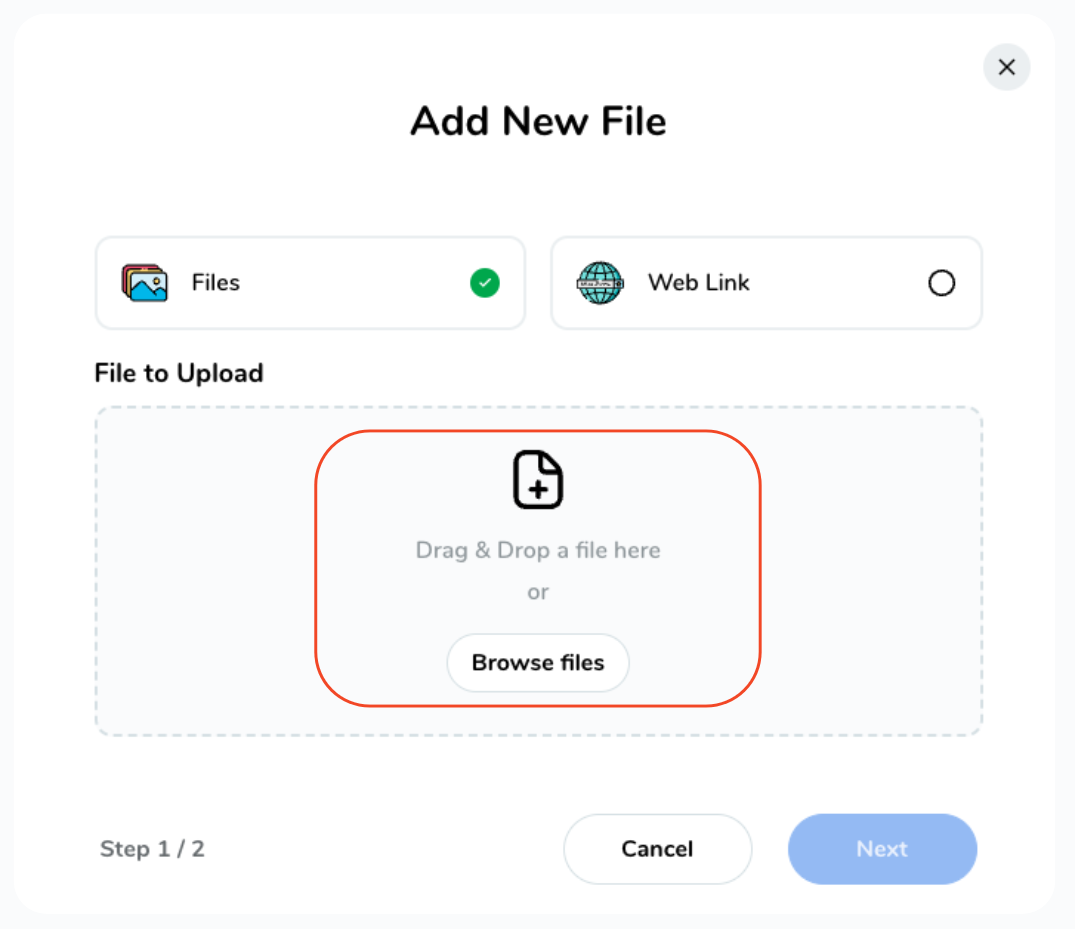
Another pop-up will appear, giving you the option to add a new file. You can upload various file types, including MS Office documents, PDFs, images, videos, and web links.
For a new file upload,
-
Select "Files" and then tap on "Browse Files" to access your device's file system. Next, choose the desired file you wish to upload.
Select "Files" and then tap on "Browse Files" to access your device's file system. Next, choose the desired file you wish to upload.
-
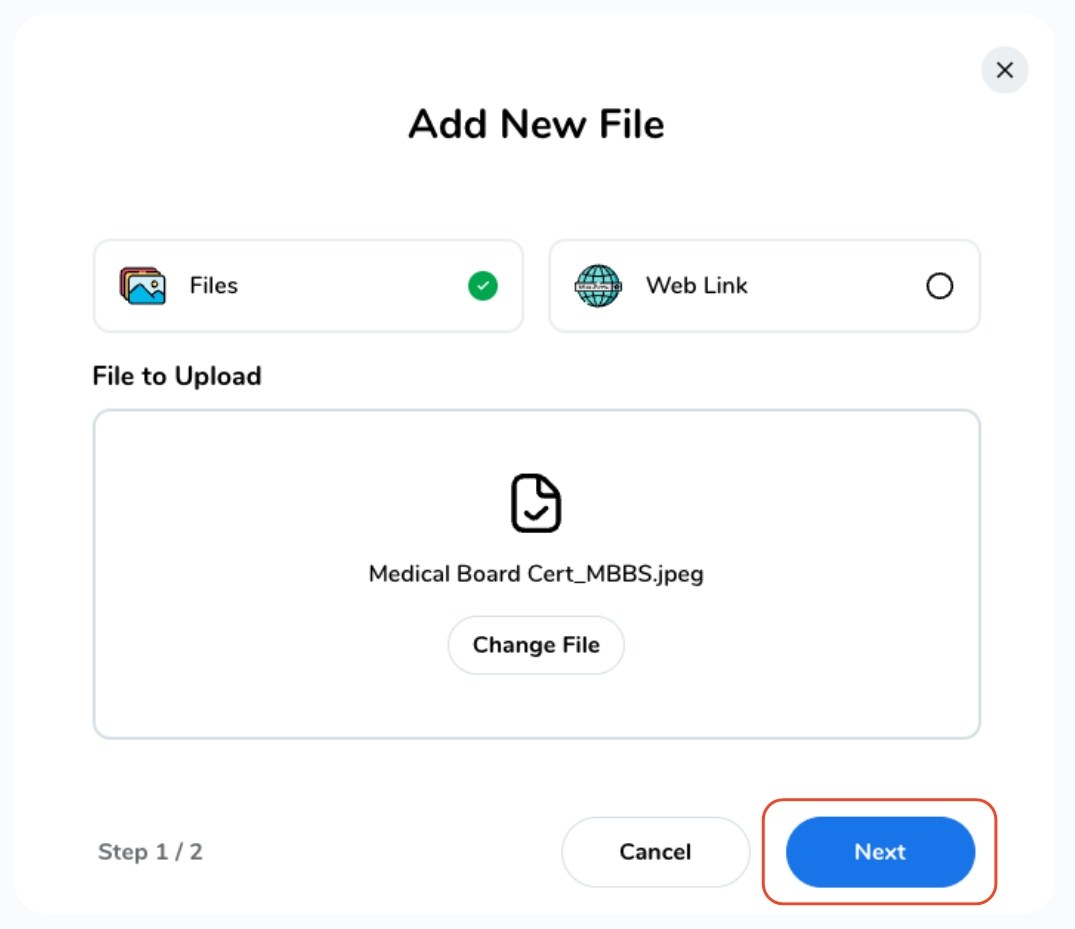
Select a file from your device, then click "Next".
Select a file from your device, then click "Next".
-
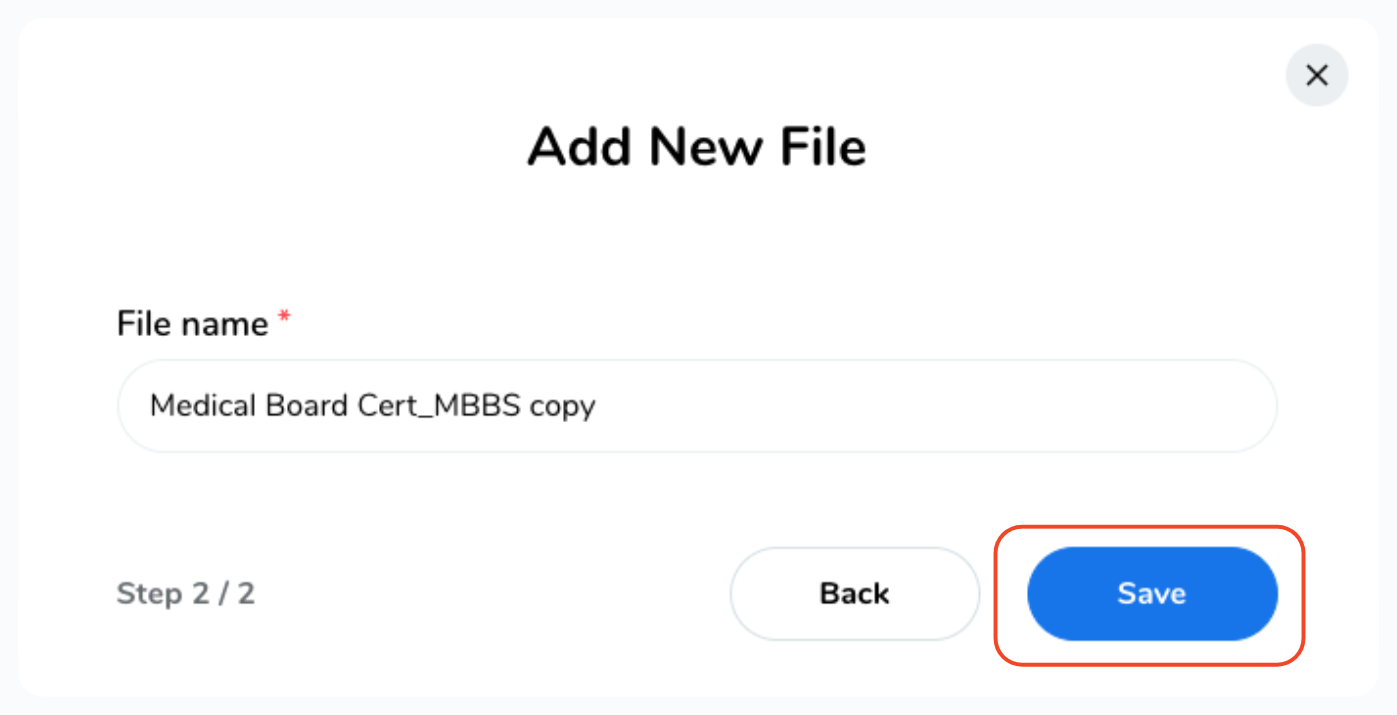
Finally, give your file a name and click "Save"
Finally, give your file a name and click "Save"
To add a weblink,
-
Select "Web Link", enter the URL link and a File Name, then click "Save".
Select "Web Link", enter the URL link and a File Name, then click "Save".
Congratulations! The file you selected has now been successfully uploaded and is a part of your personal storage files.
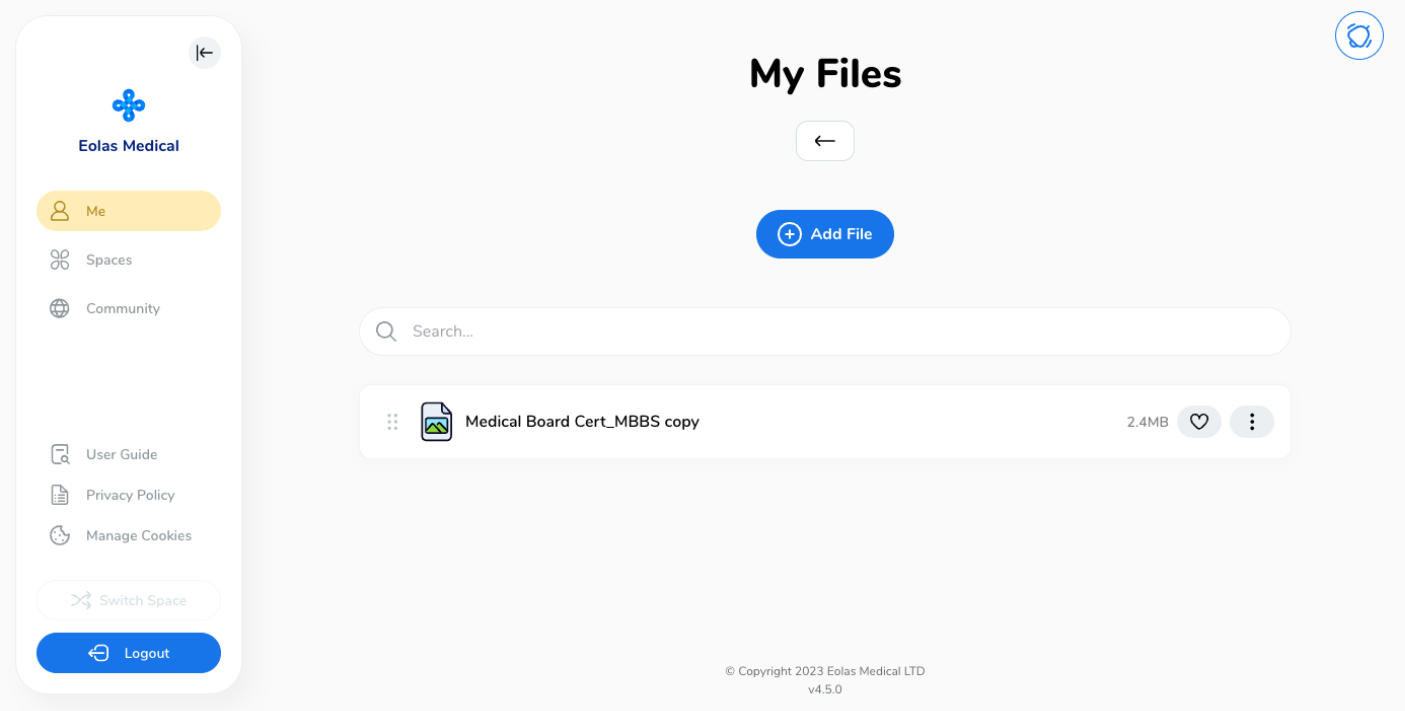
Finding Your Files.
As your collection of files grows, the need to locate a specific document becomes more significant. Fortunately, our system offers you with convenient methods to help you achieve this:
-
Utilise the Search Feature: Quickly retrieve specific documents using the search function.
-
Sort Your Files. Alternatively, sort your files by alphabetical order, date, or favourites for easy access.
-
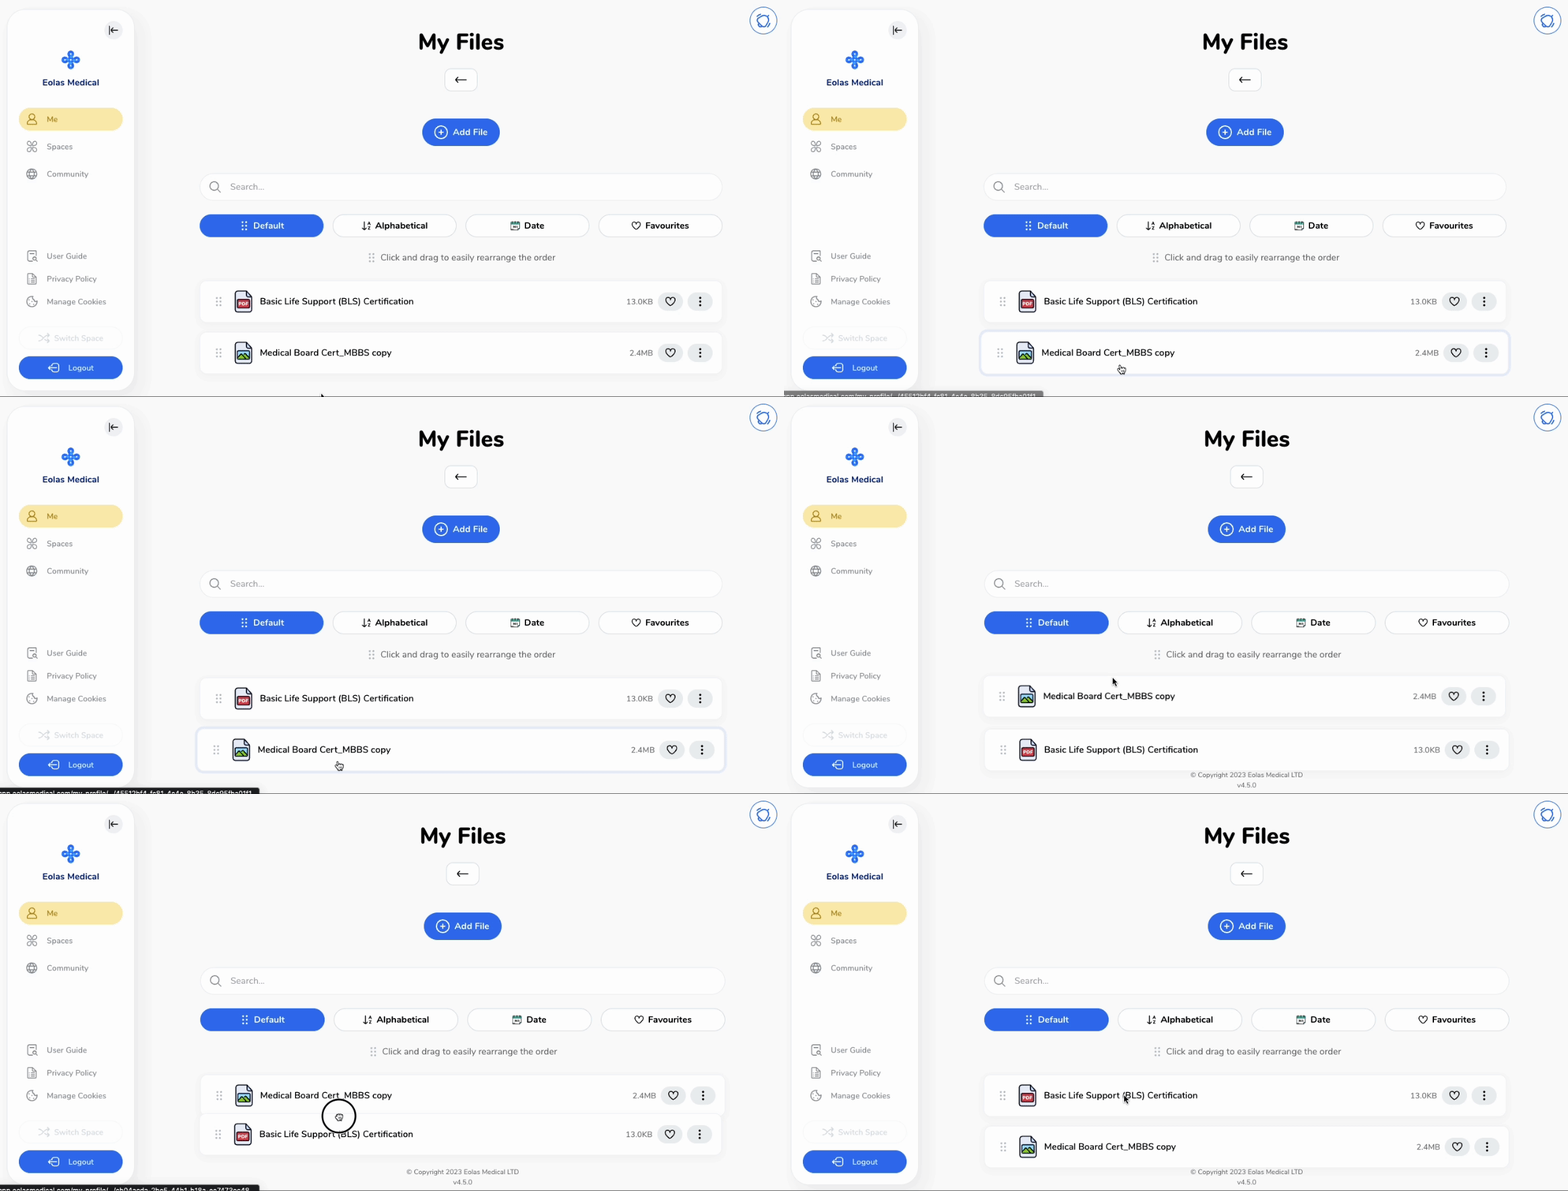
Rearrange File Order: Additionally, you have the flexibility to rearrange the order of your files by simply clicking and dragging them. This customisation feature allows you to prioritise your files according to your specific needs and preferences.
Utilise the Search Feature: Quickly retrieve specific documents using the search function.
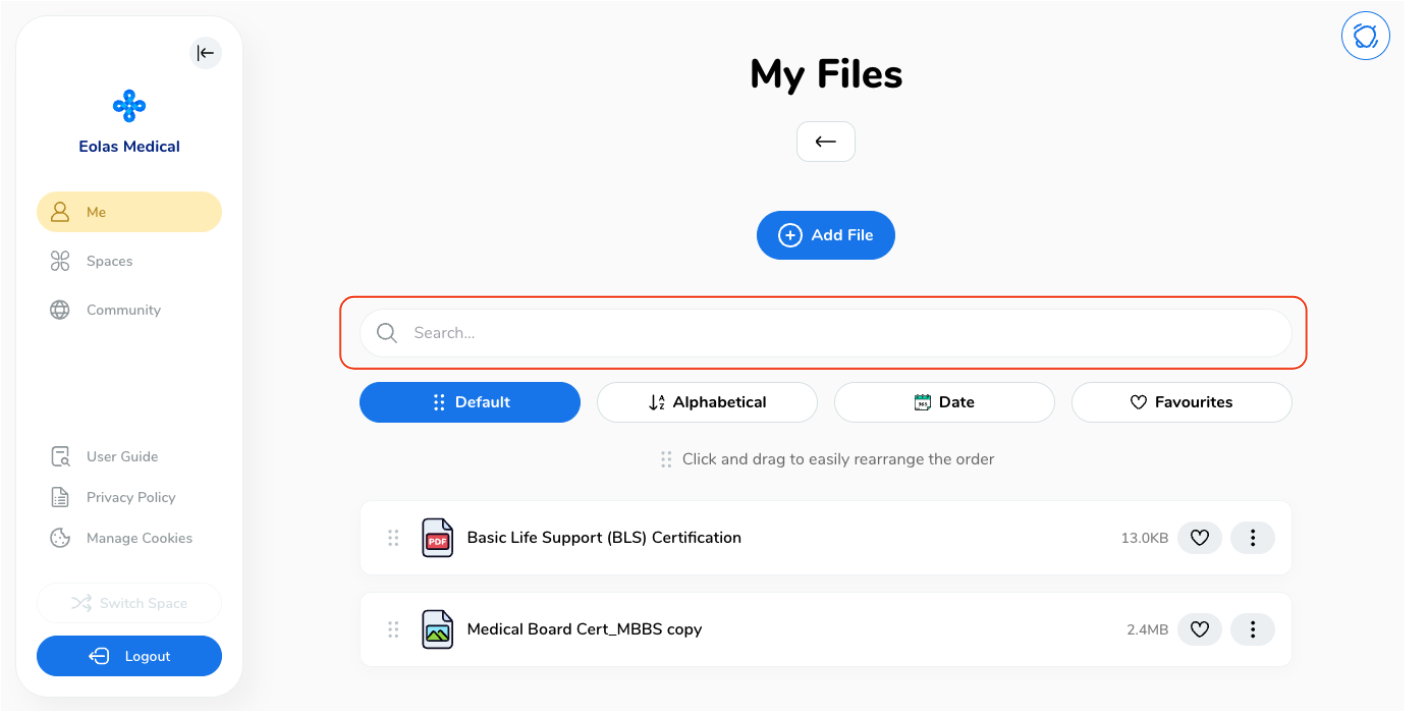
Sort Your Files. Alternatively, sort your files by alphabetical order, date, or favourites for easy access.
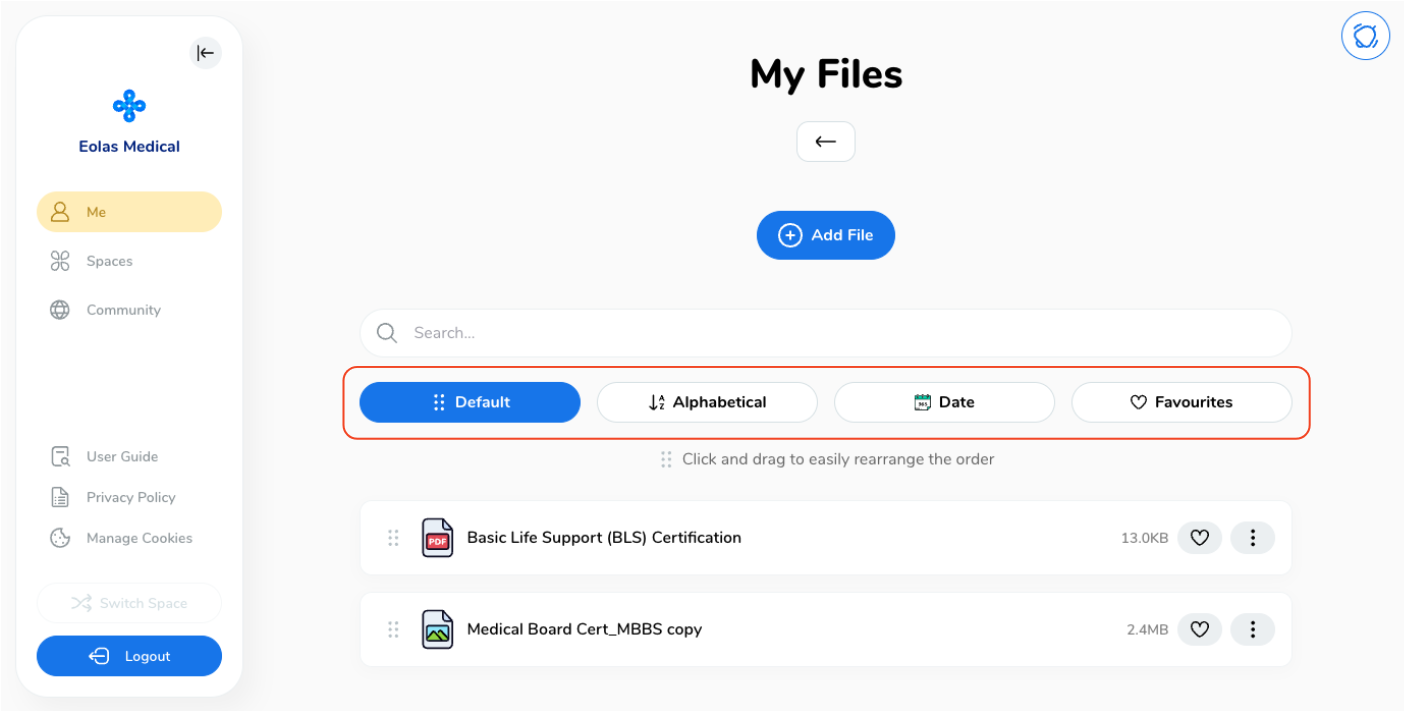
Rearrange File Order: Additionally, you have the flexibility to rearrange the order of your files by simply clicking and dragging them. This customisation feature allows you to prioritise your files according to your specific needs and preferences.
In conclusion, My Files is your ultimate answer to streamlined and secure file management. With limitless storage, offline access, and an intuitive interface, you'll always have your vital documents within reach. Bid farewell to file clutter and embrace the ease of well-organised, easily accessible files. Happy Uploading!


