Inviting members to your space using trust email domains.
Learn the ins and outs of inviting members to your space and managing trusted email domains.
Welcome to our guide on expanding your space!
Whether you want to invite new members or add trusted email addresses to enhance your space's collaboration and accessibility, this step-by-step guide will walk you through the process.
To invite users, you can easily follow these steps:
Web - Inviting Members and Adding Trusted Emails to Your Private Space.
-
Click on "Admin Panel" on your space page.
-
On the admin panel page, click "Manage Users".
-
Here, you have complete control over your space access, including inviting new users, adding trusted emails, and adjusting your space's privacy settings.
Click on "Admin Panel" on your space page.
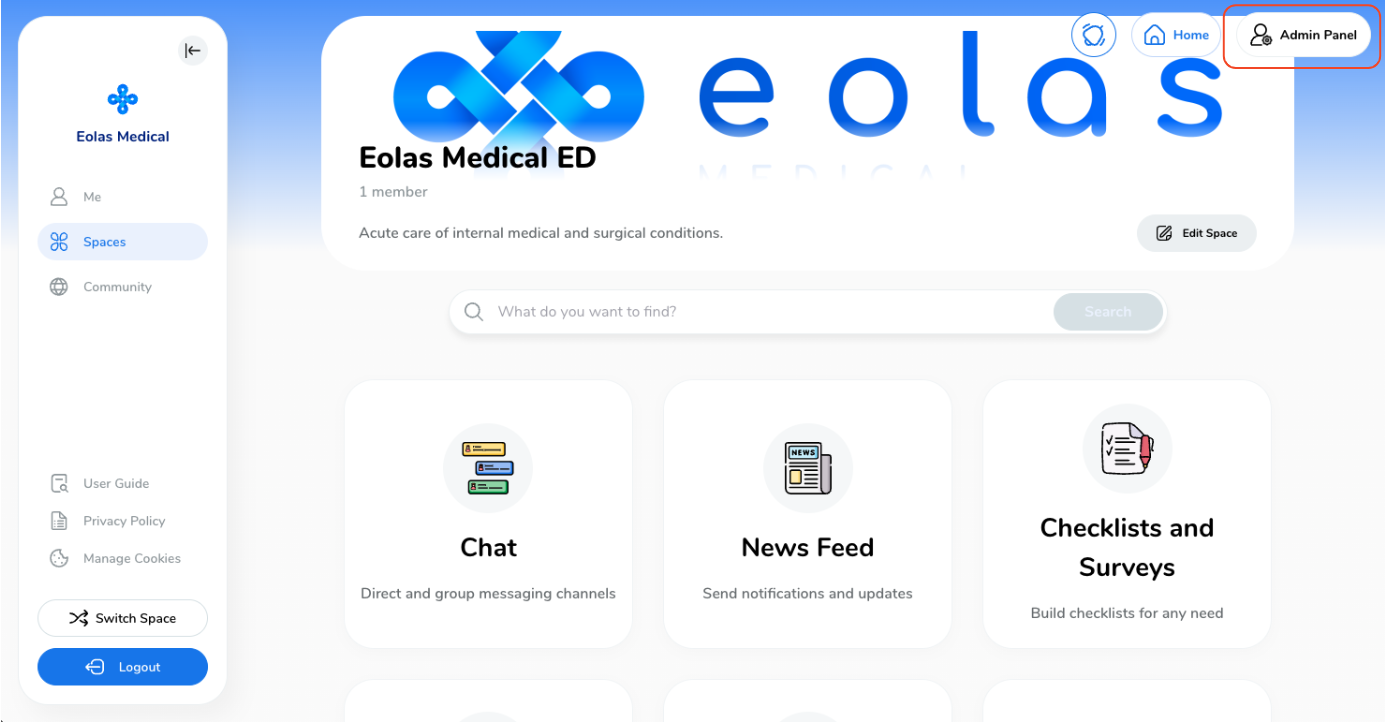
On the admin panel page, click "Manage Users".

Here, you have complete control over your space access, including inviting new users, adding trusted emails, and adjusting your space's privacy settings.
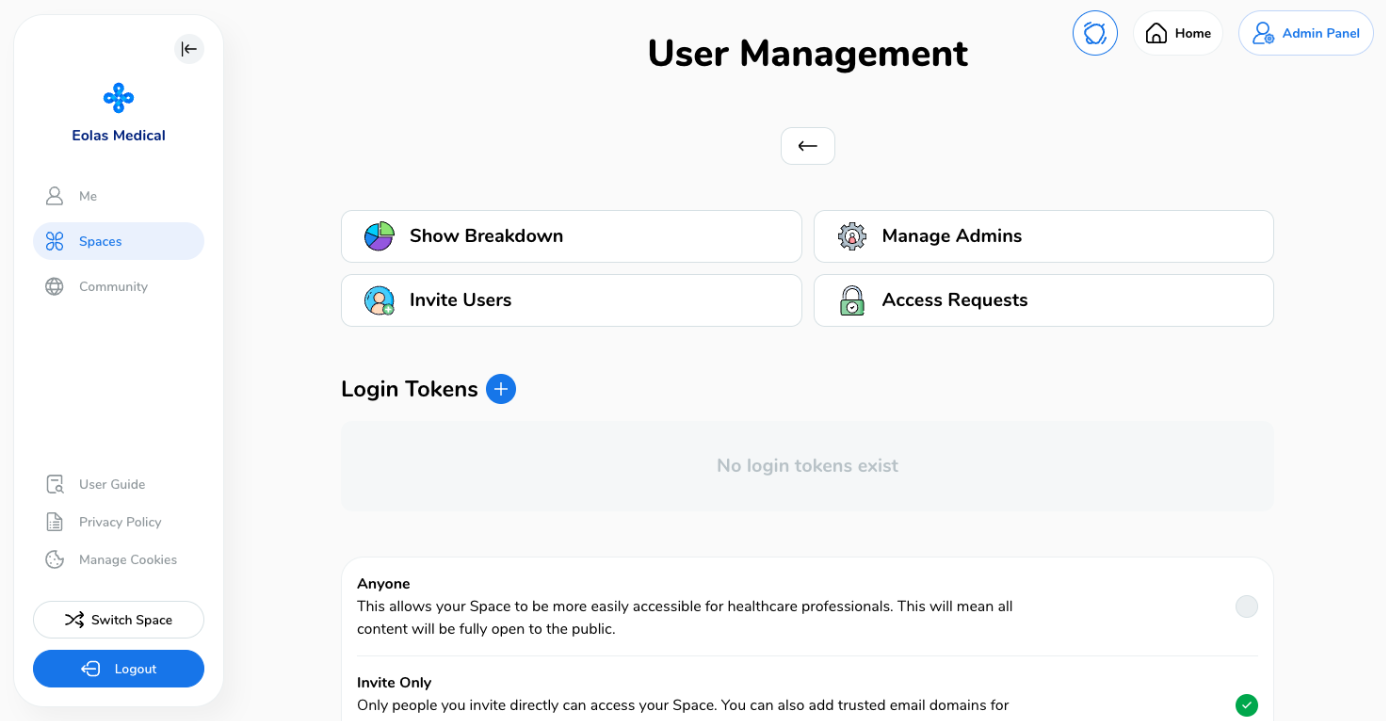
Inviting users to your space via link or email address.
-
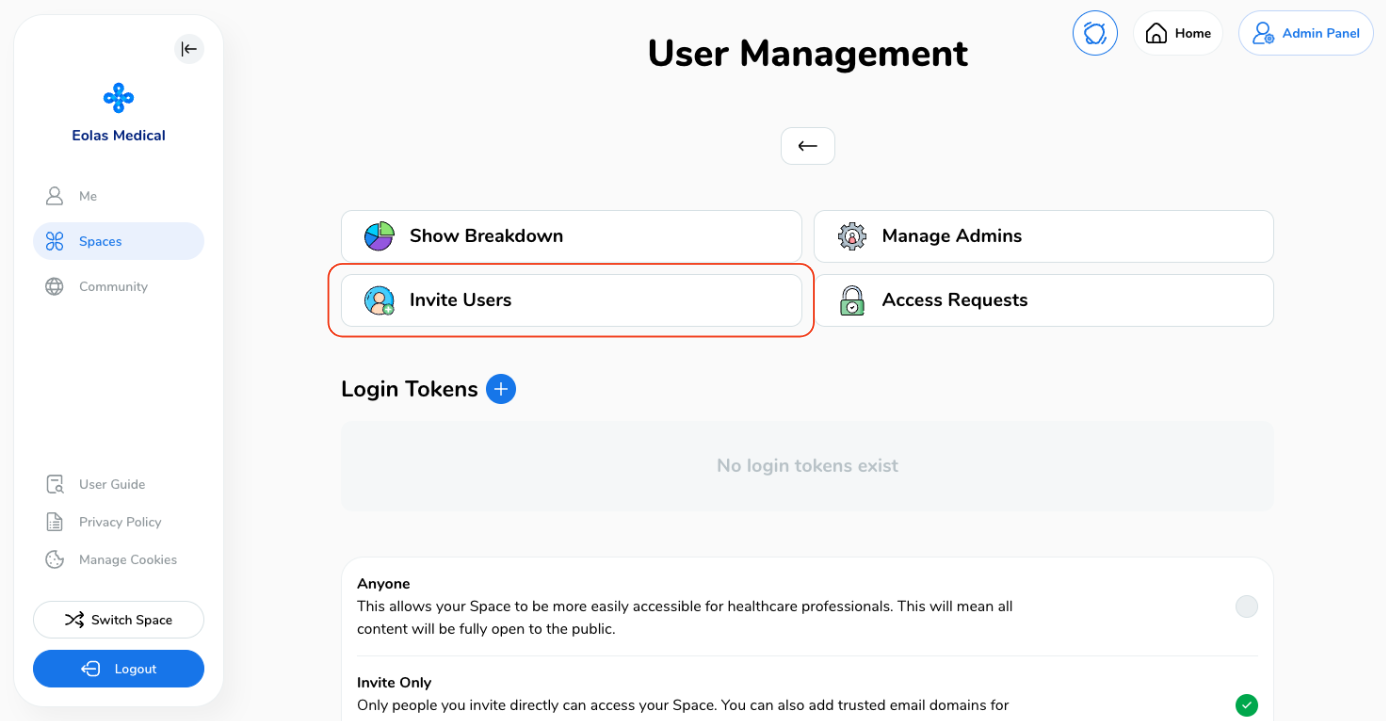
Click on "Invite Users".
-
A pop-up will appear, allowing you to choose between inviting users via link (QR code) or email. We recommend using the link option when inviting a large number of members to your space.
-
To invite users via link select the option accordingly, and a QR code will be generated for you to share. You can share it through messaging services, email, or print the QR code for your department ward.
-
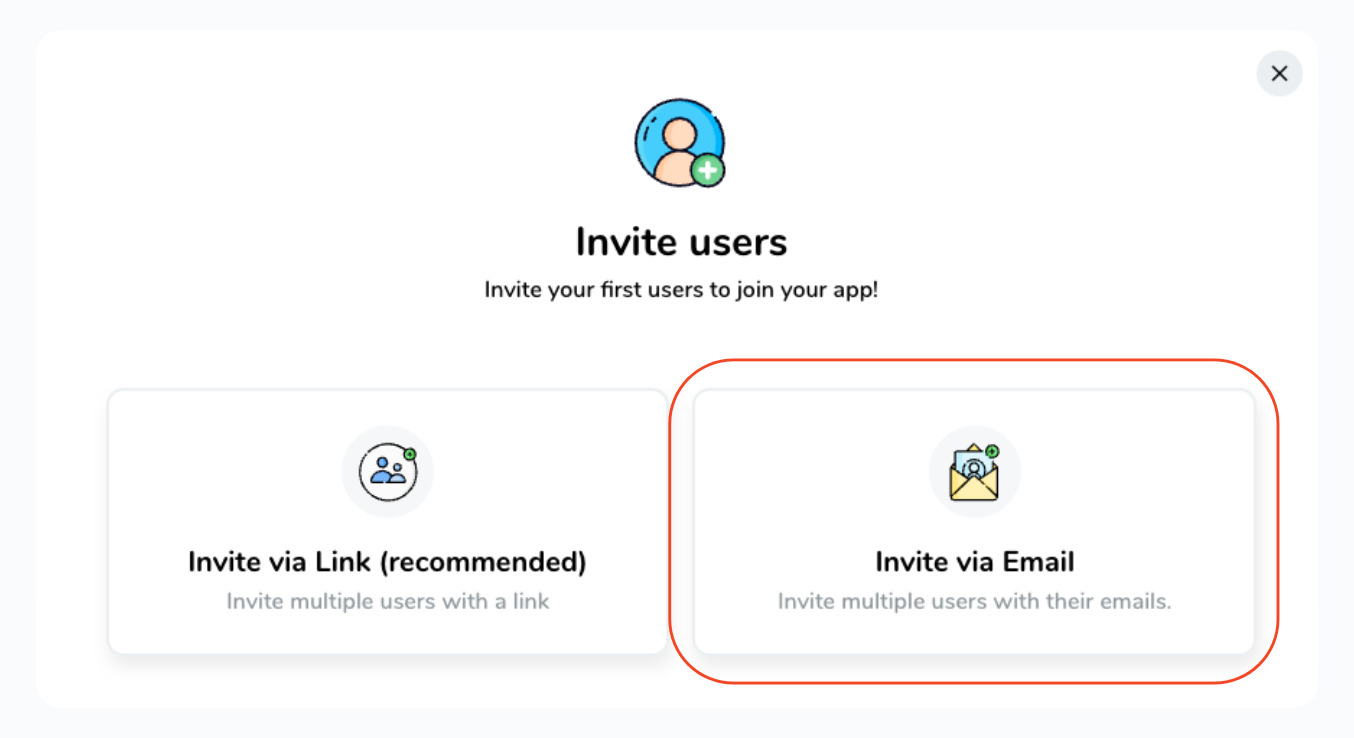
To invite users via email select the option accordingly,
-
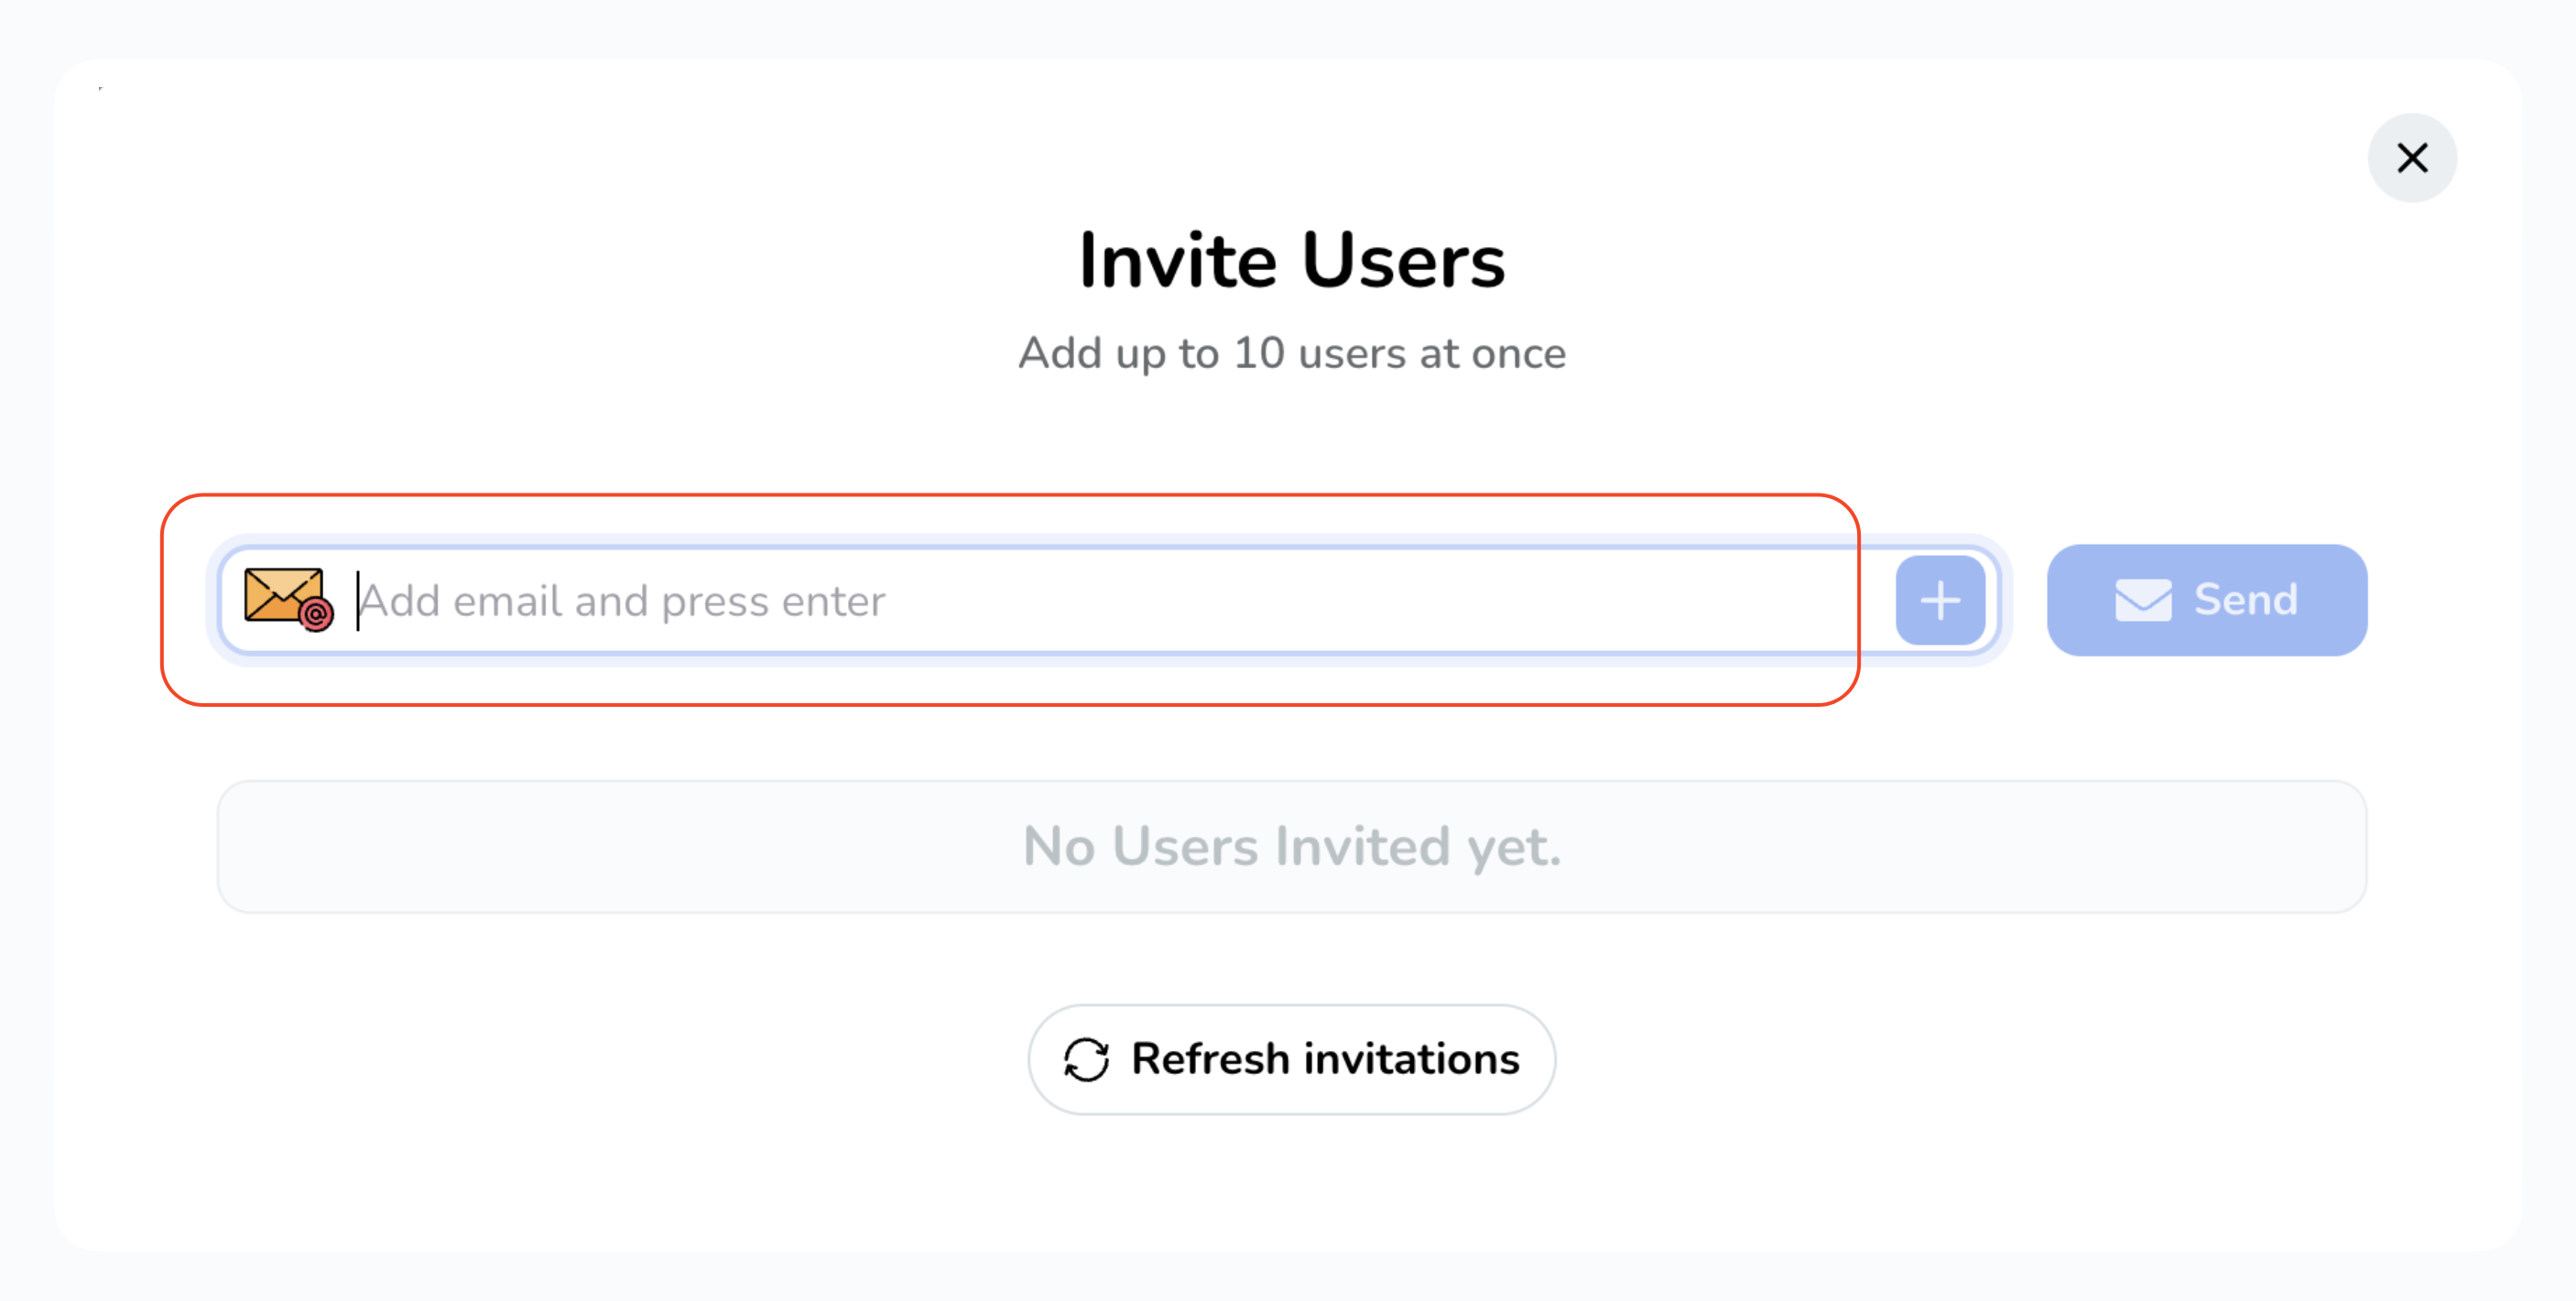
In the pop-up window, enter the email address.
-
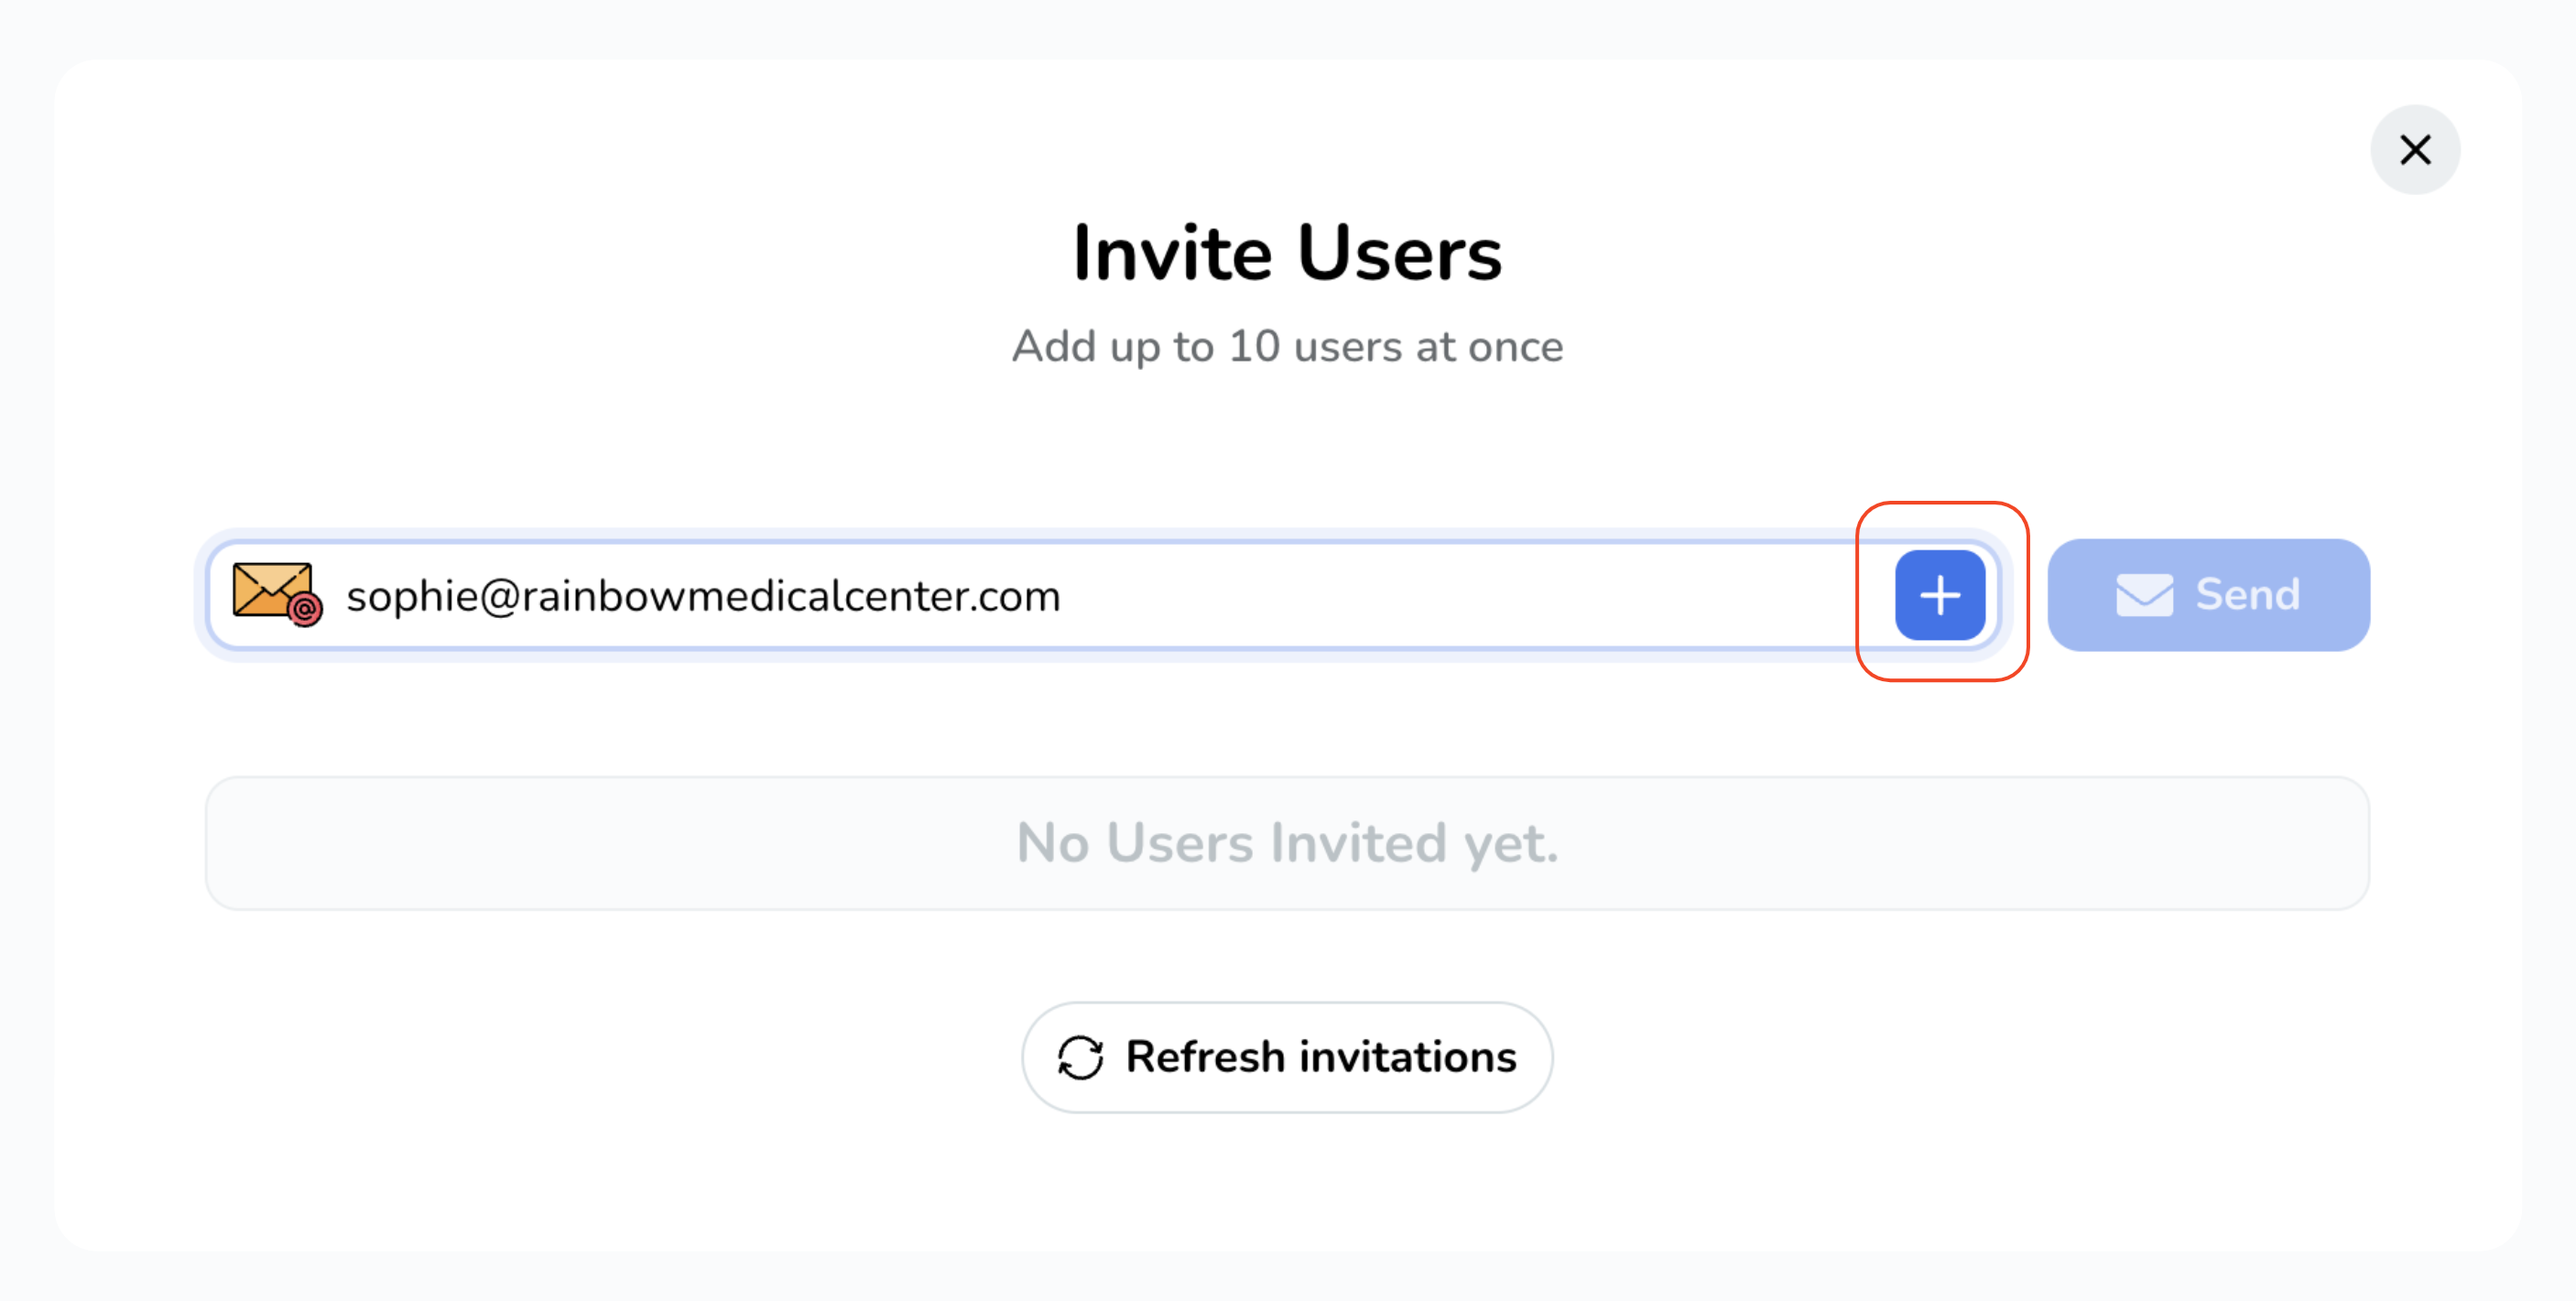
Click the "Plus" button to add the email address to the list. You can send up to 10 invites at once. To add more email addresses, simply repeat the process.
-
Once you are done, click the "Send" button.
-
If you need to refresh invitations, just click on the "Refresh Invitations" button.
-
As invited users, they will receive an email invitation. They can accept the invitation and sign up for the app, gaining pre-approved access to your space.
They'll need to follow on-screen instructions, including entering their name and creating a password. Once signed up, they'll have full access to your space.
-
Click on "Invite Users".
A pop-up will appear, allowing you to choose between inviting users via link (QR code) or email. We recommend using the link option when inviting a large number of members to your space.
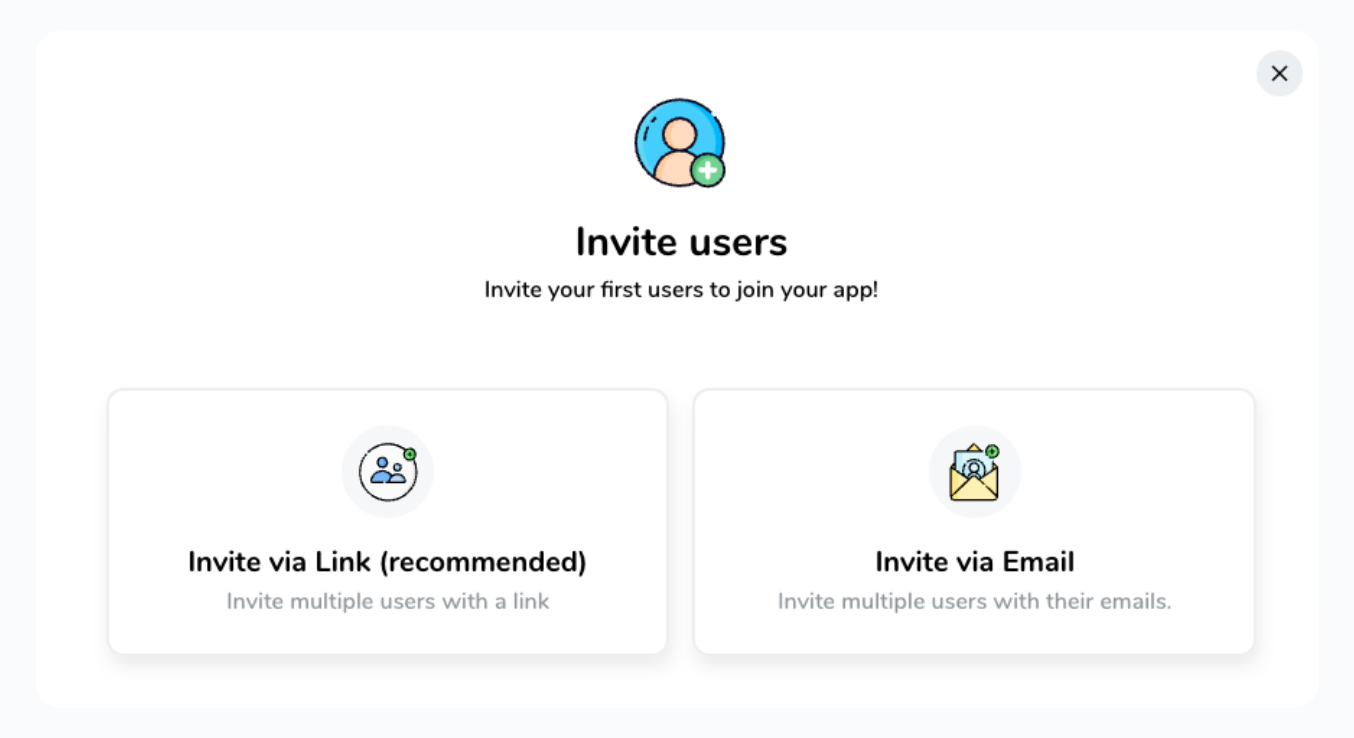
To invite users via link select the option accordingly, and a QR code will be generated for you to share. You can share it through messaging services, email, or print the QR code for your department ward.
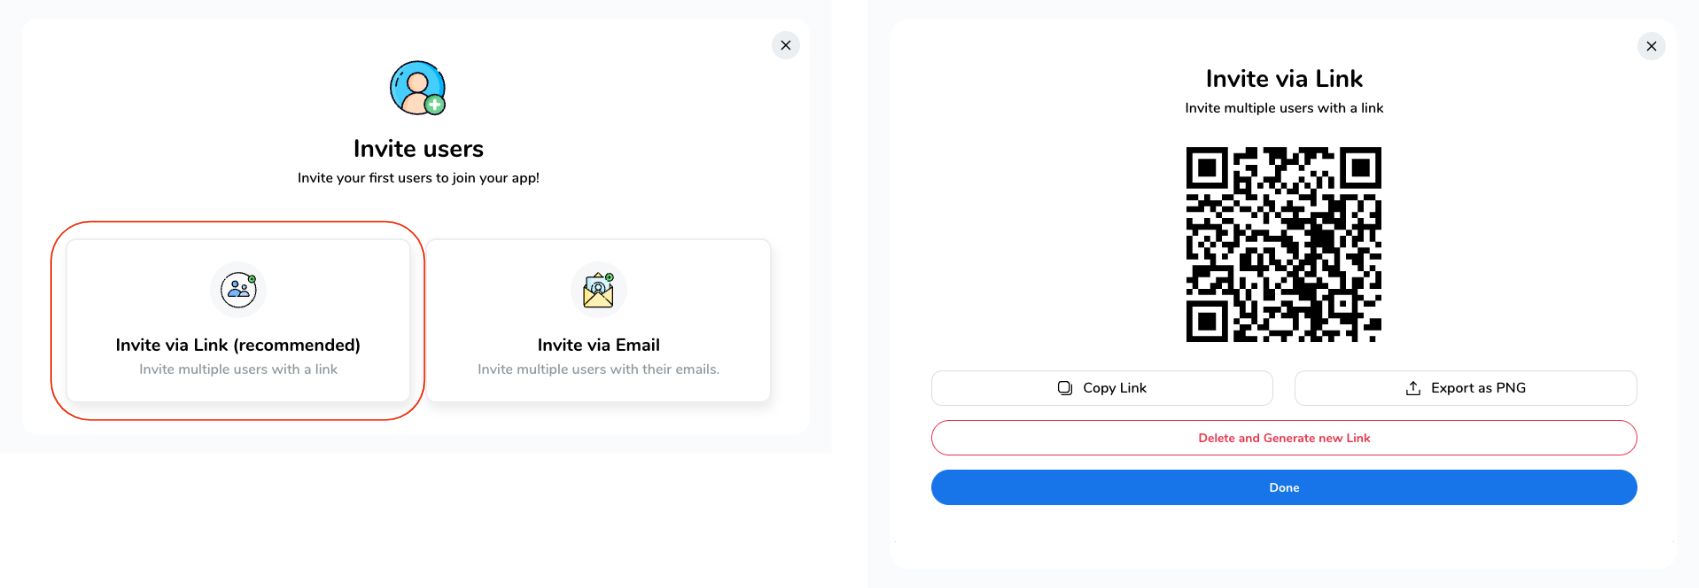
To invite users via email select the option accordingly,
-
In the pop-up window, enter the email address.
In the pop-up window, enter the email address.
-
Click the "Plus" button to add the email address to the list. You can send up to 10 invites at once. To add more email addresses, simply repeat the process.
Click the "Plus" button to add the email address to the list. You can send up to 10 invites at once. To add more email addresses, simply repeat the process.
-
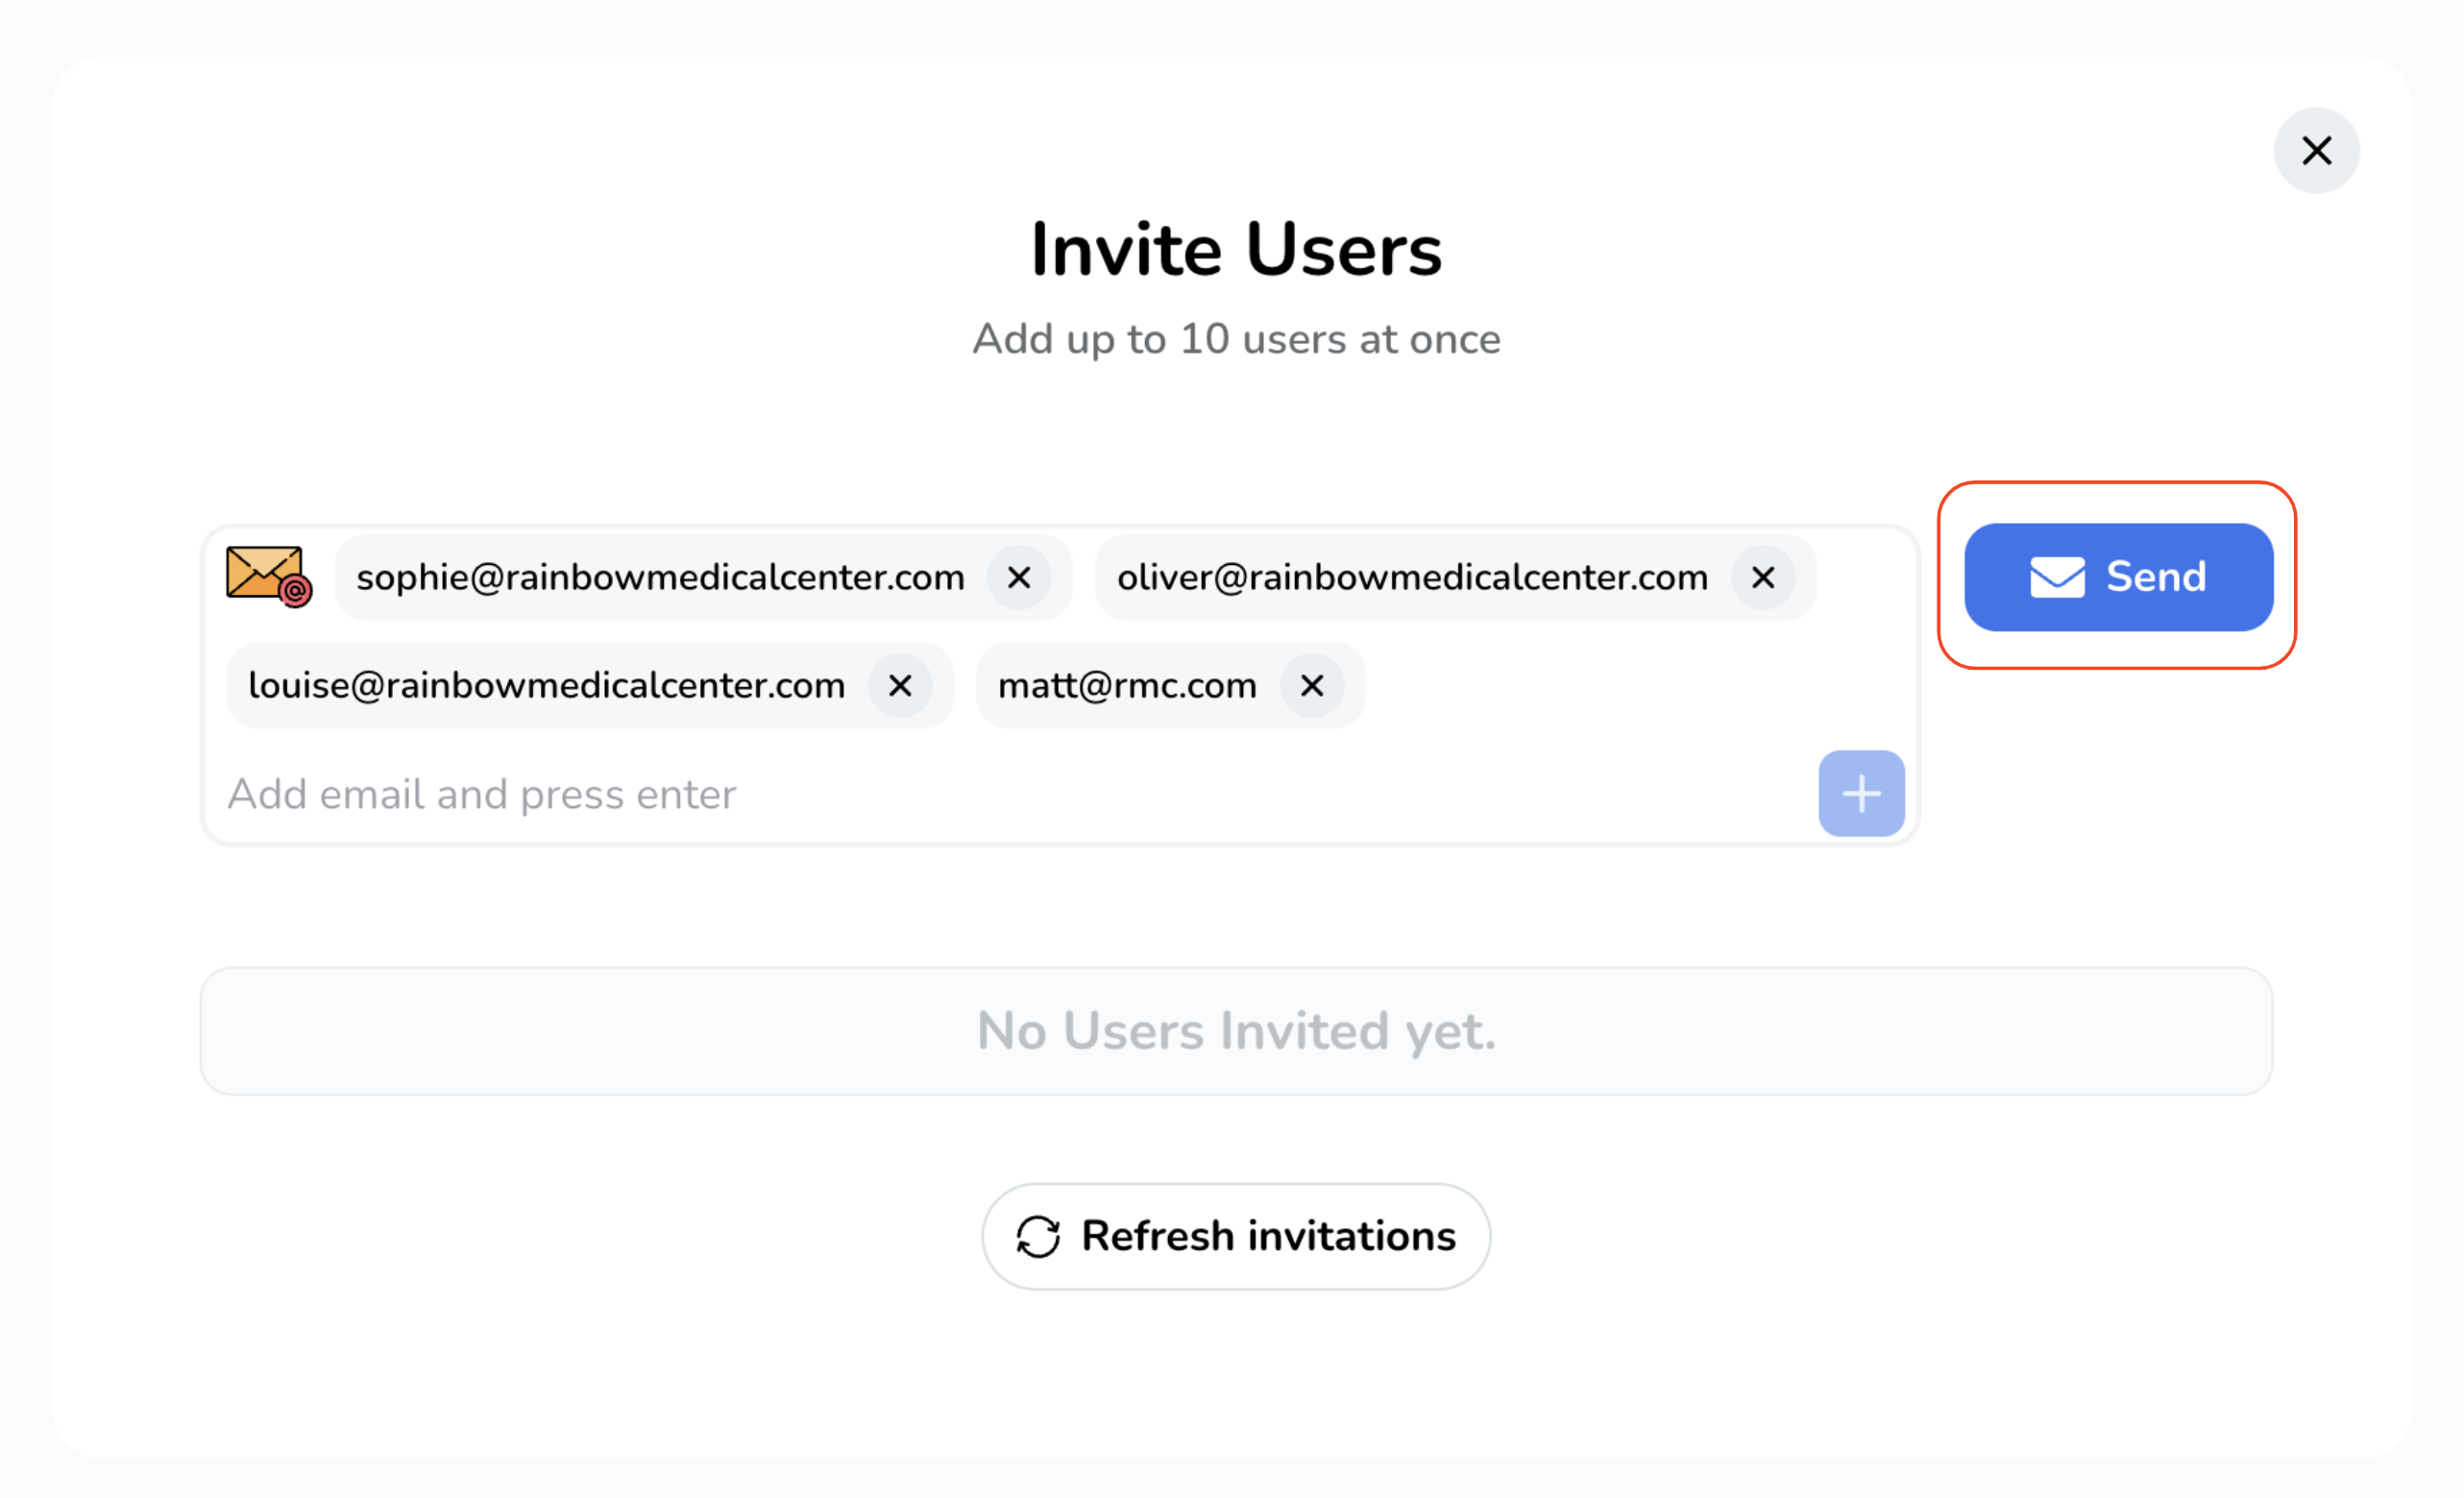
Once you are done, click the "Send" button.
Once you are done, click the "Send" button.
-
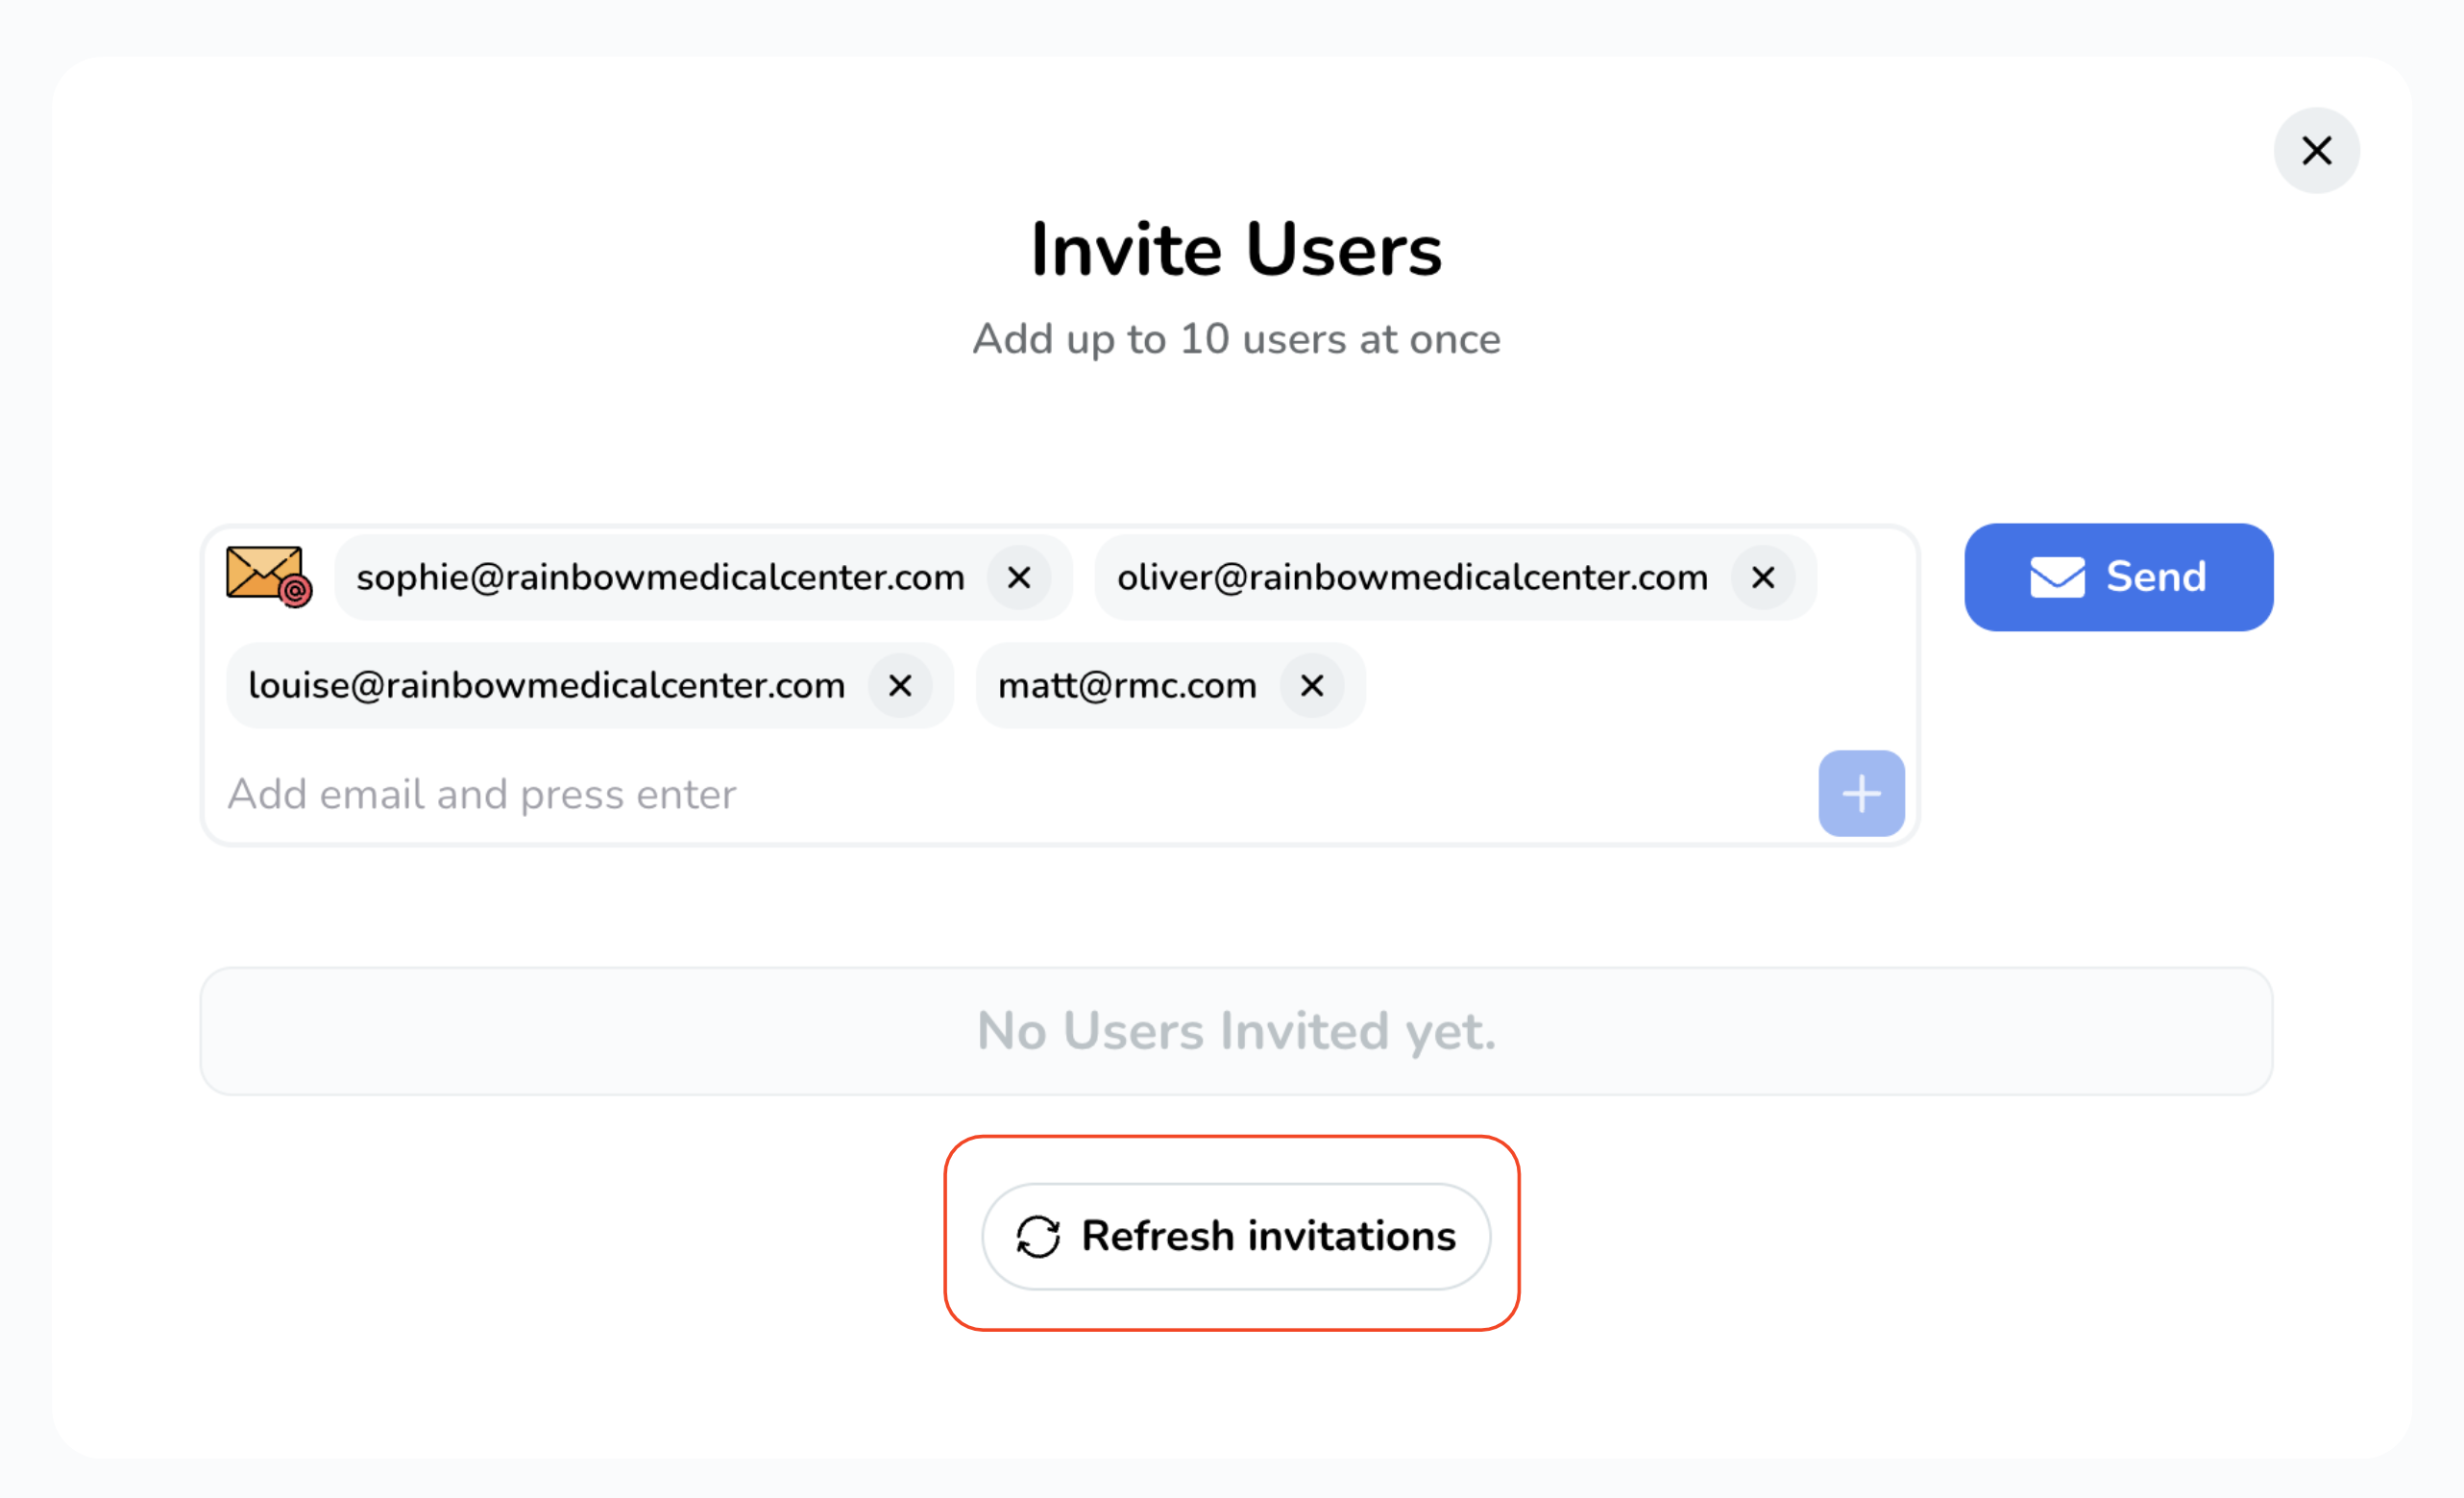
If you need to refresh invitations, just click on the "Refresh Invitations" button.
If you need to refresh invitations, just click on the "Refresh Invitations" button.
-
As invited users, they will receive an email invitation. They can accept the invitation and sign up for the app, gaining pre-approved access to your space.
They'll need to follow on-screen instructions, including entering their name and creating a password. Once signed up, they'll have full access to your space.
Inviting users to your space via trusted email authentication.
Adding trusted email addresses means any users with a verified matching email address can access your space.
Please note that, at the moment, this feature is exclusively accessible through our web app. Rest assured, we're actively working on incorporating it into our mobile app as well.
To do this, follow these steps:
-
Click on the "Plus" icon on the Trusted Email Authentication section.
-
In the pop-up, enter the email domain.
-
Then click "Save".
-
Users with authorised email addresses can now sign up and gain access to your space with ease.
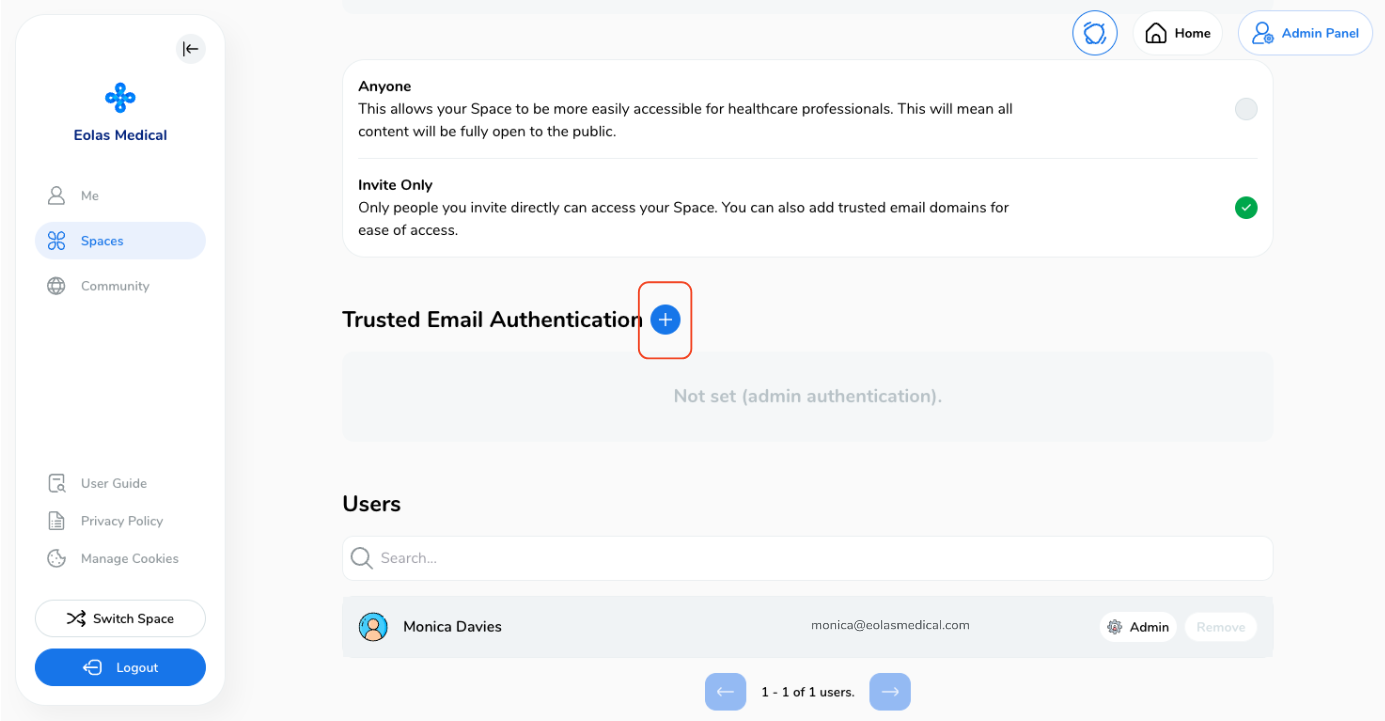
Click on the "Plus" icon on the Trusted Email Authentication section.
In the pop-up, enter the email domain.
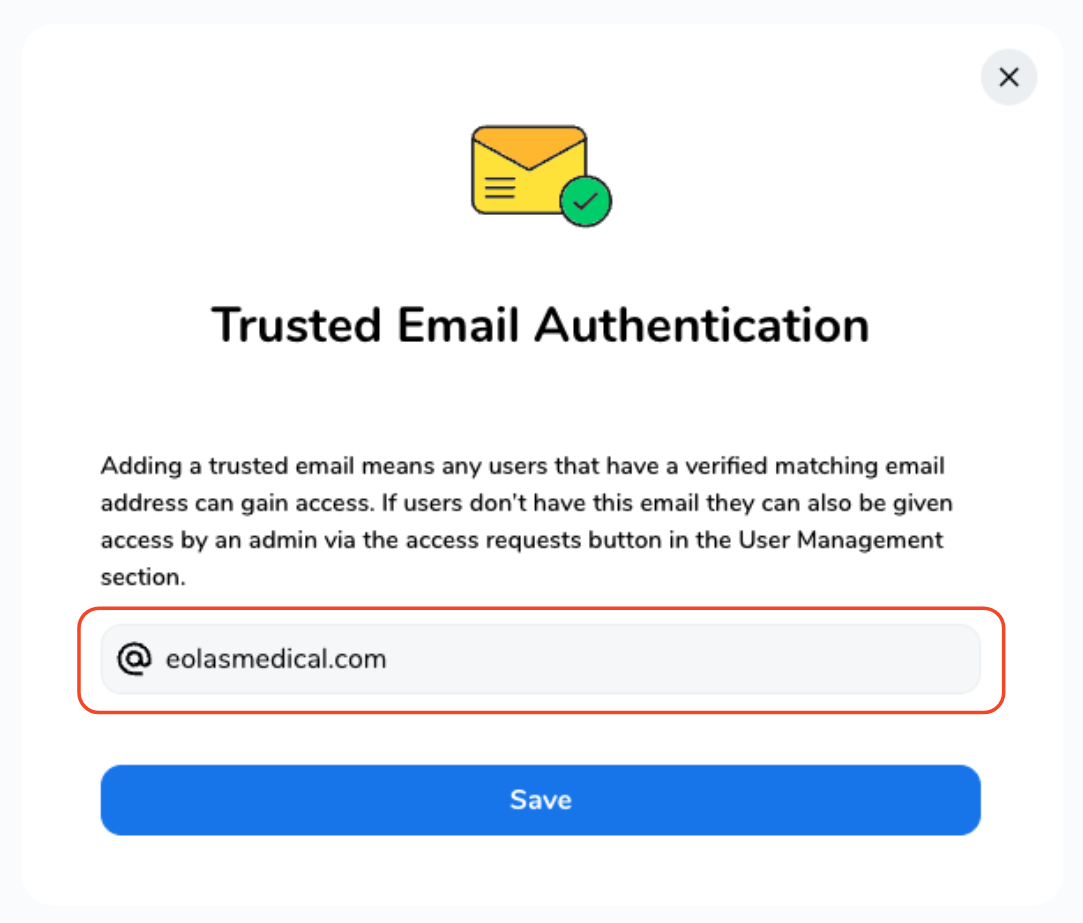
Then click "Save".
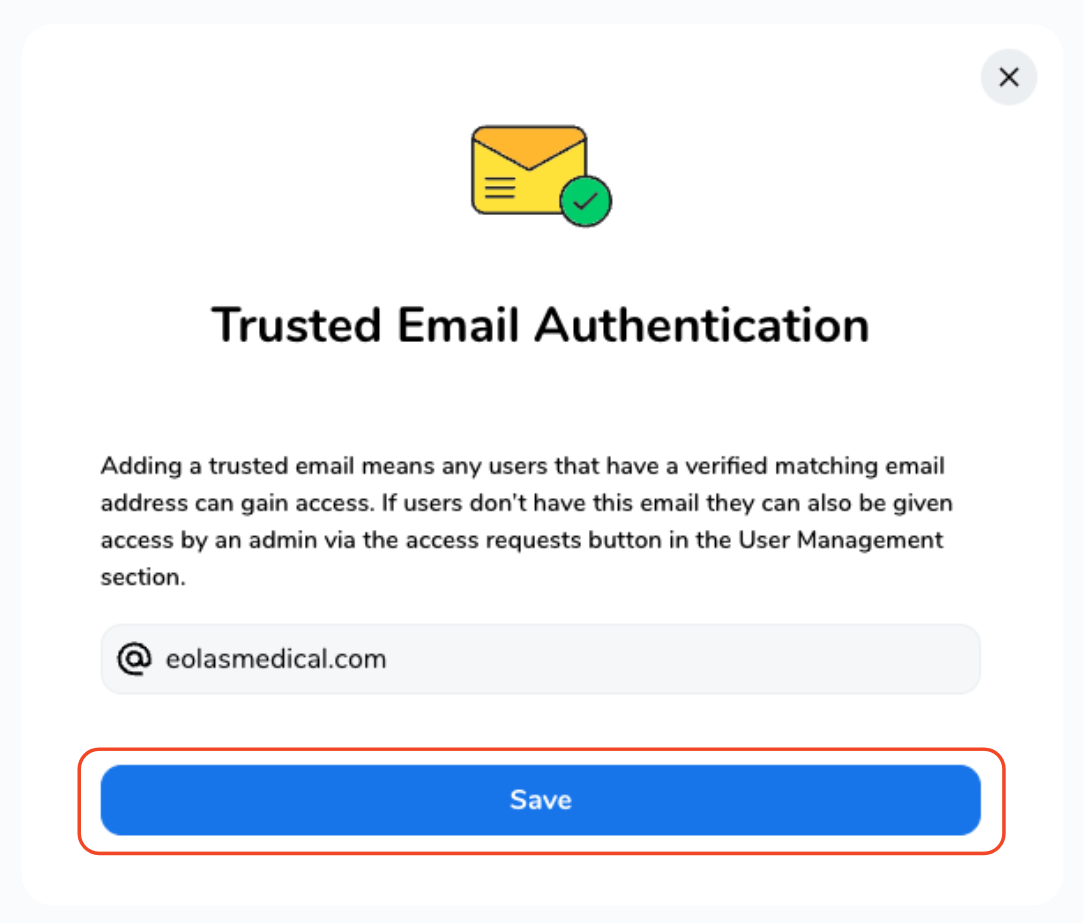
Users with authorised email addresses can now sign up and gain access to your space with ease.
With this user-friendly guide, expanding your space and enhancing collaboration has never been more straightforward!
Mobile - Inviting Members to Your Private Space.
-
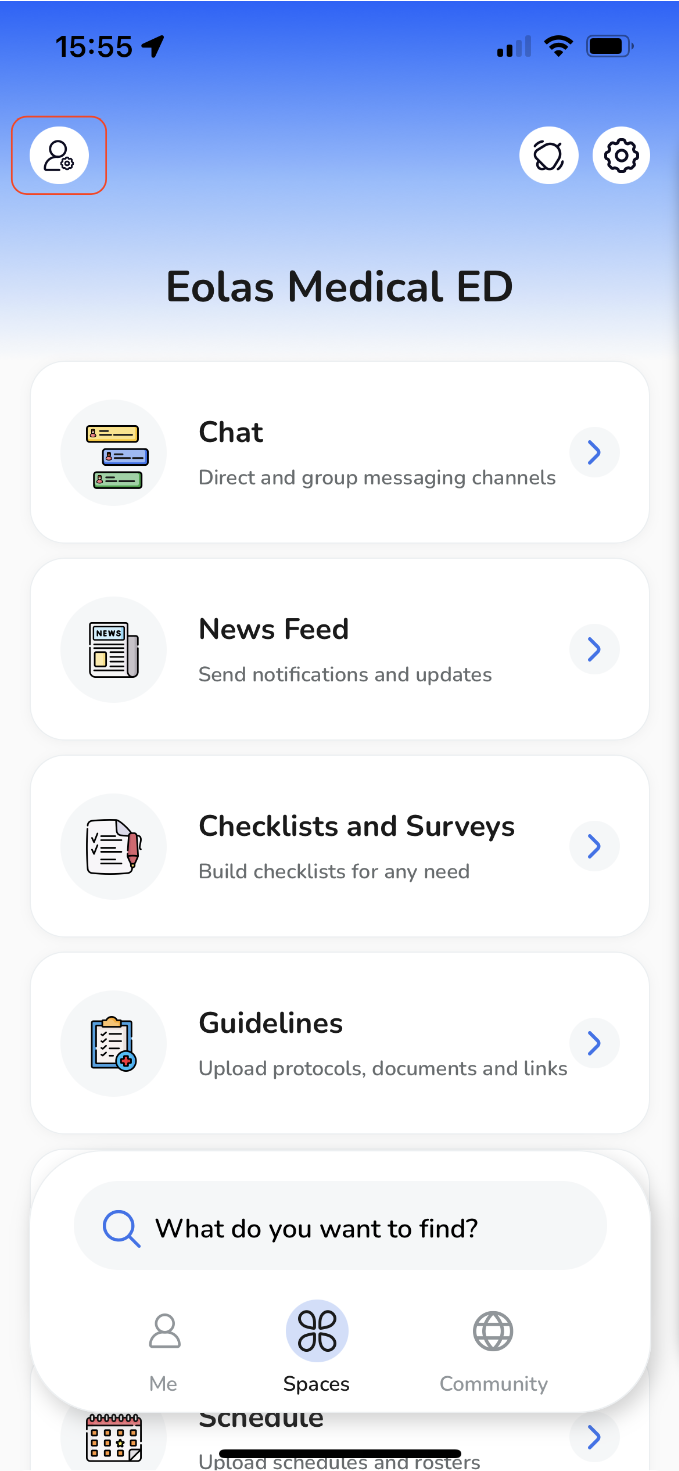
On your space page, you'll notice a "User Management" icon button; go ahead and give it a tap.
-
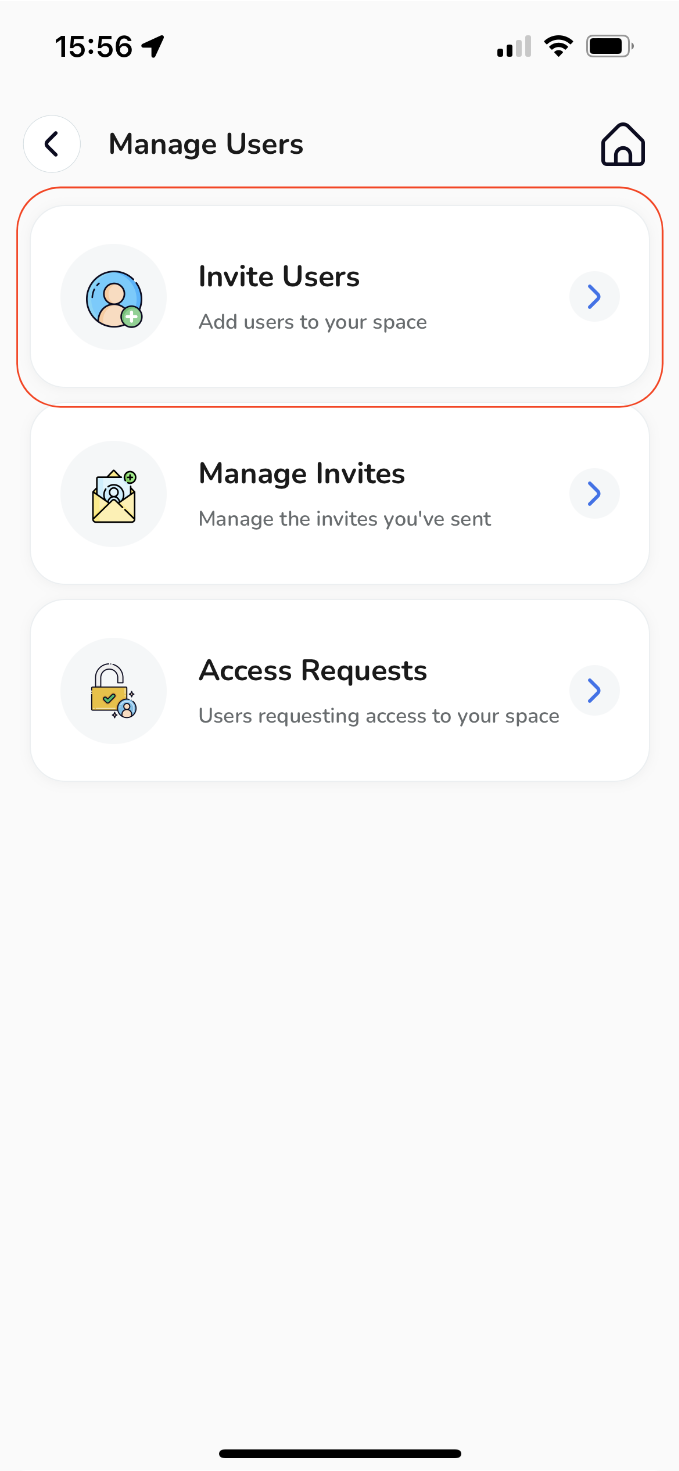
You'll then be directed to the "Manage Users" page. To invite users to your space, click on "Invite Users".
-
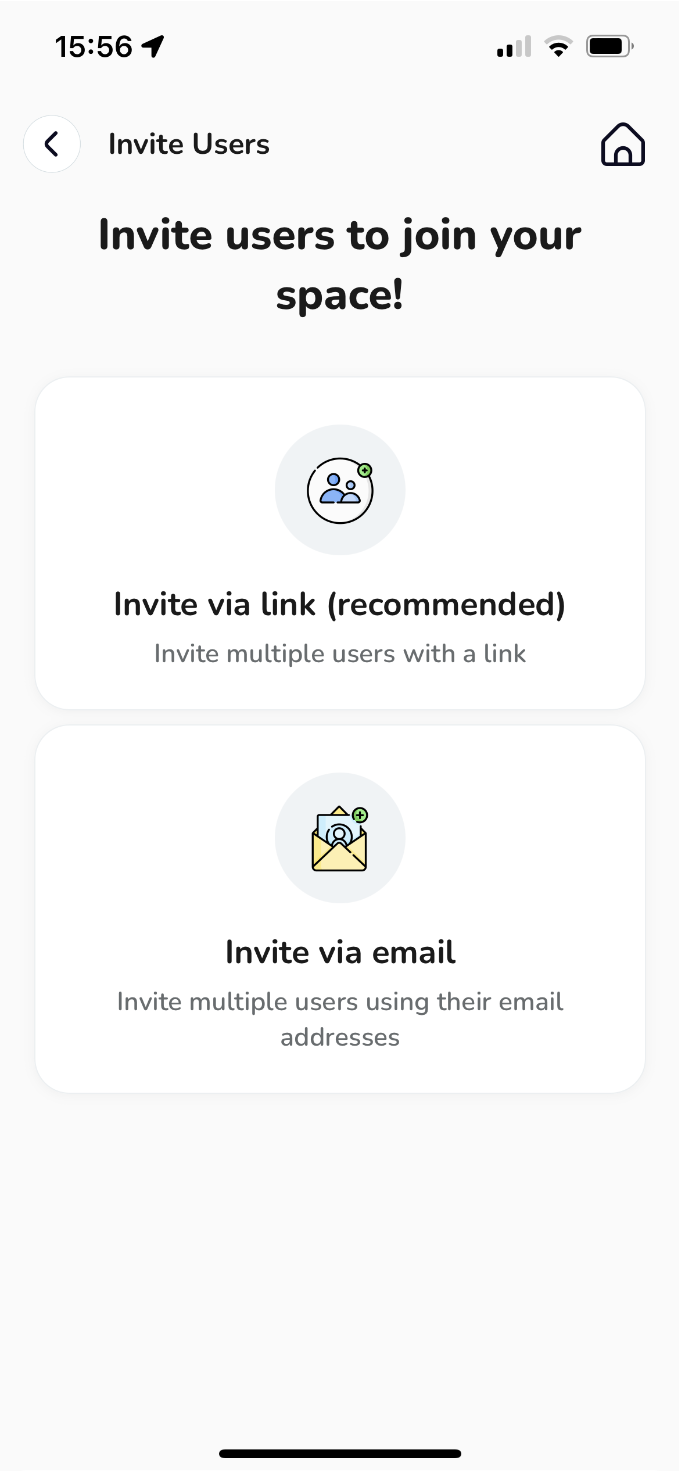
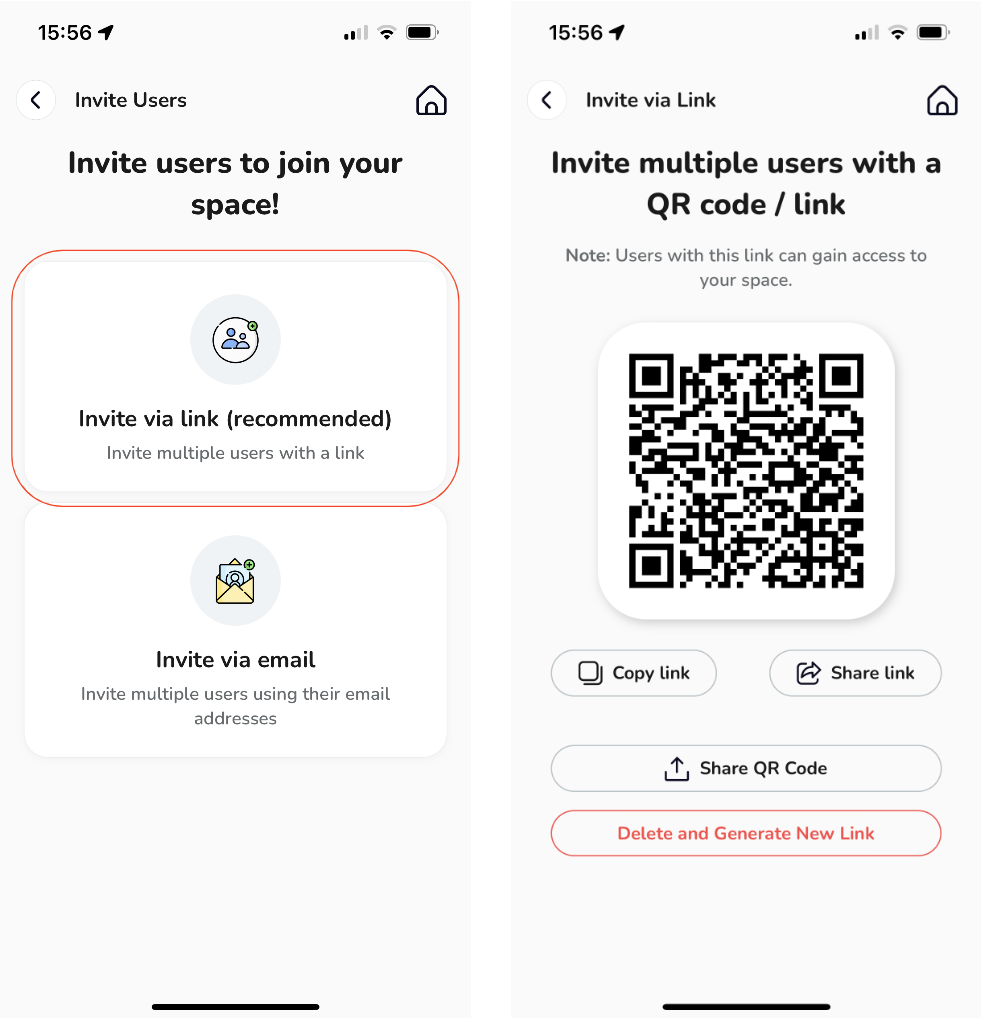
Now, you have the choice of inviting users via a link (QR code) or through email. If you're inviting a large number of members, we recommend using the link option.
On your space page, you'll notice a "User Management" icon button; go ahead and give it a tap.
You'll then be directed to the "Manage Users" page. To invite users to your space, click on "Invite Users".
Now, you have the choice of inviting users via a link (QR code) or through email. If you're inviting a large number of members, we recommend using the link option.
To invite users via link (QR code):
-
Select the link option, and a QR code will be generated for you to share. You can easily copy and share it through messaging services or email.
Select the link option, and a QR code will be generated for you to share. You can easily copy and share it through messaging services or email.
To invite users via email:
-
Opt for the email option.
-
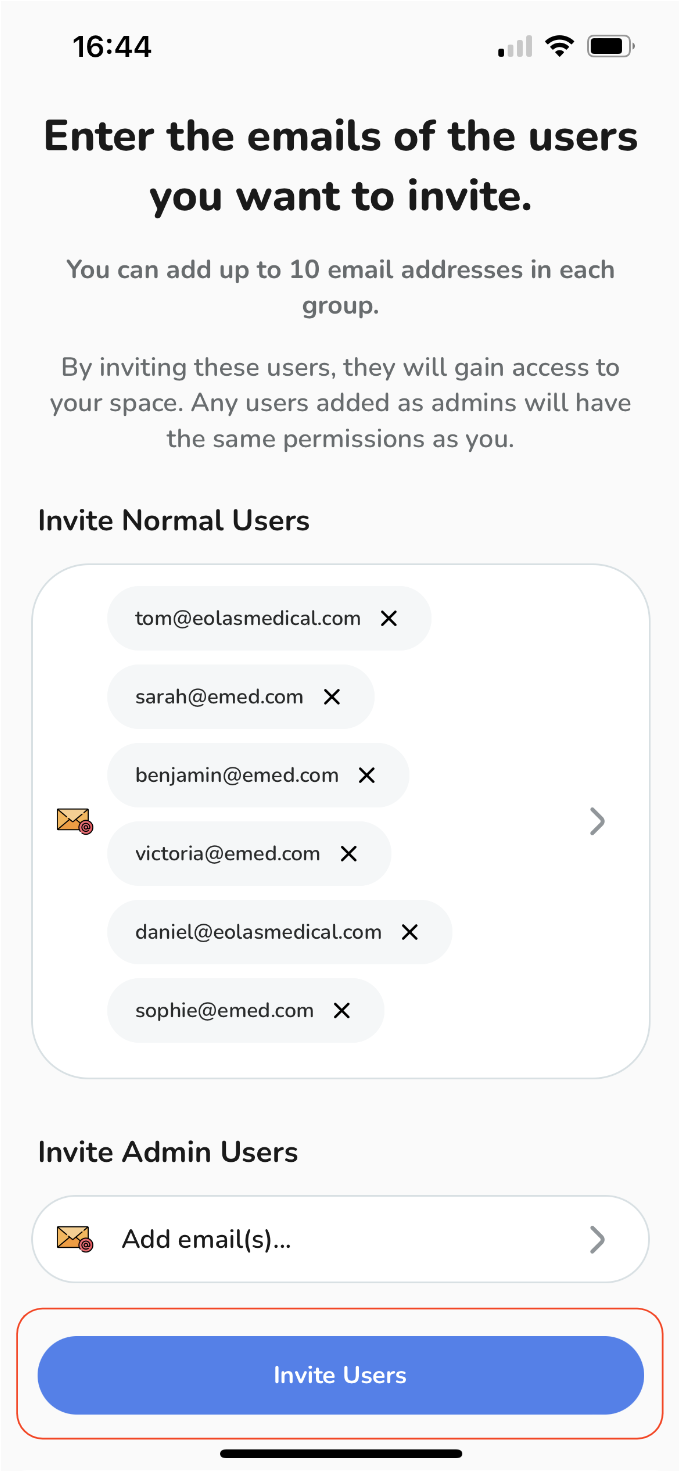
You'll be presented with two types of users: "Normal Users" who are members of your space with no admin rights, and "Admin Users" who will have permissions to manage your space. Please select accordingly.
-
Enter the email address.
-
Remember, you can send invitations to up to 10 users at once. To add more email addresses, simply type them in the box,
if you need to delete an email, just tap on the "x" button.
-
Once you are ready, tap on "Done".
-
To confirm select "Invite Users"
-
As invited users, they will receive an email invitation. They can accept the invitation and sign up for the app, gaining pre-approved access to your space.
They'll need to follow on-screen instructions, including entering their name and creating a password. Once signed up, they'll have full access to your space.
Opt for the email option.
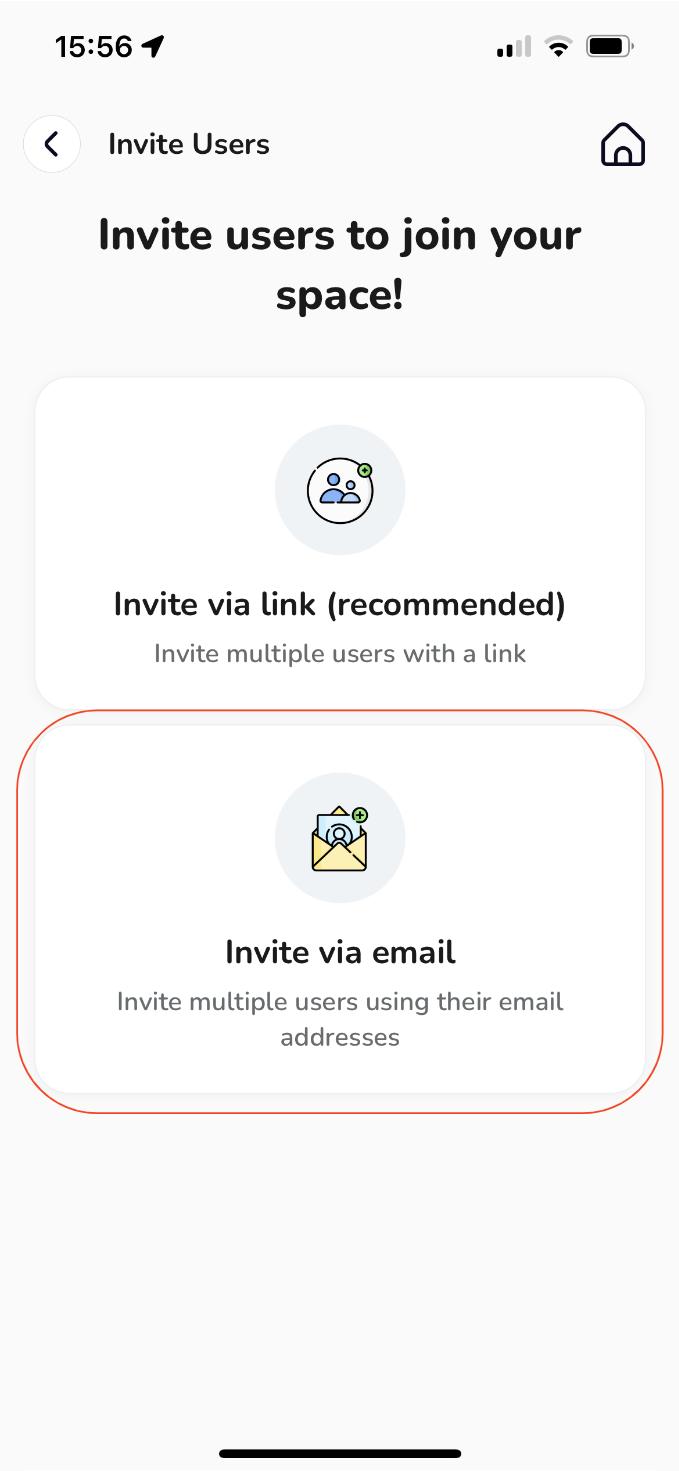
You'll be presented with two types of users: "Normal Users" who are members of your space with no admin rights, and "Admin Users" who will have permissions to manage your space. Please select accordingly.
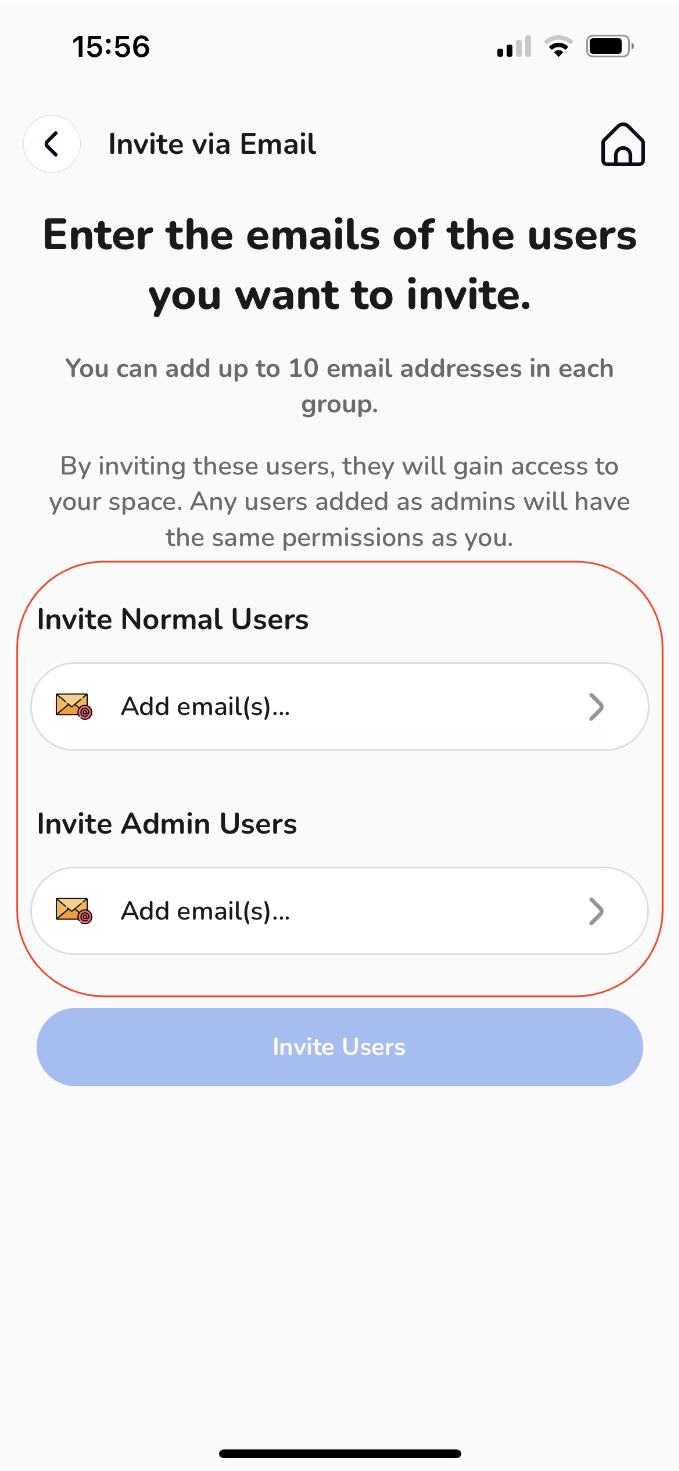
Enter the email address.
Remember, you can send invitations to up to 10 users at once. To add more email addresses, simply type them in the box,
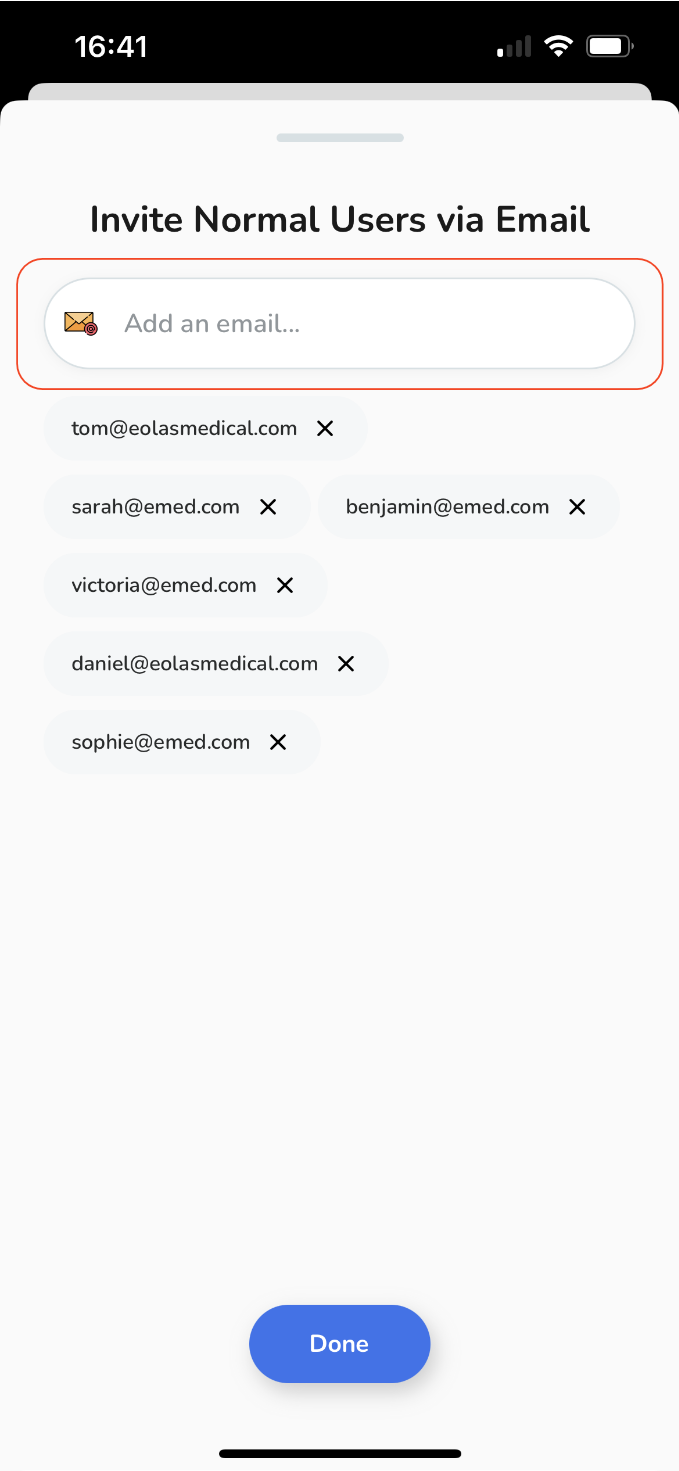
if you need to delete an email, just tap on the "x" button.
Once you are ready, tap on "Done".
To confirm select "Invite Users"
As invited users, they will receive an email invitation. They can accept the invitation and sign up for the app, gaining pre-approved access to your space.
They'll need to follow on-screen instructions, including entering their name and creating a password. Once signed up, they'll have full access to your space.
And there you have it, expanding your space and enhancing collaboration has never been easier!


