Adding a New Ultrasound - Vascular Access Event to your Portfolio | Eolas Medical | Help Center
Learn how to add a New Ultrasound - Vascular Access event to your portfolio, attach evidence, request feedback, and submit the event.
To create an Ultrasound - Vascular Access event simply follow this steps:
Web - Add an Ultrasound - Vascular Access event.
-
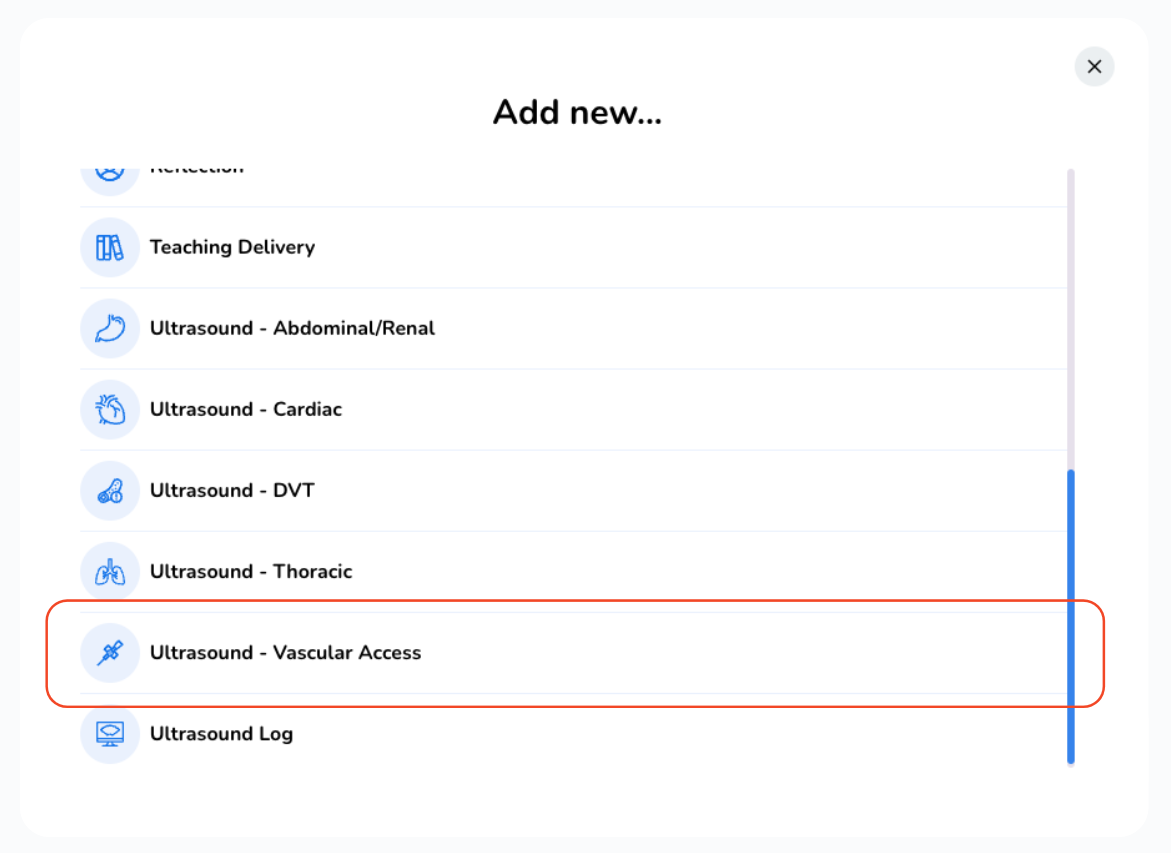
Scroll through the available options and select "Ultrasound - Vascular Access"
-
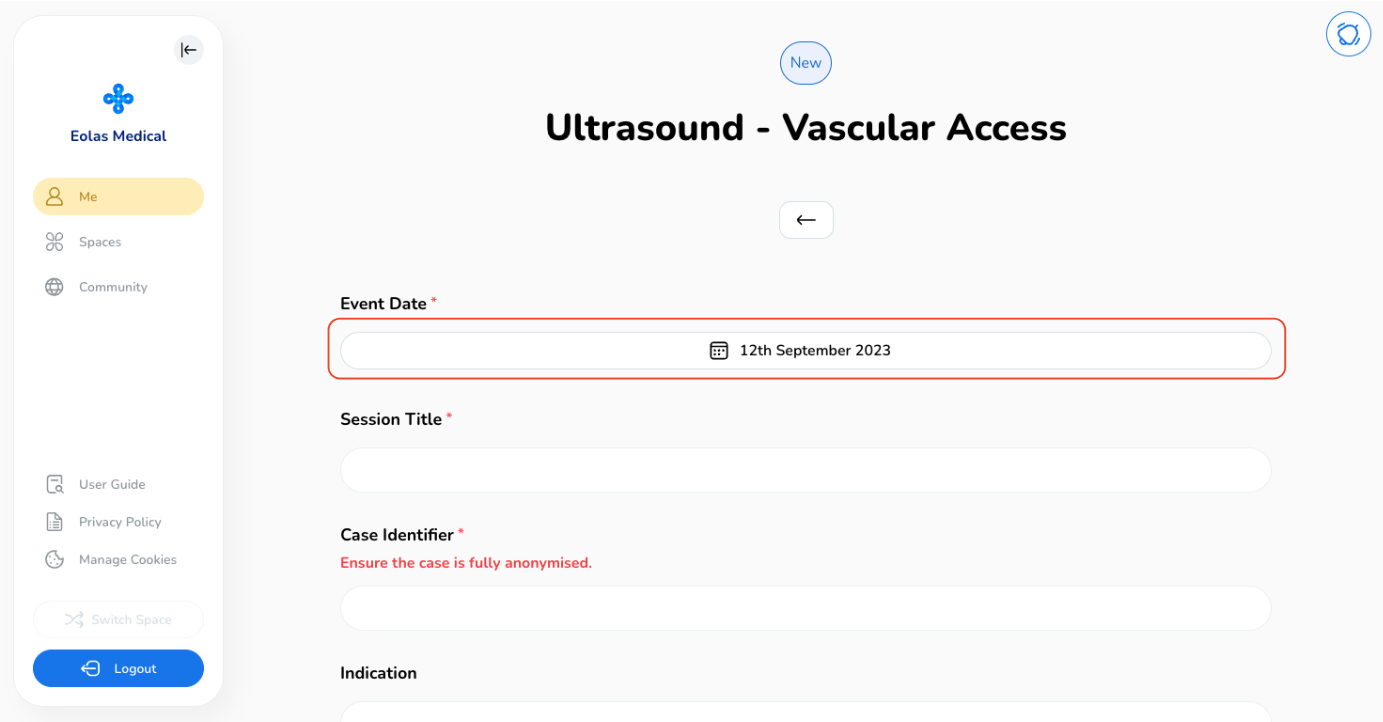
Choose the event date. The default date displayed is today's date, but if you wish to make changes, simply click on the "Date" button and select your desired date.
-
Provide a title for your session.
-
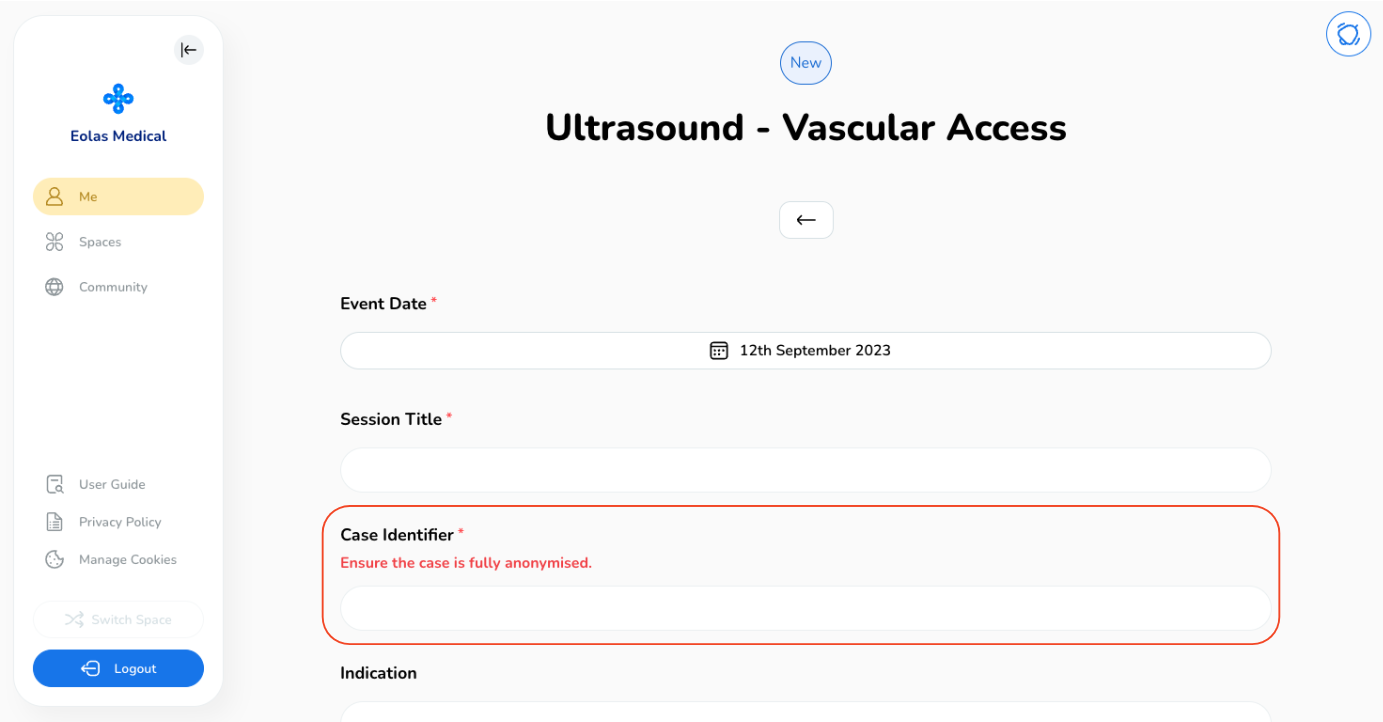
Supply a case identifier, and be sure to maintain full anonymity for the case.
-
Include any missing indications if necessary.
-
Complete the form by selecting appropriate answers.
-
Feel free to add any extra comments or relevant details that you believe are worth mentioning.
-
If you wish to document your session, use the "Attach Evidence" option.
-
A pop-up window will appear. You can either choose from your existing files or upload a new one from your device.
-
To upload a new file,
-
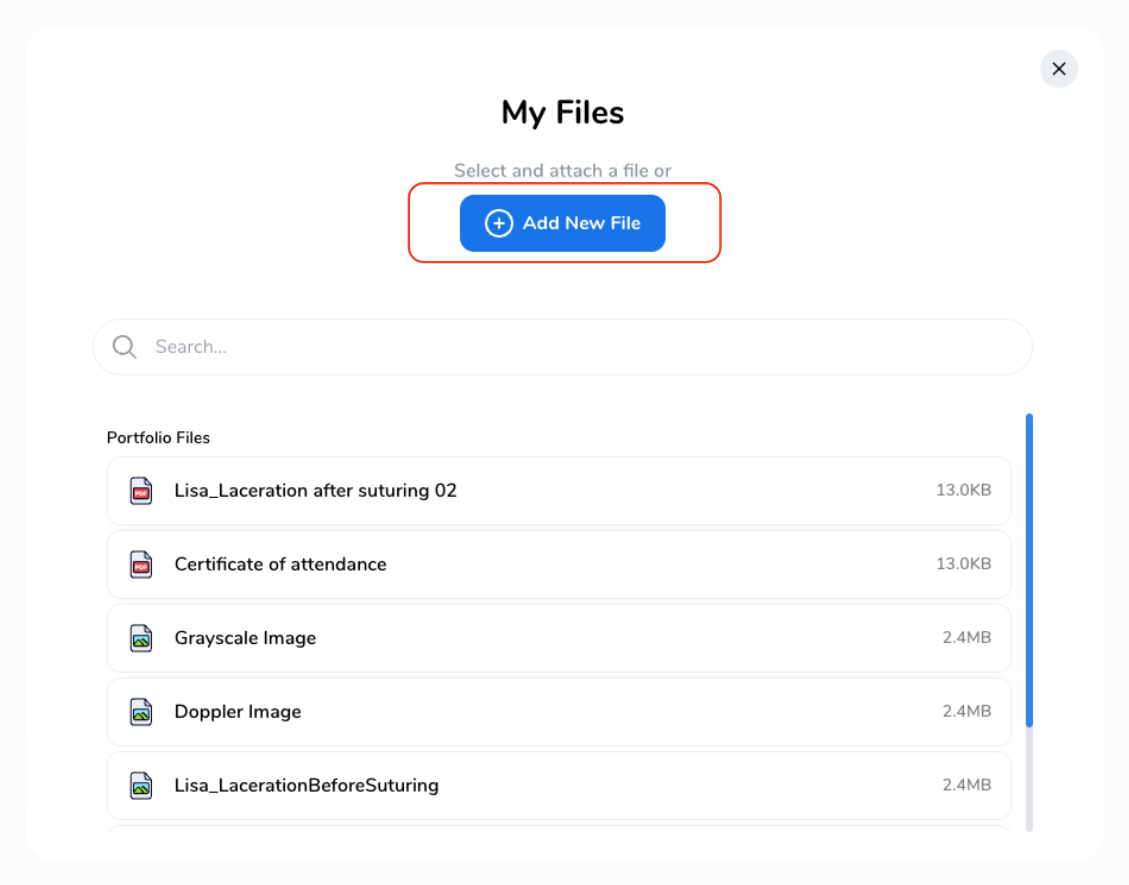
Select "Add New File".
-
You can upload various file types, including MS Office documents, PDFs, images, videos, and web links.
-
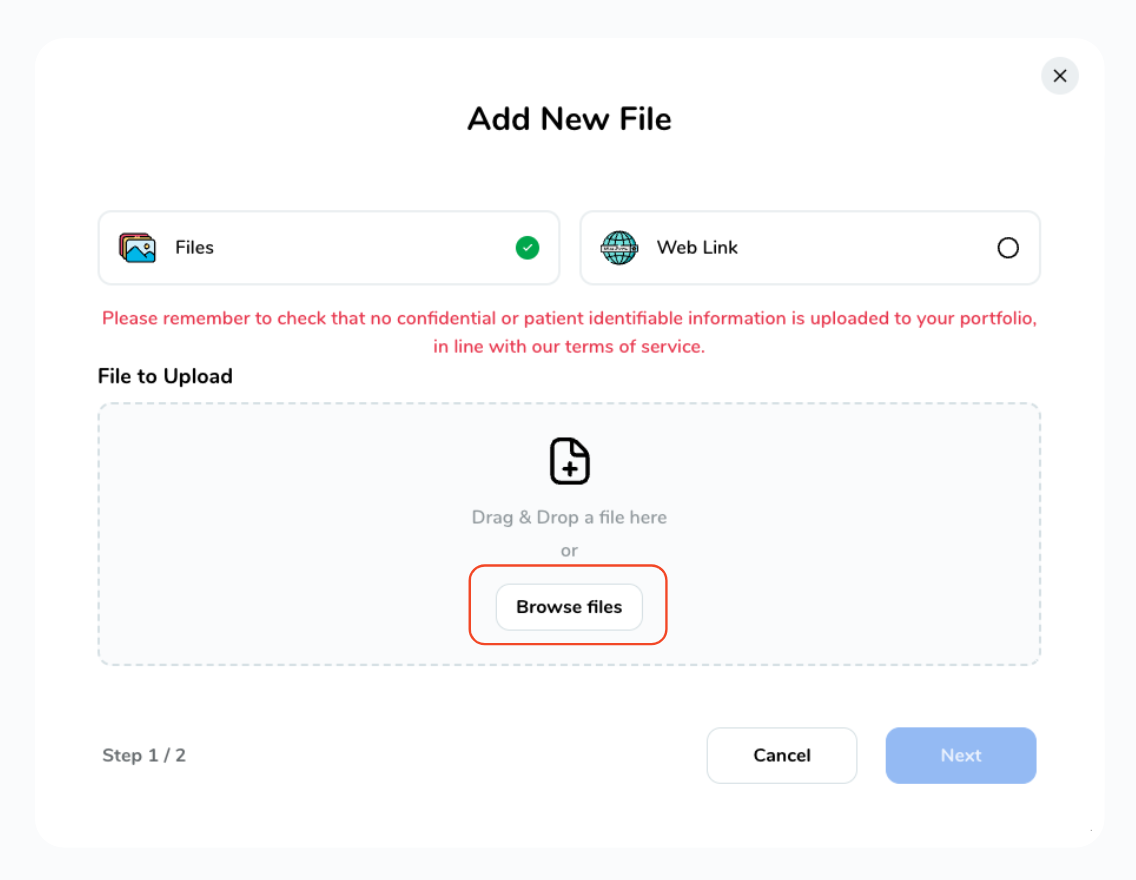
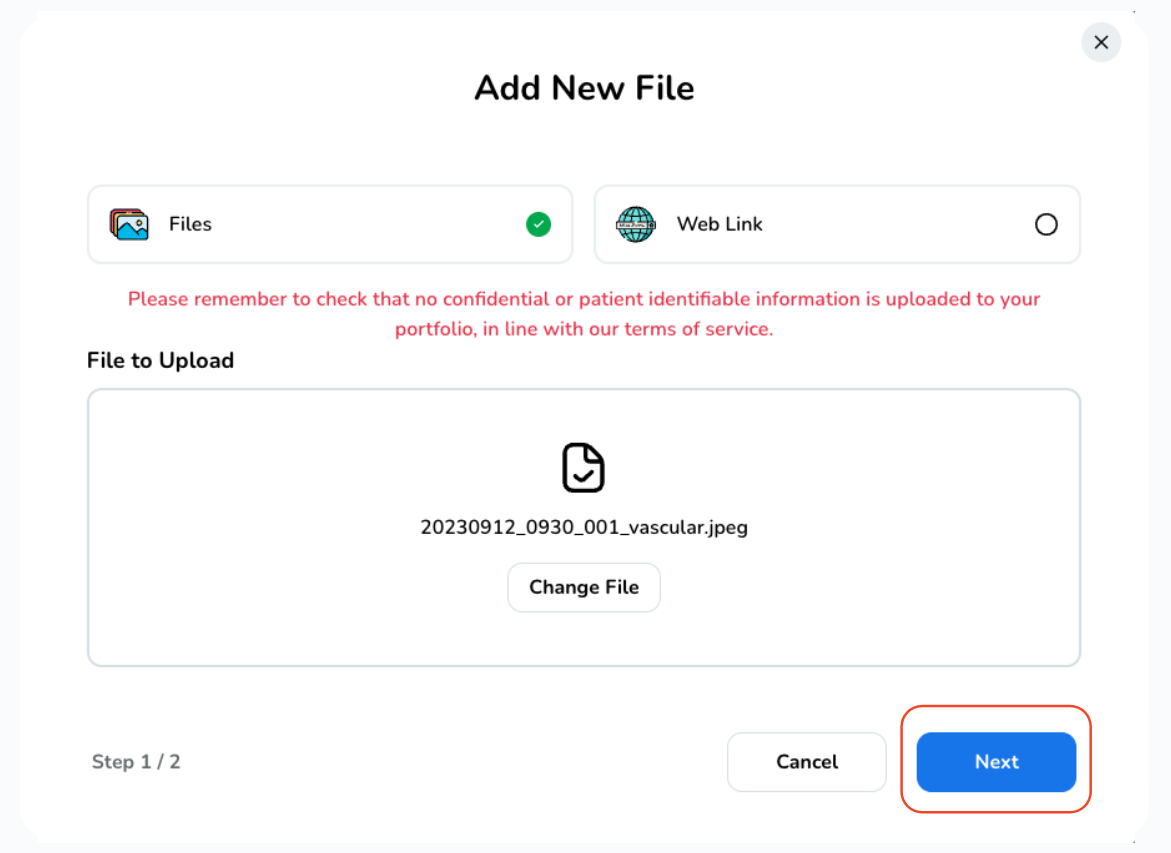
To upload a new file, click on "Browse Files" and select a file from your device, then click "Next".
-
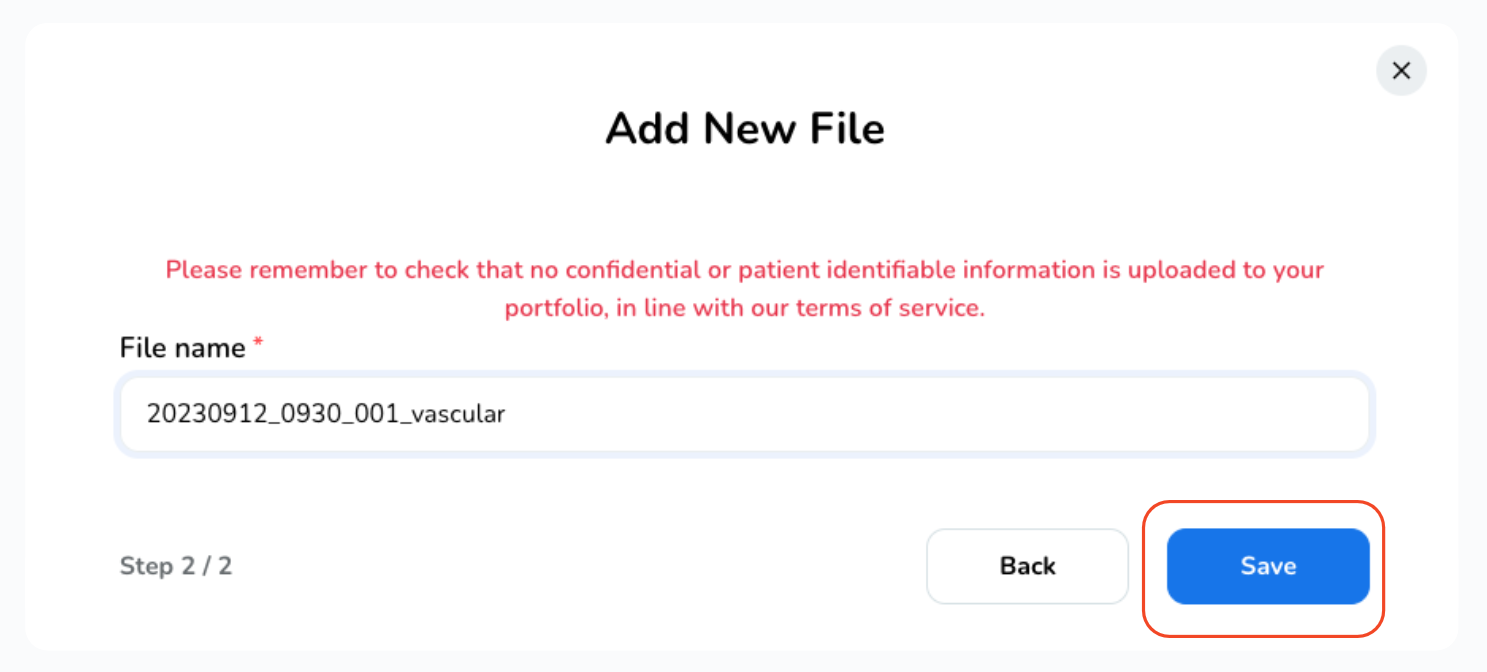
Provide a name for the file and click "Save" to attach it.
-
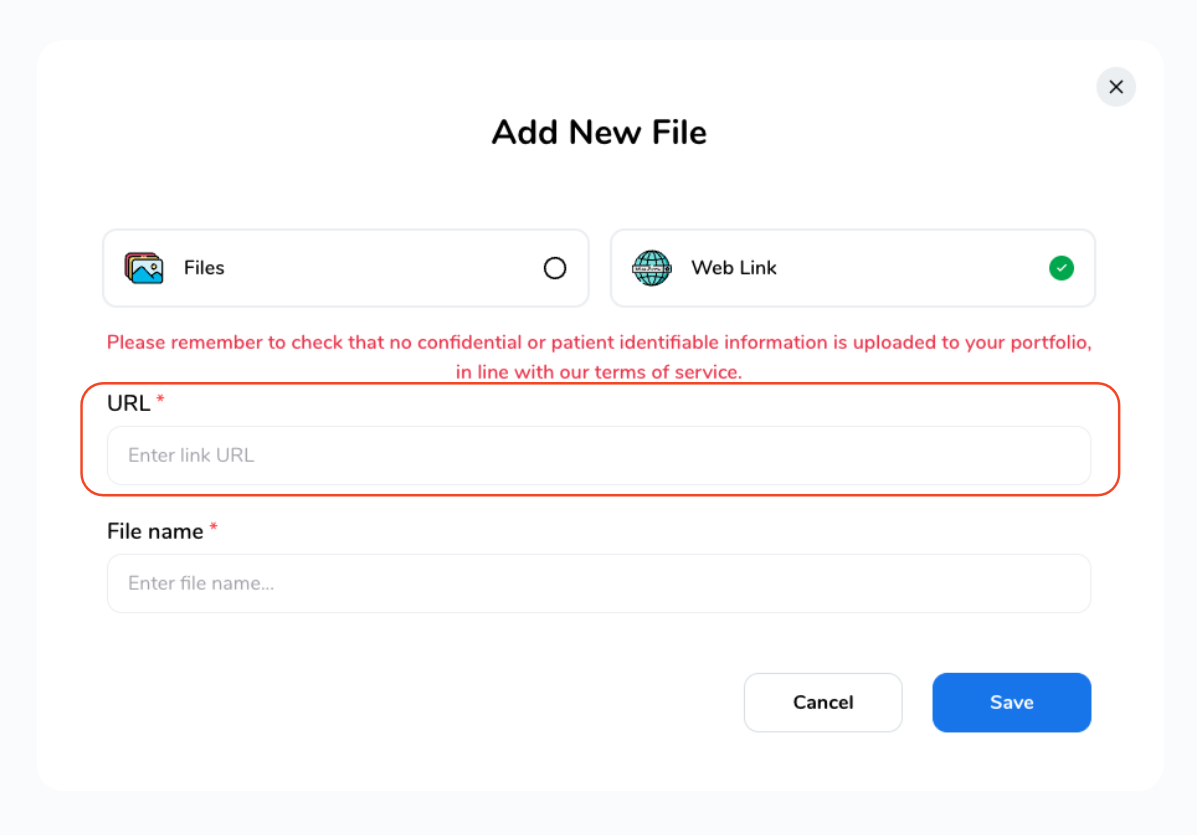
To add a weblink, enter the URL link and a File Name, then click "Save"
-
-
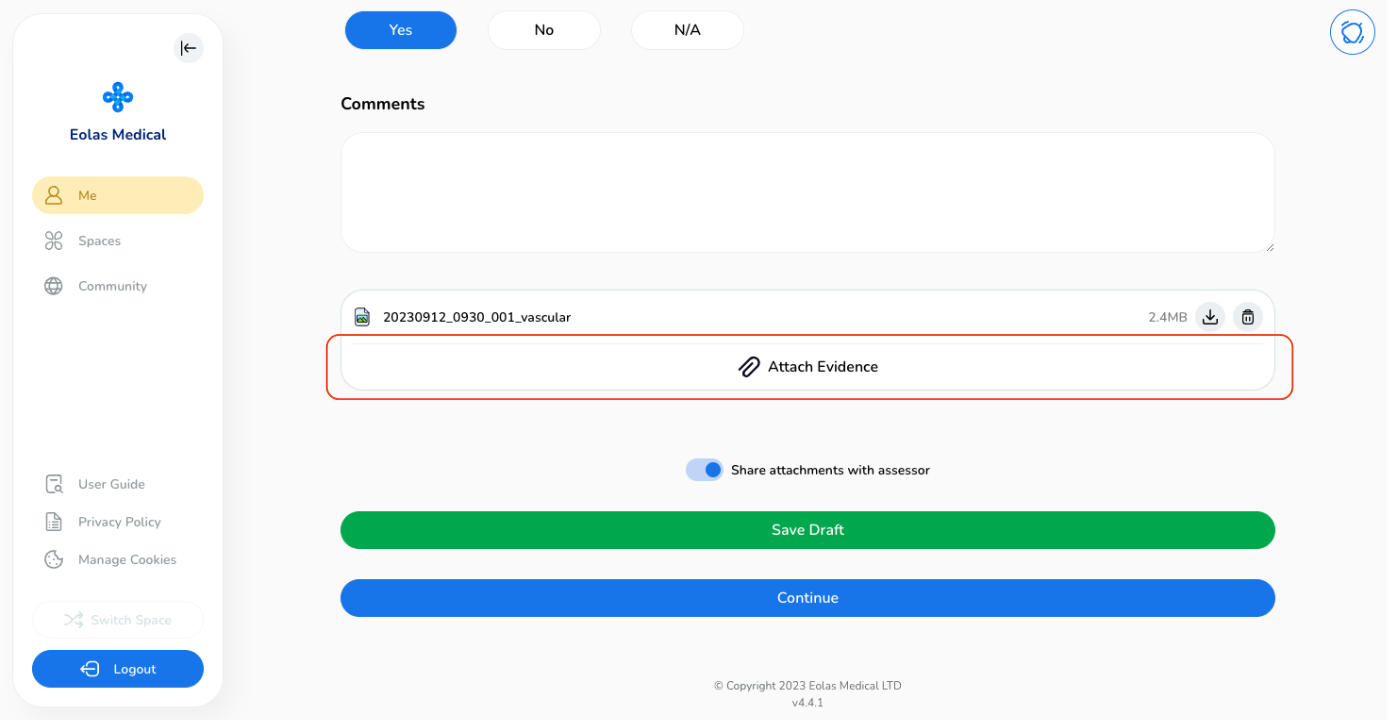
Your file will now be attached, If you wish to add multiple files, simply click on "Attach Evidence" once more and follow the same process again.
-
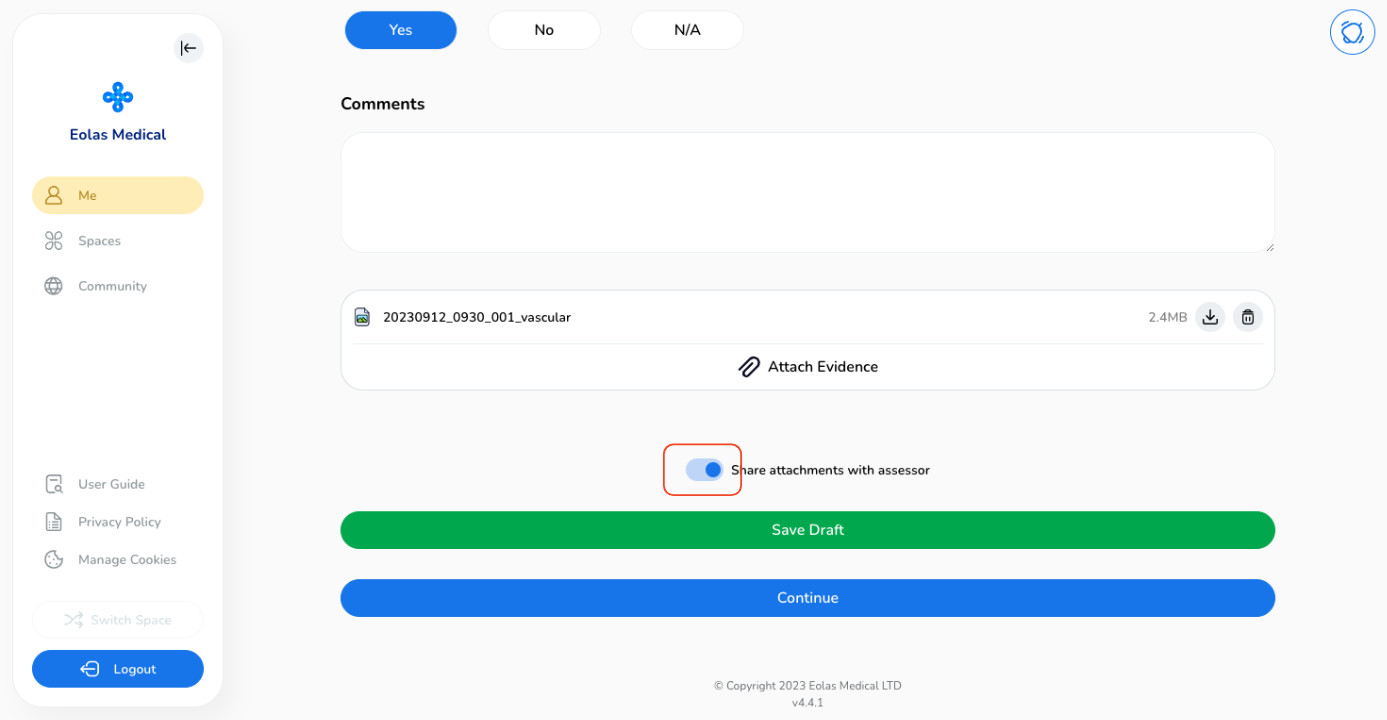
You can opt to share the attachment with your assessor by using the toggle button.
-
Once you're ready, you have several choices:
-
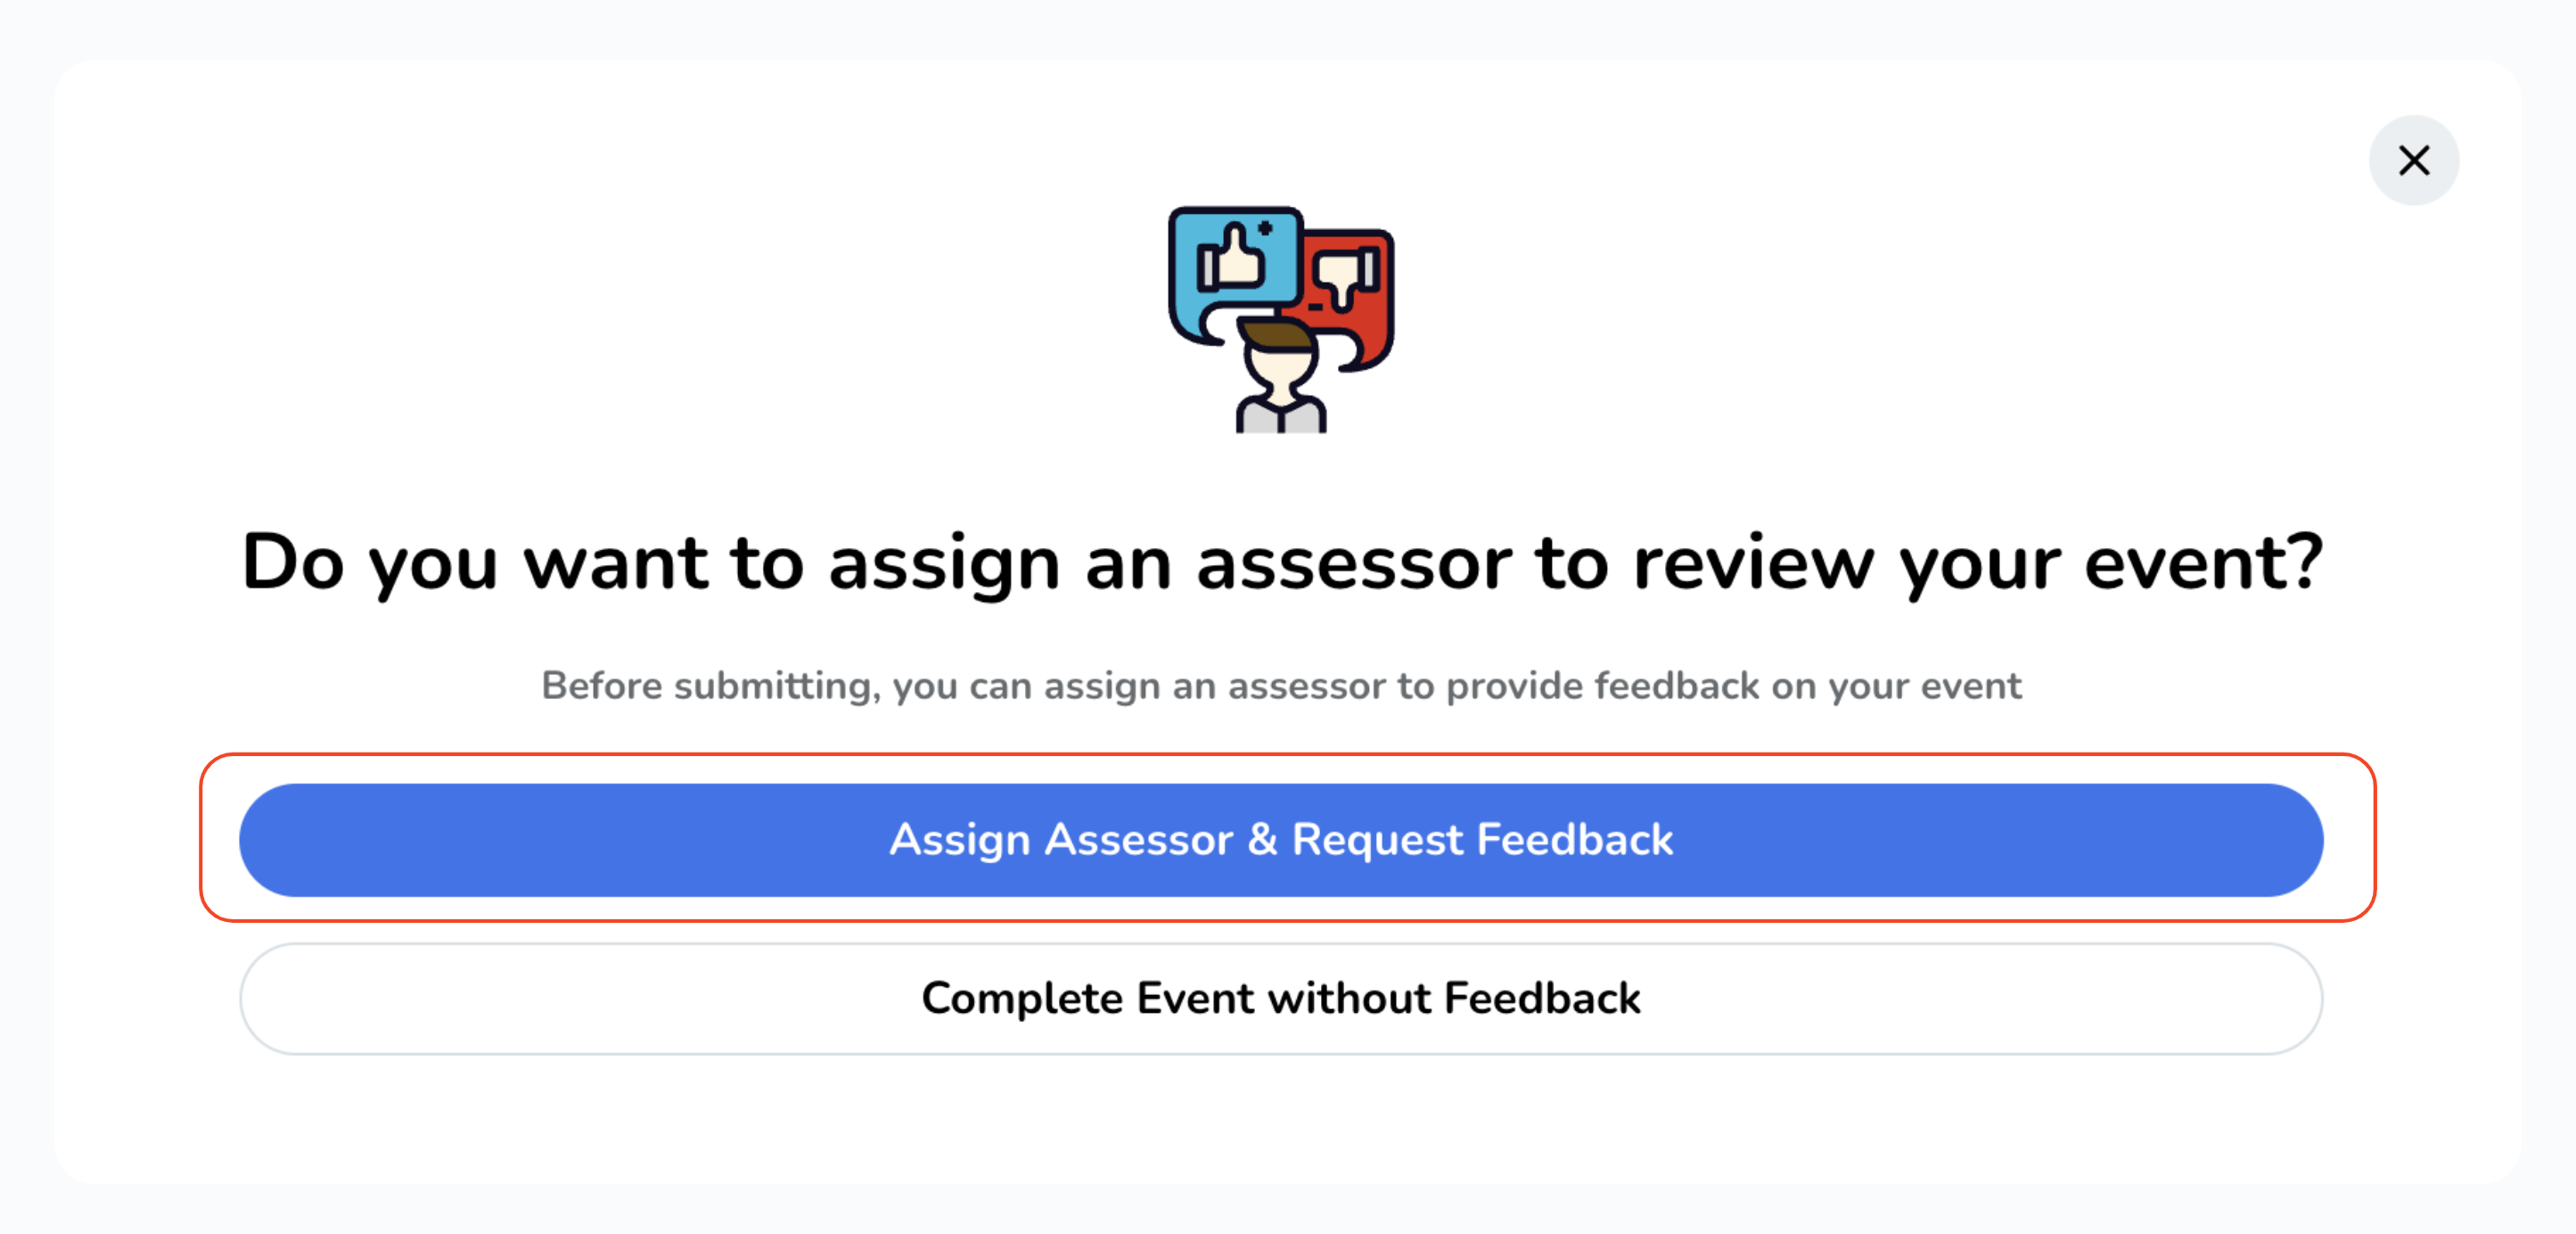
After clicking "Continue", a pop-up will appear for assigning an assessor.
Scroll through the available options and select "Ultrasound - Vascular Access"
Choose the event date. The default date displayed is today's date, but if you wish to make changes, simply click on the "Date" button and select your desired date.
Provide a title for your session.
Supply a case identifier, and be sure to maintain full anonymity for the case.
Include any missing indications if necessary.
Complete the form by selecting appropriate answers.
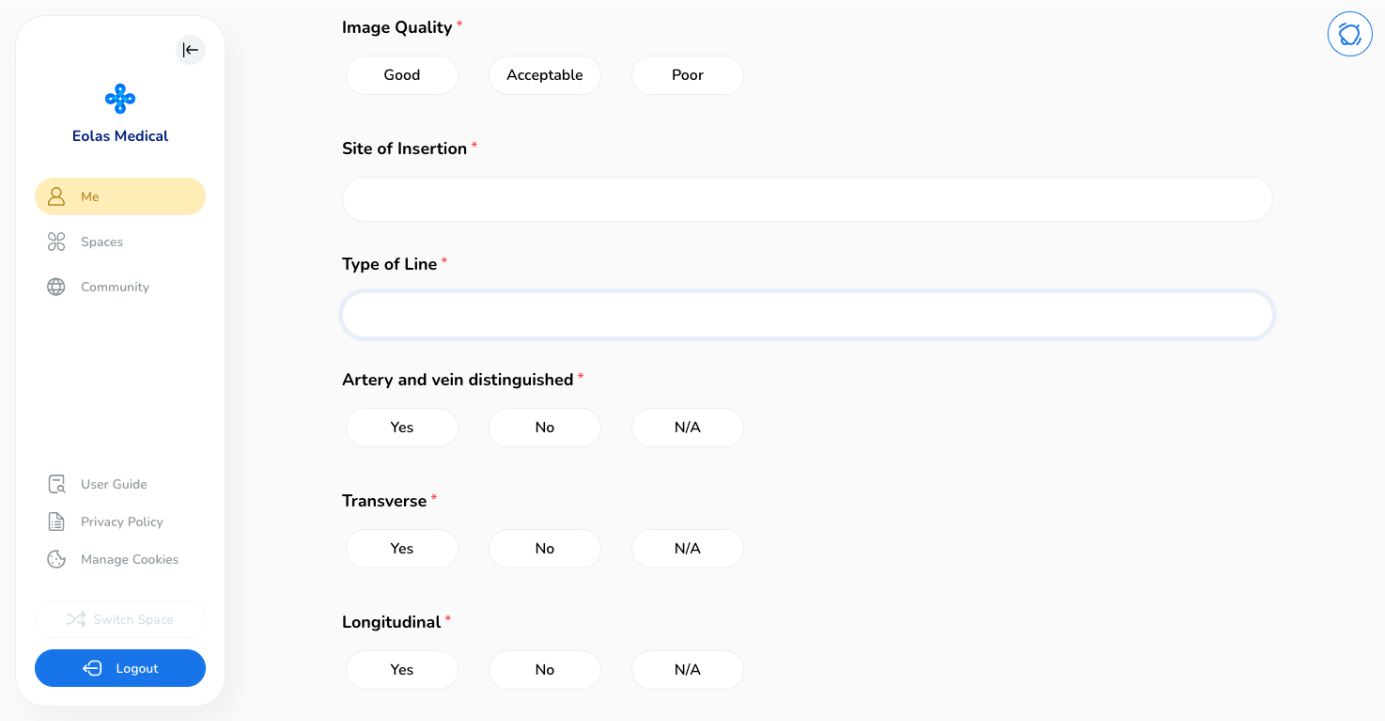
Feel free to add any extra comments or relevant details that you believe are worth mentioning.
If you wish to document your session, use the "Attach Evidence" option.
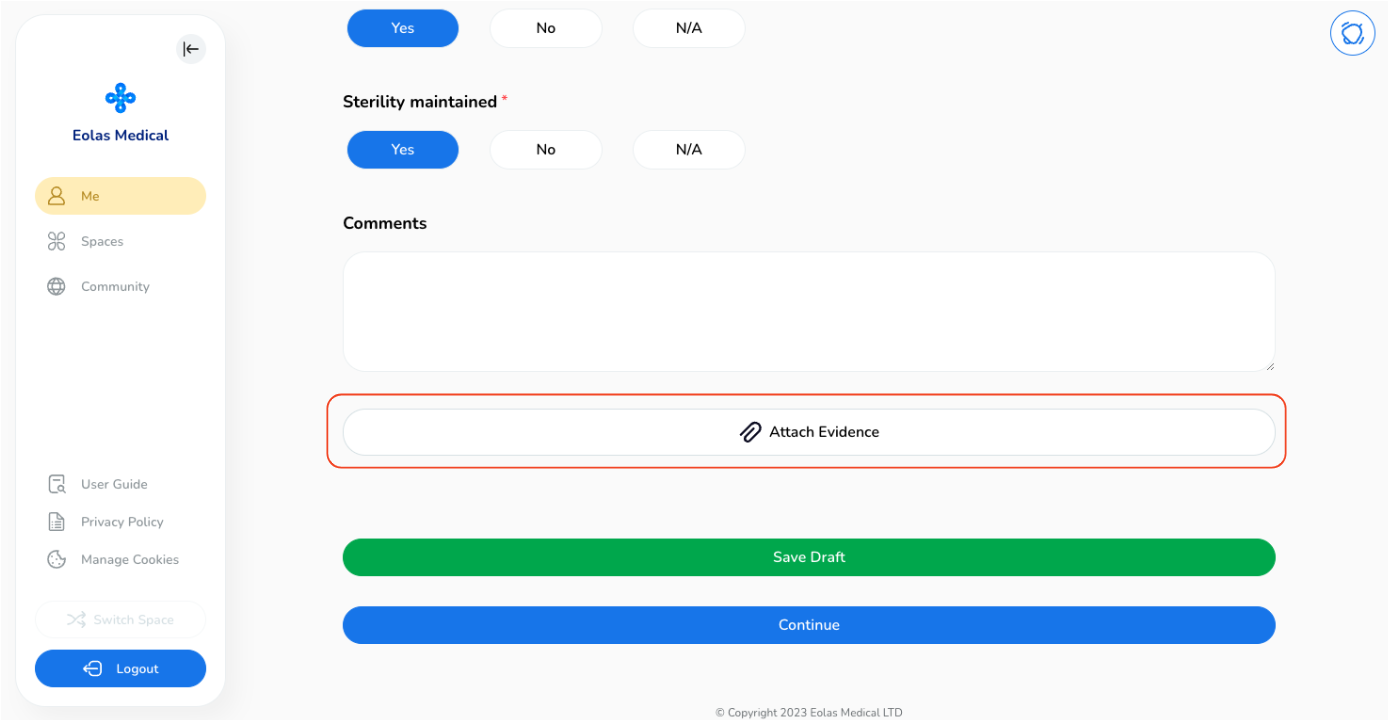
A pop-up window will appear. You can either choose from your existing files or upload a new one from your device.
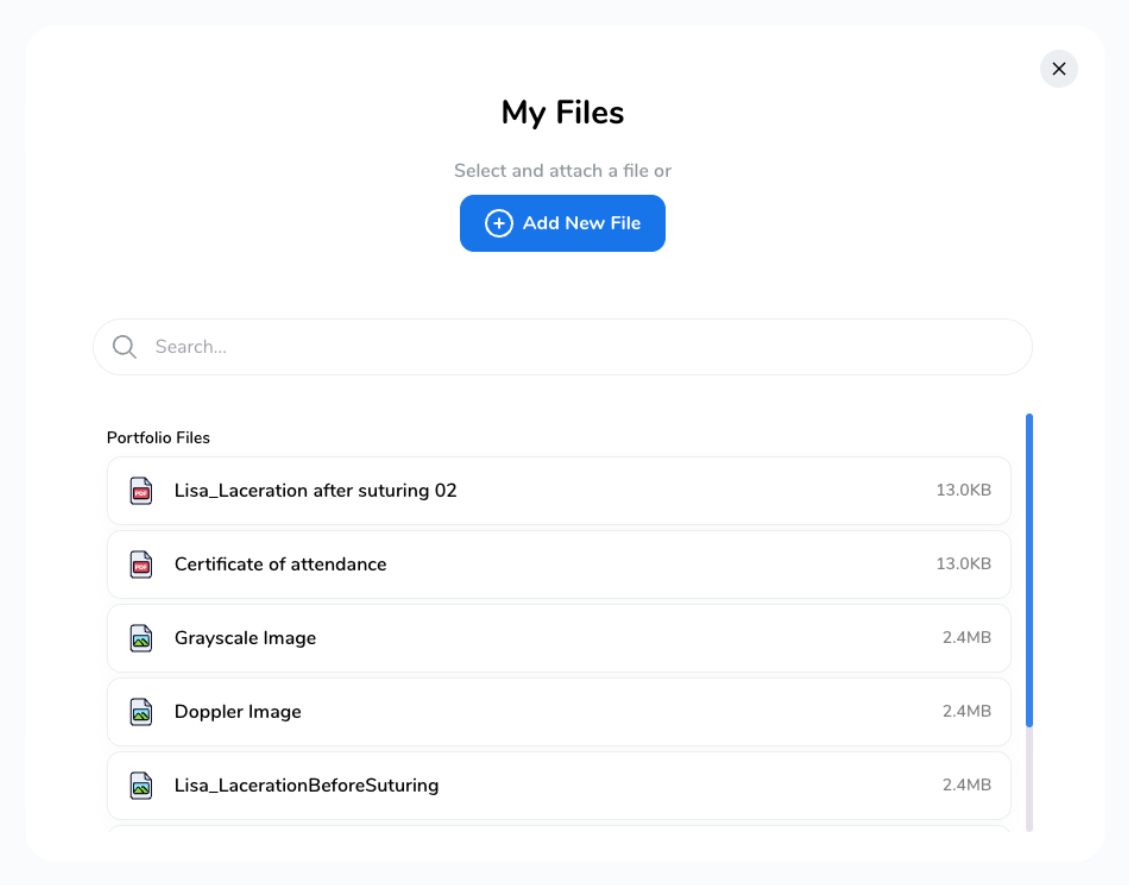
To upload a new file,
-
Select "Add New File".
Select "Add New File".
-
You can upload various file types, including MS Office documents, PDFs, images, videos, and web links.
You can upload various file types, including MS Office documents, PDFs, images, videos, and web links.
-
To upload a new file, click on "Browse Files" and select a file from your device, then click "Next".
To upload a new file, click on "Browse Files" and select a file from your device, then click "Next".
-
Provide a name for the file and click "Save" to attach it.
Provide a name for the file and click "Save" to attach it.
-
To add a weblink, enter the URL link and a File Name, then click "Save"
To add a weblink, enter the URL link and a File Name, then click "Save"
Your file will now be attached, If you wish to add multiple files, simply click on "Attach Evidence" once more and follow the same process again.
You can opt to share the attachment with your assessor by using the toggle button.
Once you're ready, you have several choices:
-
Save your session as a draft for future reference and make any adjustments you need.
Save your session as a draft for future reference and make any adjustments you need.
-
Alternatively, click the "Continue" button to proceed with the submission.
Alternatively, click the "Continue" button to proceed with the submission.
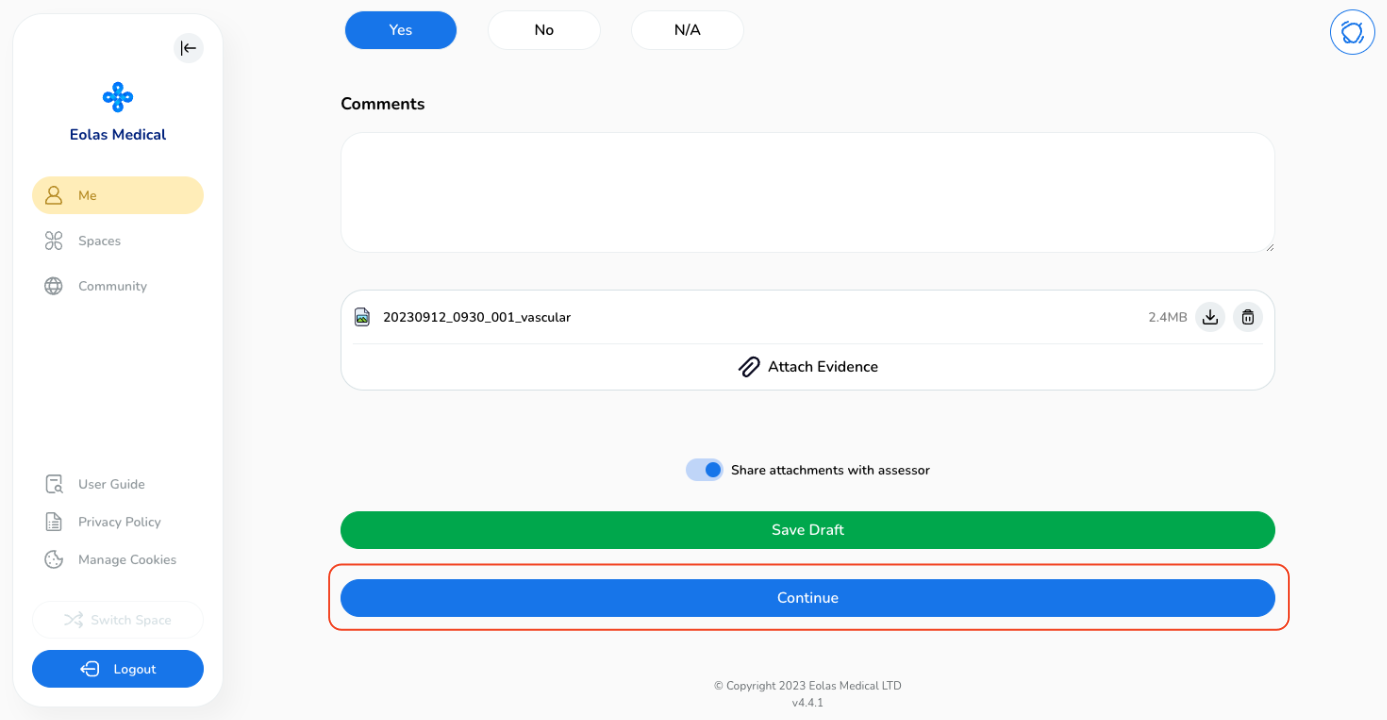
After clicking "Continue", a pop-up will appear for assigning an assessor.
Assigning an assessor to your Ultrasound - Vascular Access Event.
-
To appoint an assessor for your event, simply click the "Assign Assessor & Request Feedback" button. If you prefer to proceed with the event without requesting feedback, choose the appropriate option accordingly.
-
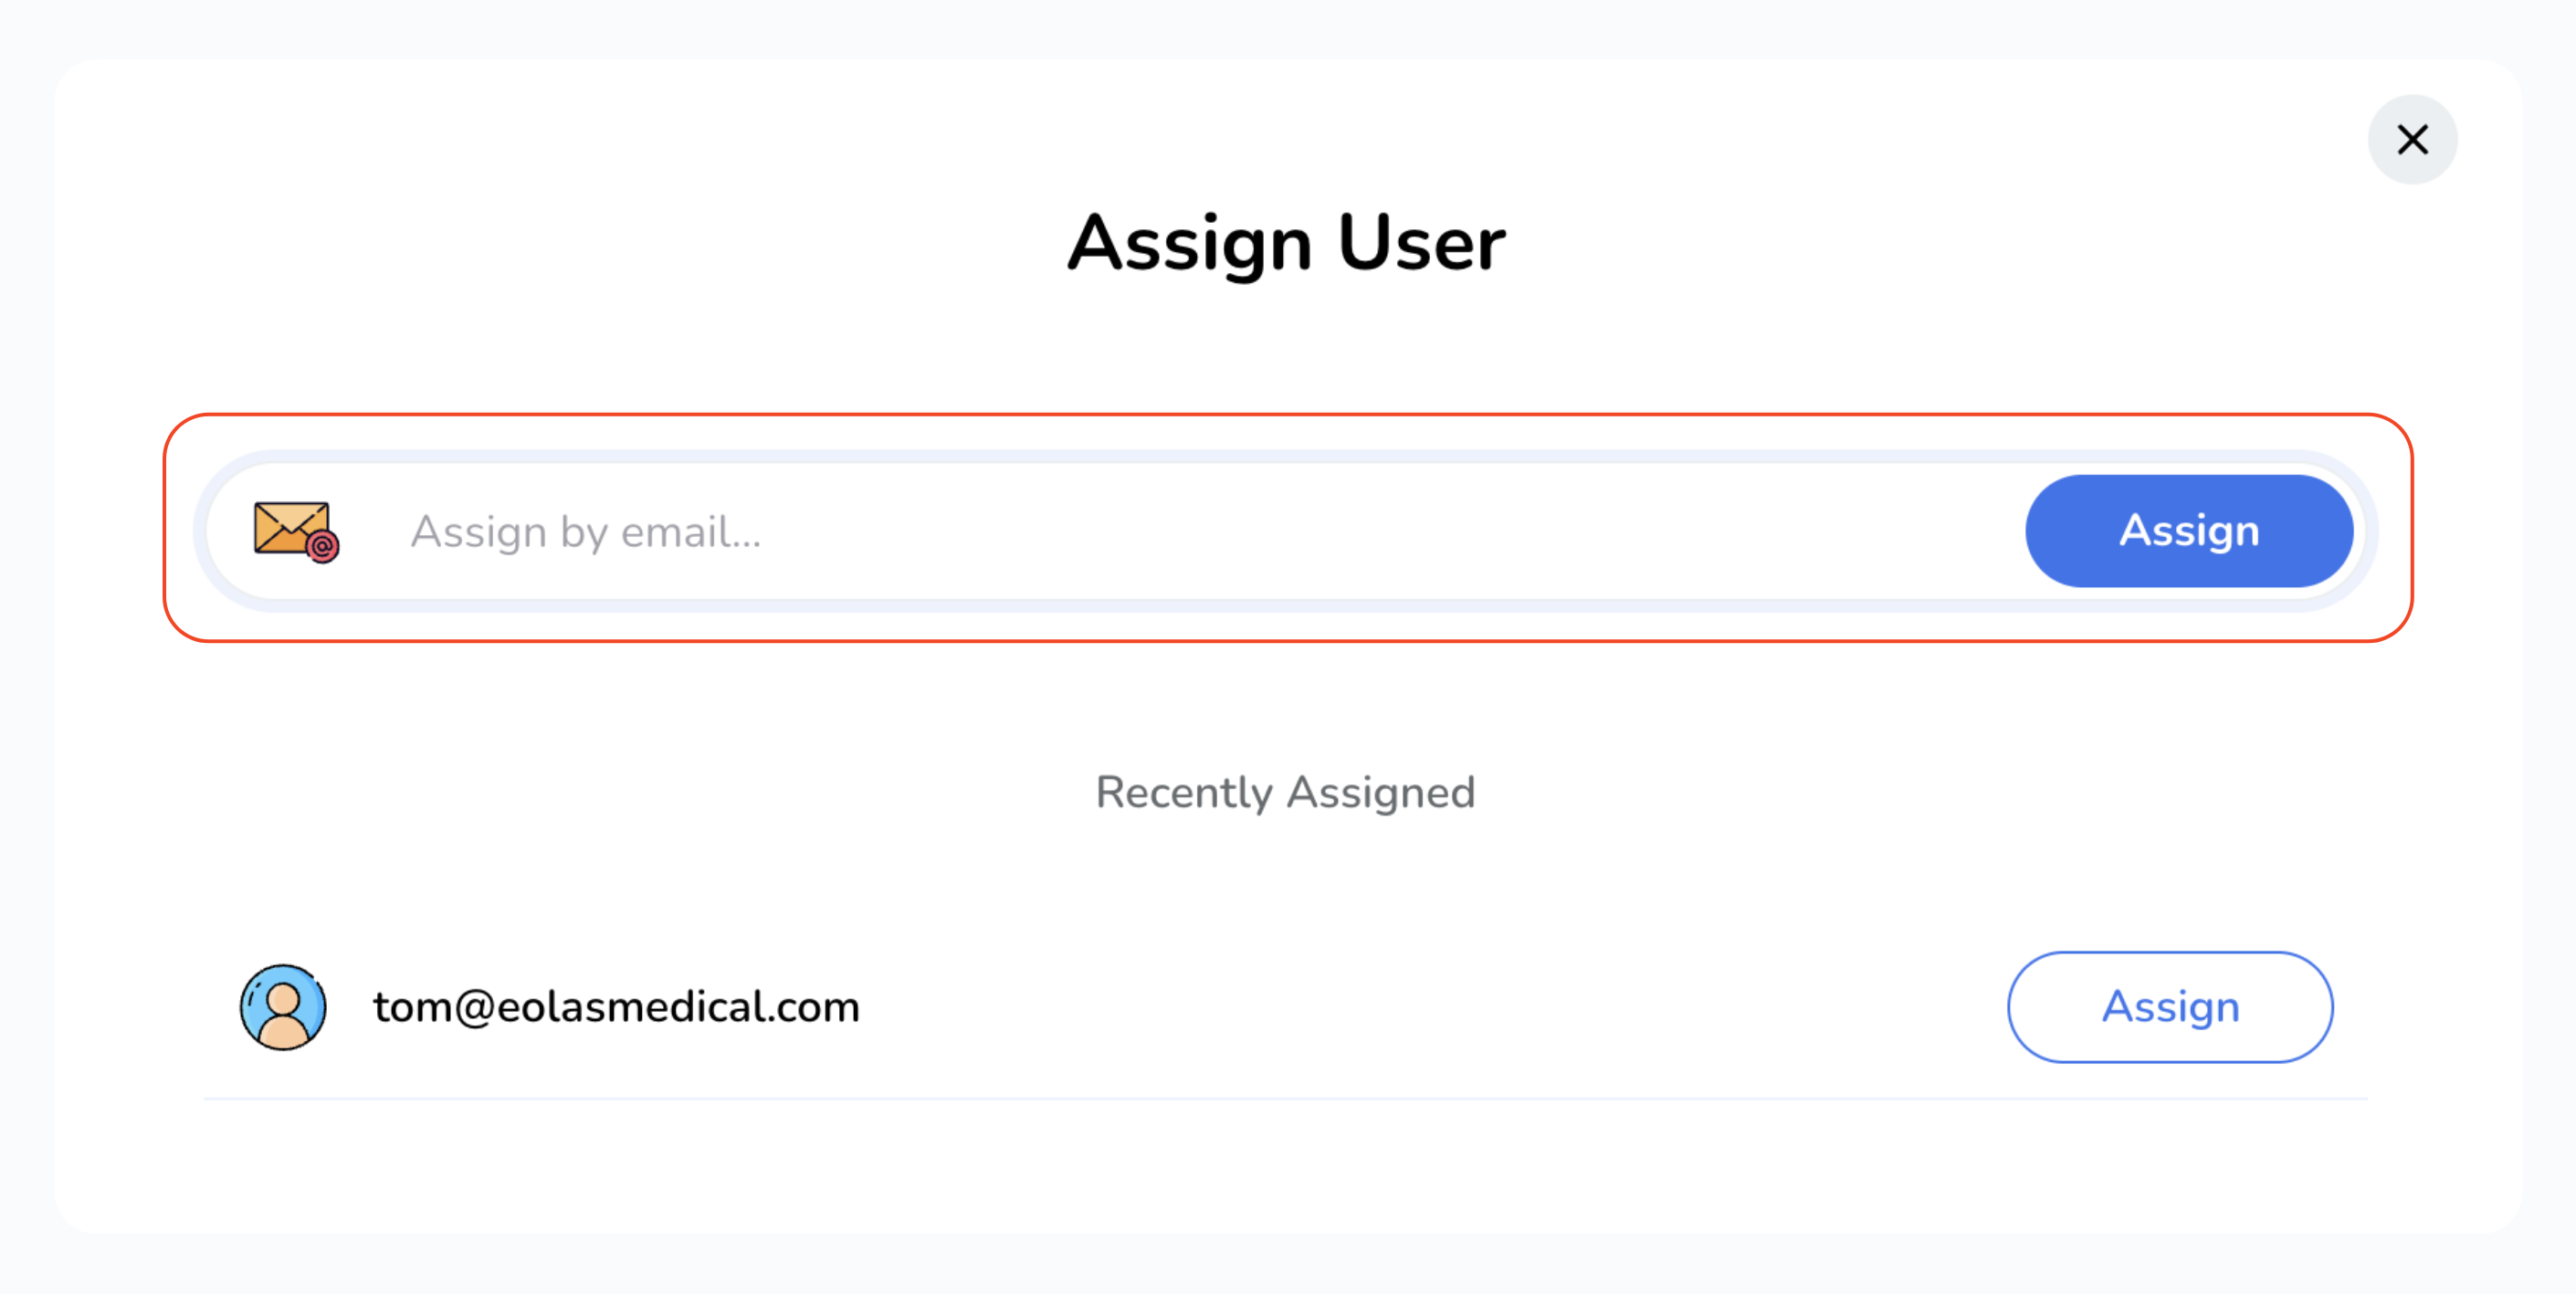
In the pop-up, enter the assessor's email address and click on the "Assign" button. Or, you can pick one from the list of recent assessors (if available).
-
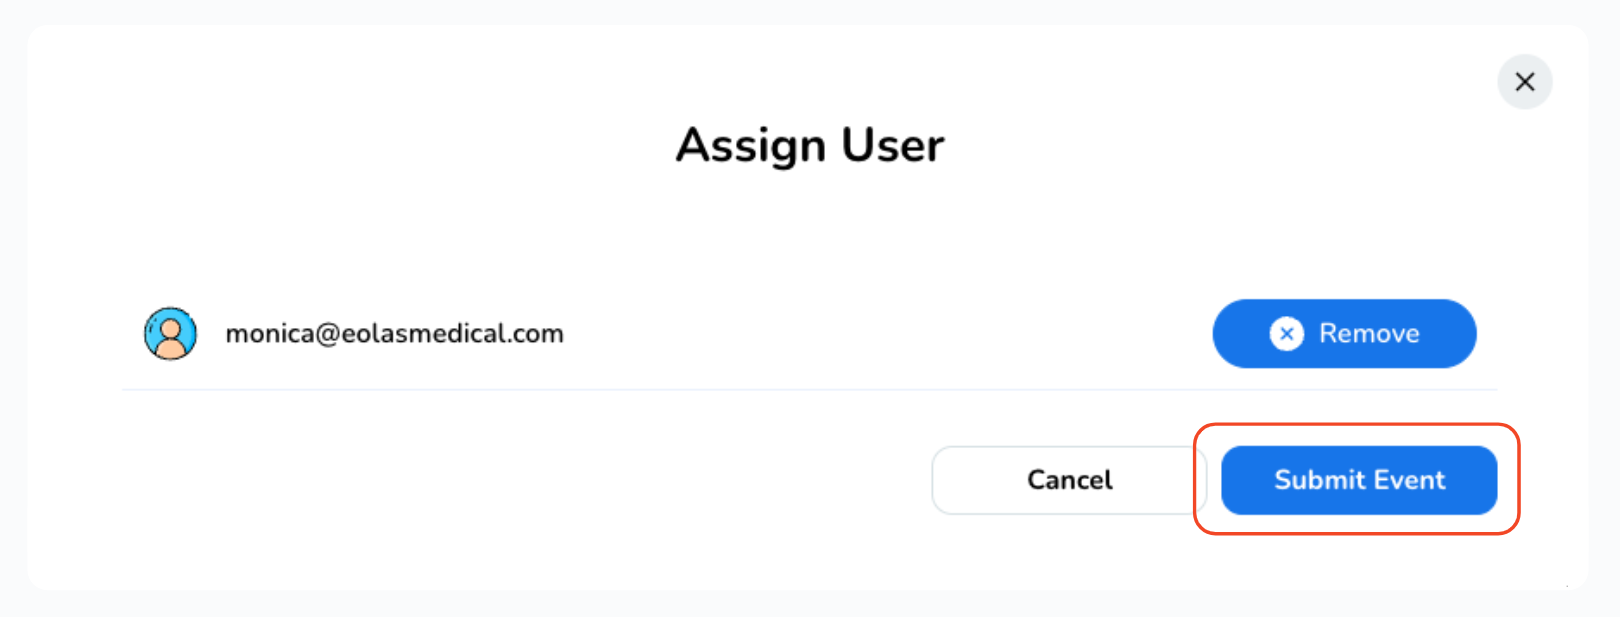
Last but not least, confirm your selection by clicking "Submit Event" And, an email notification will be sent to your assessor. Off it goes!
-
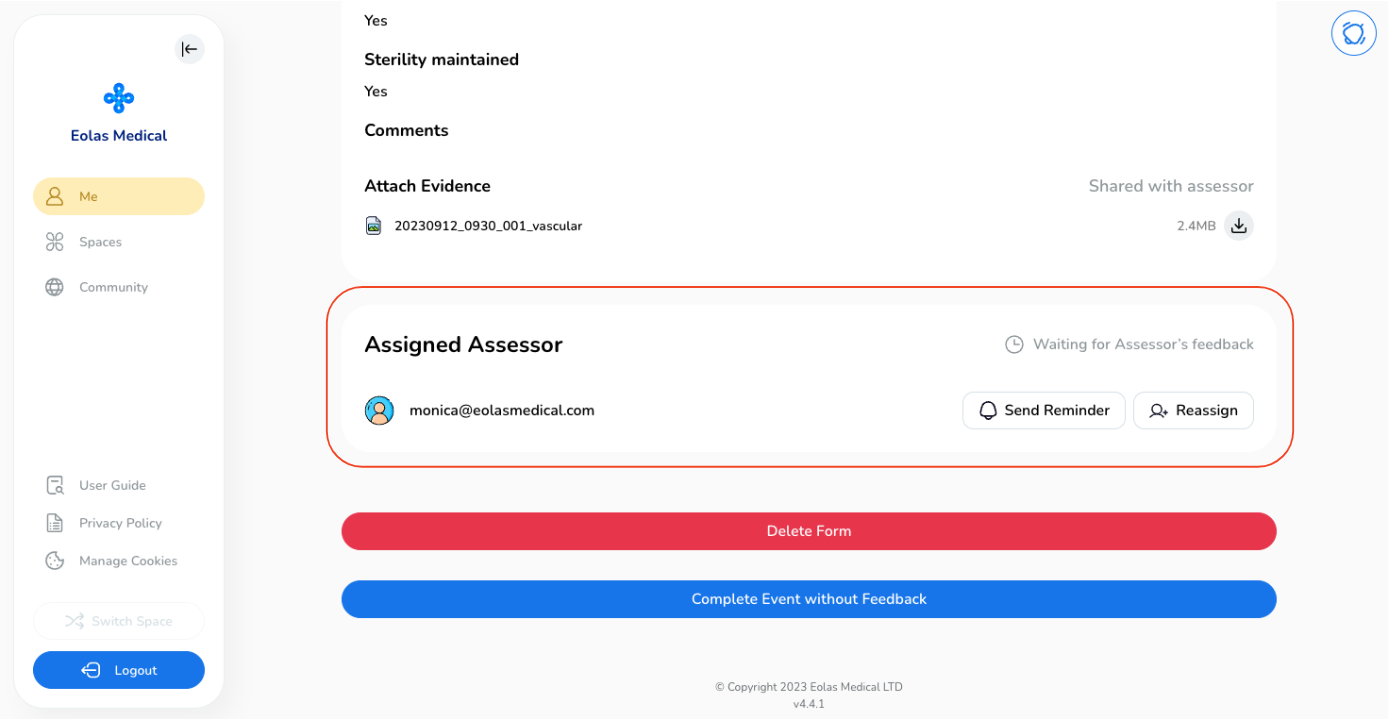
After submission, you will be directed to the event's page where you can view crucial information, including your assigned assessor and the feedback status. At this stage, your event page will show a yellow label denoting "Pending".
-
Furthermore, you have the option to:
-
Send a reminder to your assessor.
-
Reassign the assessor.
-
Delete it permanently.
-
Or, opt to conclude the event without feedback.
-
-
-
Once you receive feedback from your assessor, the event's page will show a green label saying "Completed."
-
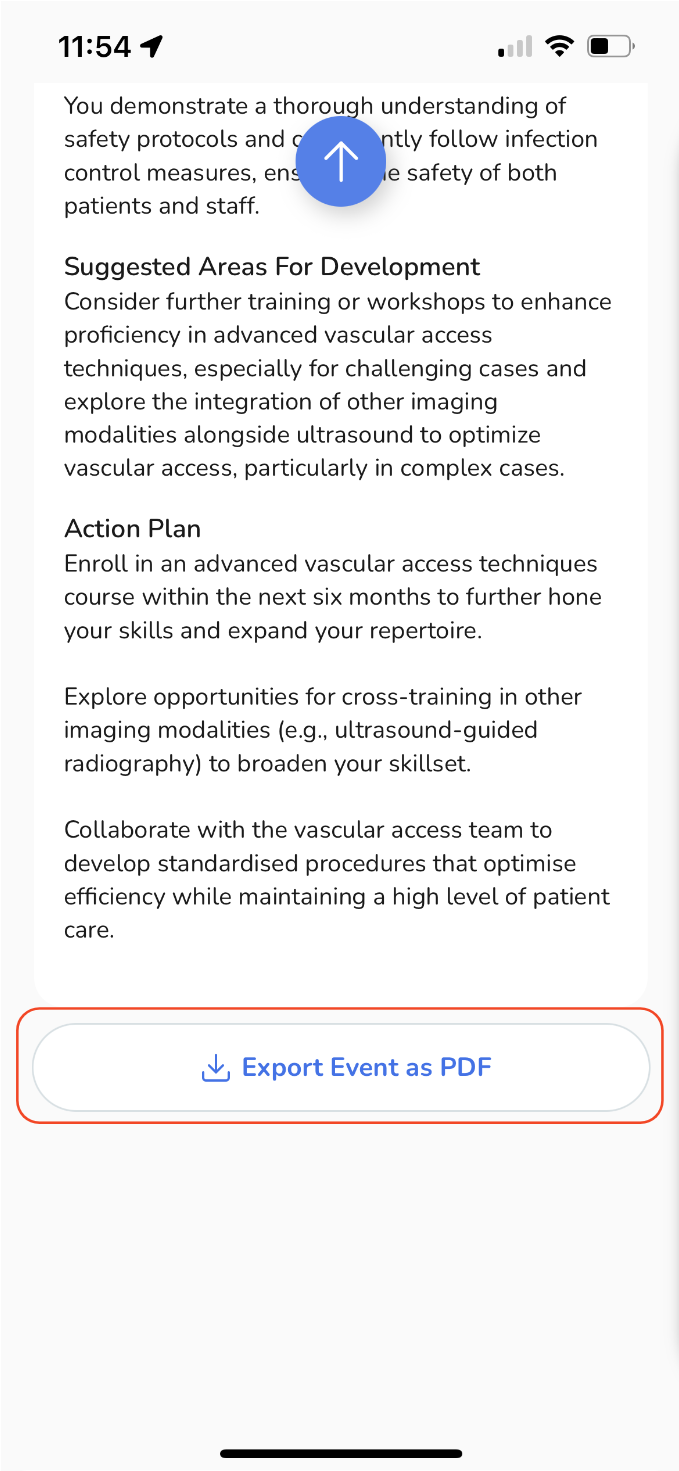
Take a scroll down to view the feedback and If you feel like showcasing it as a PDF, you can totally export it as well, by clicking on the "Export Event as Feedback"
To appoint an assessor for your event, simply click the "Assign Assessor & Request Feedback" button. If you prefer to proceed with the event without requesting feedback, choose the appropriate option accordingly.
In the pop-up, enter the assessor's email address and click on the "Assign" button. Or, you can pick one from the list of recent assessors (if available).
Last but not least, confirm your selection by clicking "Submit Event" And, an email notification will be sent to your assessor. Off it goes!
After submission, you will be directed to the event's page where you can view crucial information, including your assigned assessor and the feedback status. At this stage, your event page will show a yellow label denoting "Pending".

-
Furthermore, you have the option to:
-
Send a reminder to your assessor.
-
Reassign the assessor.
-
Delete it permanently.
-
Or, opt to conclude the event without feedback.
-
Furthermore, you have the option to:
-
Send a reminder to your assessor.
Send a reminder to your assessor.
-
Reassign the assessor.
Reassign the assessor.
-
Delete it permanently.
Delete it permanently.
-
Or, opt to conclude the event without feedback.
Or, opt to conclude the event without feedback.
Once you receive feedback from your assessor, the event's page will show a green label saying "Completed."

Take a scroll down to view the feedback and If you feel like showcasing it as a PDF, you can totally export it as well, by clicking on the "Export Event as Feedback"
Mobile - Add an Ultrasound - Vascular Access event.
-
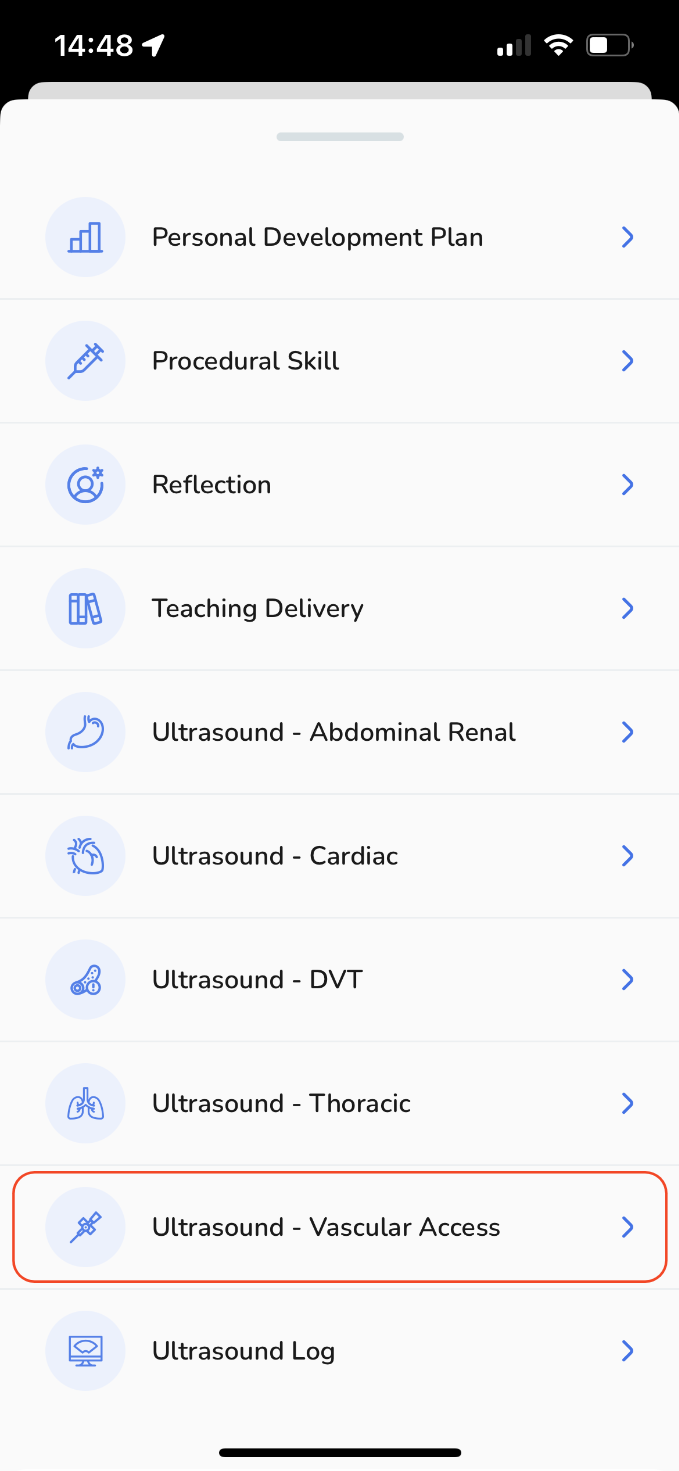
To begin, scroll through the list of available choices and select "Ultrasound - Vascular Access".
-
Choose the date for your event. By default, today's date will be displayed, but if you need to make changes, simply tap the "Date" button and select your desired date.
-
Give your session a title.
-
Provide a case identifier while ensuring complete anonymity for the case.
-
If needed, include any missing indications.
-
Complete the remaining sections of the form by choosing the appropriate answers.
-
Feel free to include any additional comments or information that you consider important.
-
If you wish to document your session, you can select the "Add Attachments" option to include any supporting materials.
-
A pop-up window will appear, providing you with the choice to either select from your existing files or upload a new one from your device.
-
To upload a new file,
-
Select "Add New File".
-
According to your needs, you can upload a range of file types, such as MS Office documents, PDFs, images, videos, and web links. Please choose the suitable option accordingly.
-
To upload a new file, tap "Browse Files", select the desired file from your device, provide a name, and then tap "Done".
-
The newly added file will become part of your personal storage files. To include it in your event, just tap "Attach File".
-
-
To add a weblink,
-
Your file is now attached. If you'd like to add more files, simply click on "Add Attachments" once more and repeat the same process.
-
You can decide whether to share the attachment with your assessor by clicking the "toggle" button.
-
When you're ready, you have few options:
-
After selecting "Continue", a pop-up window will appear, providing you with the option to designate an assessor and collect feedback.
To begin, scroll through the list of available choices and select "Ultrasound - Vascular Access".
Choose the date for your event. By default, today's date will be displayed, but if you need to make changes, simply tap the "Date" button and select your desired date.
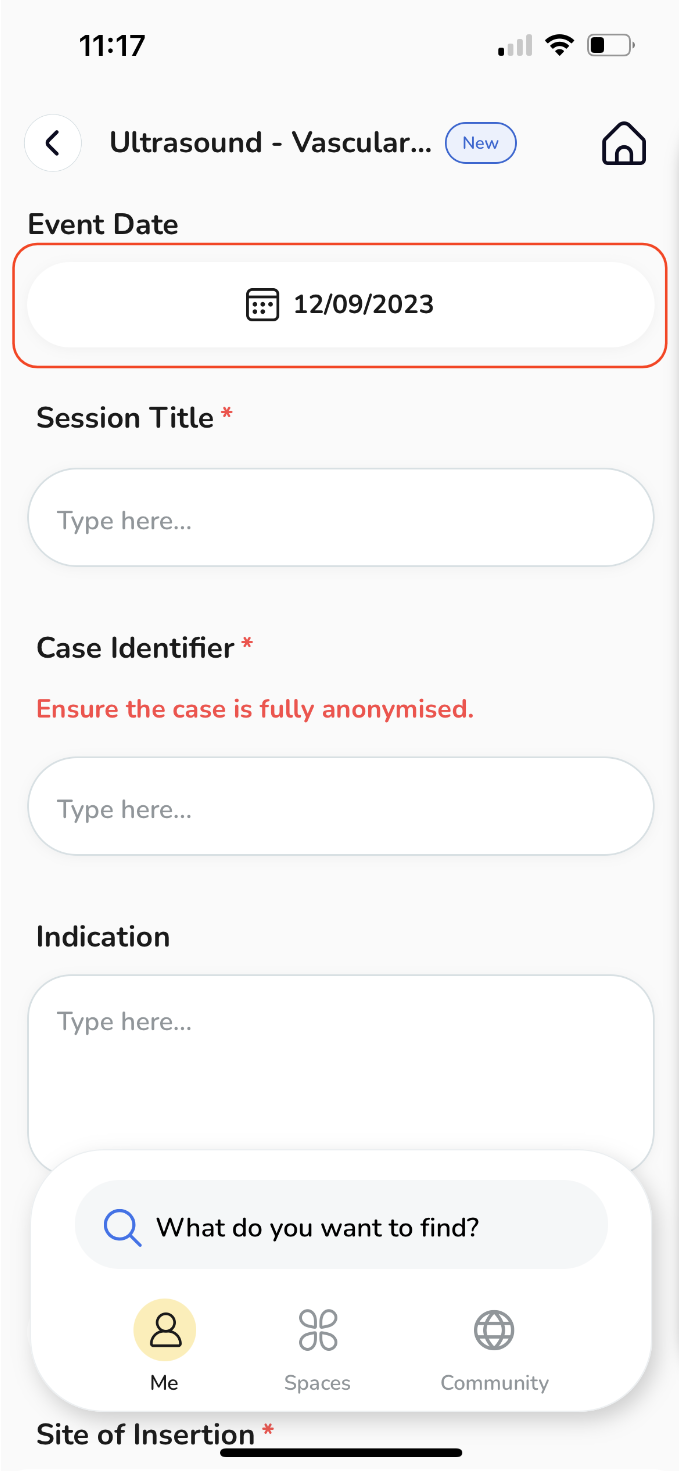
Give your session a title.
Provide a case identifier while ensuring complete anonymity for the case.
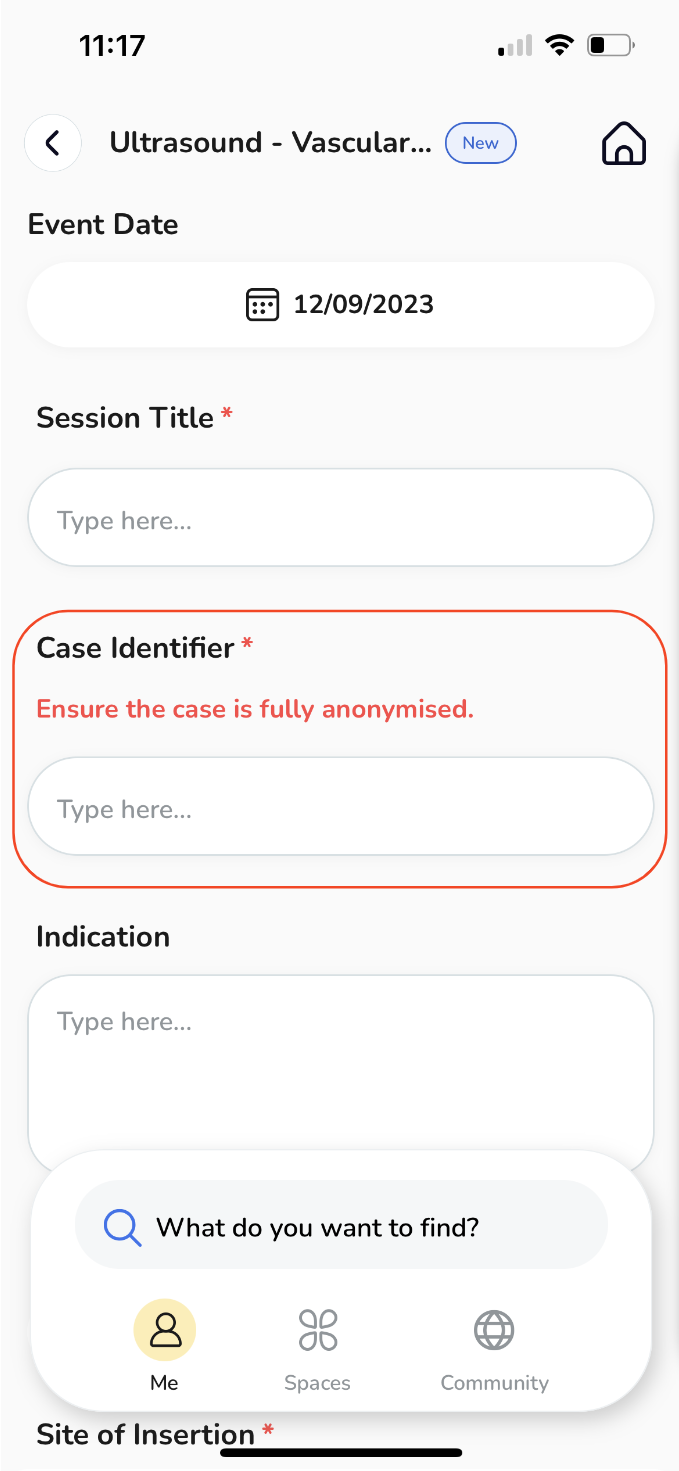
If needed, include any missing indications.
Complete the remaining sections of the form by choosing the appropriate answers.
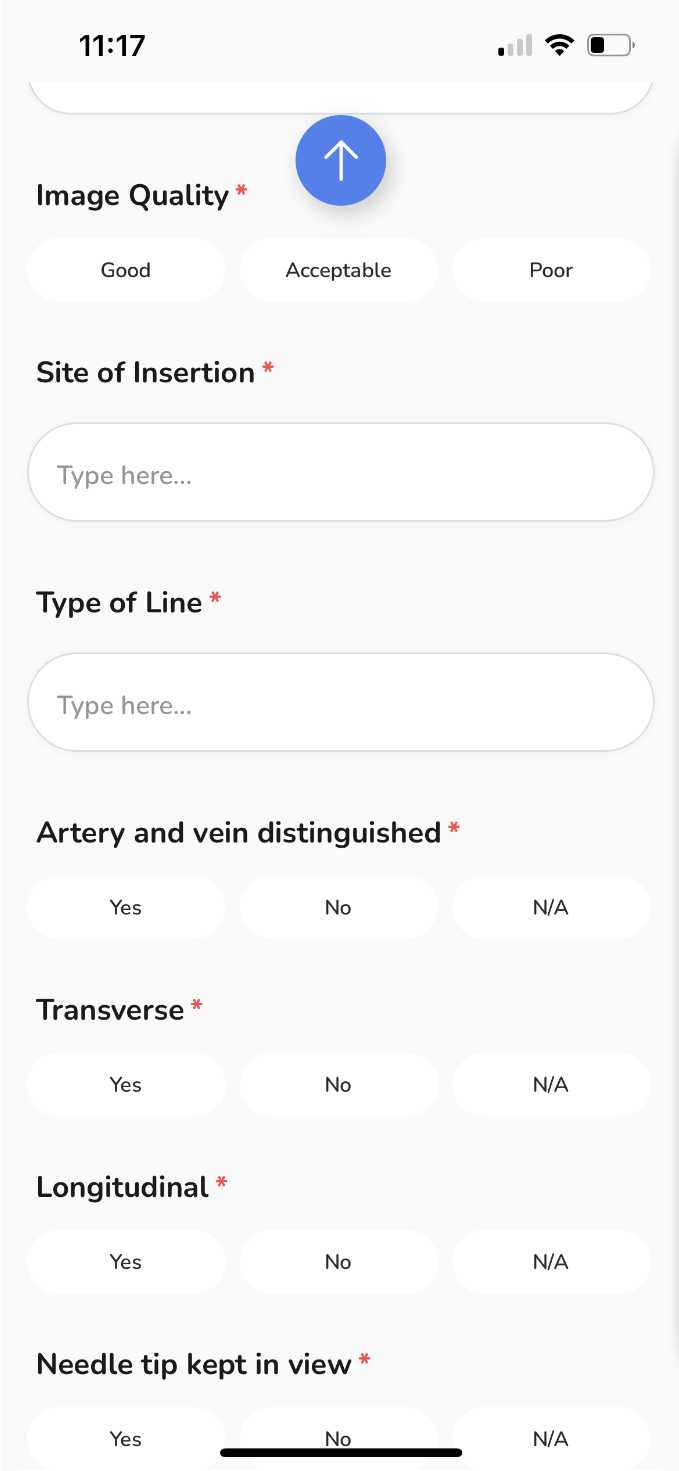
Feel free to include any additional comments or information that you consider important.
If you wish to document your session, you can select the "Add Attachments" option to include any supporting materials.
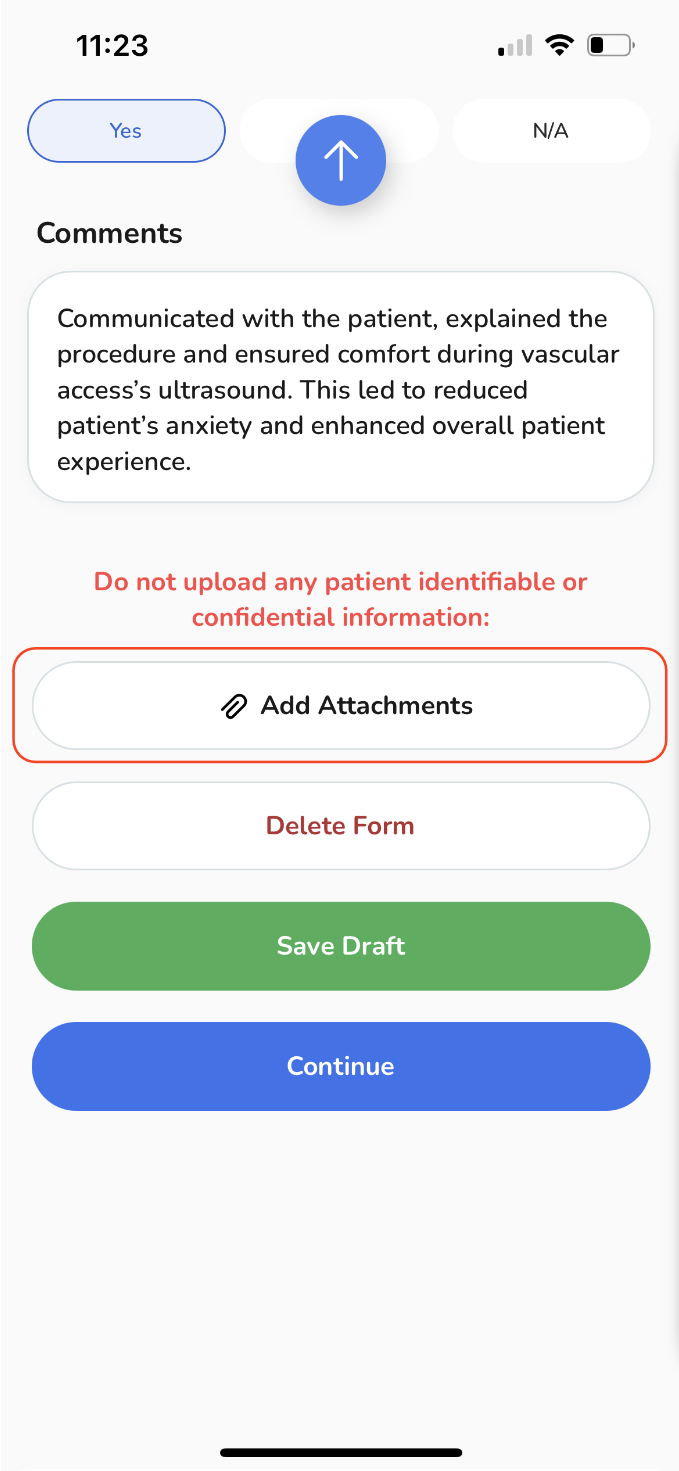
A pop-up window will appear, providing you with the choice to either select from your existing files or upload a new one from your device.
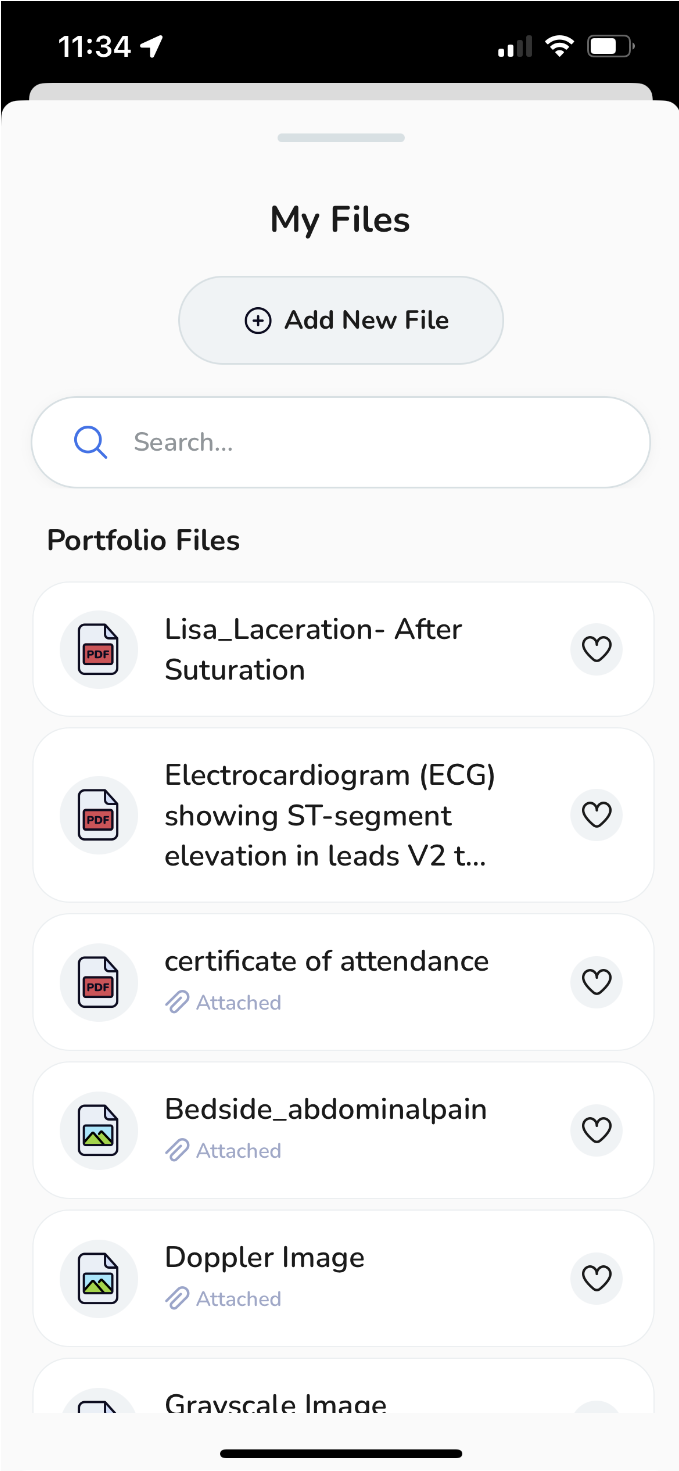
To upload a new file,
-
Select "Add New File".
Select "Add New File".
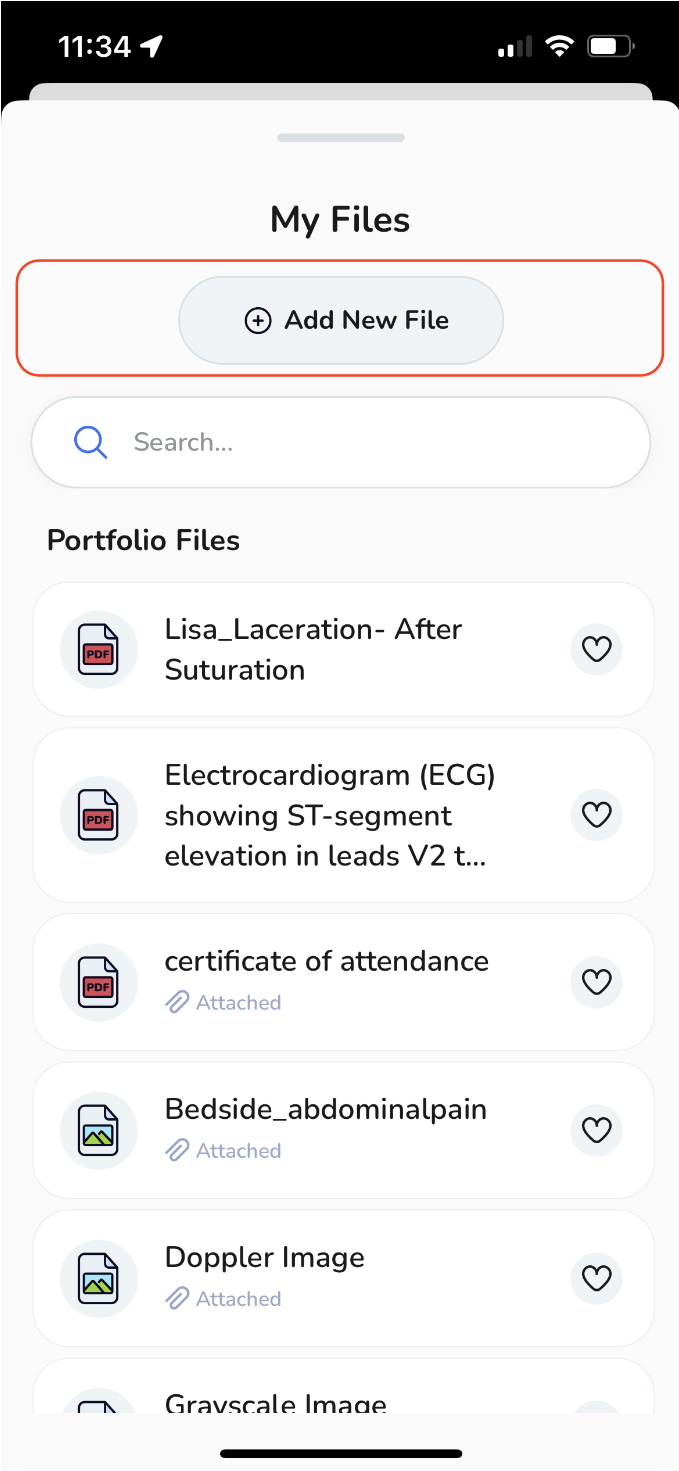
-
According to your needs, you can upload a range of file types, such as MS Office documents, PDFs, images, videos, and web links. Please choose the suitable option accordingly.
According to your needs, you can upload a range of file types, such as MS Office documents, PDFs, images, videos, and web links. Please choose the suitable option accordingly.
-
To upload a new file, tap "Browse Files", select the desired file from your device, provide a name, and then tap "Done".
To upload a new file, tap "Browse Files", select the desired file from your device, provide a name, and then tap "Done".
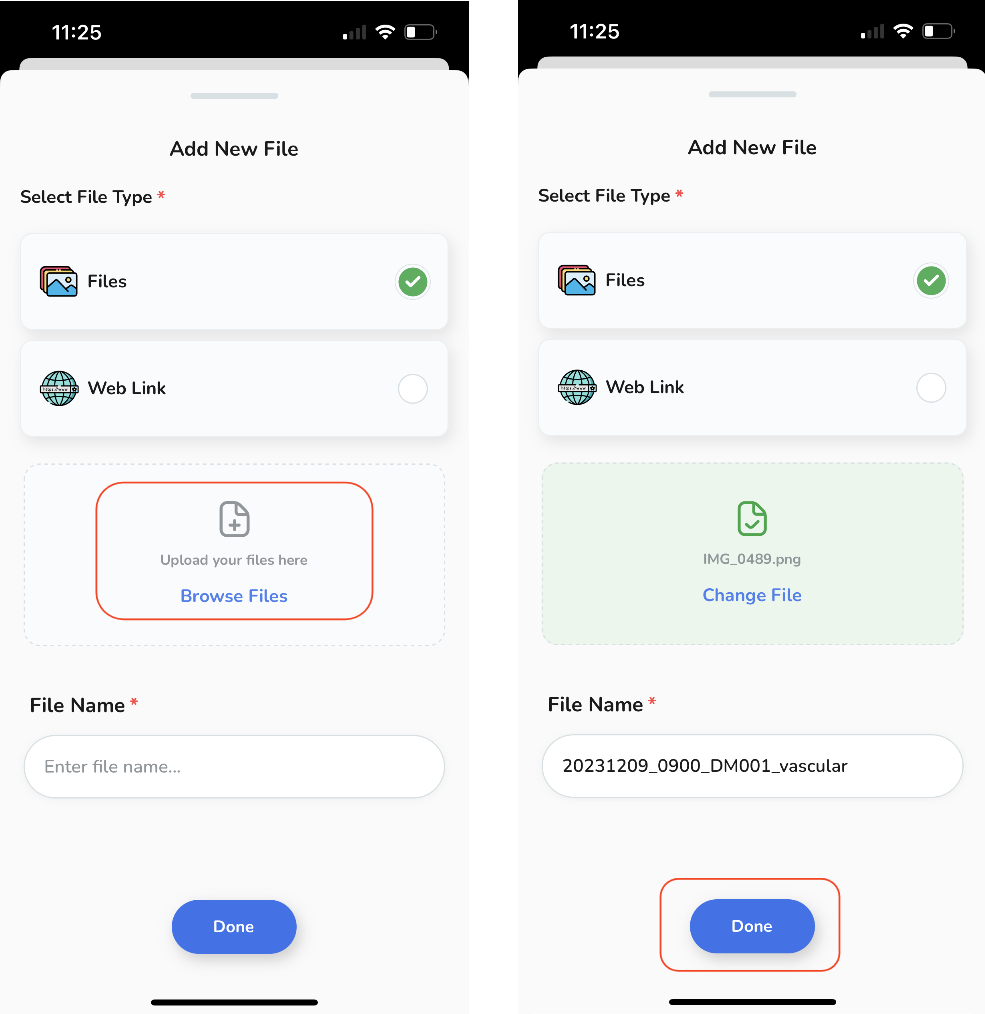
-
The newly added file will become part of your personal storage files. To include it in your event, just tap "Attach File".
The newly added file will become part of your personal storage files. To include it in your event, just tap "Attach File".
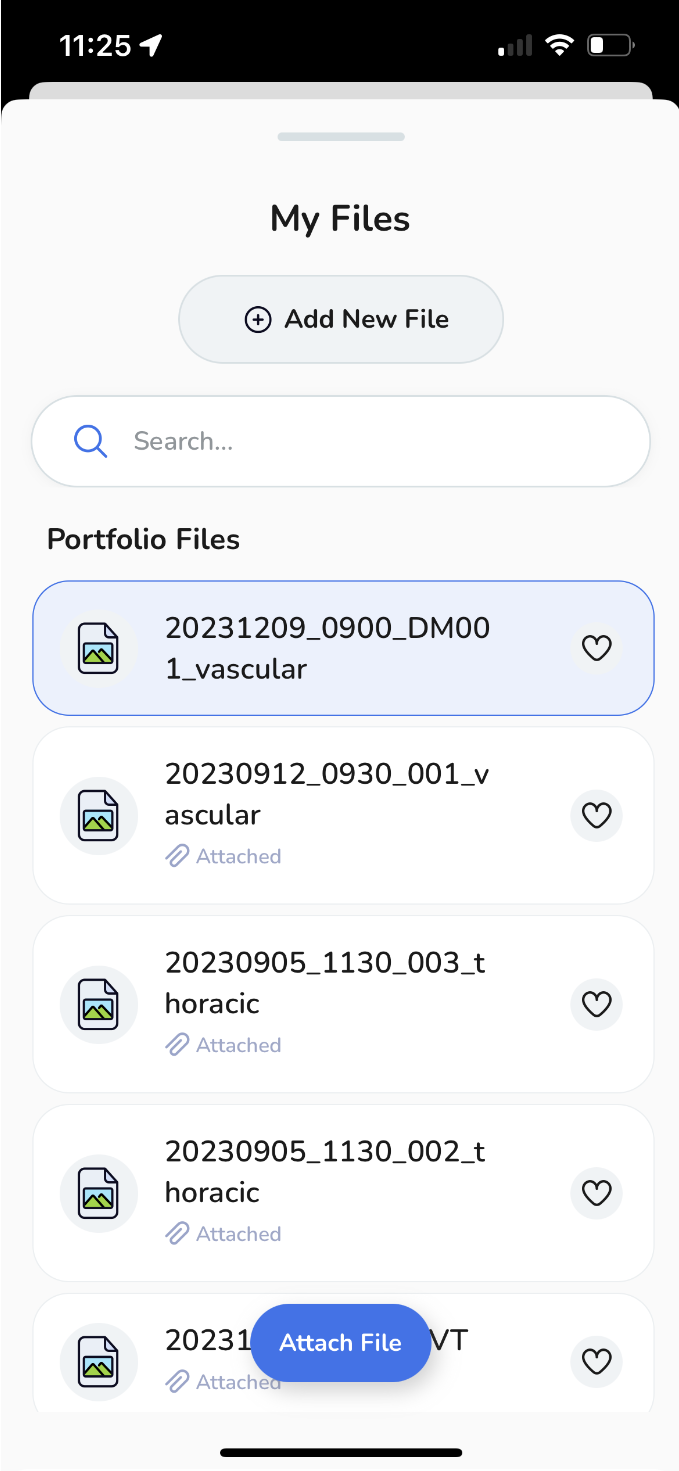
To add a weblink,
-
Provide the URL link along with a File Name, and then tap "Done".
Provide the URL link along with a File Name, and then tap "Done".
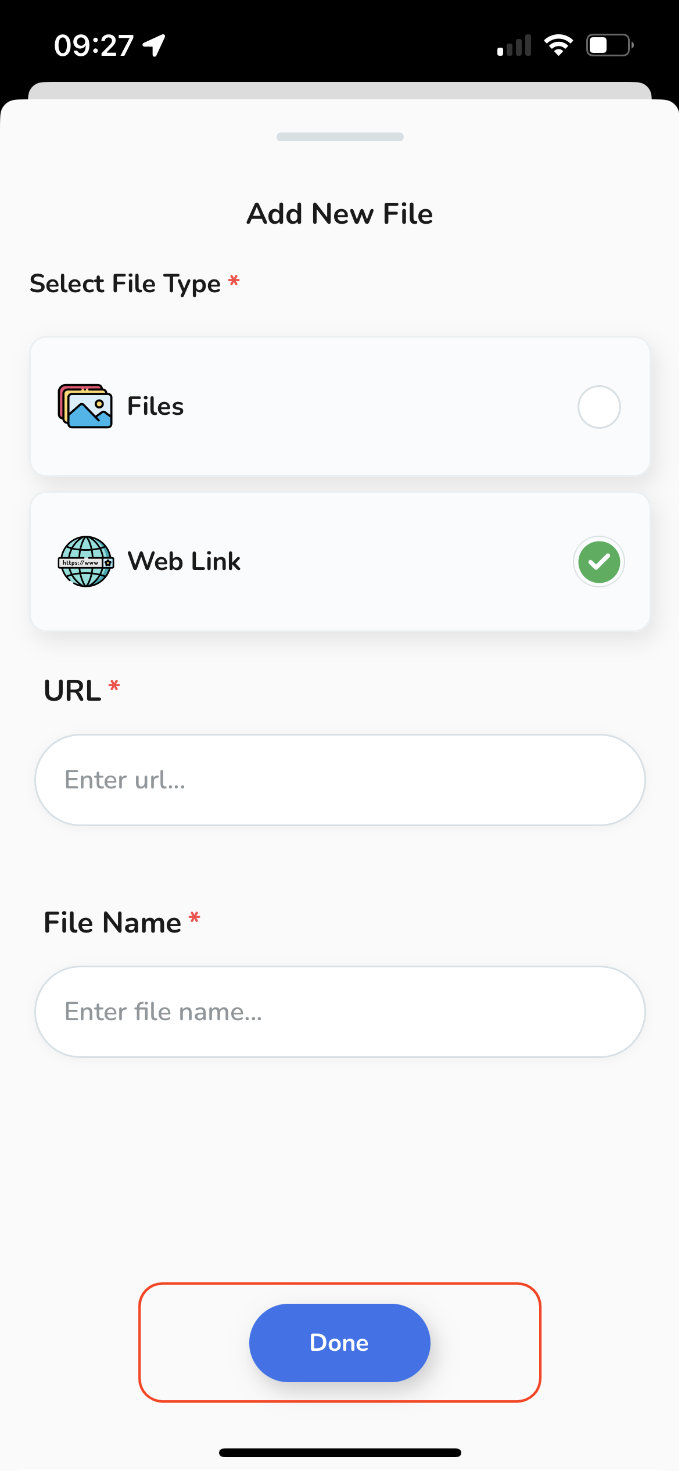
Your file is now attached. If you'd like to add more files, simply click on "Add Attachments" once more and repeat the same process.
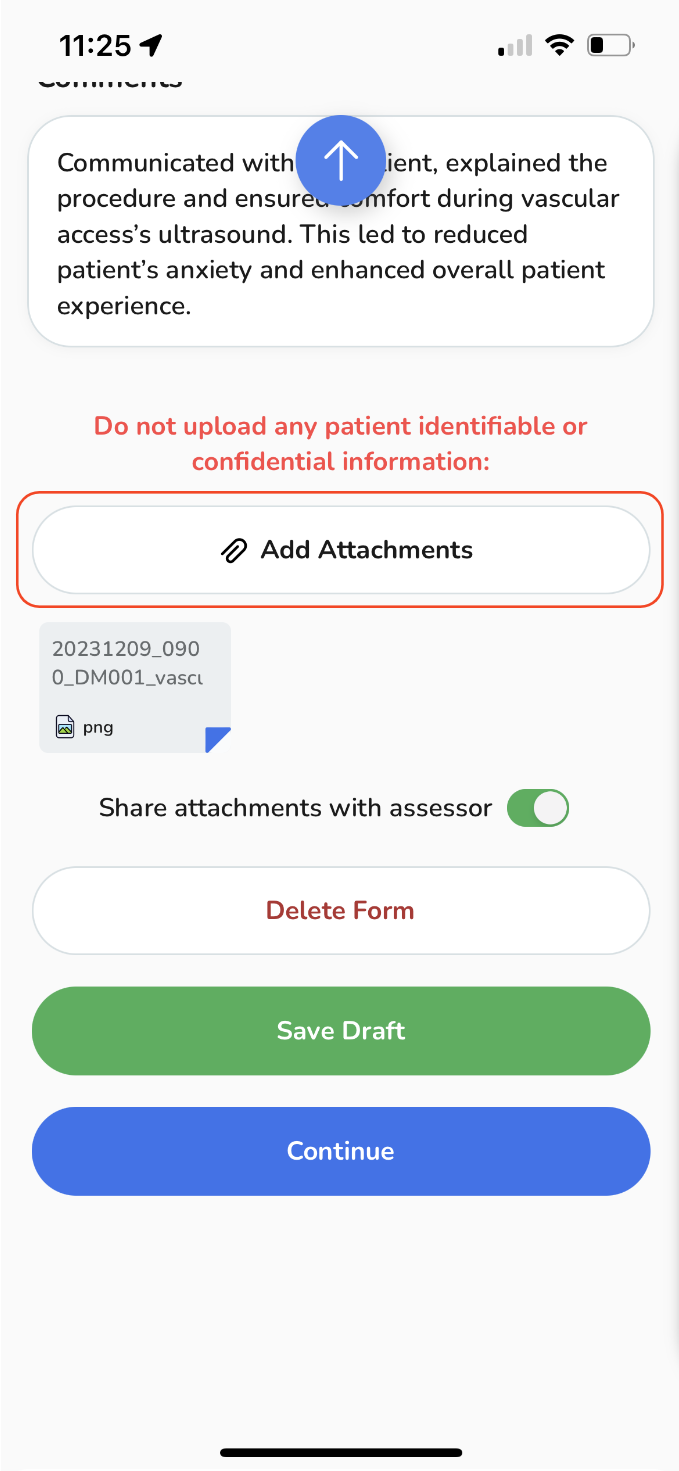
You can decide whether to share the attachment with your assessor by clicking the "toggle" button.
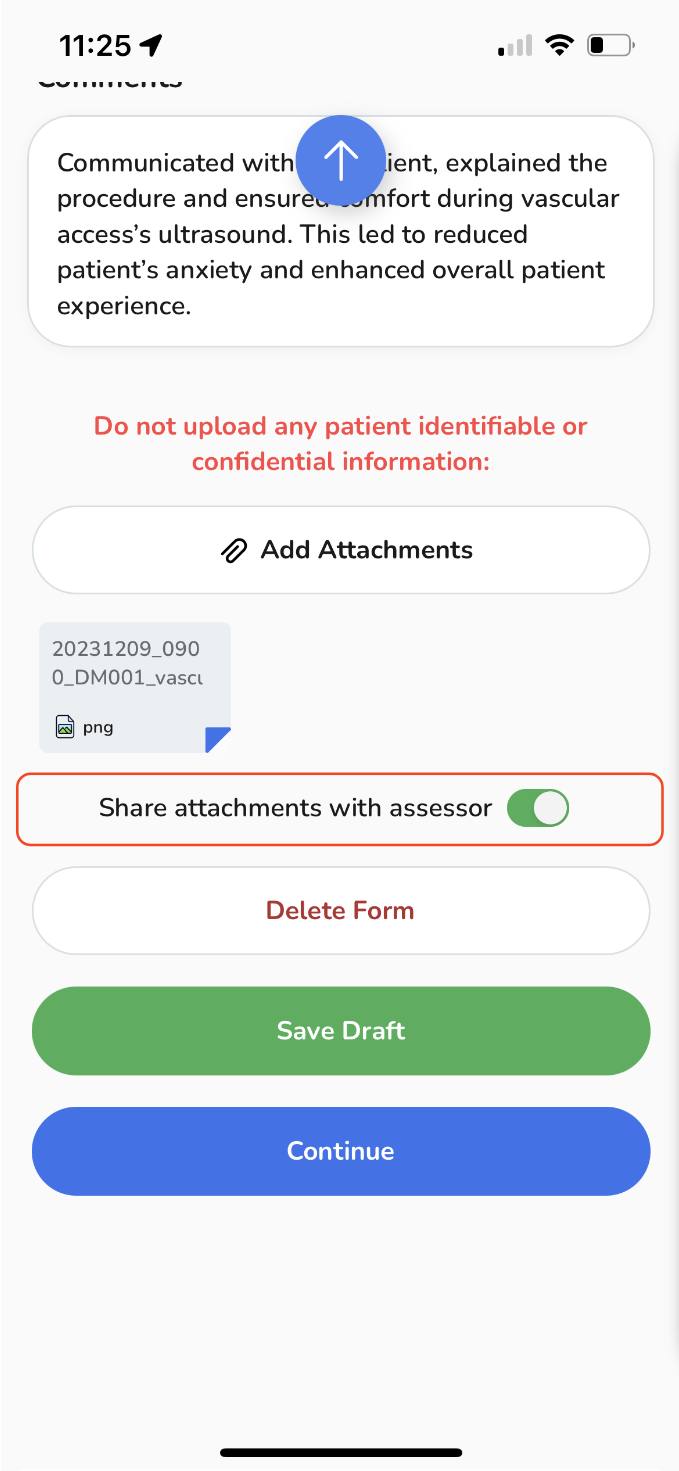
When you're ready, you have few options:
-
Delete the form completely,
Delete the form completely,
-
Save your session as a draft for future reference and make any adjustments you need.
Save your session as a draft for future reference and make any adjustments you need.
-
Alternatively, tap the "Continue" button to proceed with the submission.
Alternatively, tap the "Continue" button to proceed with the submission.
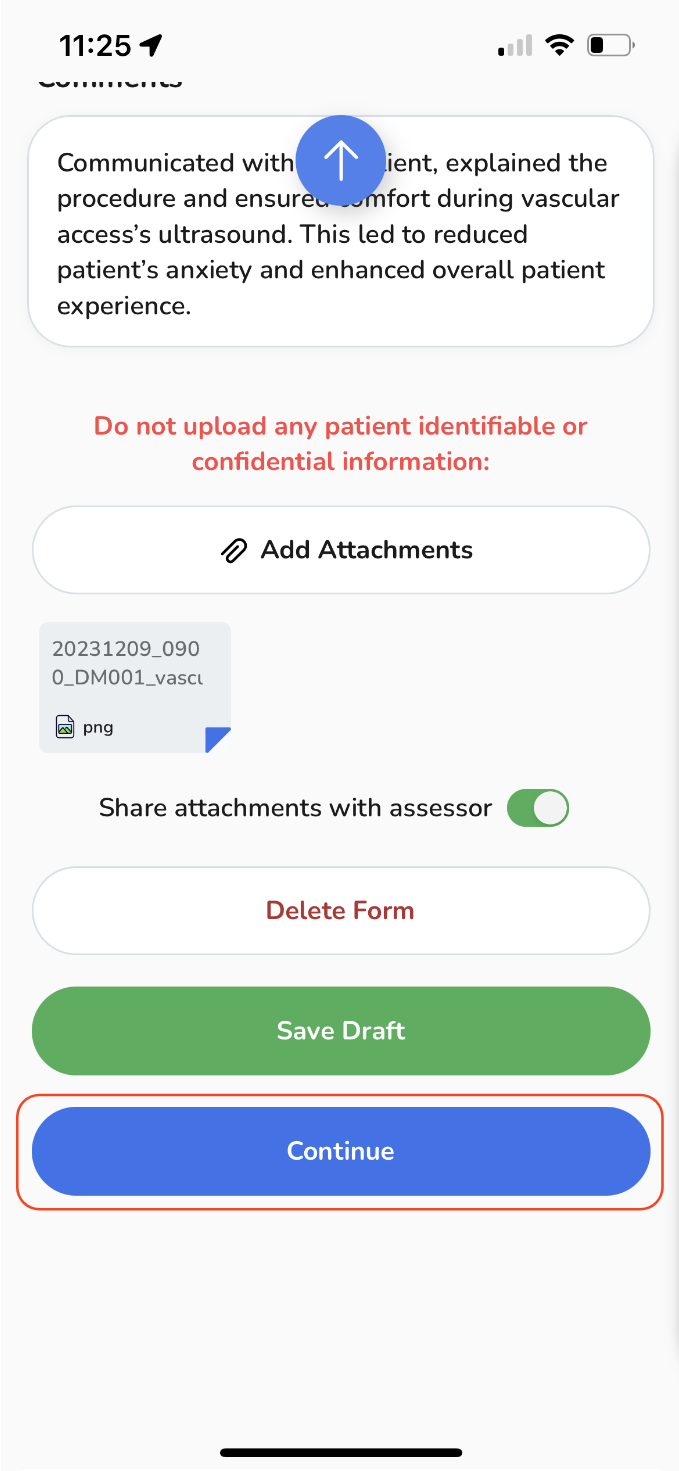
After selecting "Continue", a pop-up window will appear, providing you with the option to designate an assessor and collect feedback.
Assigning an assessor to your Ultrasound - Vascular Access Event.
-
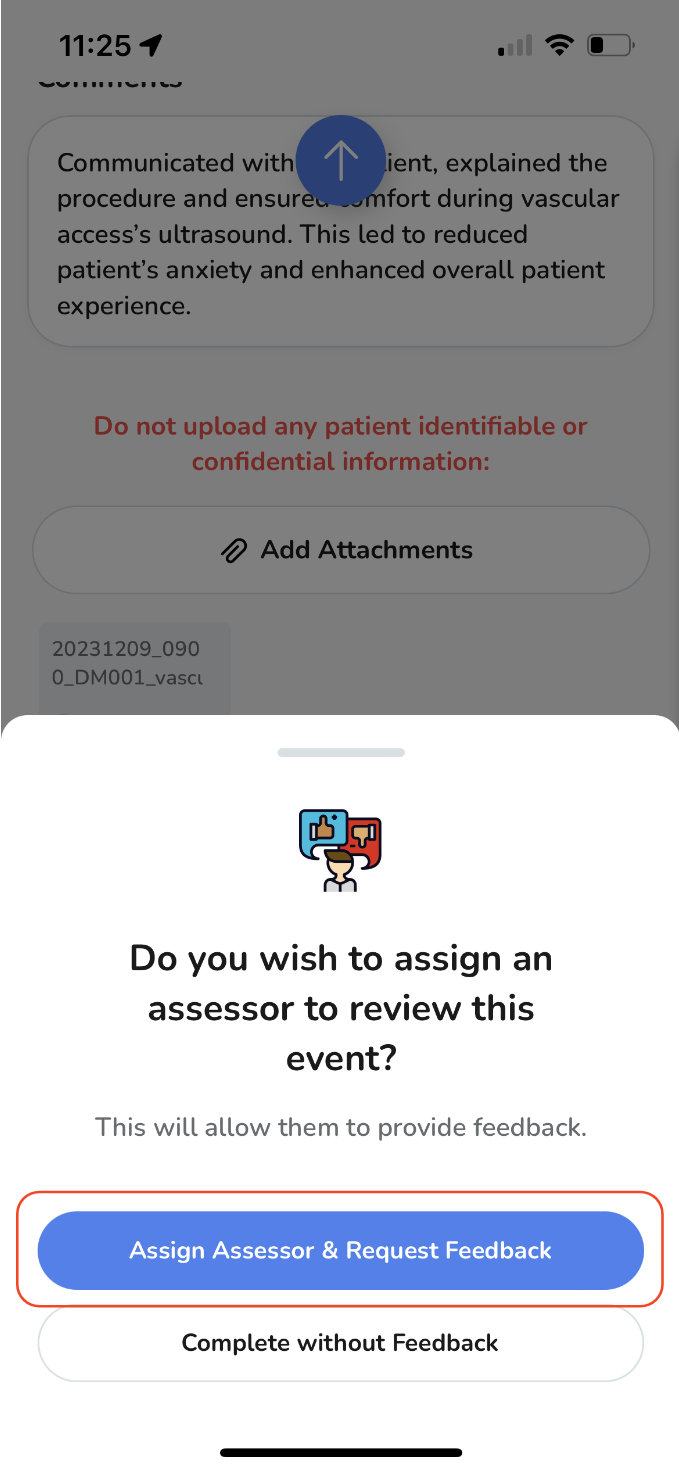
To assign an assessor for your event, tap on the "Assign Assessor & Request Feedback" button.
-
If you prefer to complete the event without feedback, select the appropriate option accordingly.
-
-
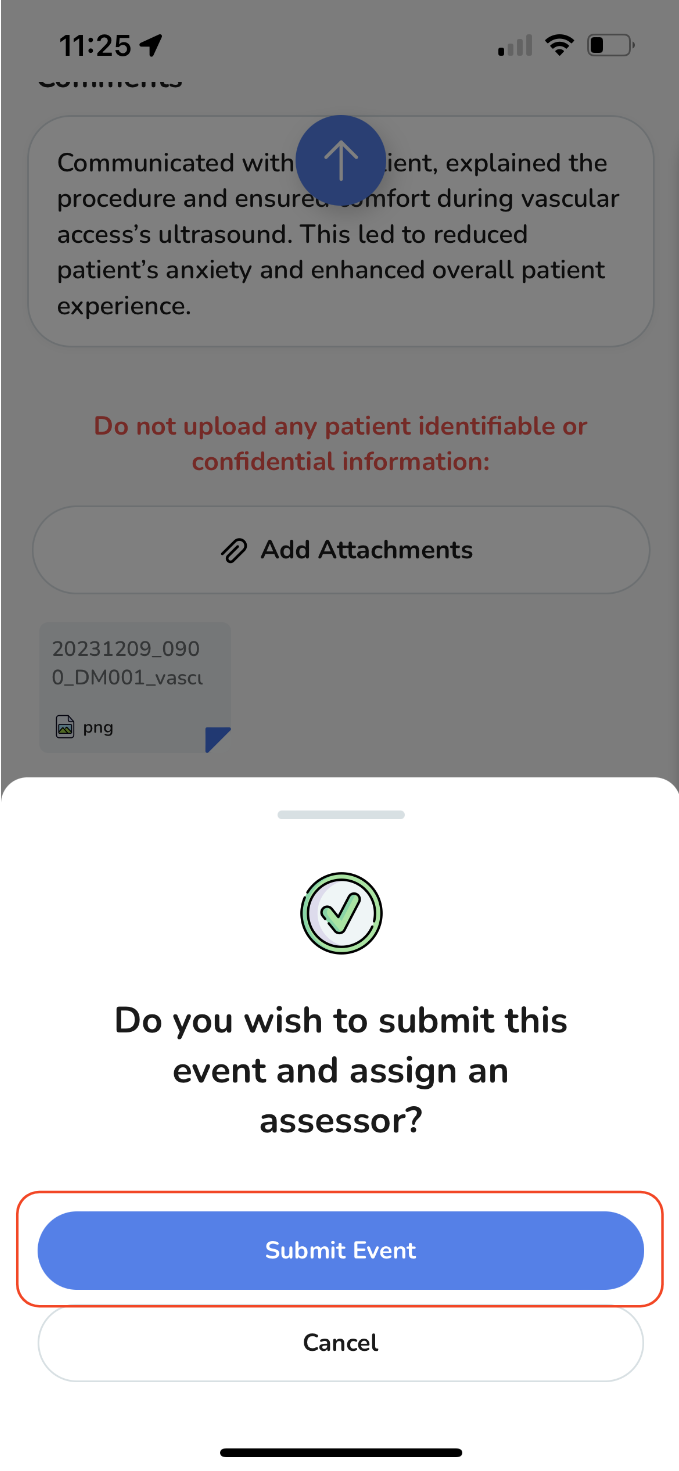
Then tap in "Submit Event" on the second pop-up.
-
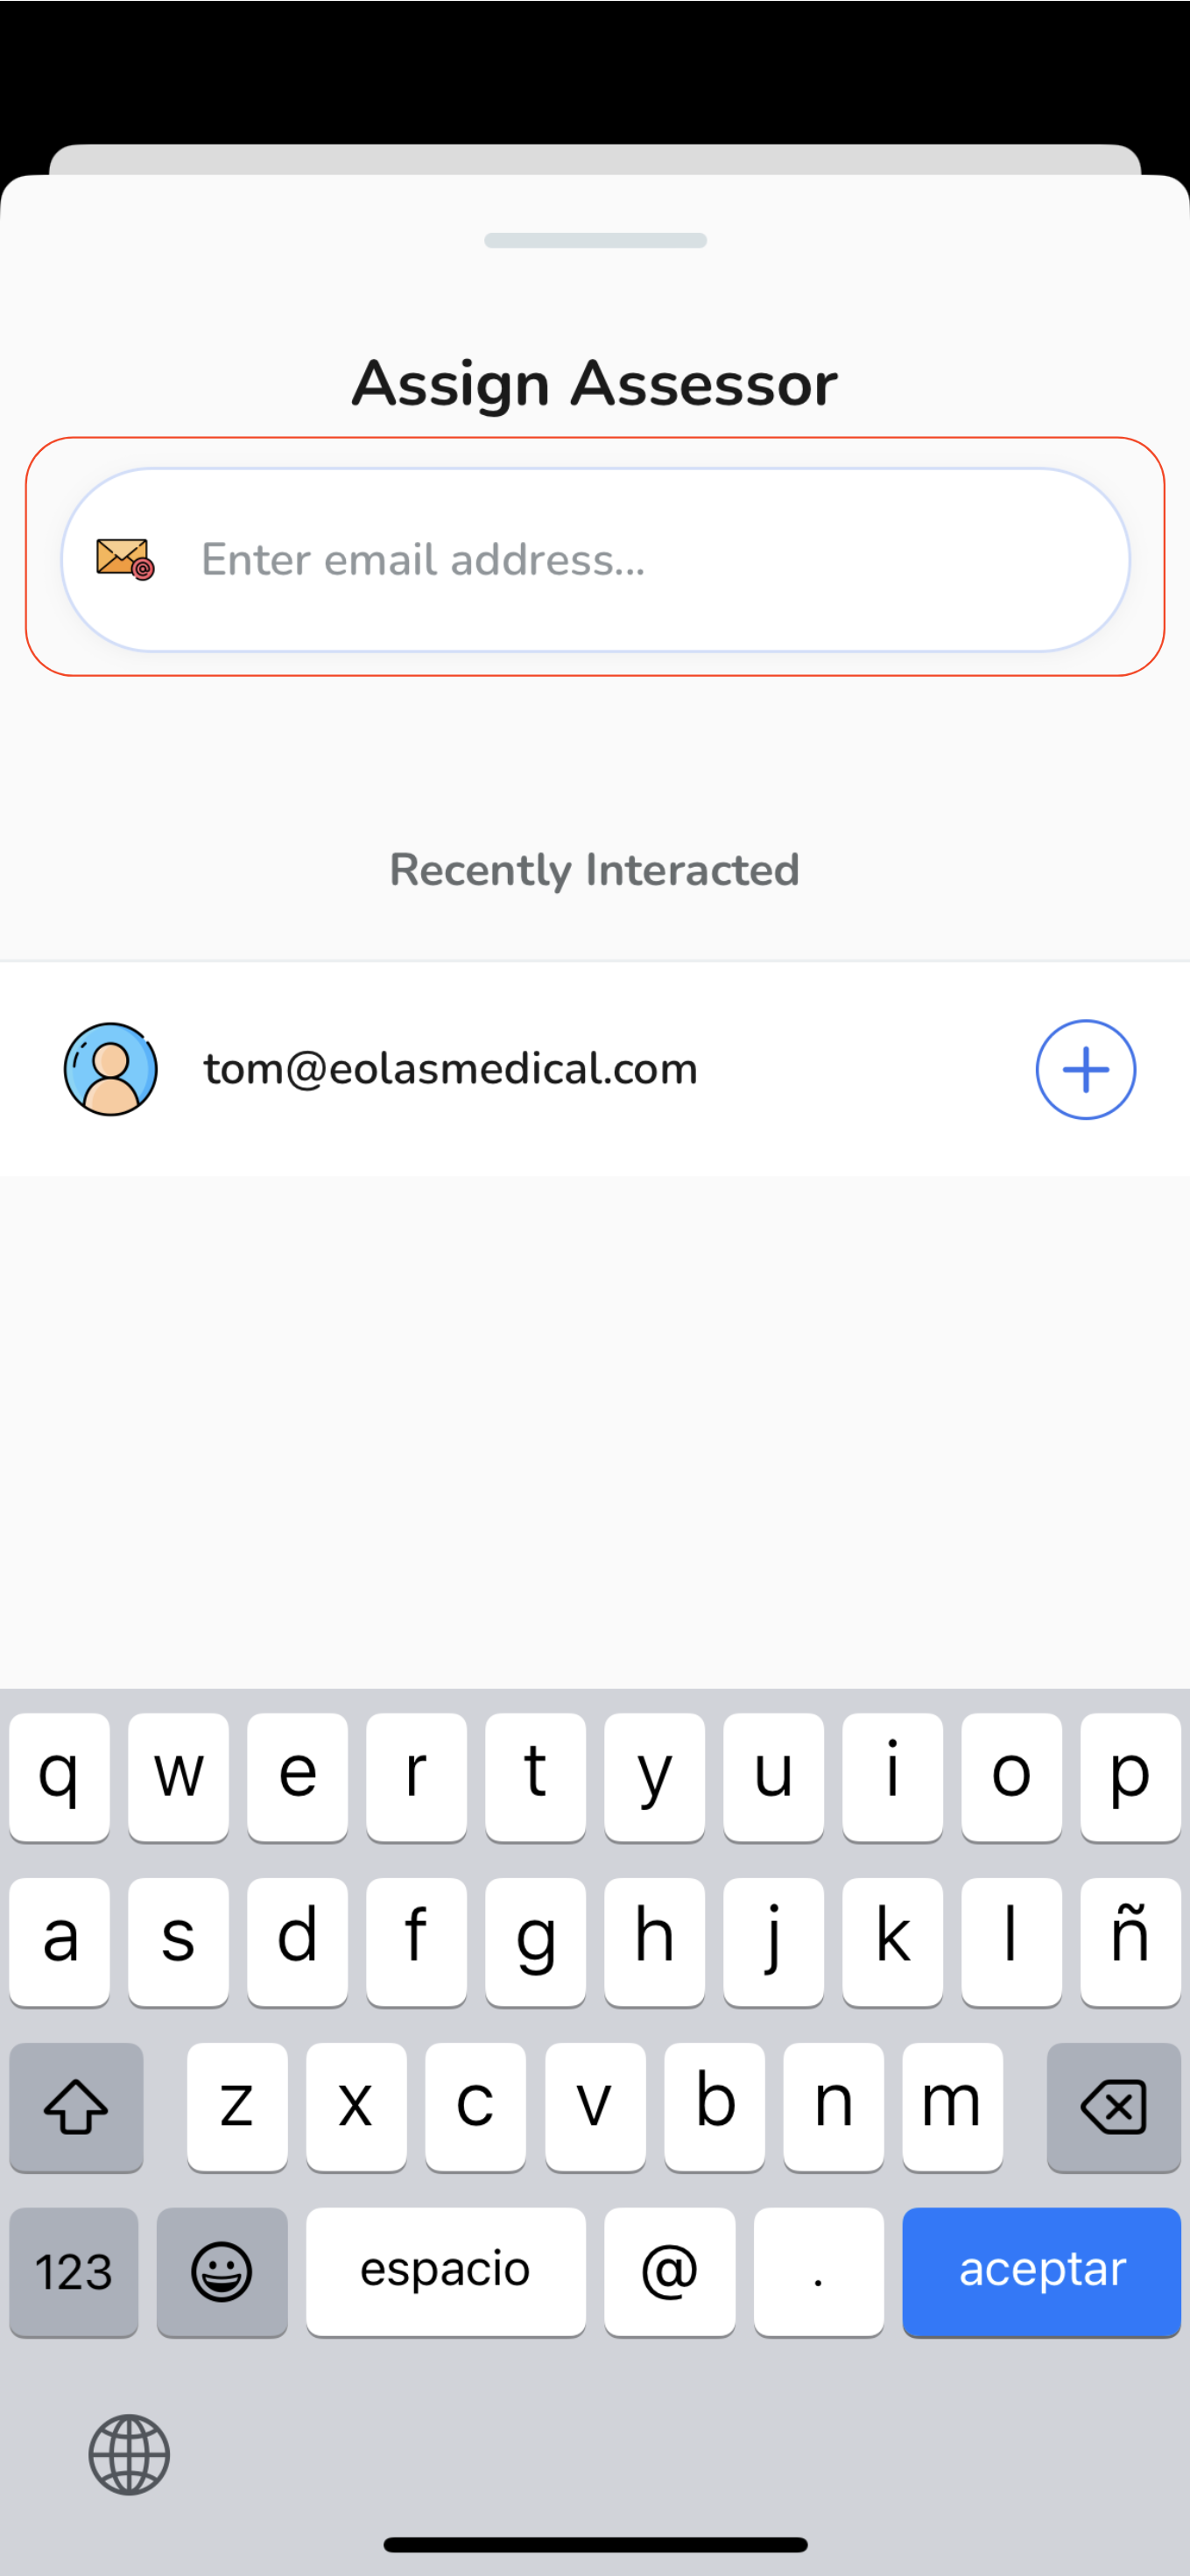
Once tapped, enter the assessor's email address. you can select an assessor from the list of recent assessors (if available).
-
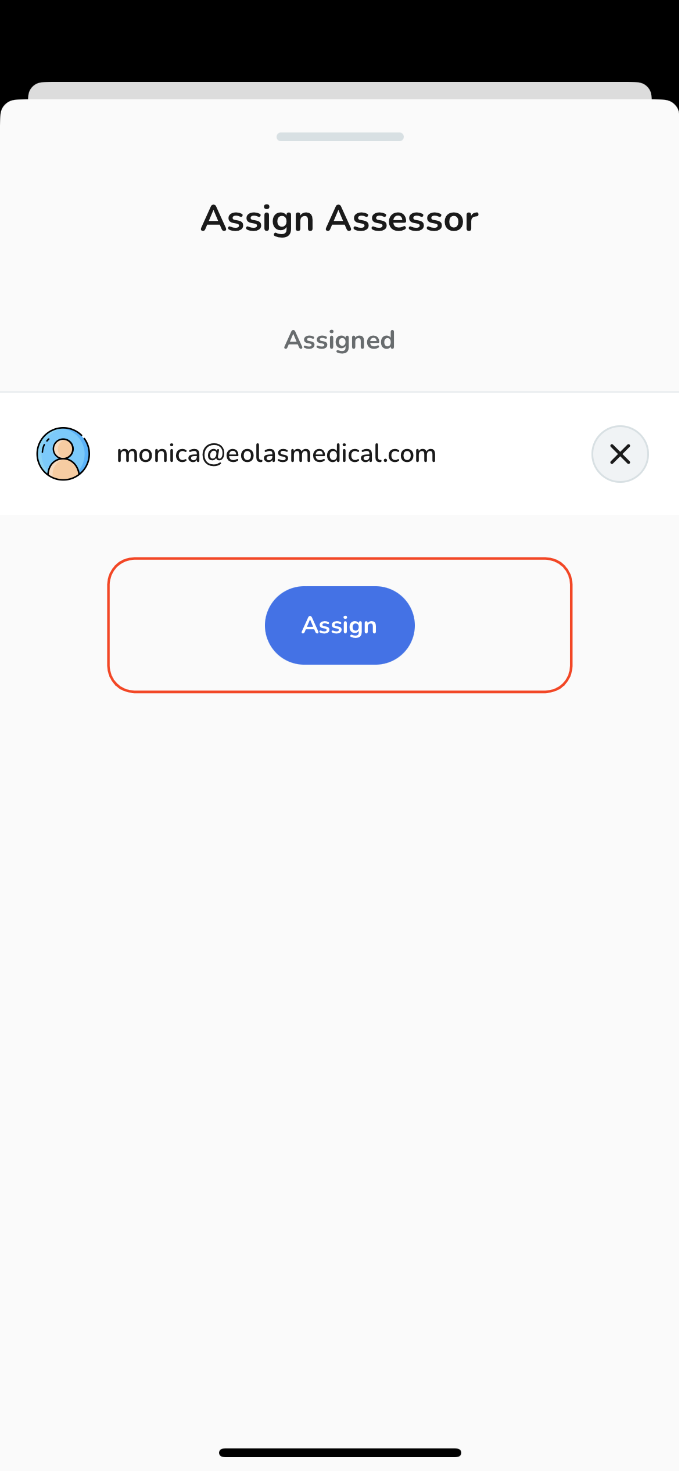
Then tap on the "Assign" button.
-
After submission, you'll be directed to the even's page where you can access important information, including your assigned assessor and feedback status. At this stage, your event page will feature a yellow label indicating "Pending."
-
To send a reminder to the assessor or change the assessor for your event, just tap on the "Three Dots" button next to the assessor's email and select the appropriate option.
-
In addition, you have the flexibility to:
-
Delete it completely.
-
Or, choose to complete the event without feedback.
-
-
-
After receiving feedback from your assessor, the event page will display a green label indicating "Completed."
-
Scroll down to review the feedback, and if you wish to present it as a PDF, you can easily export it by clicking on the "Export Event as Feedback" option.
To assign an assessor for your event, tap on the "Assign Assessor & Request Feedback" button.
-
If you prefer to complete the event without feedback, select the appropriate option accordingly.
If you prefer to complete the event without feedback, select the appropriate option accordingly.
Then tap in "Submit Event" on the second pop-up.
Once tapped, enter the assessor's email address. you can select an assessor from the list of recent assessors (if available).
Then tap on the "Assign" button.
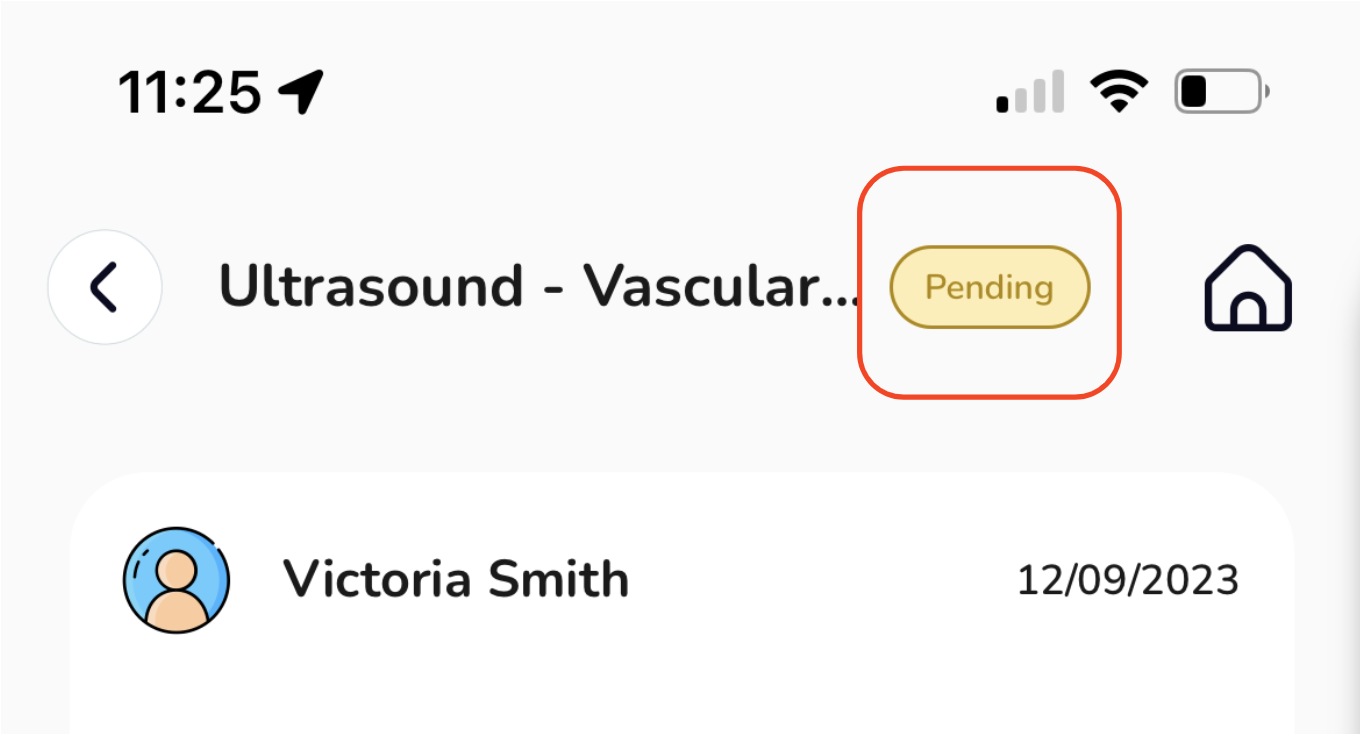
After submission, you'll be directed to the even's page where you can access important information, including your assigned assessor and feedback status. At this stage, your event page will feature a yellow label indicating "Pending."
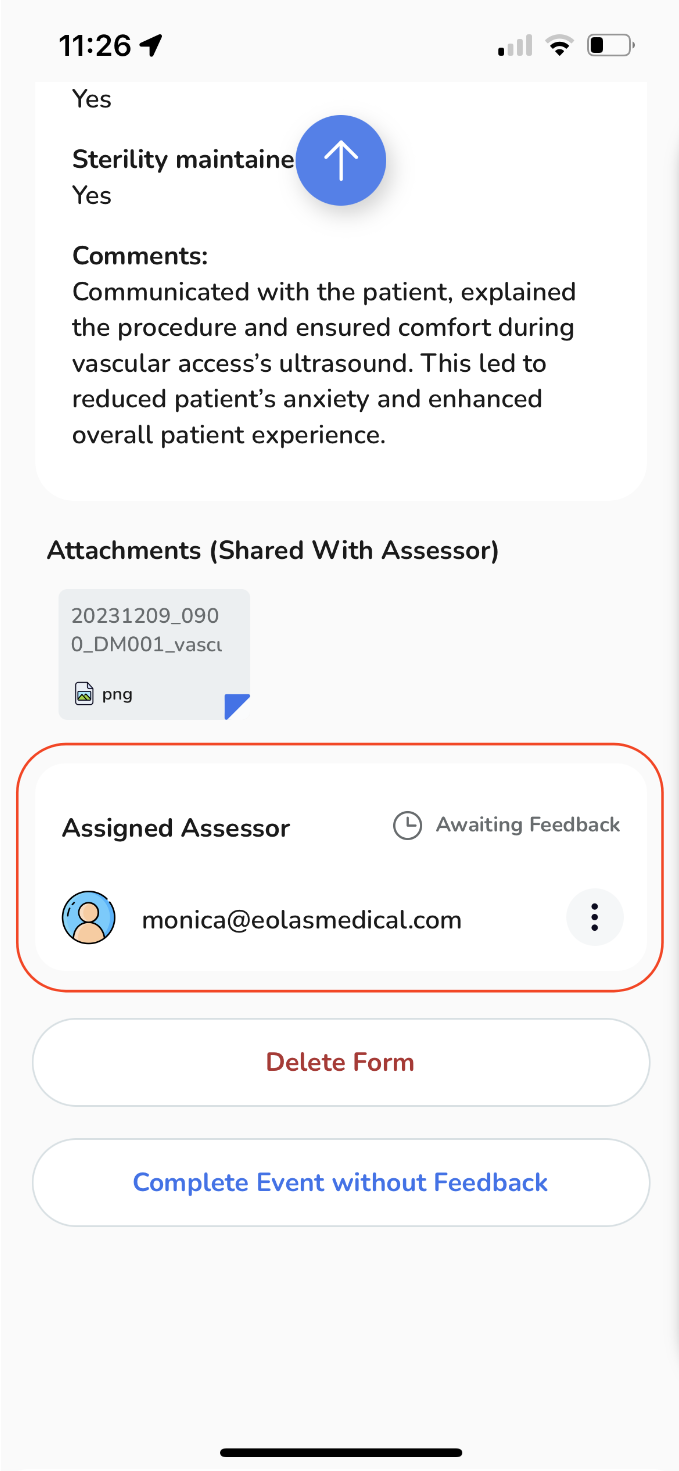
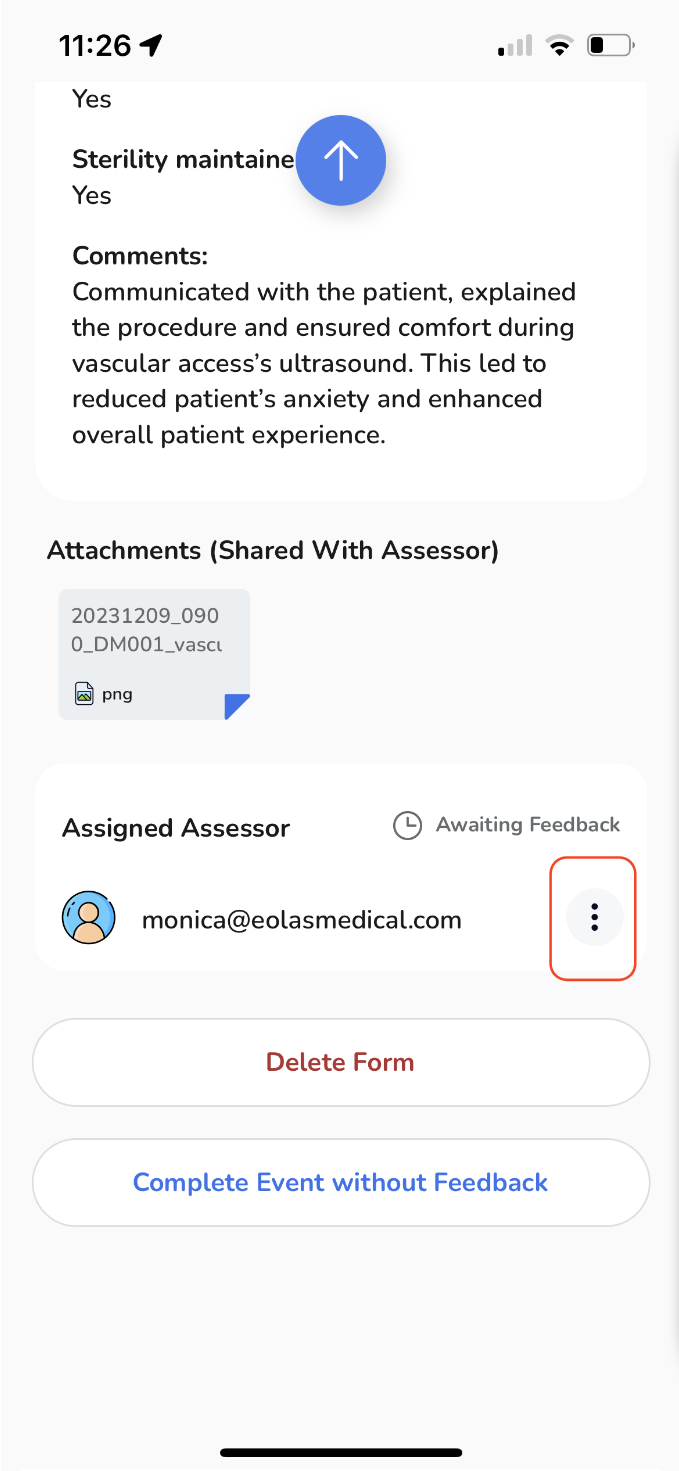
To send a reminder to the assessor or change the assessor for your event, just tap on the "Three Dots" button next to the assessor's email and select the appropriate option.
-
In addition, you have the flexibility to:
-
Delete it completely.
-
Or, choose to complete the event without feedback.
-
In addition, you have the flexibility to:
-
Delete it completely.
Delete it completely.
-
Or, choose to complete the event without feedback.
Or, choose to complete the event without feedback.
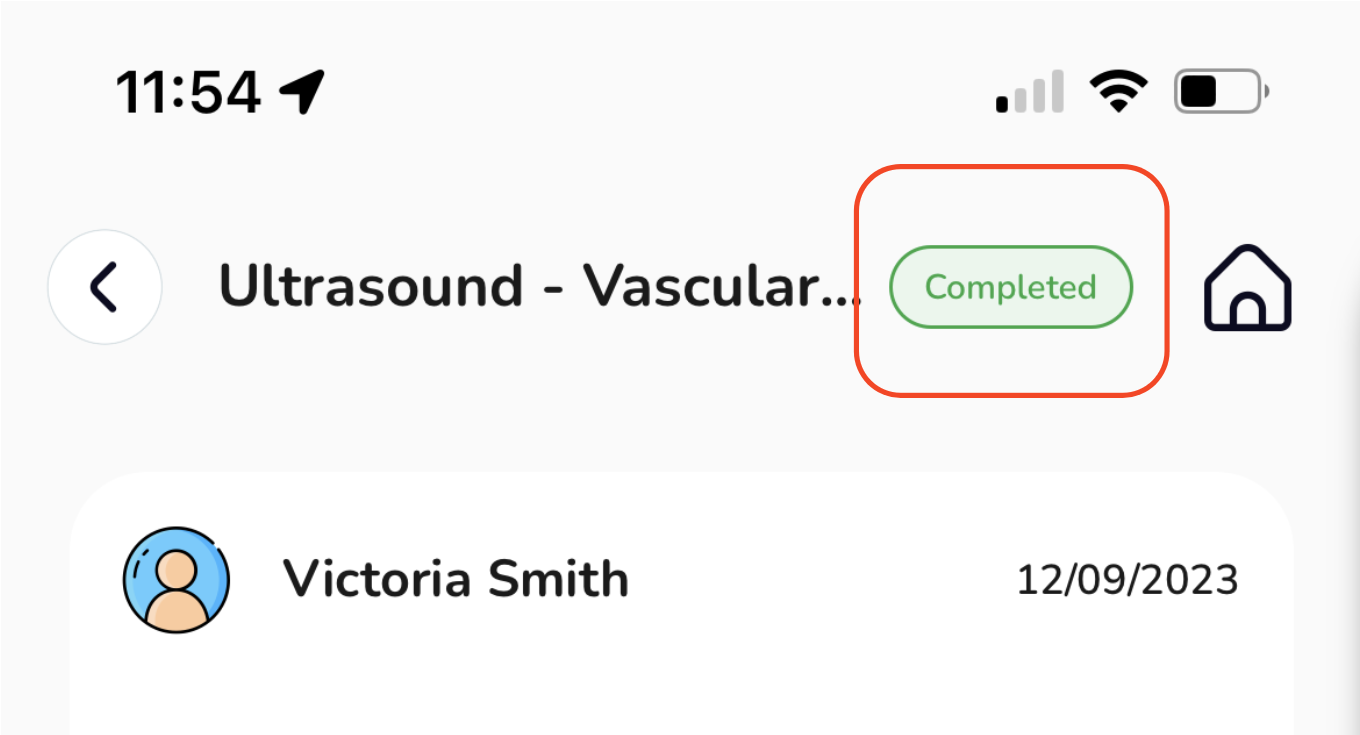
After receiving feedback from your assessor, the event page will display a green label indicating "Completed."
Scroll down to review the feedback, and if you wish to present it as a PDF, you can easily export it by clicking on the "Export Event as Feedback" option.
