Adding a New Personal Development Plan Event to Your Portfolio. | Eolas Medical | Help Center
Embracing reflective practices in your portfolio opens up an exciting avenue to express your journey and professional evolution in within your career. These moments of reflection are like hidden gems, serving as insightful analyses, enabling you to communicate your skills, navigate complex clinical situations, and showcase your ability to apply theoretical knowledge to real-world scenarios.
Learning Insights.
Identify valuable lessons learned from each experience, encompassing new medical knowledge acquisition, enhanced communication skills, and a deeper comprehension of ethical considerations.
Personal Growth & Development.
Embrace the opportunity to reflect on your growth as a healthcare professional. Assess how your skills, attitudes, and knowledge have evolved, and outline your plans for continued development and advancement in the field.
To create a Personal Development Plan event simply follow this steps:
Web - Add a Personal Development Plan event.
-
Begin by adding a new portfolio event.
-
From the list of options, choose "Personal Development Plan".
-
Assign a date to your event. The default date is set to the current day, but you can modify it by clicking the "Date" button and selecting your preferred date.
-
Provide a clear and meaningful title for your Personal Development Plan.
-
Fill in all the relevant fields with appropriate information.
-
If you want to attach supporting evidence, click on "Attach Evidence."
-
A pop-up window will appear. You can either choose from your existing files or upload a new one from your device.
-
To upload a new file, select "Add New File".
-
Depending on your needs, you can upload various file types like MS Office documents, PDFs, images, videos and web links.
-
To upload a new file,
-
Select "Files", then click on "Browse Files"
-
Select a file from your device, then click "Next".
-
Finally, give your file a name and click "Save".
-
-
To add a weblink,
-
Select "Web Link", enter the URL link and a File Name, then click "Save".
-
-
Your file will now be attached, If you wish to add multiple files, simply click on "Attach Evidence" once more and follow the same process again.
-
By clicking on the "toggle" button, you have the option to decide whether to share the attachment with your assessor or not.
-
When you're happy, you have a couple of options:
-
Once you've chosen "Continue", a pop-up window will appear, offering you the option to assign an assessor and gather feedback.
Begin by adding a new portfolio event.

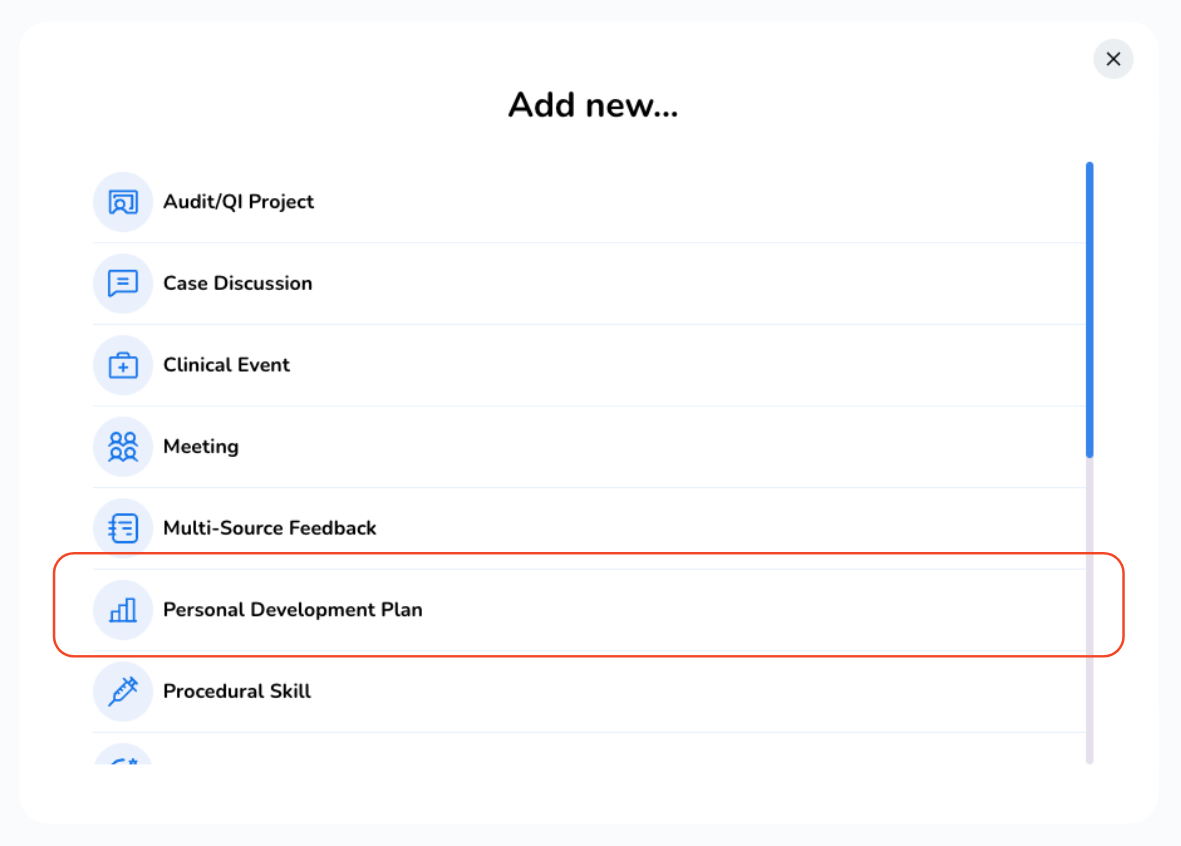
From the list of options, choose "Personal Development Plan".
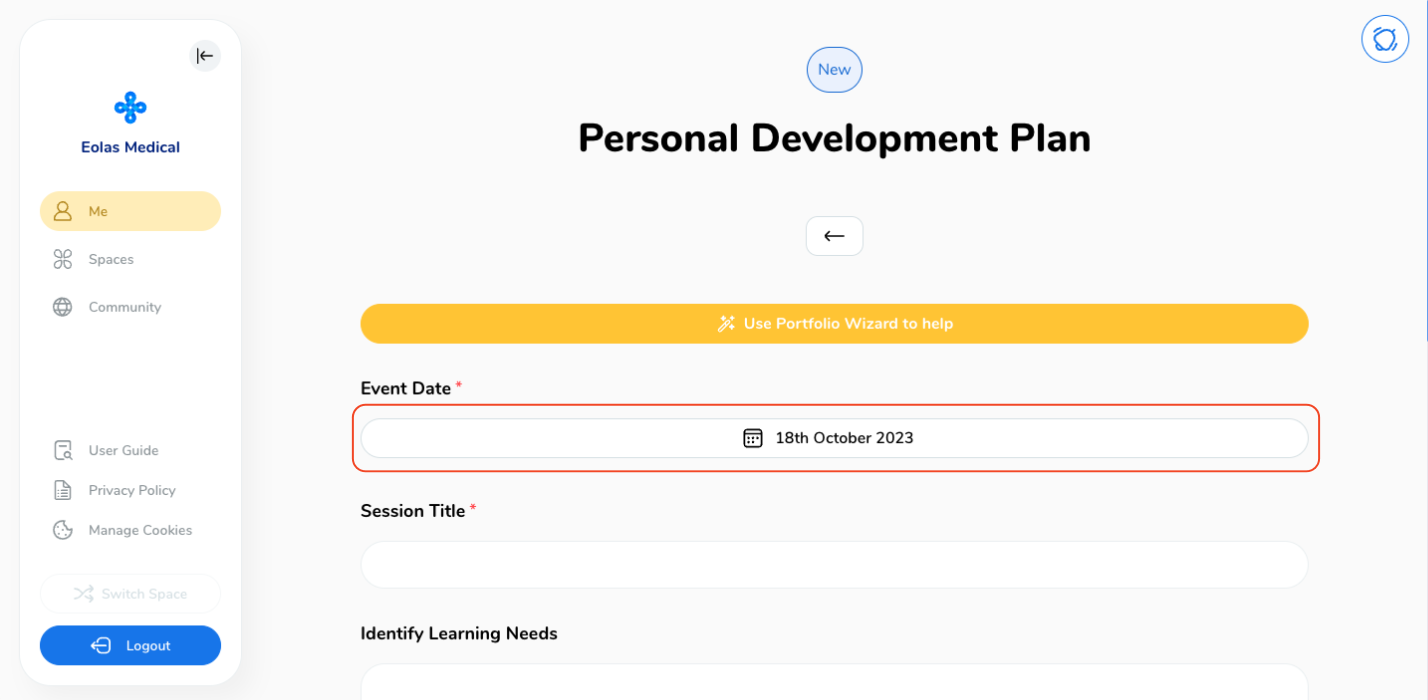
Assign a date to your event. The default date is set to the current day, but you can modify it by clicking the "Date" button and selecting your preferred date.
Provide a clear and meaningful title for your Personal Development Plan.
Fill in all the relevant fields with appropriate information.
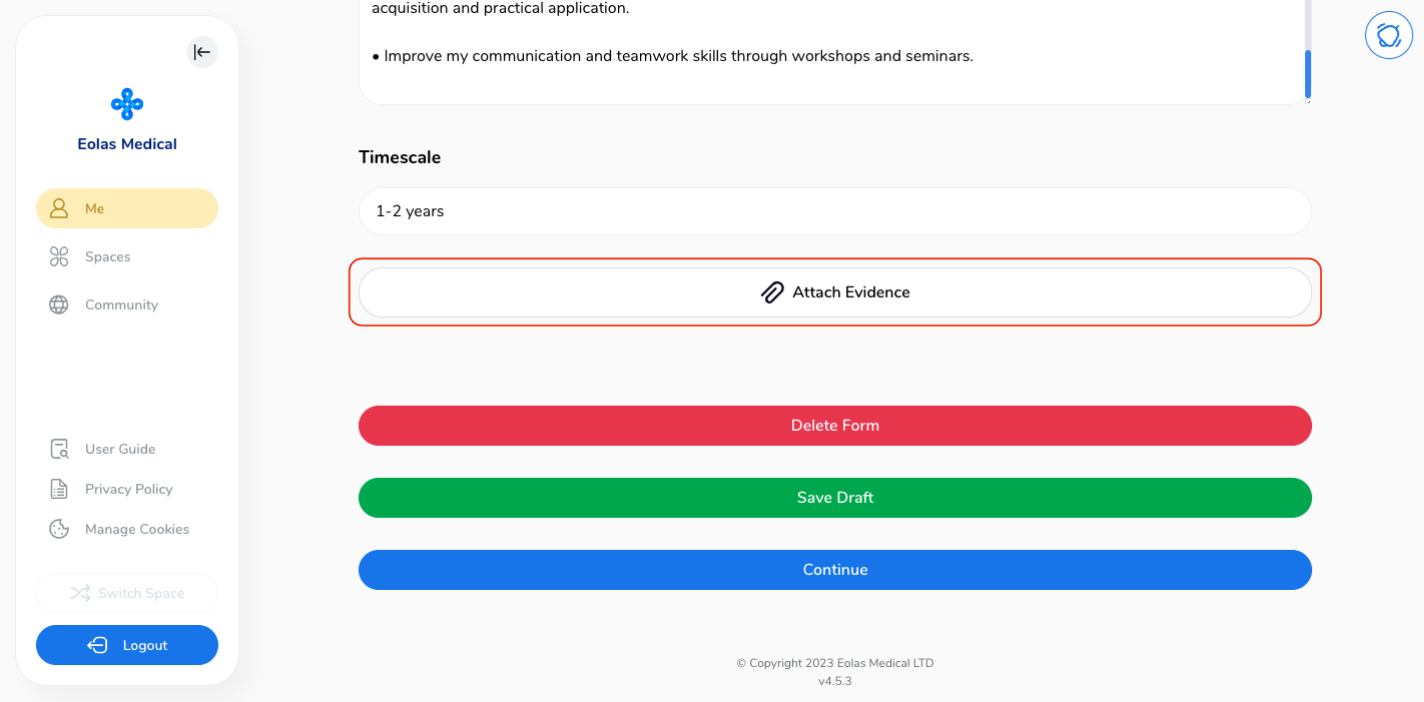
If you want to attach supporting evidence, click on "Attach Evidence."
A pop-up window will appear. You can either choose from your existing files or upload a new one from your device.
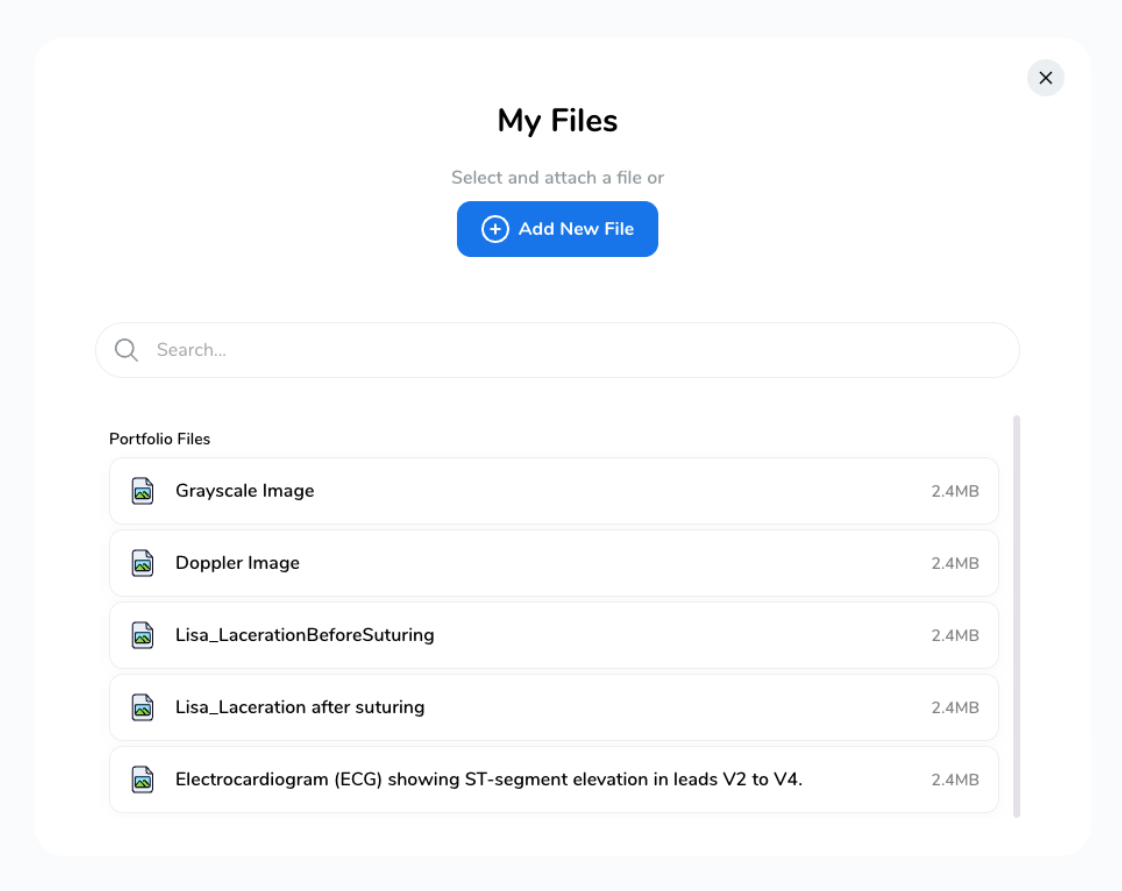
To upload a new file, select "Add New File".
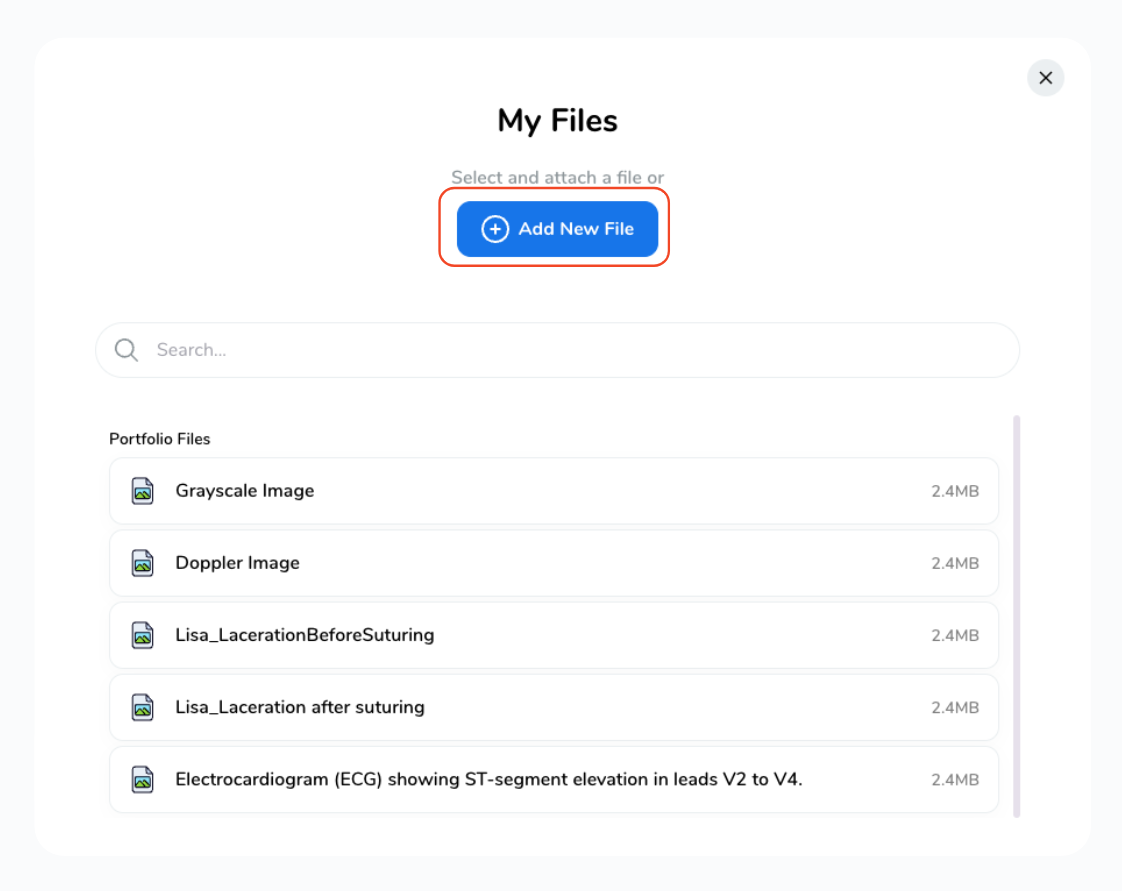
Depending on your needs, you can upload various file types like MS Office documents, PDFs, images, videos and web links.
To upload a new file,
-
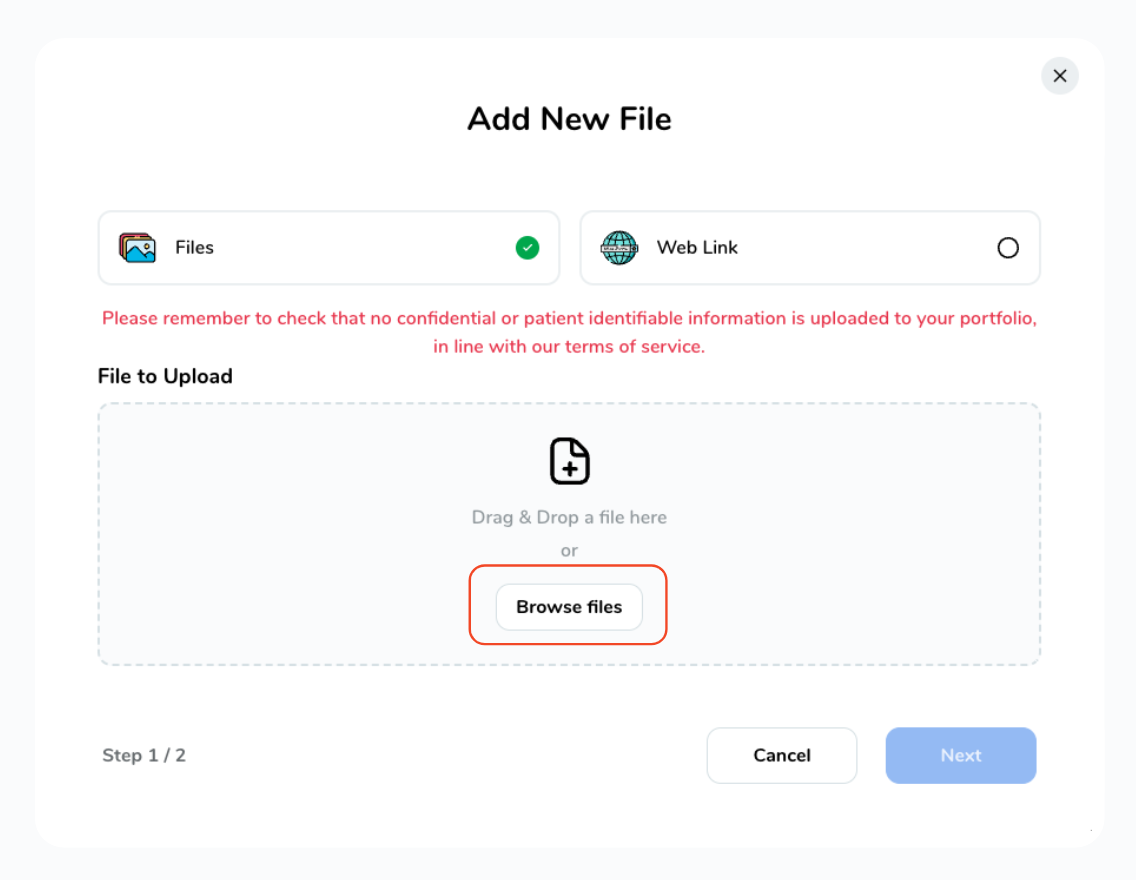
Select "Files", then click on "Browse Files"
Select "Files", then click on "Browse Files"
-
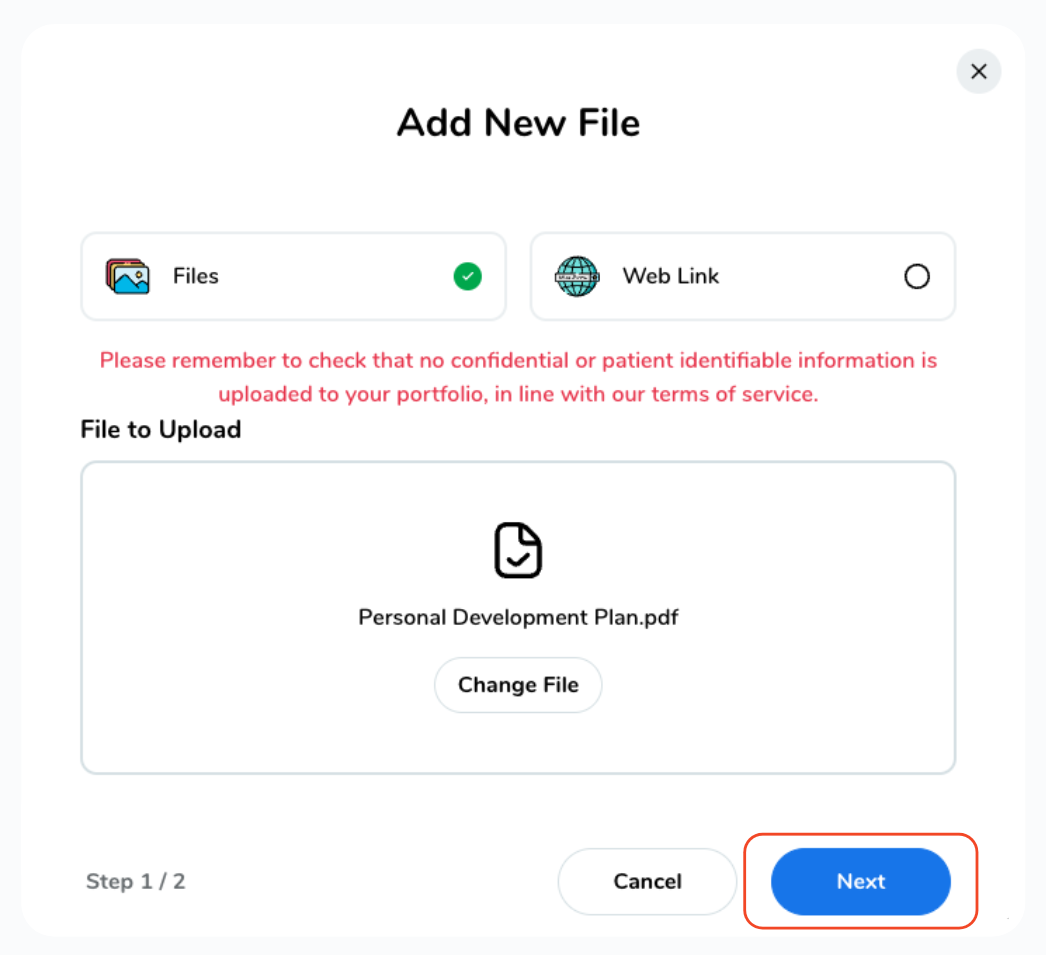
Select a file from your device, then click "Next".
Select a file from your device, then click "Next".
-
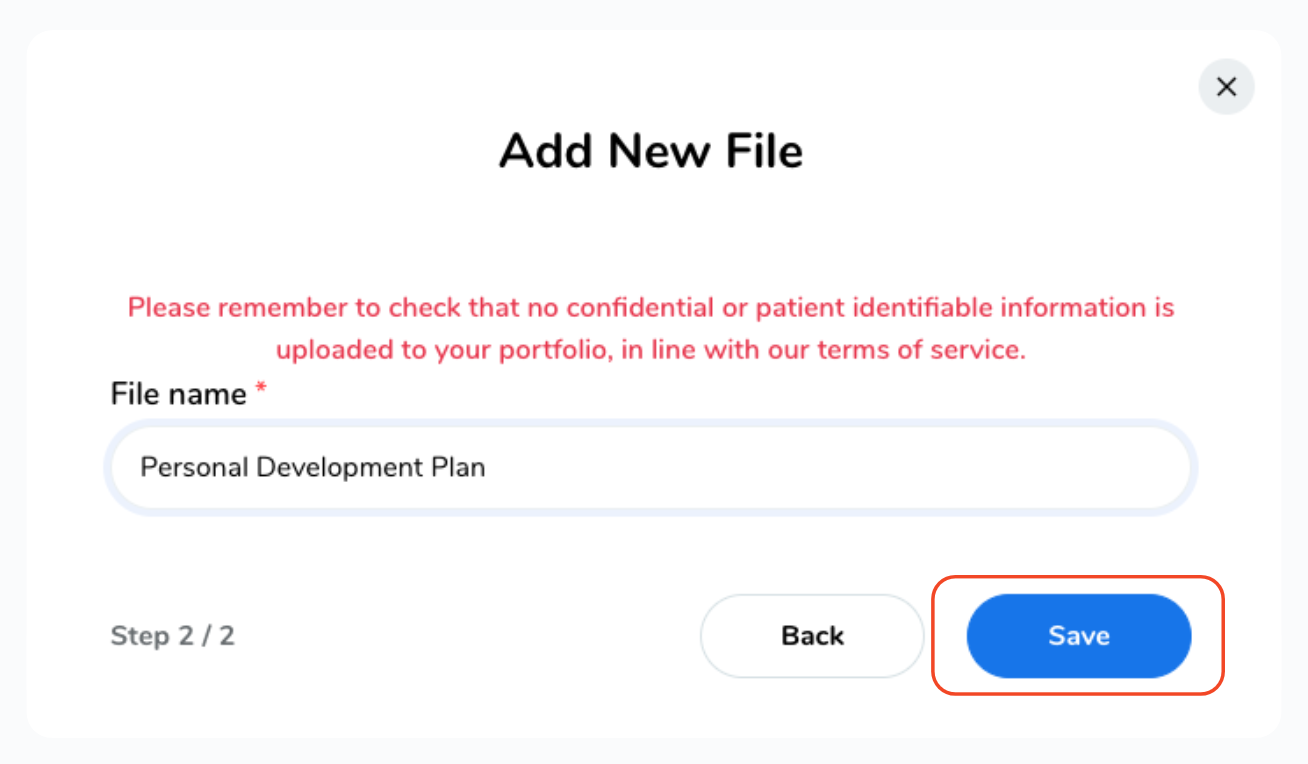
Finally, give your file a name and click "Save".
Finally, give your file a name and click "Save".
To add a weblink,
-
Select "Web Link", enter the URL link and a File Name, then click "Save".
Select "Web Link", enter the URL link and a File Name, then click "Save".
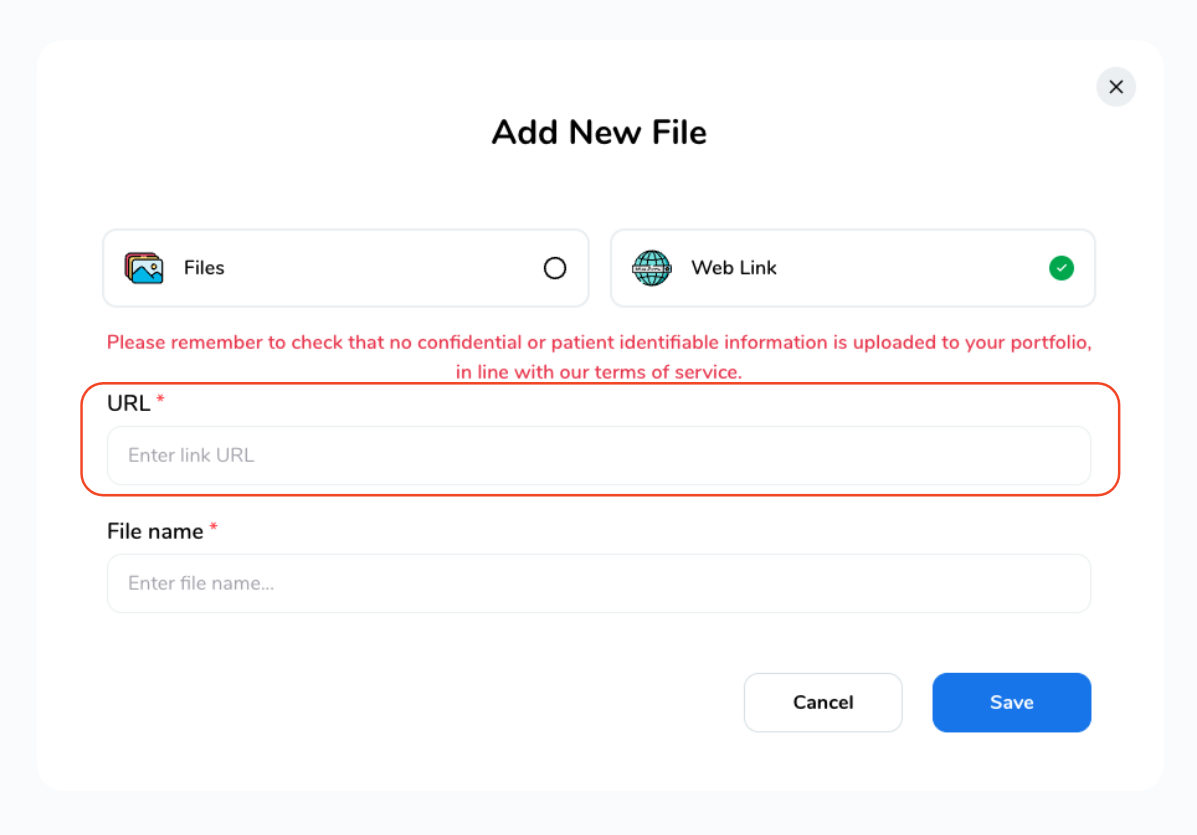
Your file will now be attached, If you wish to add multiple files, simply click on "Attach Evidence" once more and follow the same process again.
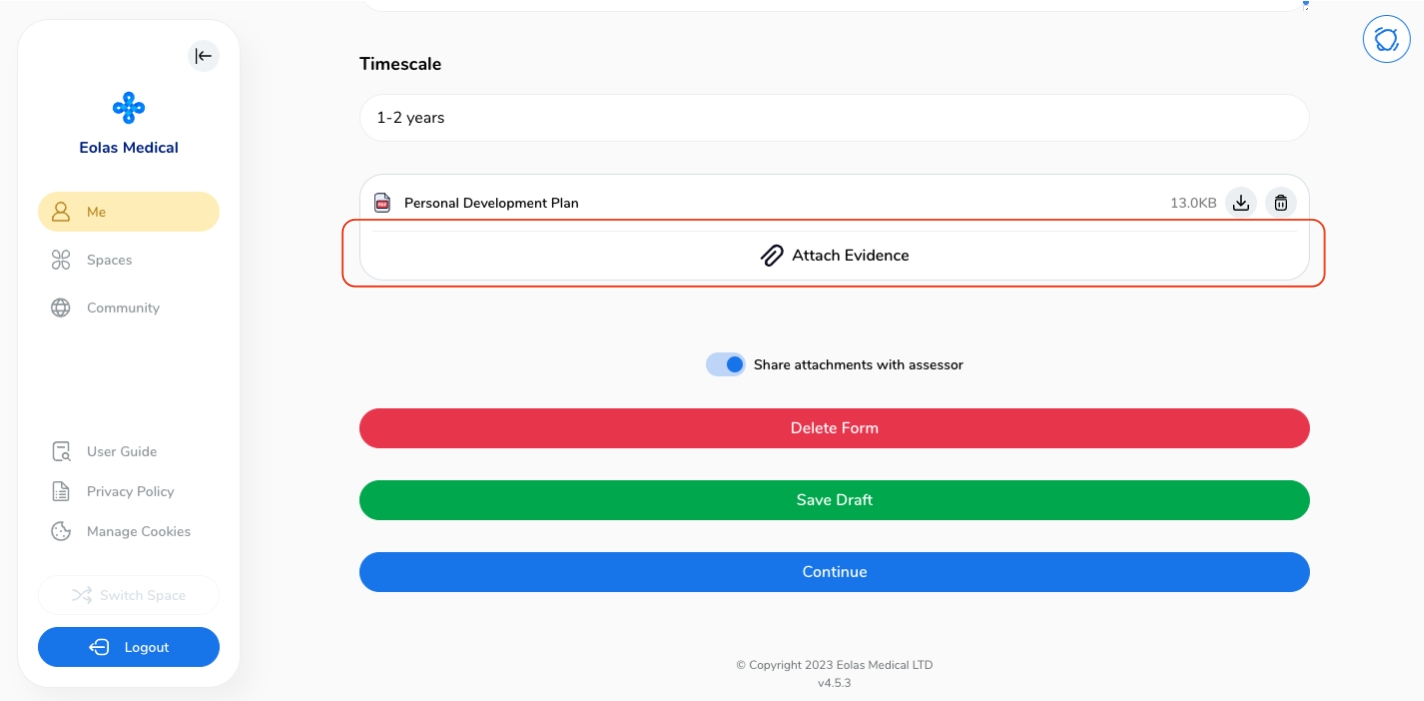
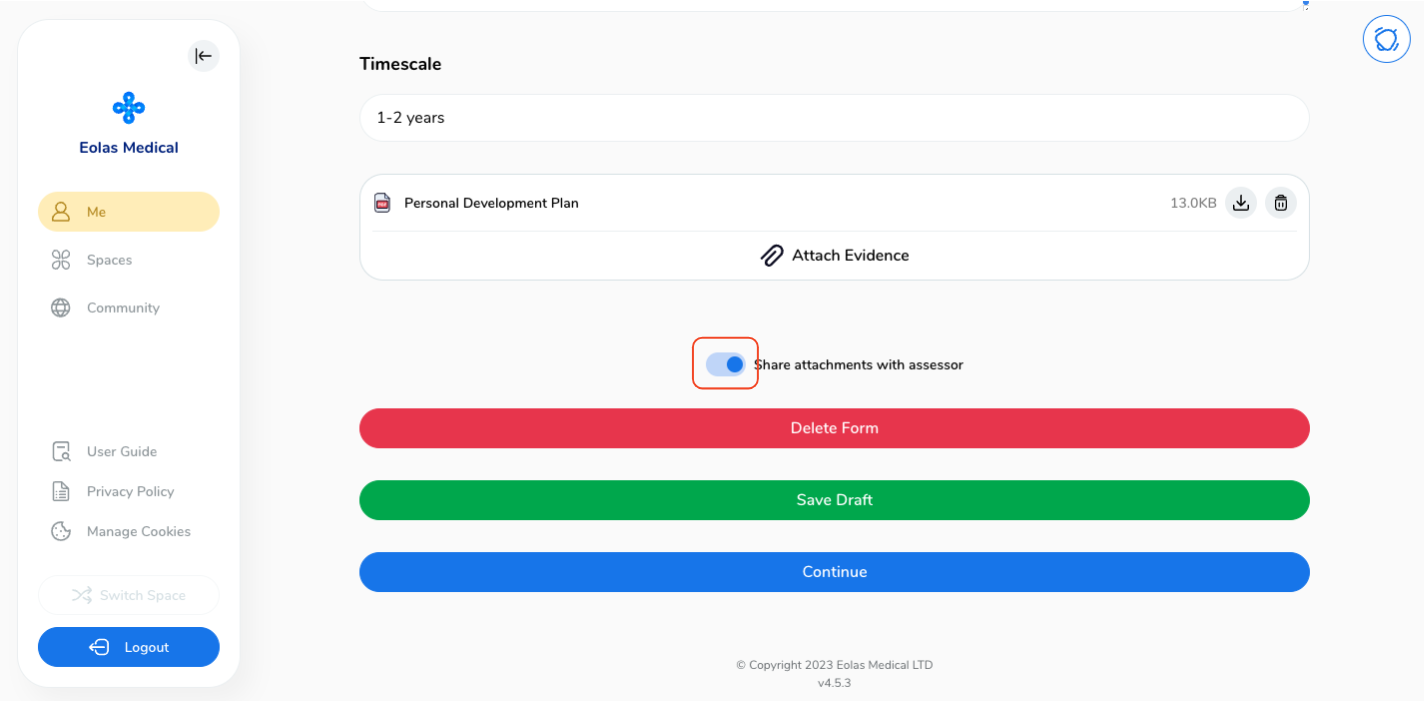
By clicking on the "toggle" button, you have the option to decide whether to share the attachment with your assessor or not.
When you're happy, you have a couple of options:
-
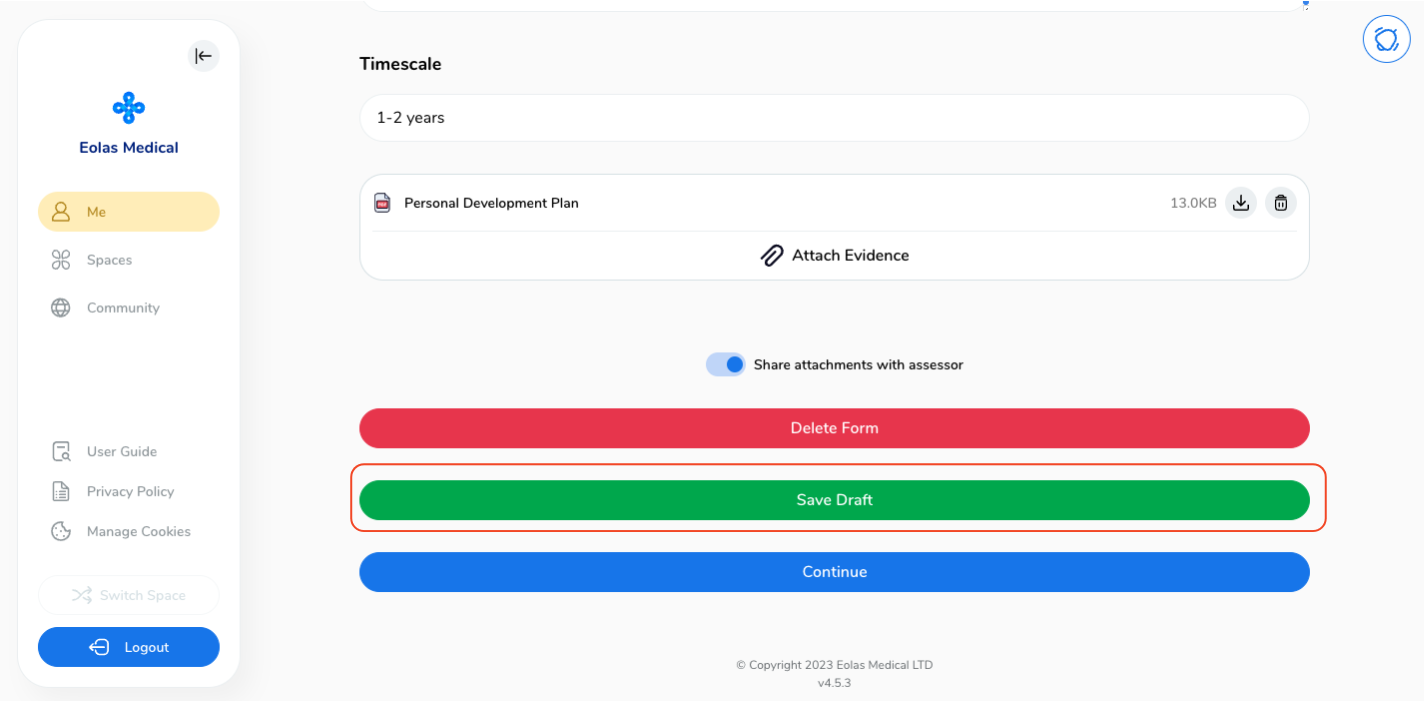
Save Draft: If you'd like to review or make adjustments later, save your session as a draft.
Save Draft: If you'd like to review or make adjustments later, save your session as a draft.
-
Alternatively, click the "Continue" button to proceed with the submission.
Alternatively, click the "Continue" button to proceed with the submission.
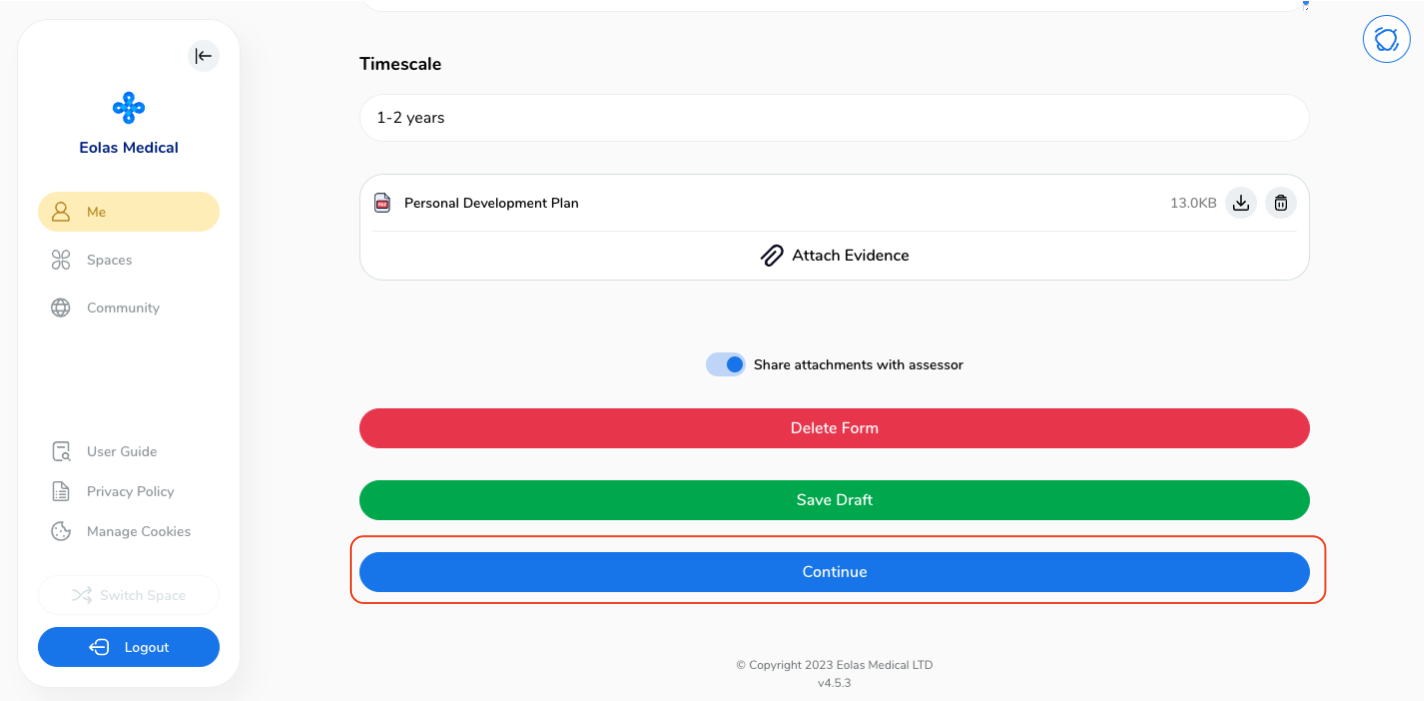
Once you've chosen "Continue", a pop-up window will appear, offering you the option to assign an assessor and gather feedback.
Assigning an assessor to your Personal Development Plan Event.
-
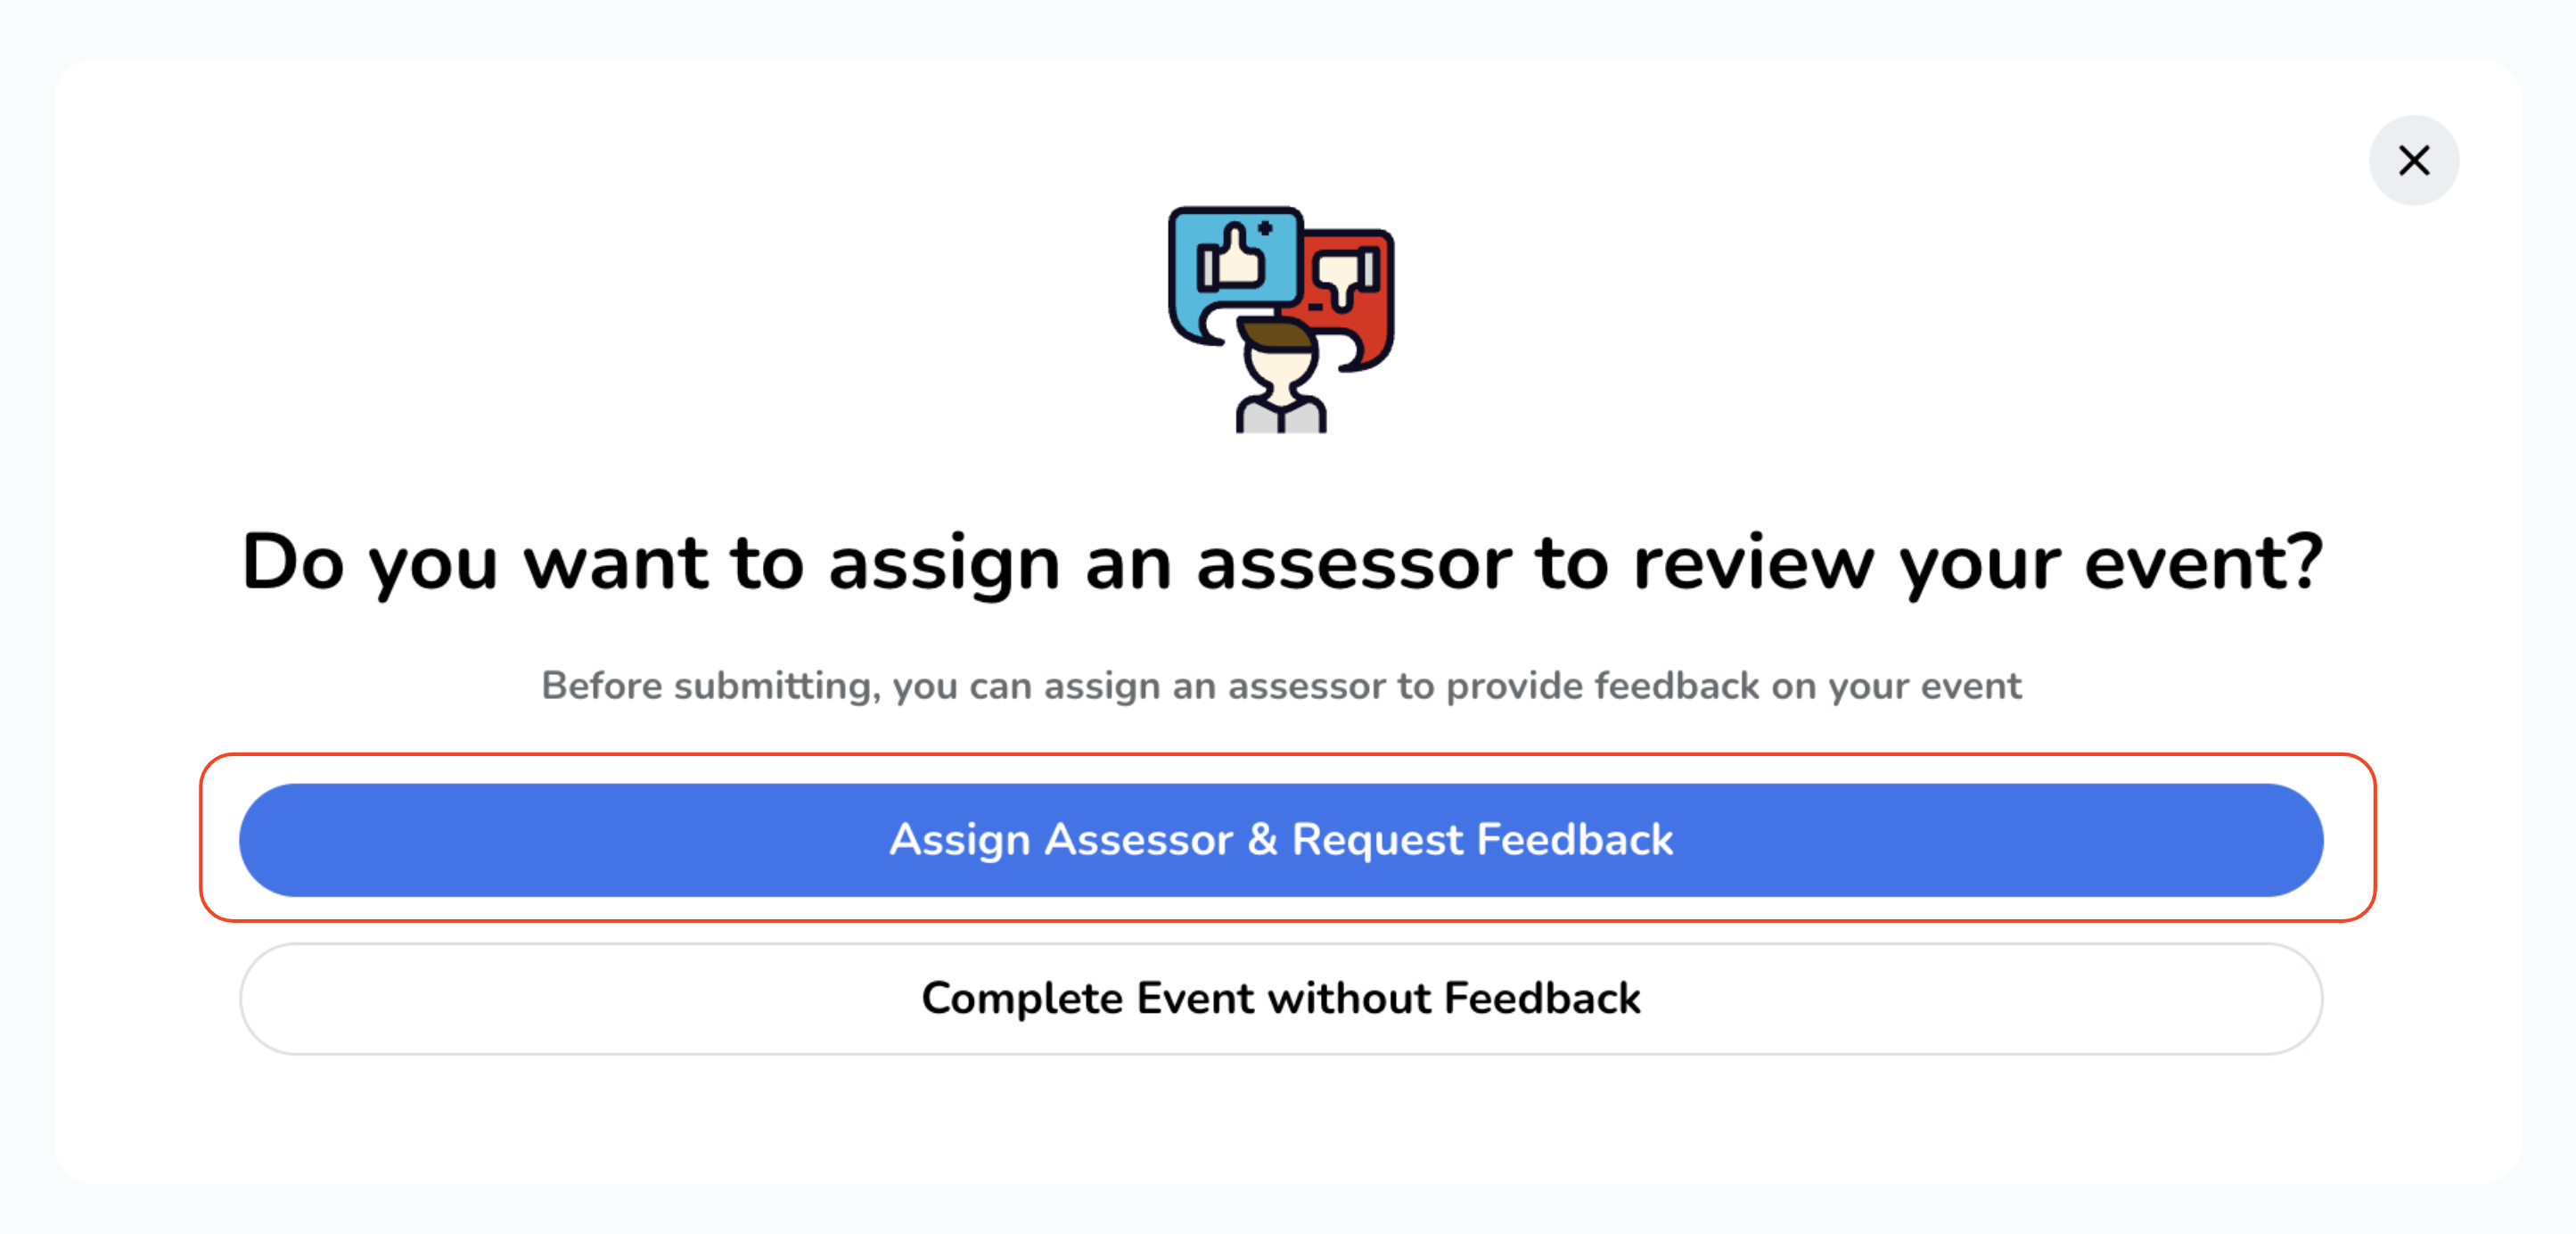
To assign an assessor for your Personal Development Plan, click on the "Assign Assessor & Request Feedback" button. If you prefer to complete the event without feedback, choose the appropriate option accordingly.
-
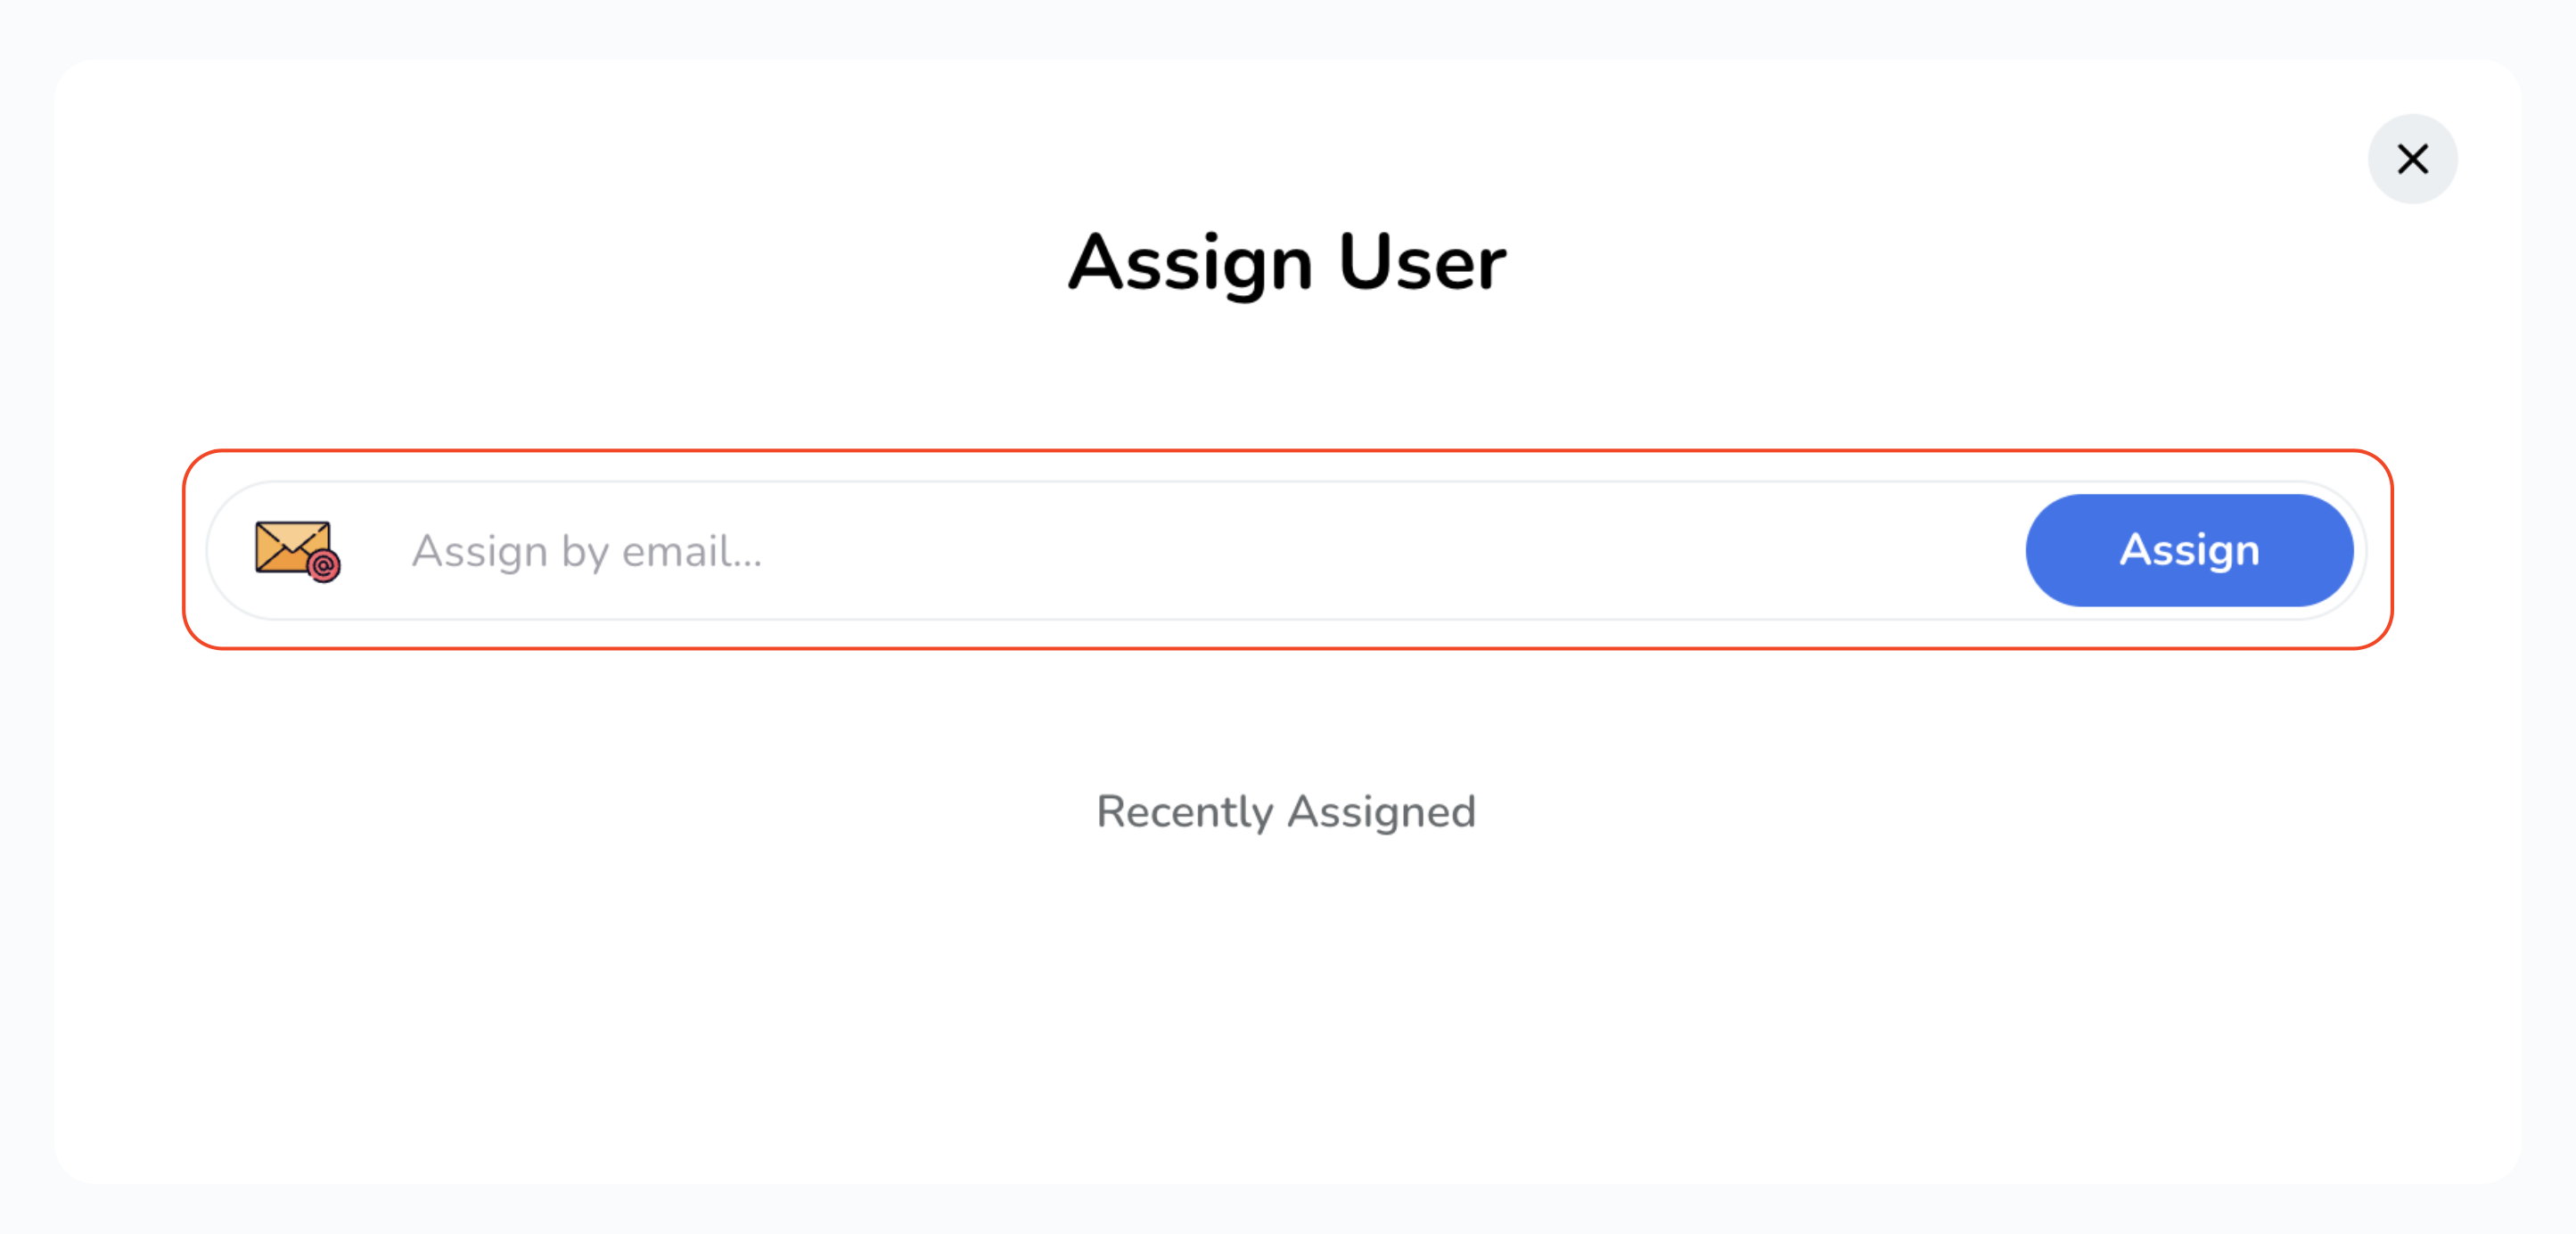
In the pop-up, enter the assessor's email address and click on the "Assign" button. Alternatively, you can choose an assessor from the list of recent assessors (if available).
-
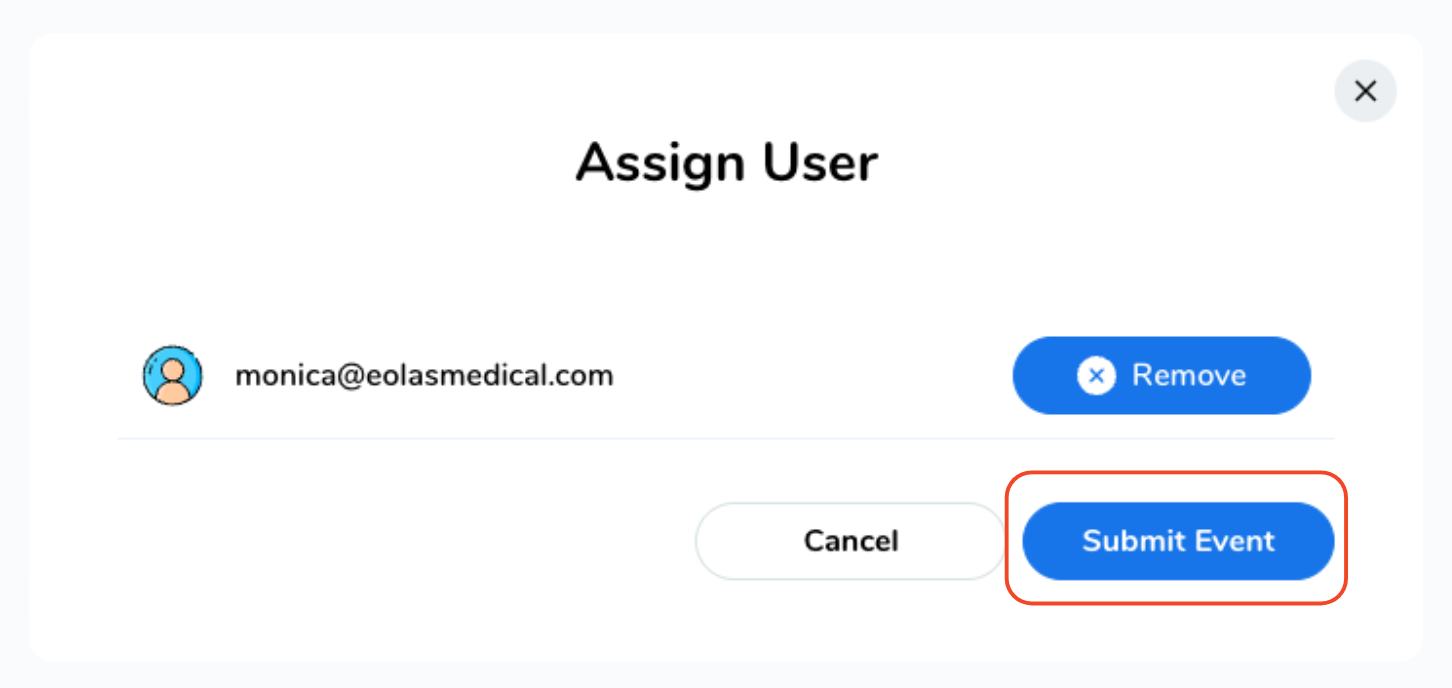
Finally, confirm your selection by clicking on "Submit Event." An email notification will be sent to your assigned assessor.
To assign an assessor for your Personal Development Plan, click on the "Assign Assessor & Request Feedback" button. If you prefer to complete the event without feedback, choose the appropriate option accordingly.
In the pop-up, enter the assessor's email address and click on the "Assign" button. Alternatively, you can choose an assessor from the list of recent assessors (if available).
Finally, confirm your selection by clicking on "Submit Event." An email notification will be sent to your assigned assessor.
What happens after assigning an assessor?
-
Upon submitting, you will be directed to the event's page. Here, you can view important details such as the assigned assessor and the feedback status.
-
At this point your event page will display a yellow label indicating "Pending".
-
In addition, you have the flexibility to:
-
Send a reminder to your assessor.
-
Reassign the assessor.
-
Delete it completely.
-
Or, choose to complete the case without feedback.
-
Upon submitting, you will be directed to the event's page. Here, you can view important details such as the assigned assessor and the feedback status.
At this point your event page will display a yellow label indicating "Pending".
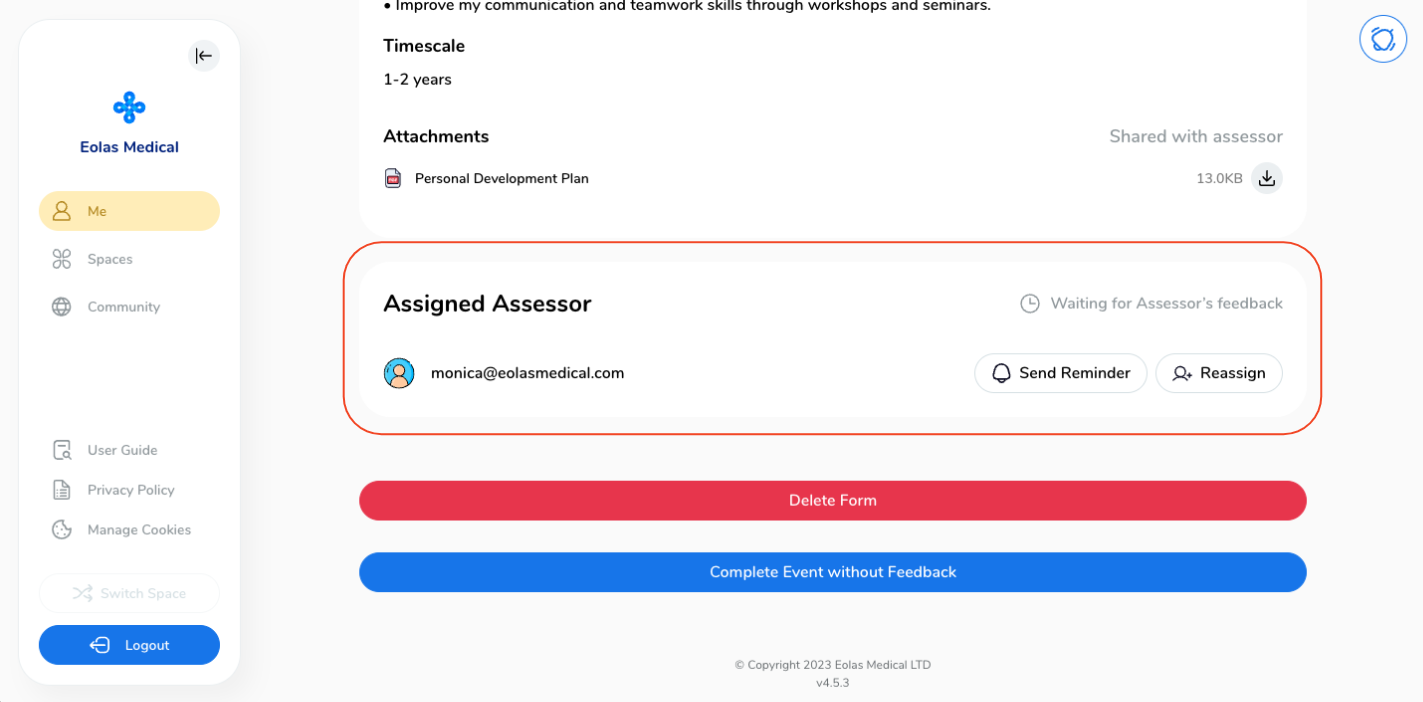
In addition, you have the flexibility to:
-
Send a reminder to your assessor.
Send a reminder to your assessor.
-
Reassign the assessor.
Reassign the assessor.
-
Delete it completely.
Delete it completely.
-
Or, choose to complete the case without feedback.
Or, choose to complete the case without feedback.
Receiving feedback from an assessor.
-
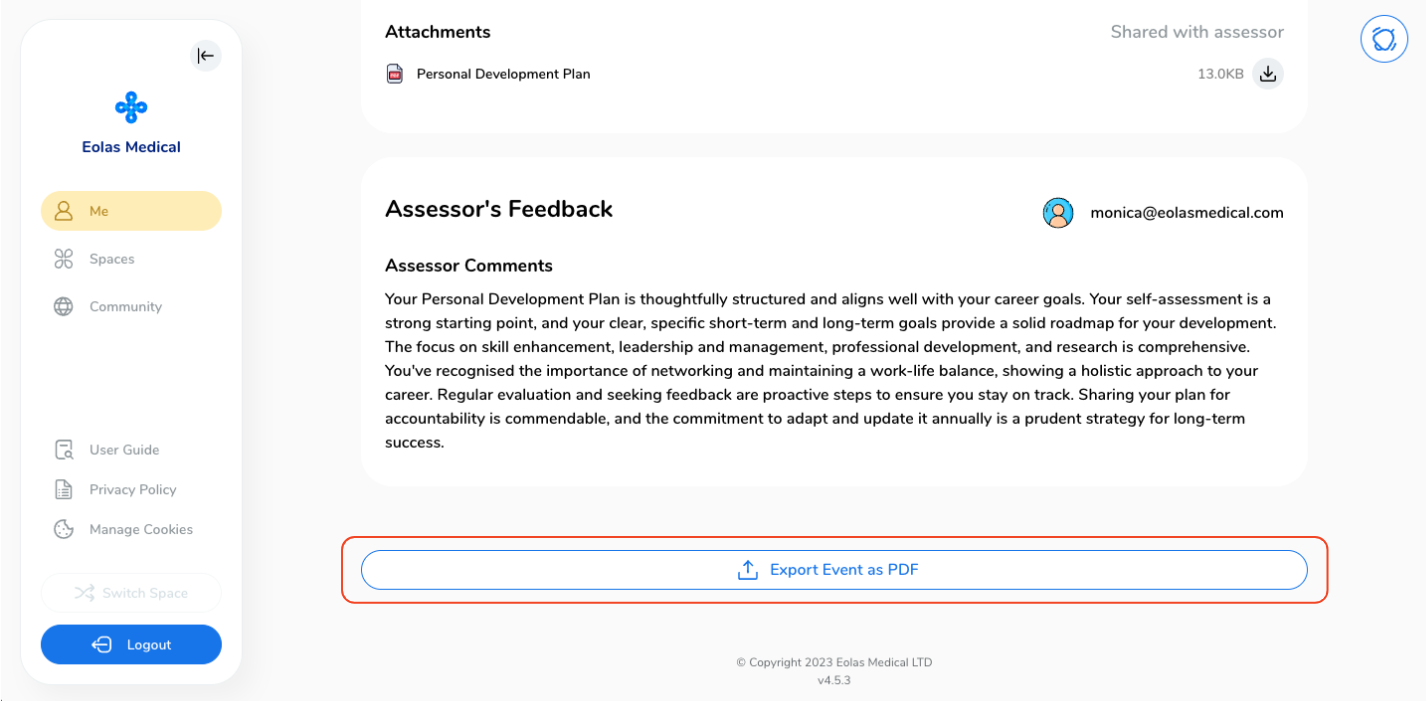
After receiving feedback from your assessor, the event's page will display a green label indicating "Completed." To review the feedback, simply scroll down on the page.
-
Additionally, if desired, you have the option to export the feedback as a PDF.
After receiving feedback from your assessor, the event's page will display a green label indicating "Completed." To review the feedback, simply scroll down on the page.
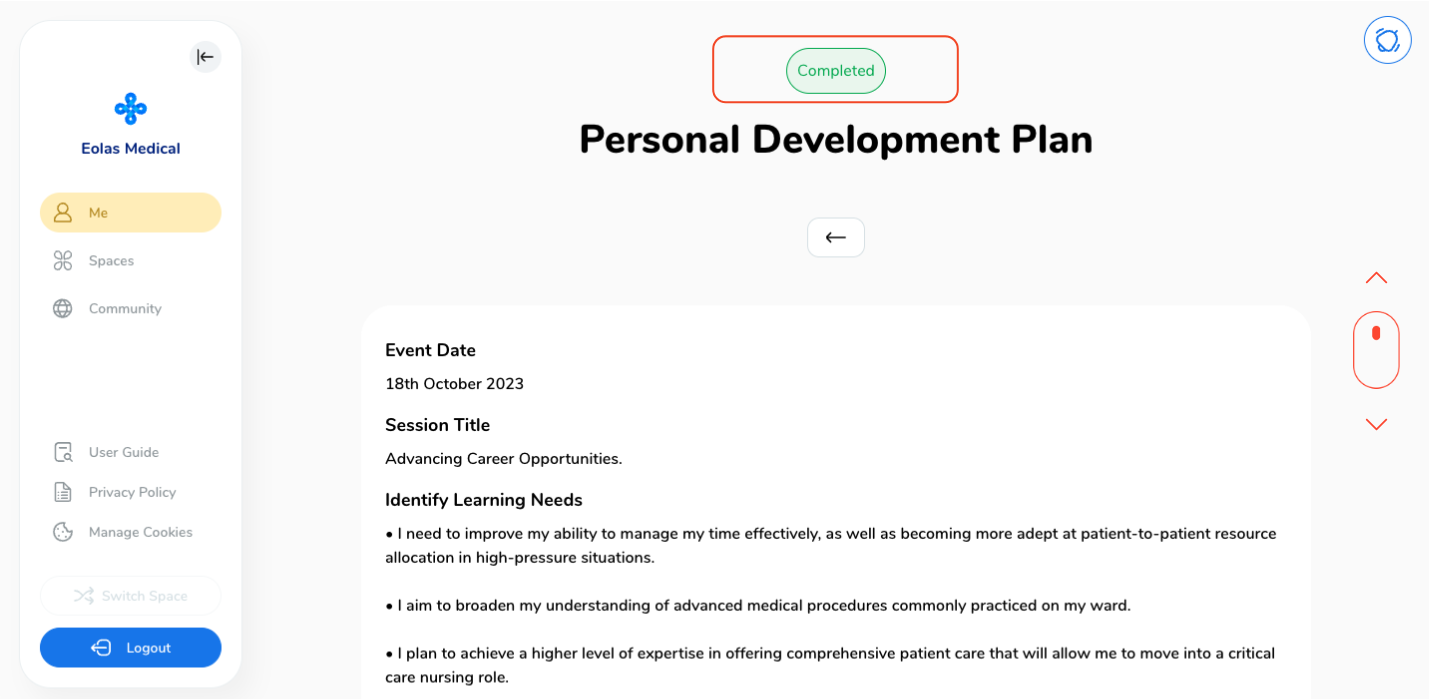
Additionally, if desired, you have the option to export the feedback as a PDF.
With these steps, you can seamlessly integrate your Personal Development Plan event into your e- portfolio!
Mobile - Add a Personal Development Plan event.
-
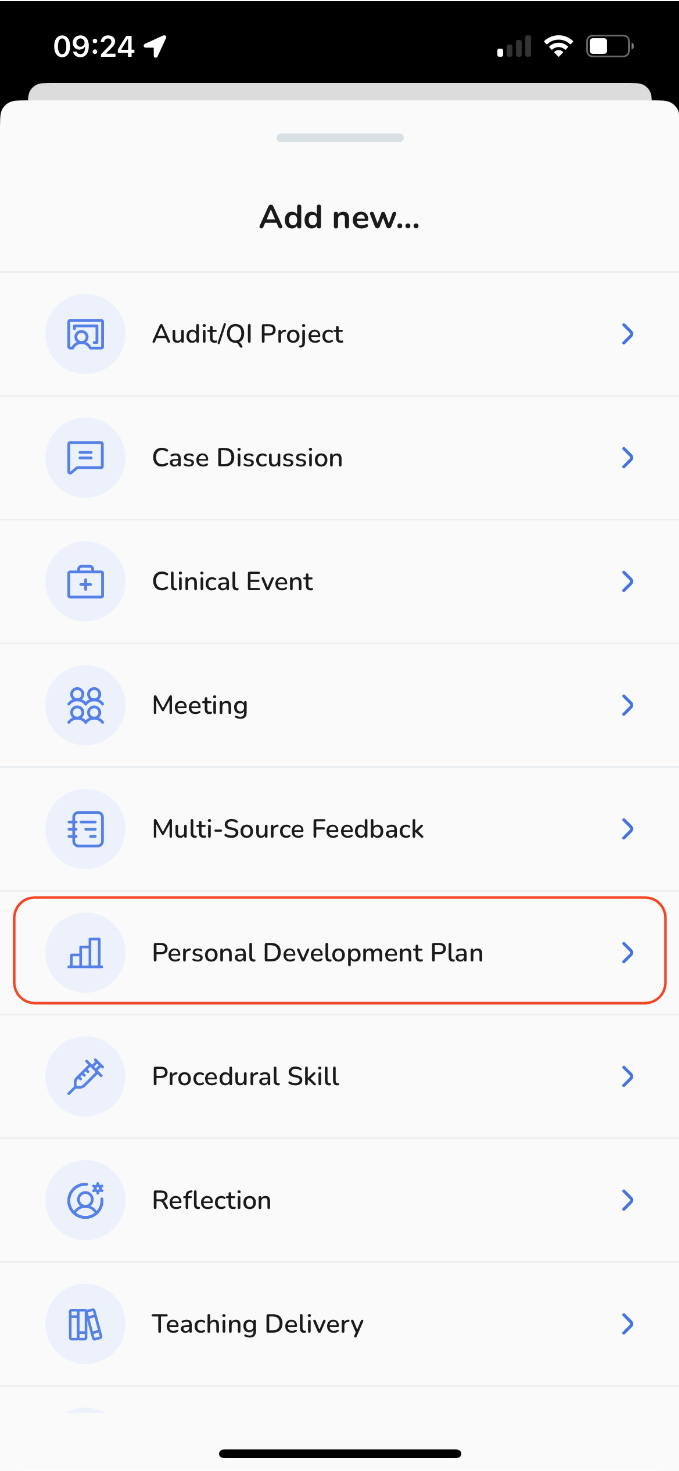
Start by creating a new event. From the list of available options, choose "Personal Development Plan."
-
Assign a date to your event. The default date is set to the current day, but you can modify it by clicking the "Date" button and selecting your preferred date.
-
Provide a title that effectively communicates the core purpose of your Personal Development Plan.
-
Complete all the relevant fields by inputting the appropriate information.
-
If you wish to take an additional step and attach supporting evidence, click on "Add Attachments". This will enable you to create a documented record of your Personal Development Plan, ensuring that it is properly documented and easily accessible for future reference.
-
A pop-up window will appear, offering you the choice to either select from your existing files or upload a new one from your device.
-
To upload a new file, select "Add New File".
-
Depending on your needs, you can upload various file types like MS Office documents, PDFs, images, videos, and web links. Choose the relevant option.
-
To upload a new file,
-
To add a weblink, select "Web Link"
-
Provide the URL link along with a File Name, and then tap "Done".
-
-
Your file will now be attached, If you wish to add multiple files, simply click on "Add Attachment" once more and follow the same process again.
-
To access the recently uploaded file, download it or to remove it in case of an error, just click on the "file" box.
-
By tapping on the "toggle" button, you have the option to decide whether to share the attachment with your assessor or not.
-
When you're ready, you have few options:
-
Delete your event completely.
-
Save your session as a draft for future reference and make any necessary adjustments.
-
Alternatively, tap the "Continue" button to proceed with the submission.
-
-
Once you've chosen "Continue", a pop-up window will surface, offering you the option to assign an assessor and gather feedback.
Start by creating a new event. From the list of available options, choose "Personal Development Plan."
Assign a date to your event. The default date is set to the current day, but you can modify it by clicking the "Date" button and selecting your preferred date.
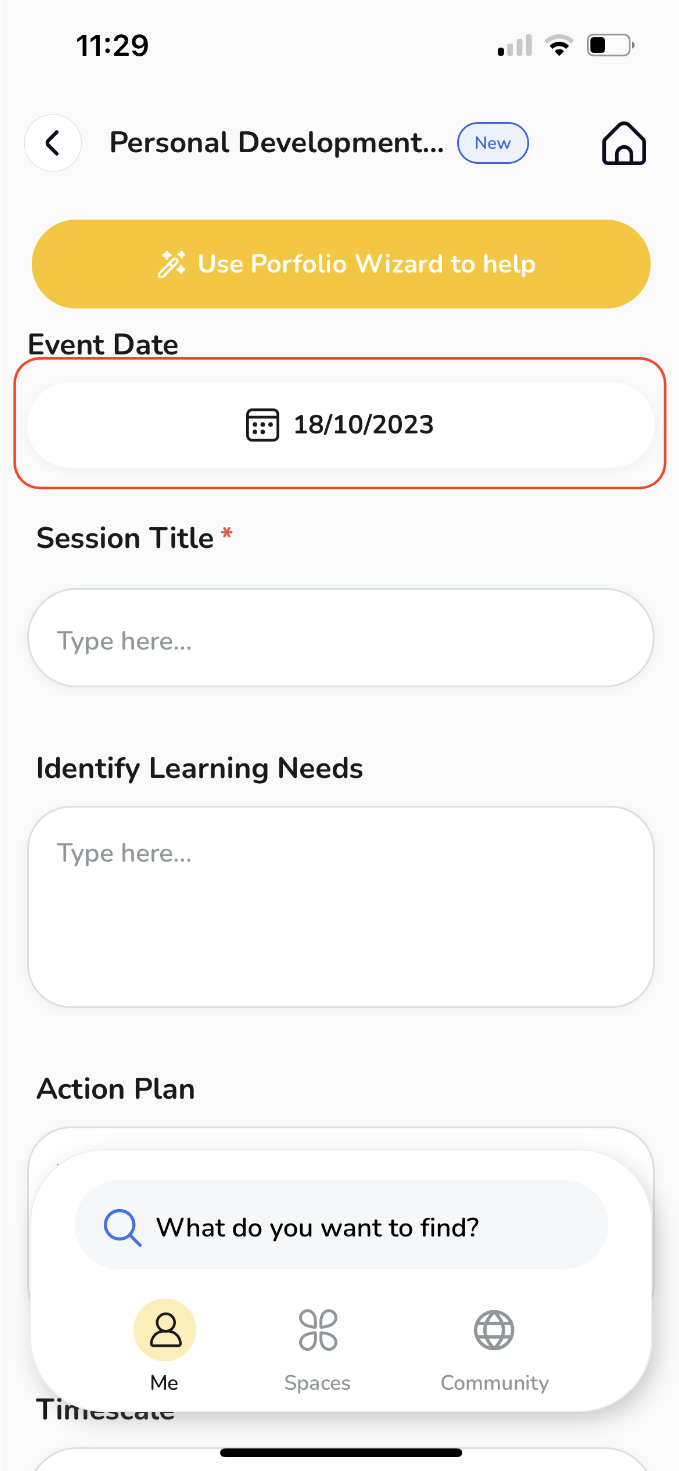
Provide a title that effectively communicates the core purpose of your Personal Development Plan.
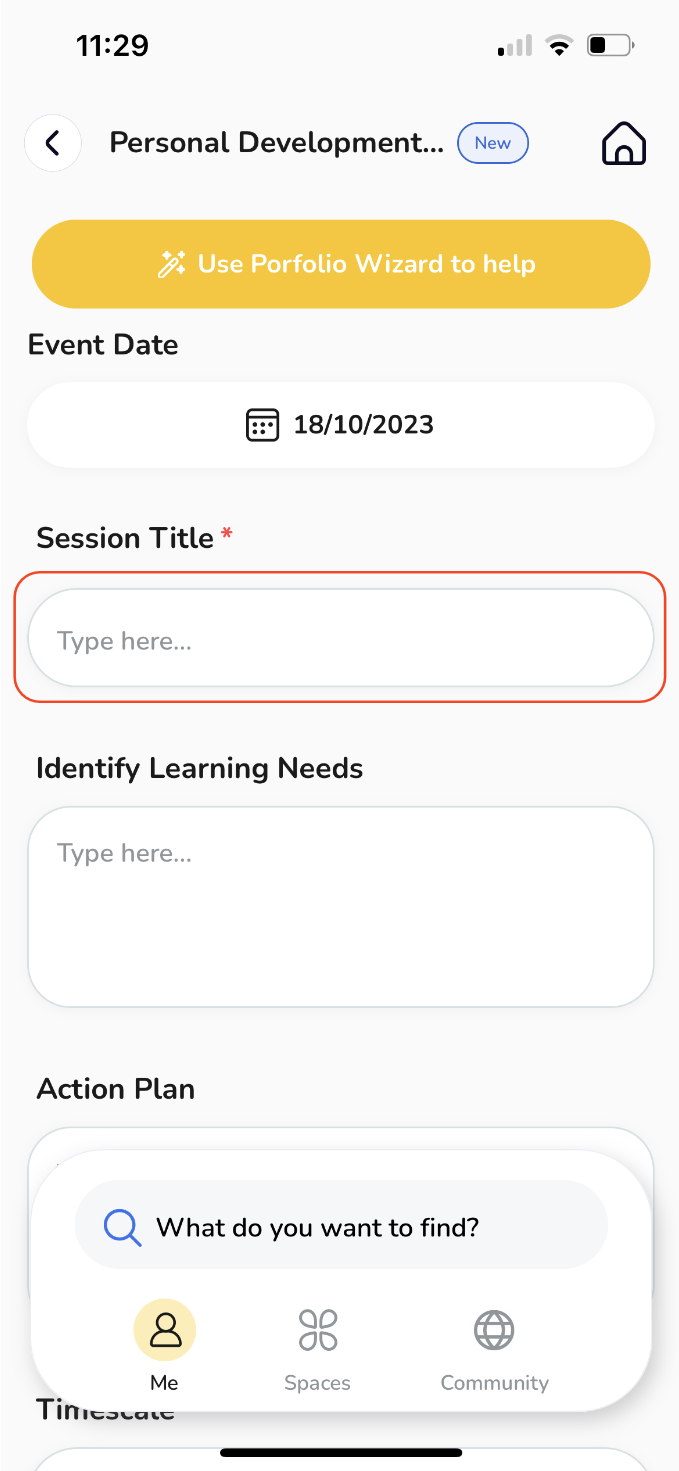
Complete all the relevant fields by inputting the appropriate information.
If you wish to take an additional step and attach supporting evidence, click on "Add Attachments". This will enable you to create a documented record of your Personal Development Plan, ensuring that it is properly documented and easily accessible for future reference.
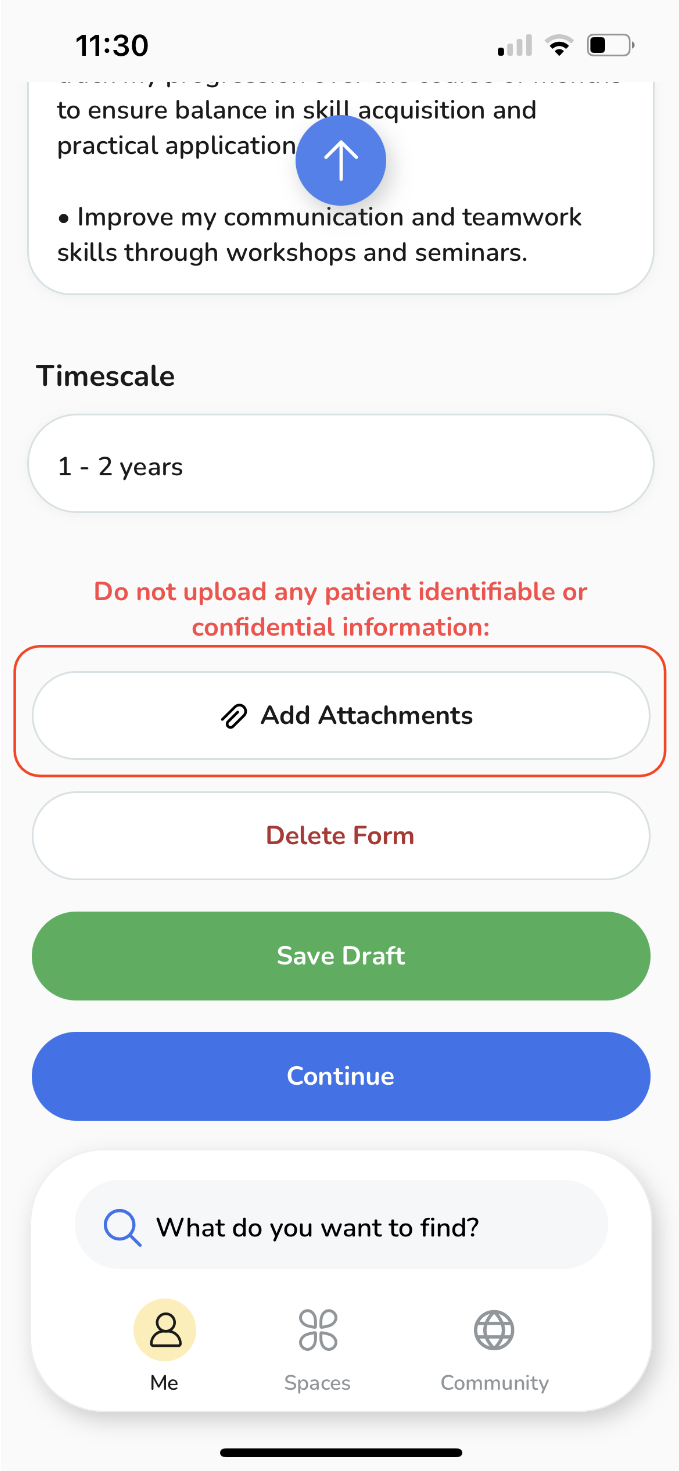
A pop-up window will appear, offering you the choice to either select from your existing files or upload a new one from your device.
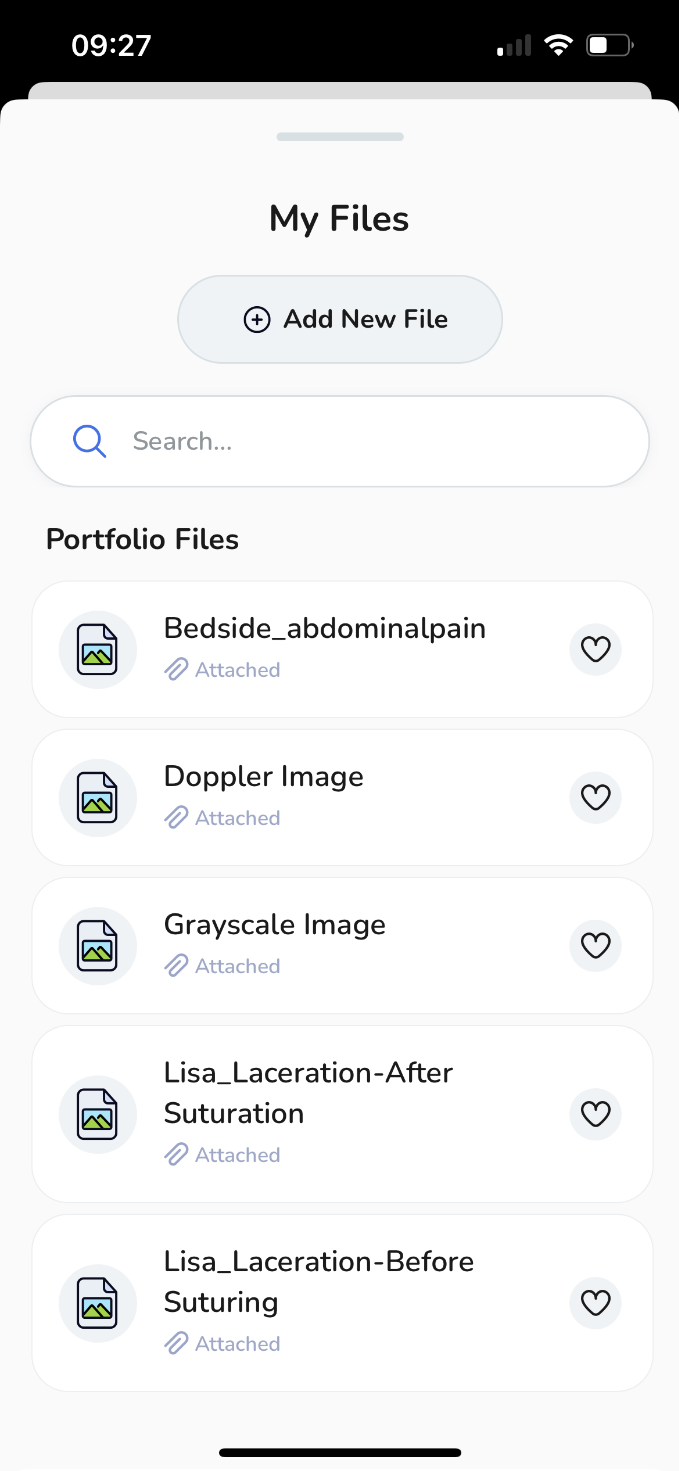
To upload a new file, select "Add New File".
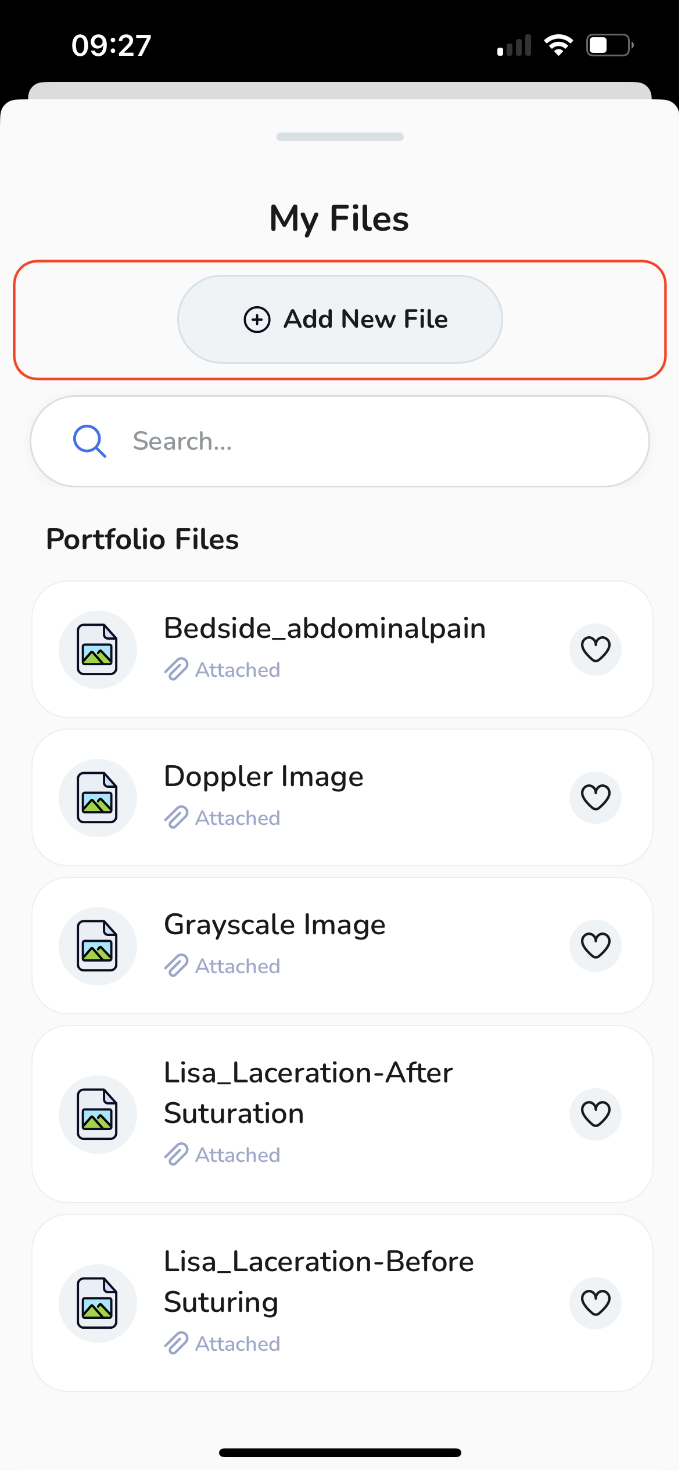
Depending on your needs, you can upload various file types like MS Office documents, PDFs, images, videos, and web links. Choose the relevant option.
To upload a new file,
-
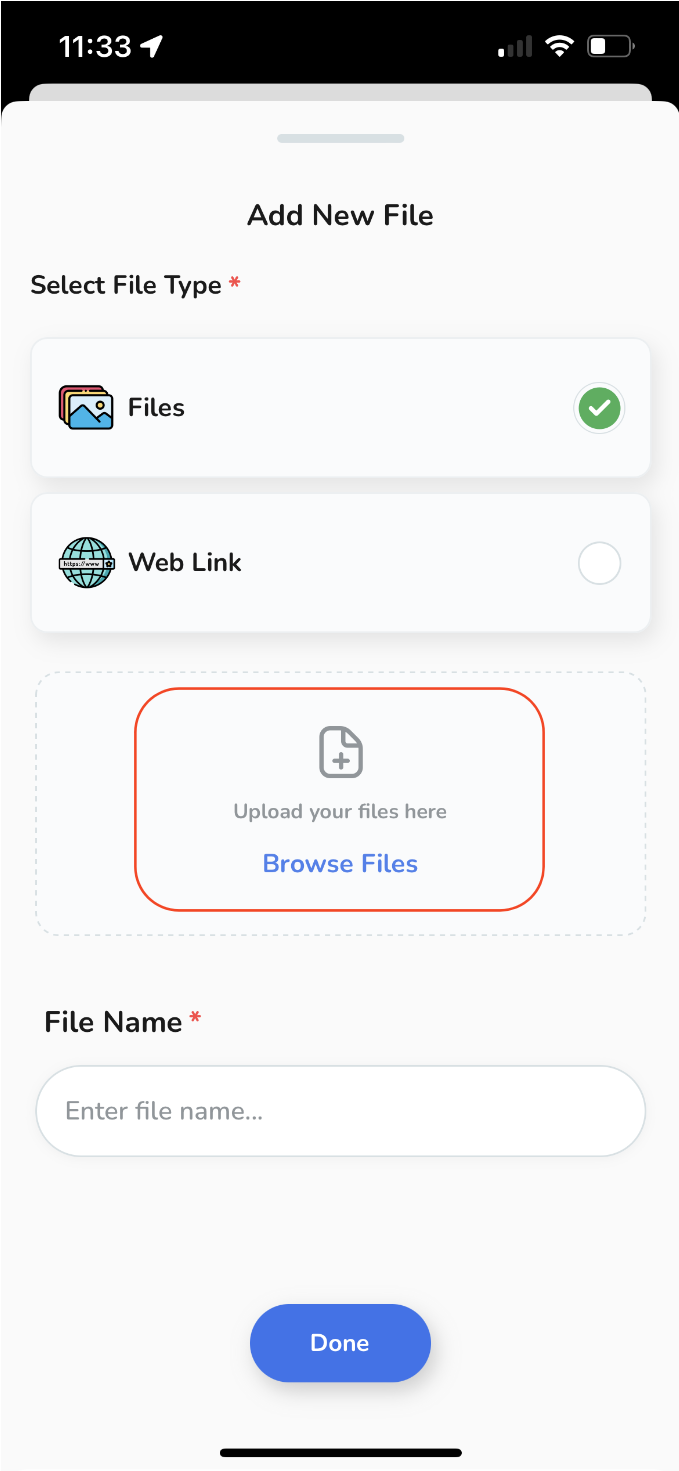
Select "Files" and then tap on "Browse Files",
Select "Files" and then tap on "Browse Files",
-
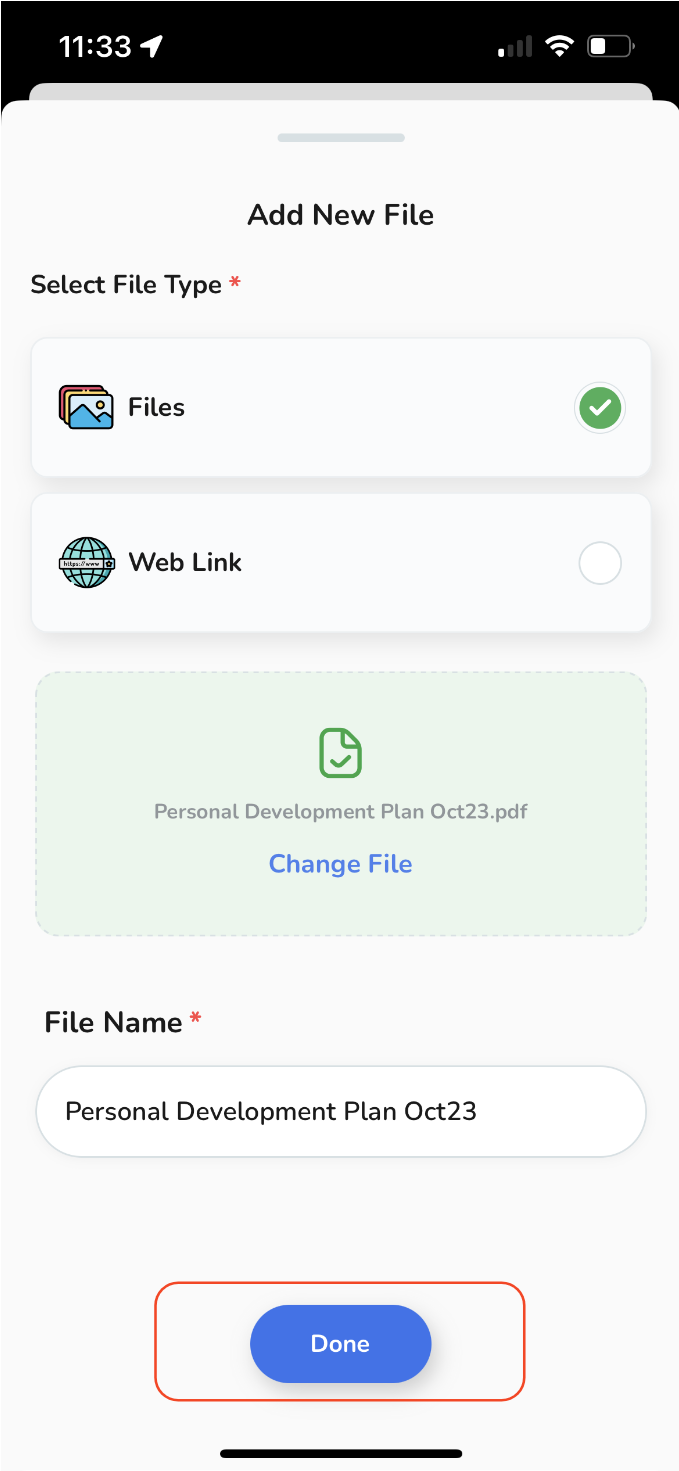
Select the desired file from your device, give it a name and then tap "Done".
Select the desired file from your device, give it a name and then tap "Done".
-
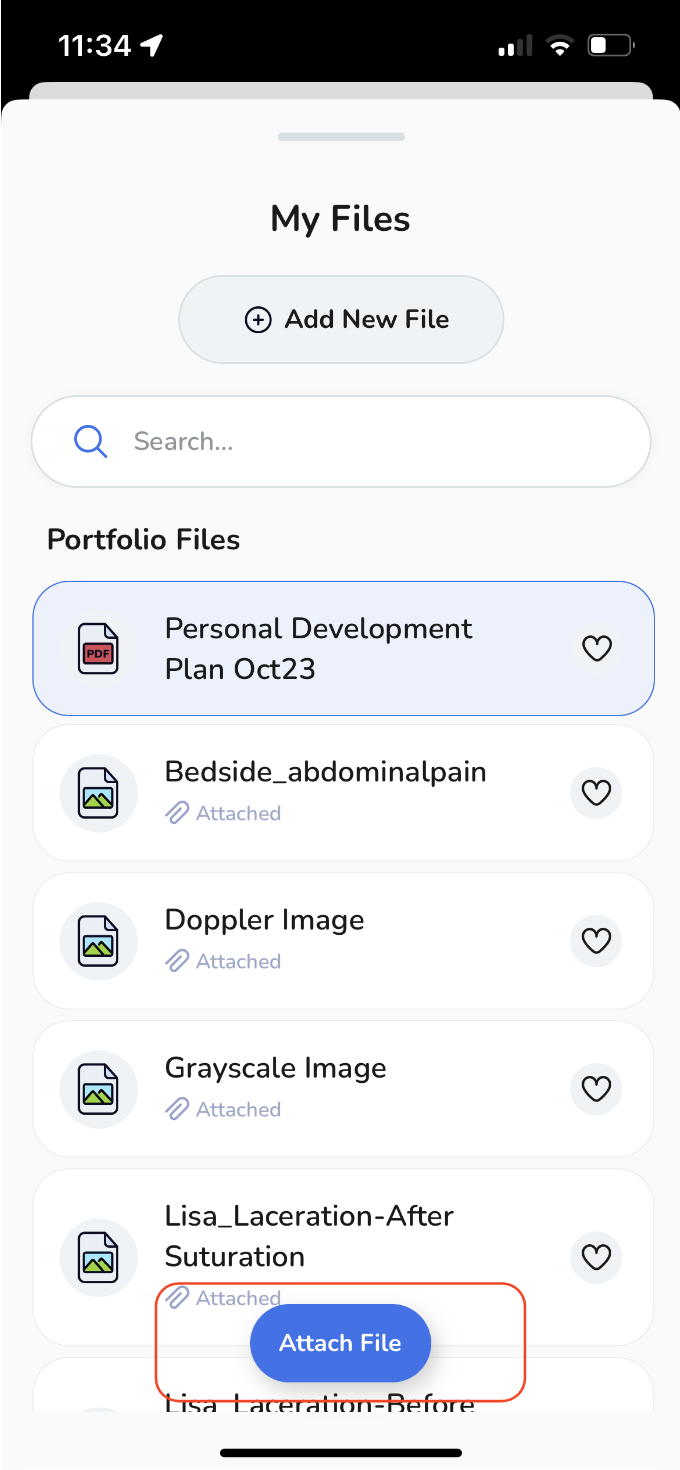
The recently added file will join your personal storage files. Simply tap "Attach File" to incorporate it into your event.
The recently added file will join your personal storage files. Simply tap "Attach File" to incorporate it into your event.
To add a weblink, select "Web Link"
-
Provide the URL link along with a File Name, and then tap "Done".
Provide the URL link along with a File Name, and then tap "Done".
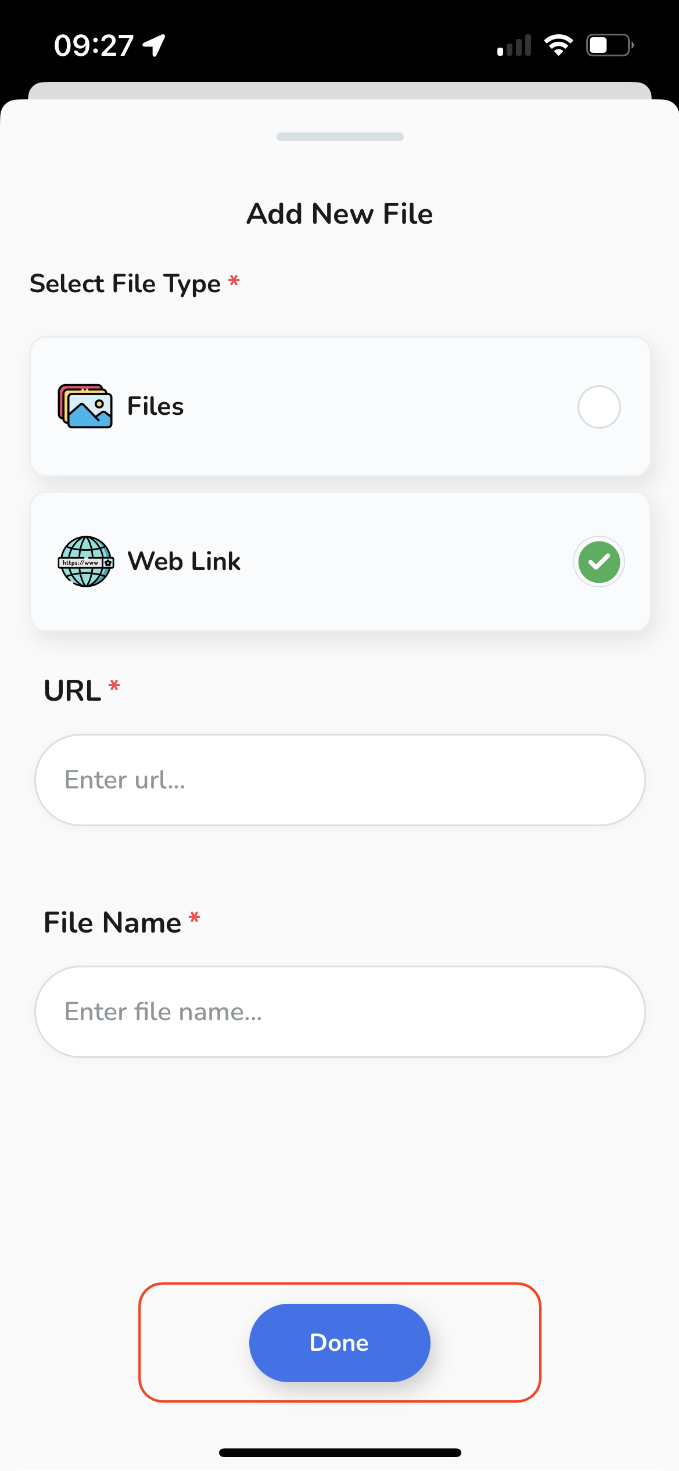
Your file will now be attached, If you wish to add multiple files, simply click on "Add Attachment" once more and follow the same process again.
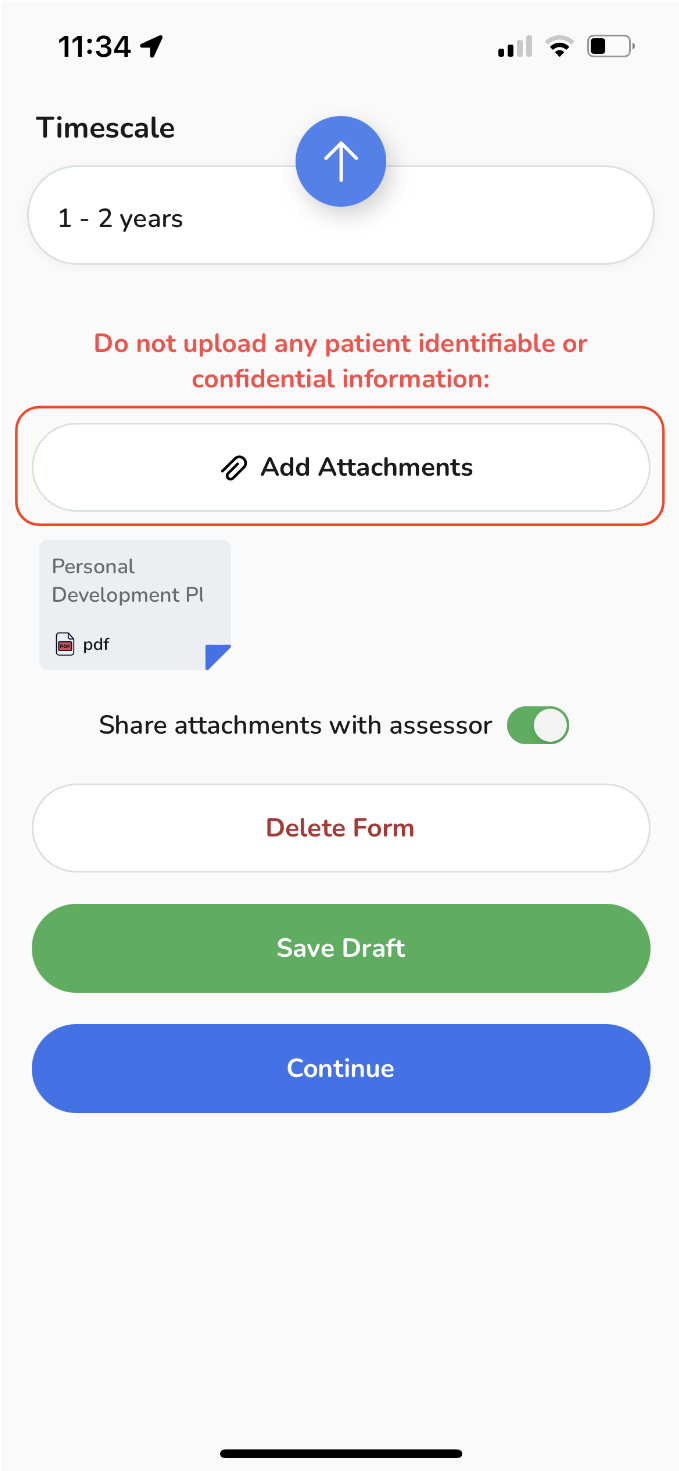
To access the recently uploaded file, download it or to remove it in case of an error, just click on the "file" box.
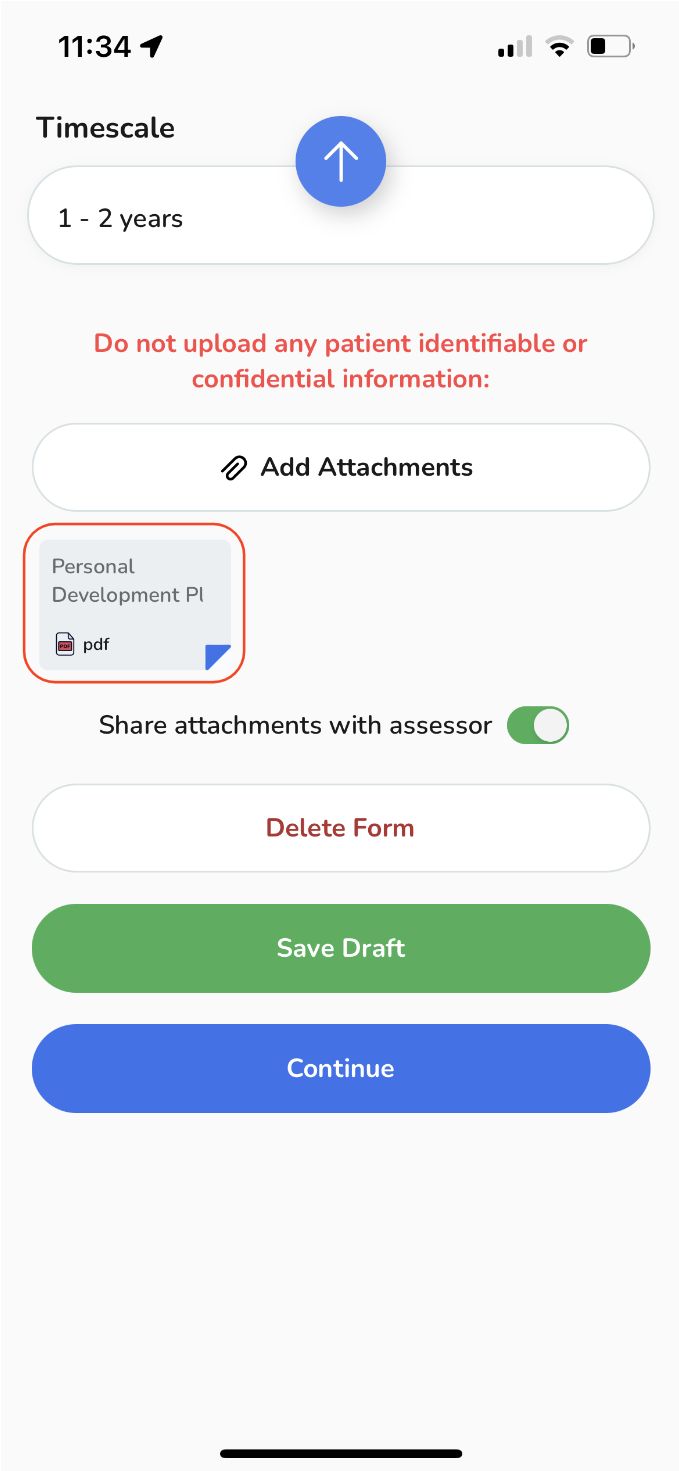
By tapping on the "toggle" button, you have the option to decide whether to share the attachment with your assessor or not.
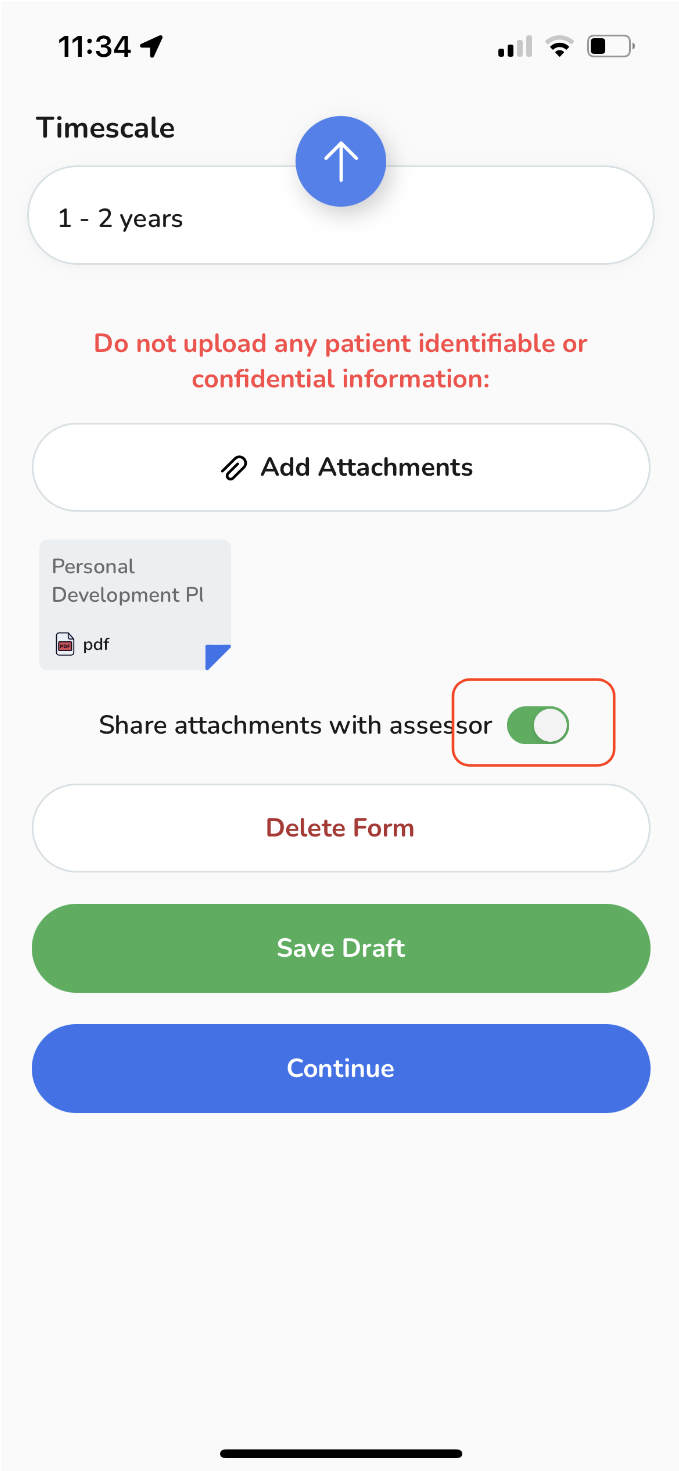
When you're ready, you have few options:
-
Delete your event completely.
Delete your event completely.
-
Save your session as a draft for future reference and make any necessary adjustments.
Save your session as a draft for future reference and make any necessary adjustments.
-
Alternatively, tap the "Continue" button to proceed with the submission.
Alternatively, tap the "Continue" button to proceed with the submission.
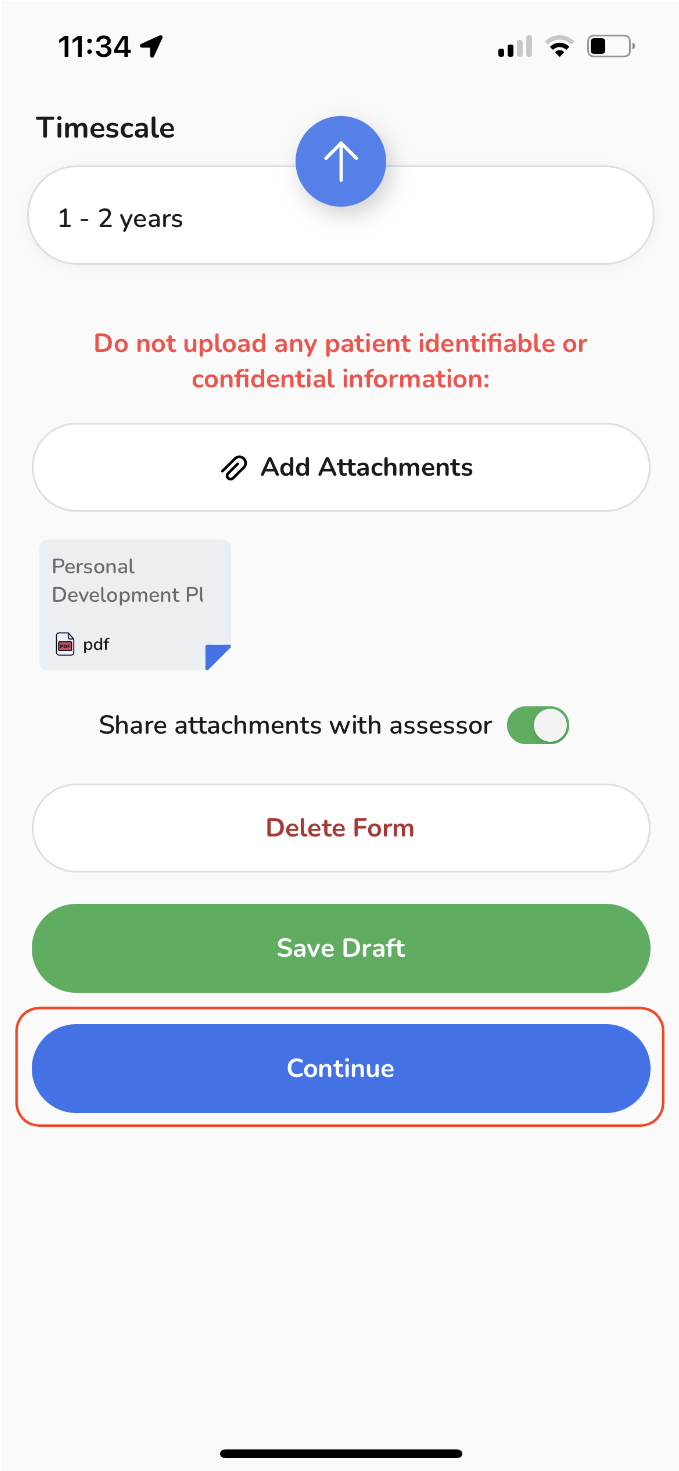
Once you've chosen "Continue", a pop-up window will surface, offering you the option to assign an assessor and gather feedback.
Assigning an assessor to your Personal Development Plan.
-
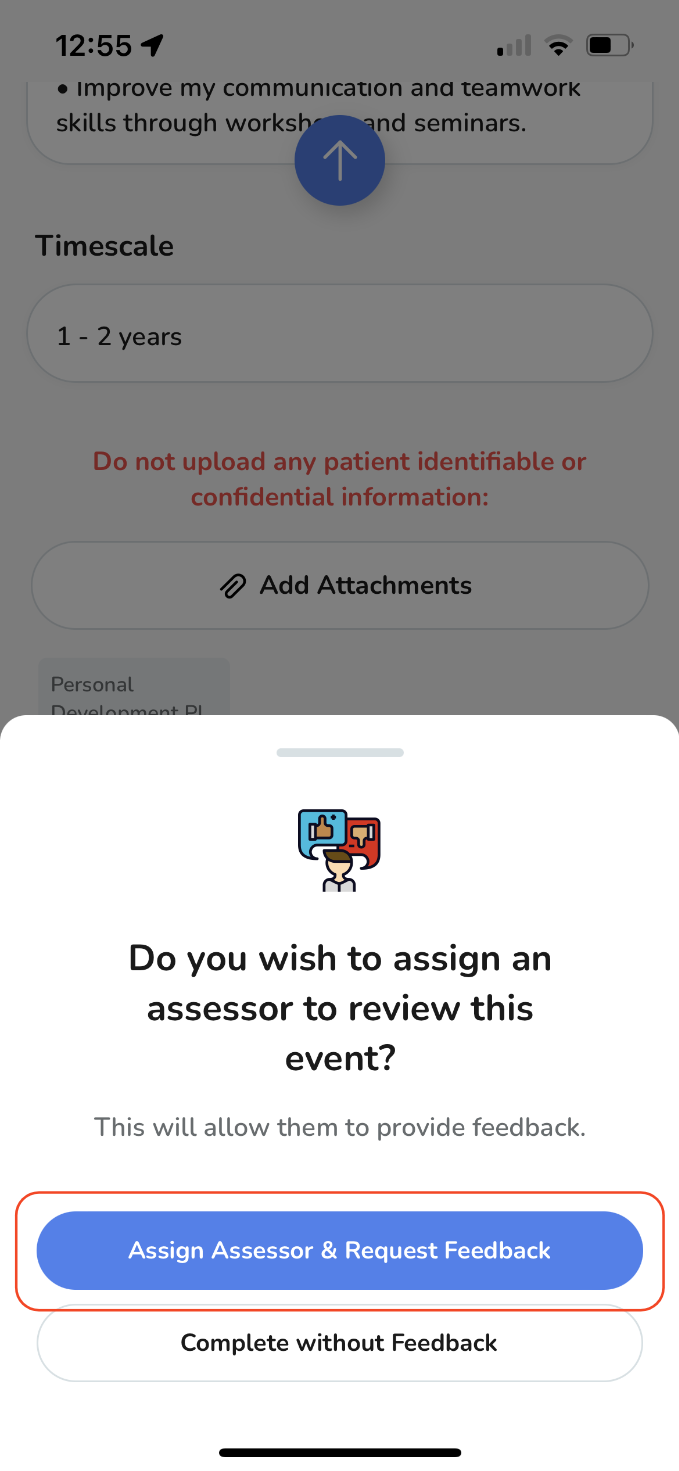
To assign an assessor for your event, tap on the "Assign Assessor & Request Feedback" button.
-
If you prefer to complete the event without feedback, choose the appropriate option accordingly.
-
-
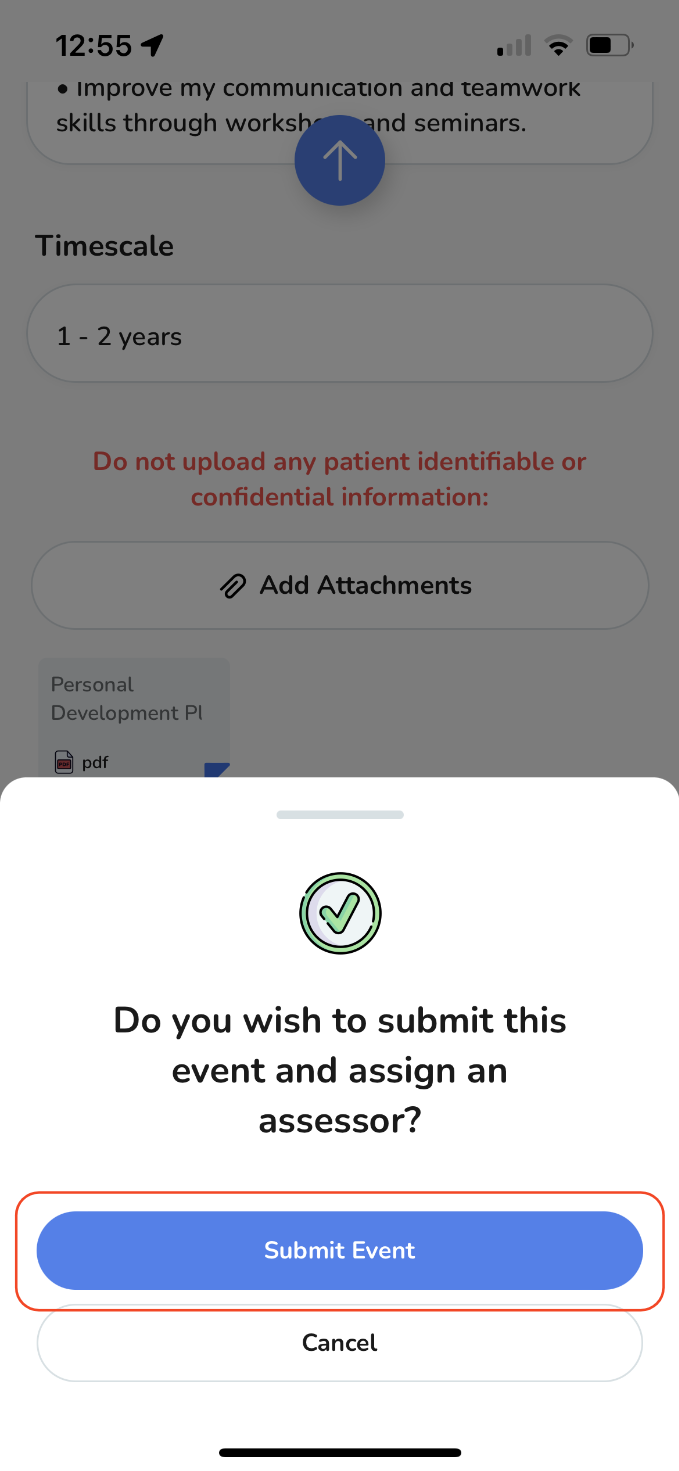
Then tap in "Submit Event" on the second pop-up.
-
Once tapped, enter the assessor's email address. Alternatively, you can choose an assessor from the list of recent assessors (if available).
-
Then tap on the "Assign" button.
To assign an assessor for your event, tap on the "Assign Assessor & Request Feedback" button.
-
If you prefer to complete the event without feedback, choose the appropriate option accordingly.
If you prefer to complete the event without feedback, choose the appropriate option accordingly.
Then tap in "Submit Event" on the second pop-up.
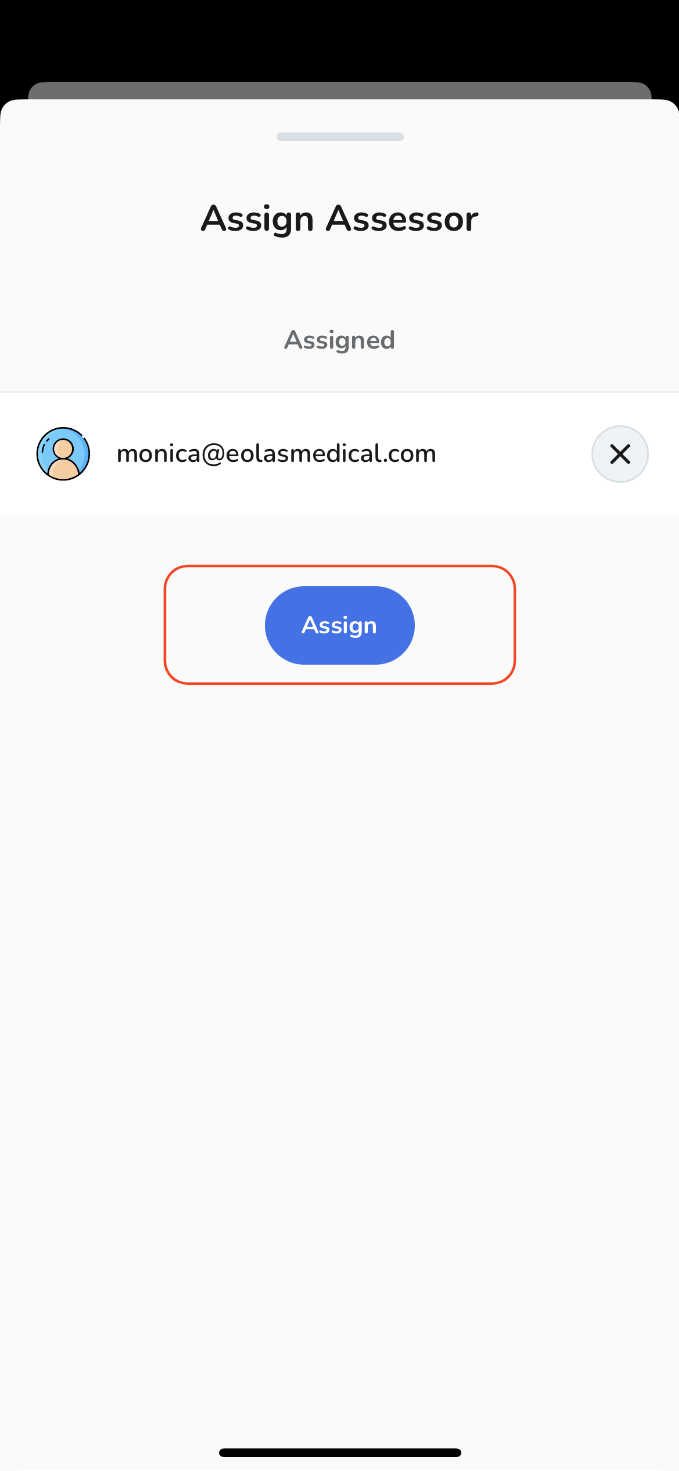
Once tapped, enter the assessor's email address. Alternatively, you can choose an assessor from the list of recent assessors (if available).
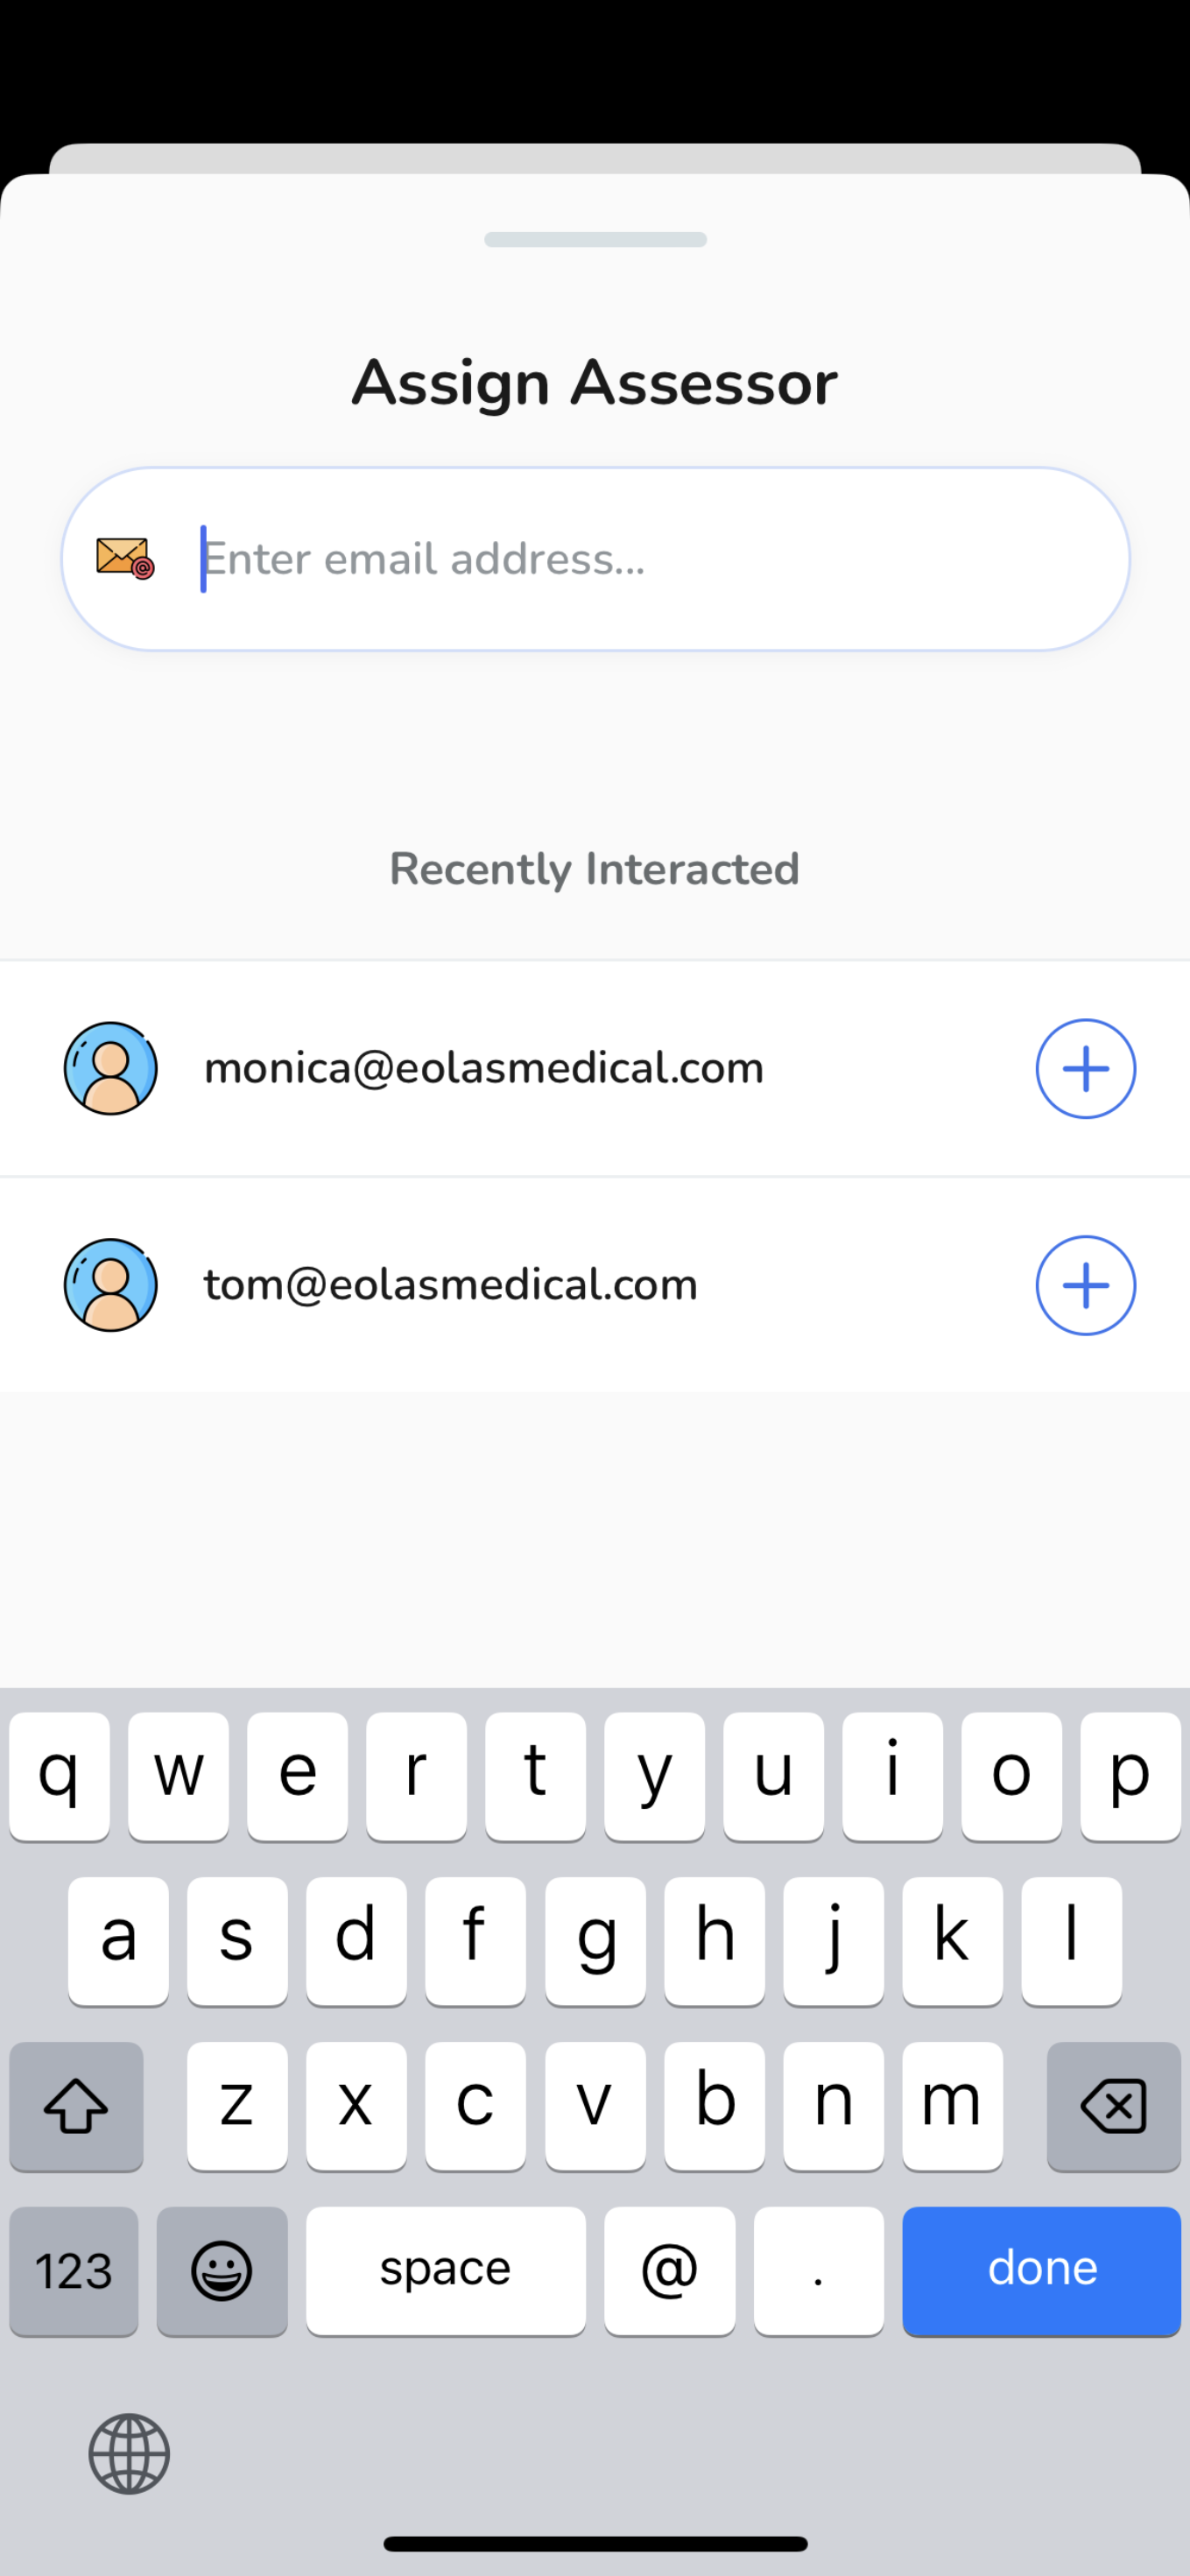
Then tap on the "Assign" button.
What happens after assigning an assessor?
-
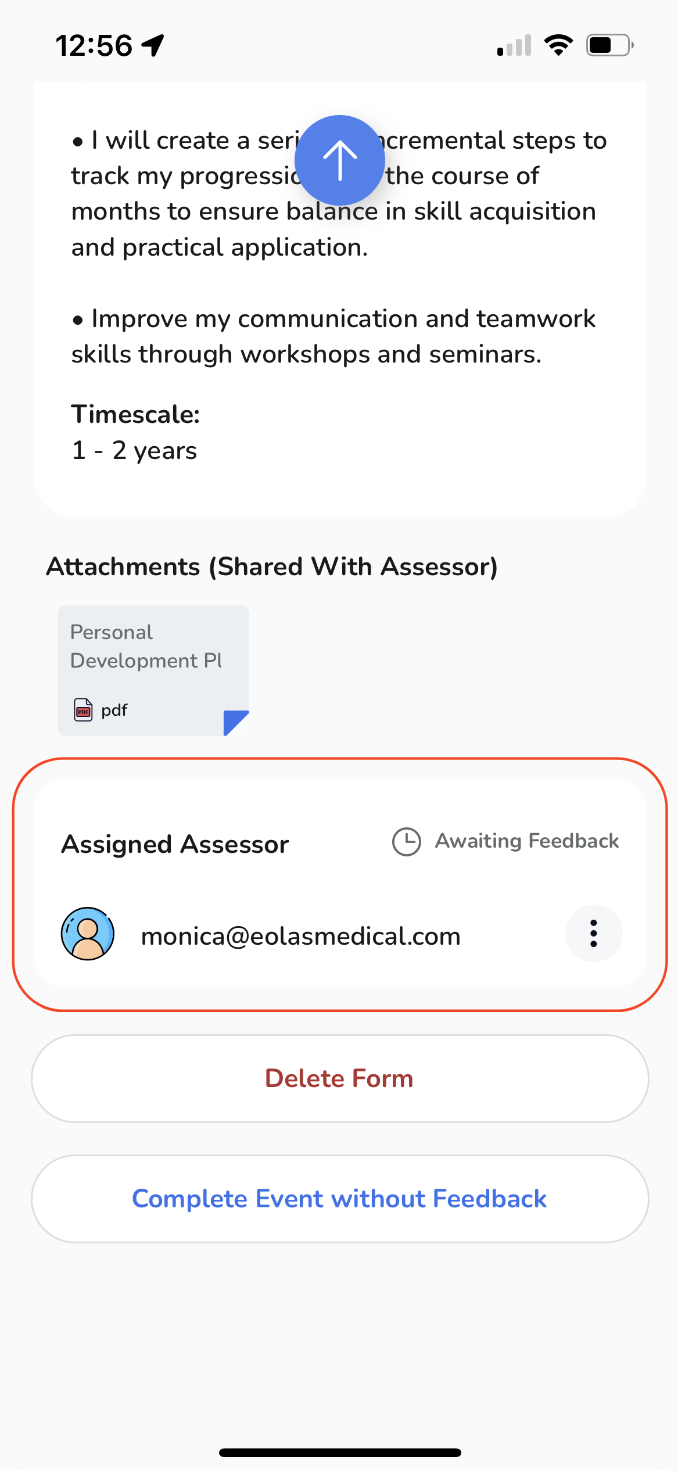
Upon submitting, you will be directed to the event's page. Here, you can view important details such as the assigned assessor and the feedback status.
At this point your event page will display a yellow label indicating "Pending".
-
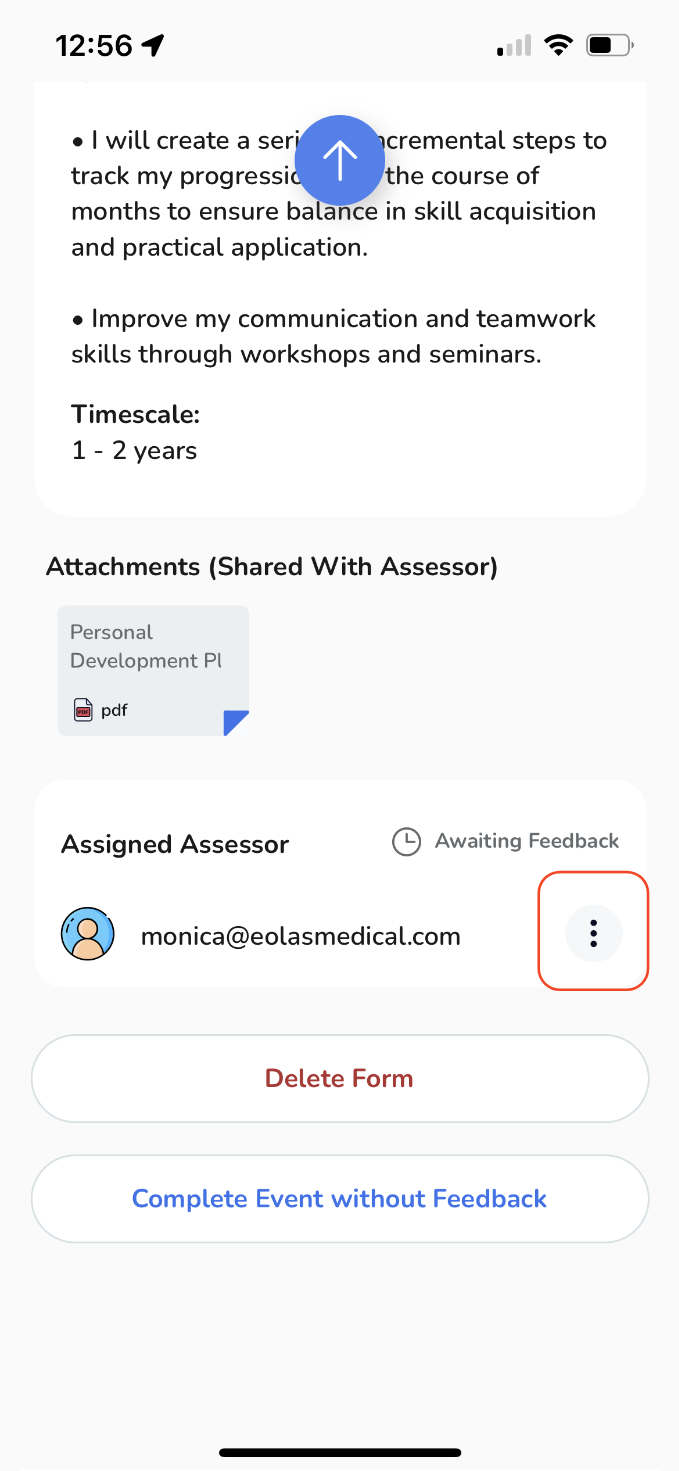
To send a reminder to the assessor or reassign assessor, simply tap on the "Three Dots" button next to the assessor's email and choose the appropriate option.
-
In addition, you have the flexibility to:
-
Delete it completely.
-
Or, choose to complete the case without feedback.
-
Upon submitting, you will be directed to the event's page. Here, you can view important details such as the assigned assessor and the feedback status.
At this point your event page will display a yellow label indicating "Pending".
To send a reminder to the assessor or reassign assessor, simply tap on the "Three Dots" button next to the assessor's email and choose the appropriate option.
In addition, you have the flexibility to:
-
Delete it completely.
Delete it completely.
-
Or, choose to complete the case without feedback.
Or, choose to complete the case without feedback.
Receiving feedback from an assessor.
-
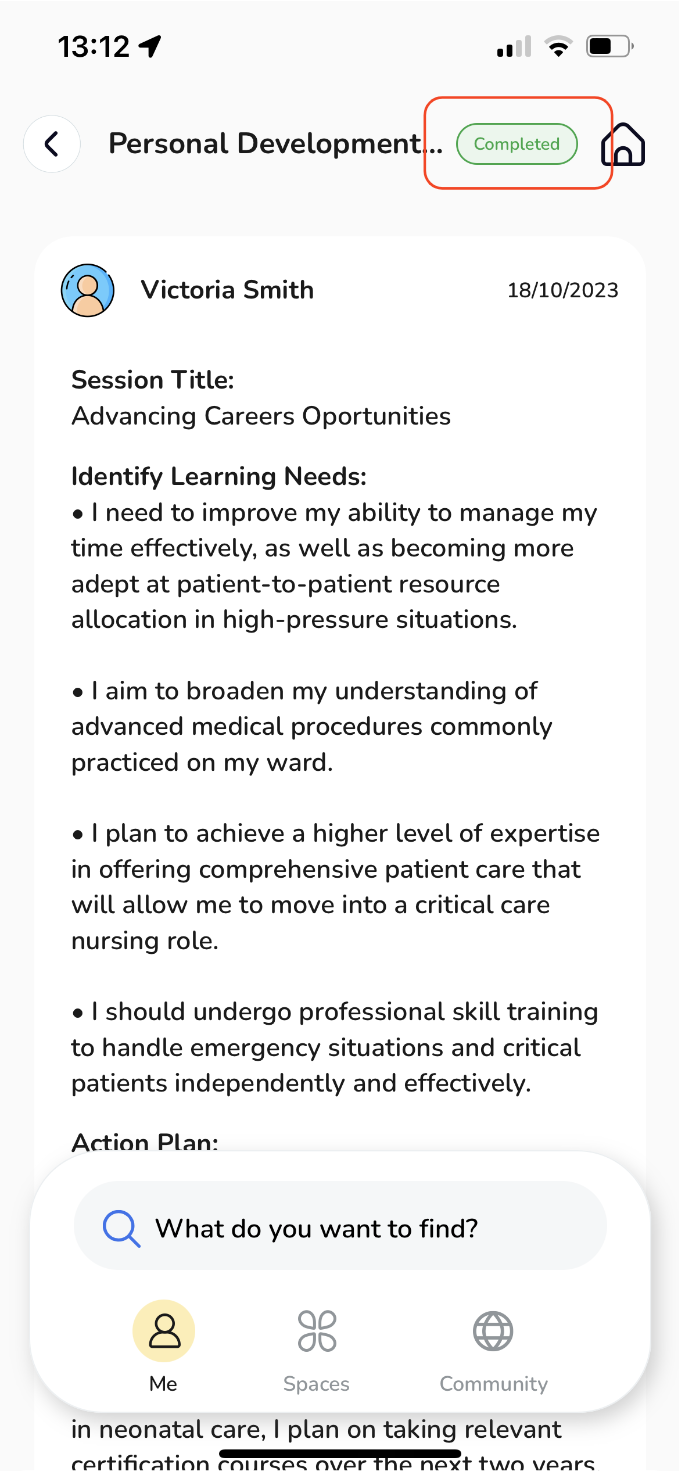
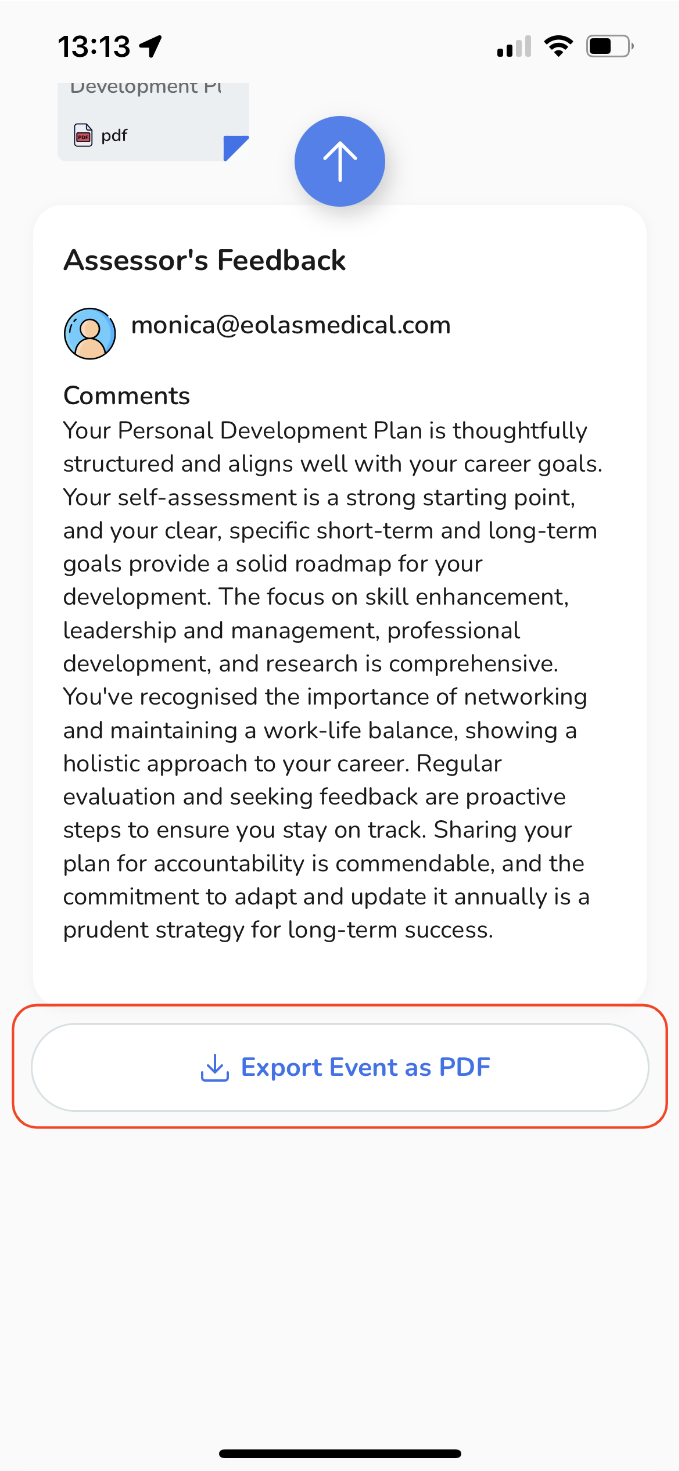
After receiving feedback from your assessor, the Personal Development Plan page will display a green label indicating "Completed." To review the feedback, simply scroll down on the page.
-
Additionally, if desired, you have the option to export the feedback as a PDF by tapping on the "Export Event as PDF" button.
-
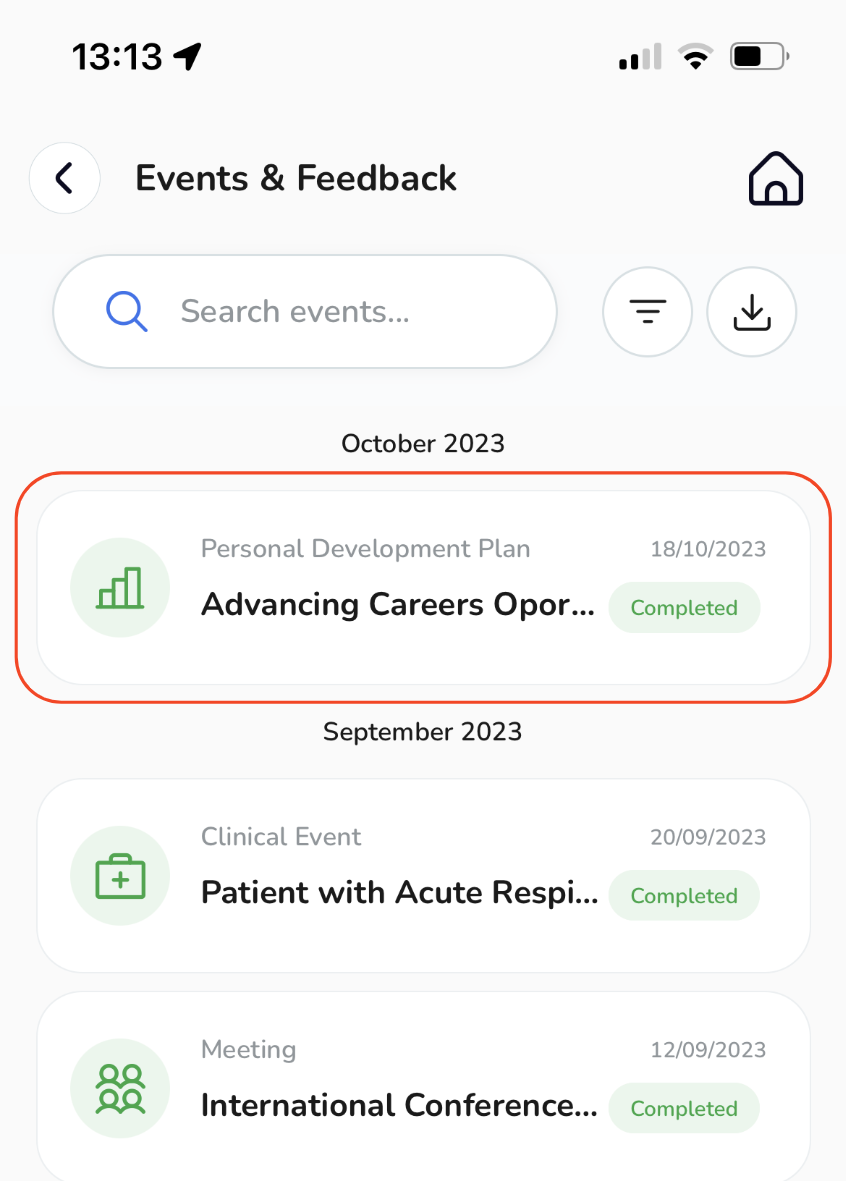
Returning to the Events & Feedback page, you will notice that the event is marked as "Complete" with a green label.
After receiving feedback from your assessor, the Personal Development Plan page will display a green label indicating "Completed." To review the feedback, simply scroll down on the page.
Additionally, if desired, you have the option to export the feedback as a PDF by tapping on the "Export Event as PDF" button.
Returning to the Events & Feedback page, you will notice that the event is marked as "Complete" with a green label.
With these steps, you can seamlessly integrate your Personal Development Plan event into your e- portfolio!


