Adding a New Clinical Event to your Portfolio. | Eolas Medical | Help Center
Learn how to add Clinical event to your portfolio, attach support evidence, requesting feedback, and submitting the event.
Introducing Clinical Events — an invaluable tool for your medical portfolio that revolutionises comprehensive record-keeping and organisational efficiency.
Simplified Record Keeping.
With Clinical Events, record keeping becomes a breeze. Easily log procedures, case discussions, and clinical events to maintain a comprehensive record of your valuable experience and expertise.
Documenting Every Clinical Milestone.
Capture and document every intriguing case, intricate procedure, and valuable learning point across your entire career journey with Clinical Events.
Streamlined Organization.
Say goodbye to cluttered notes and overlooked details. Clinical Events keeps all your essential information and documents seamlessly organised in one convenient location, ensuring you never miss a beat in your medical practice.
Web - Add a Clinical Event.
-
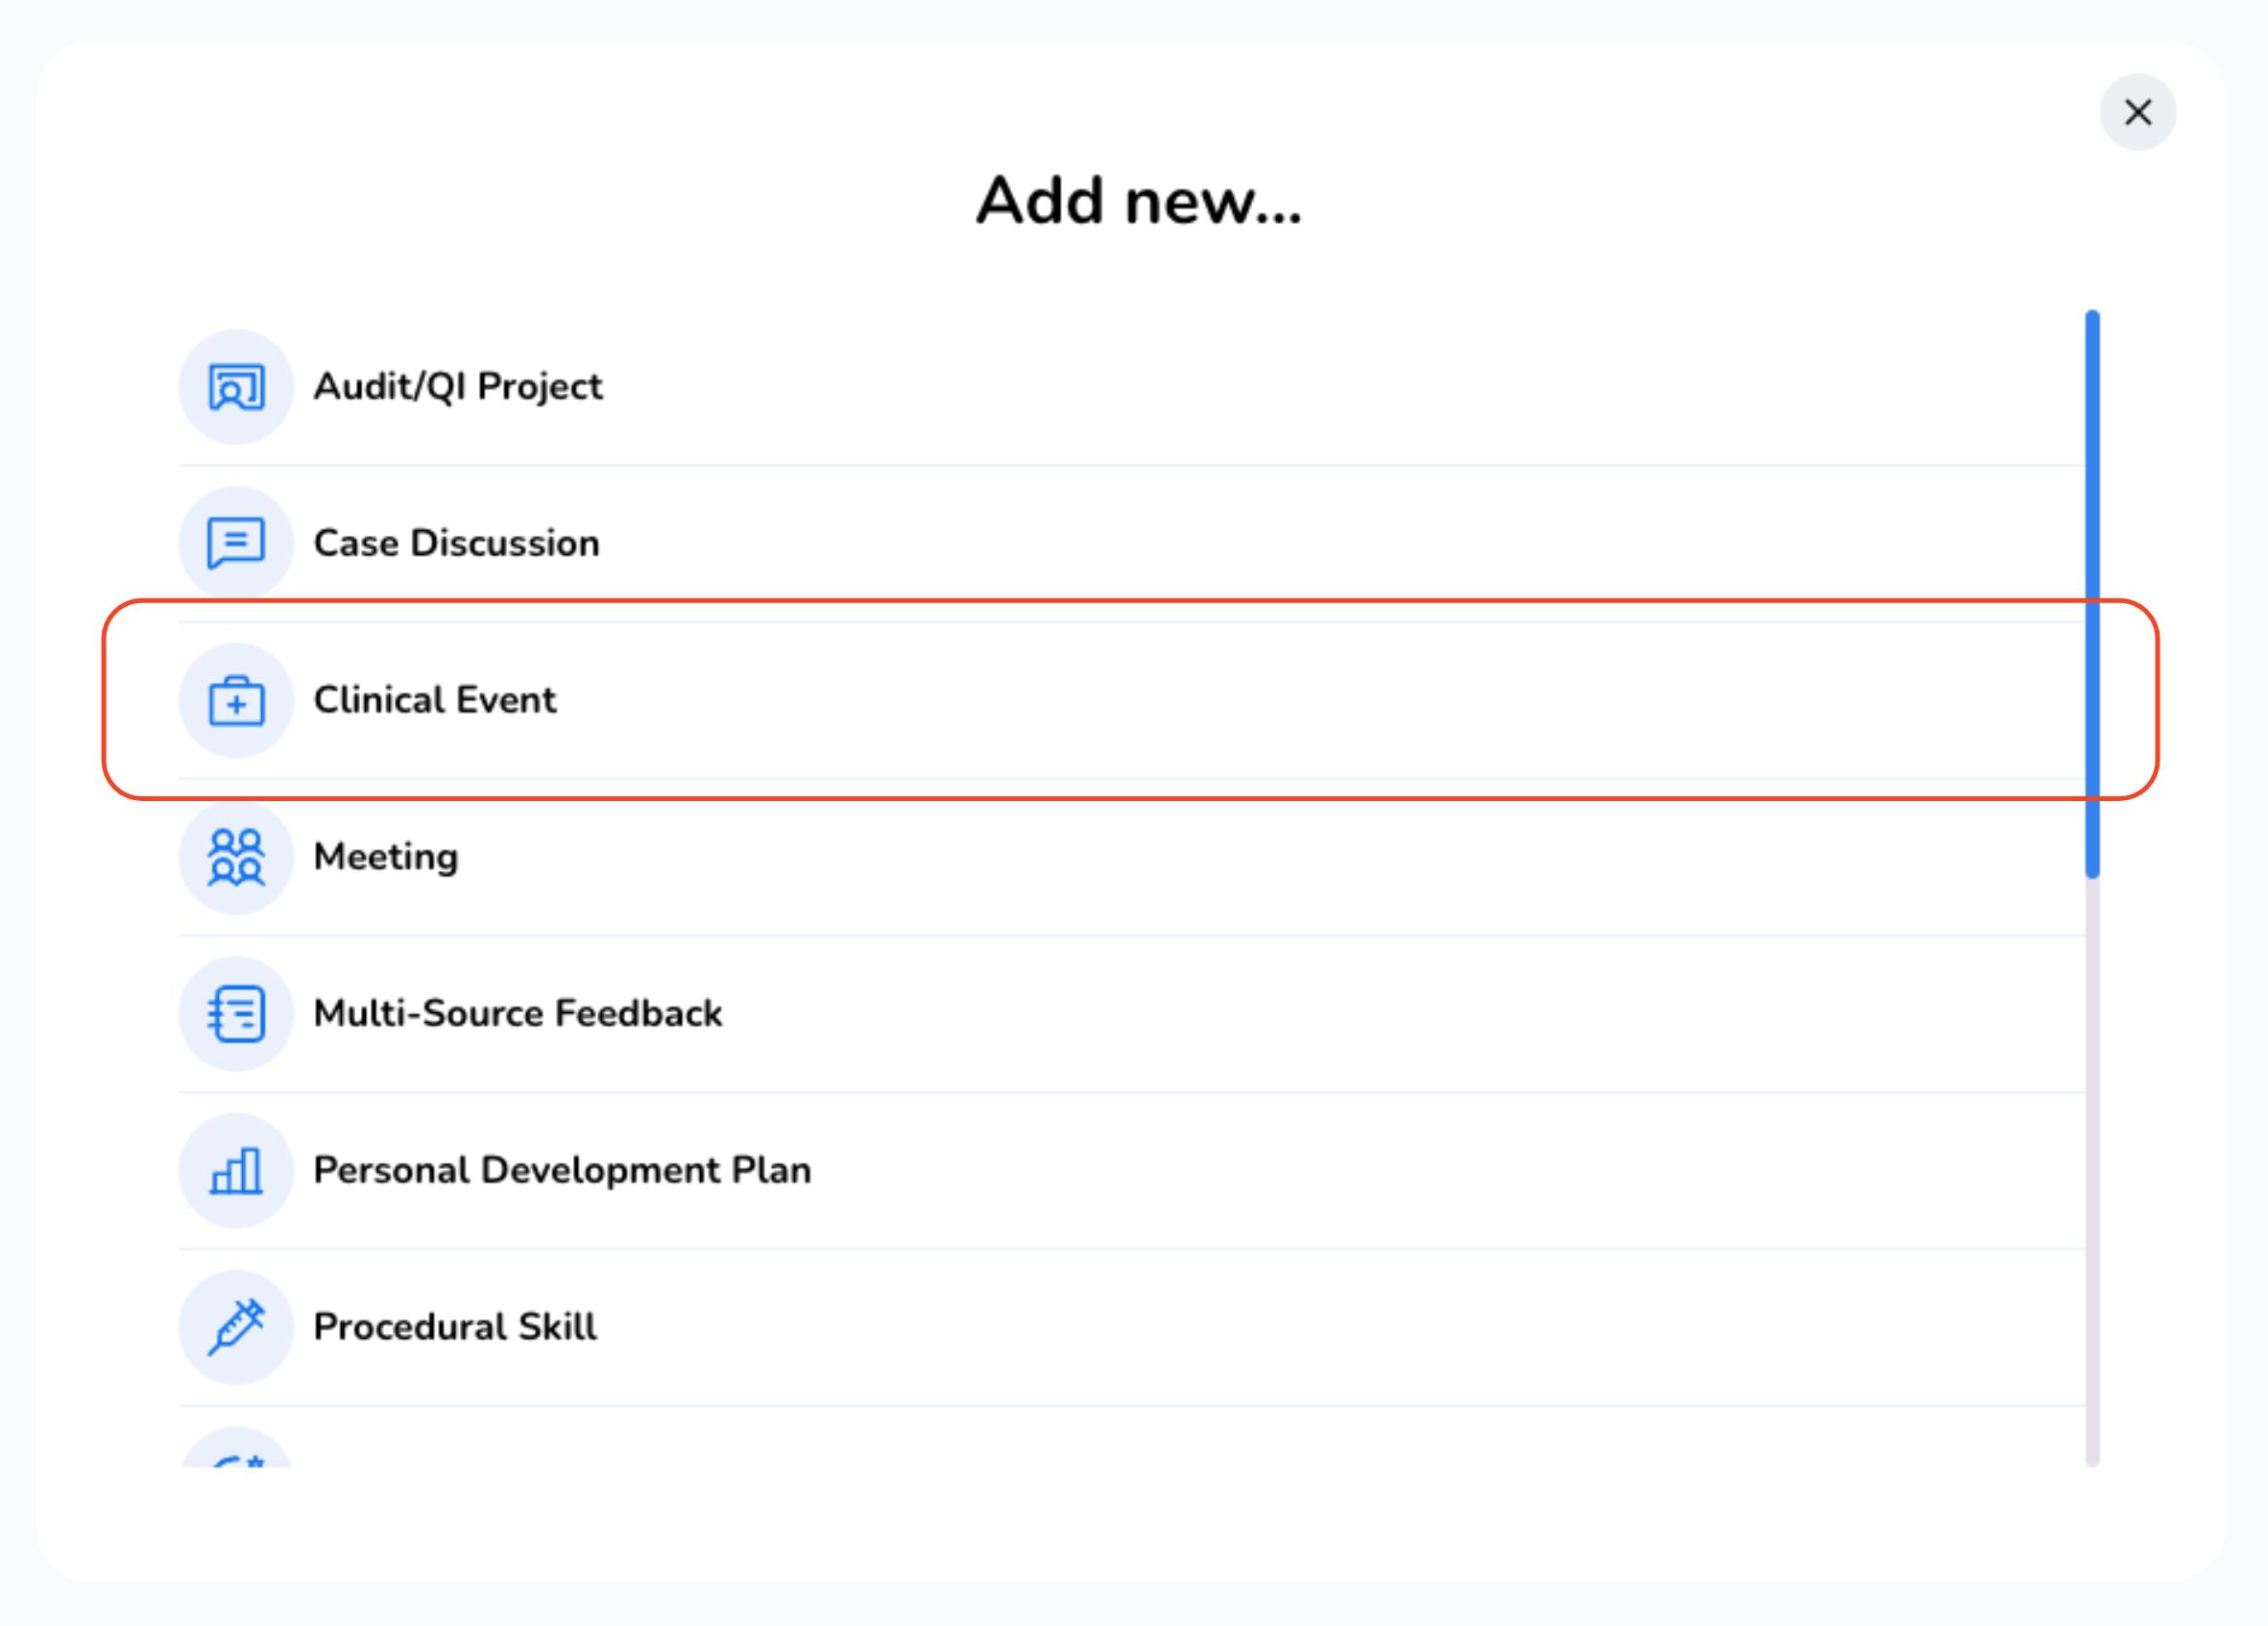
Start by choosing "Clinical Event" from the list of available options.
-
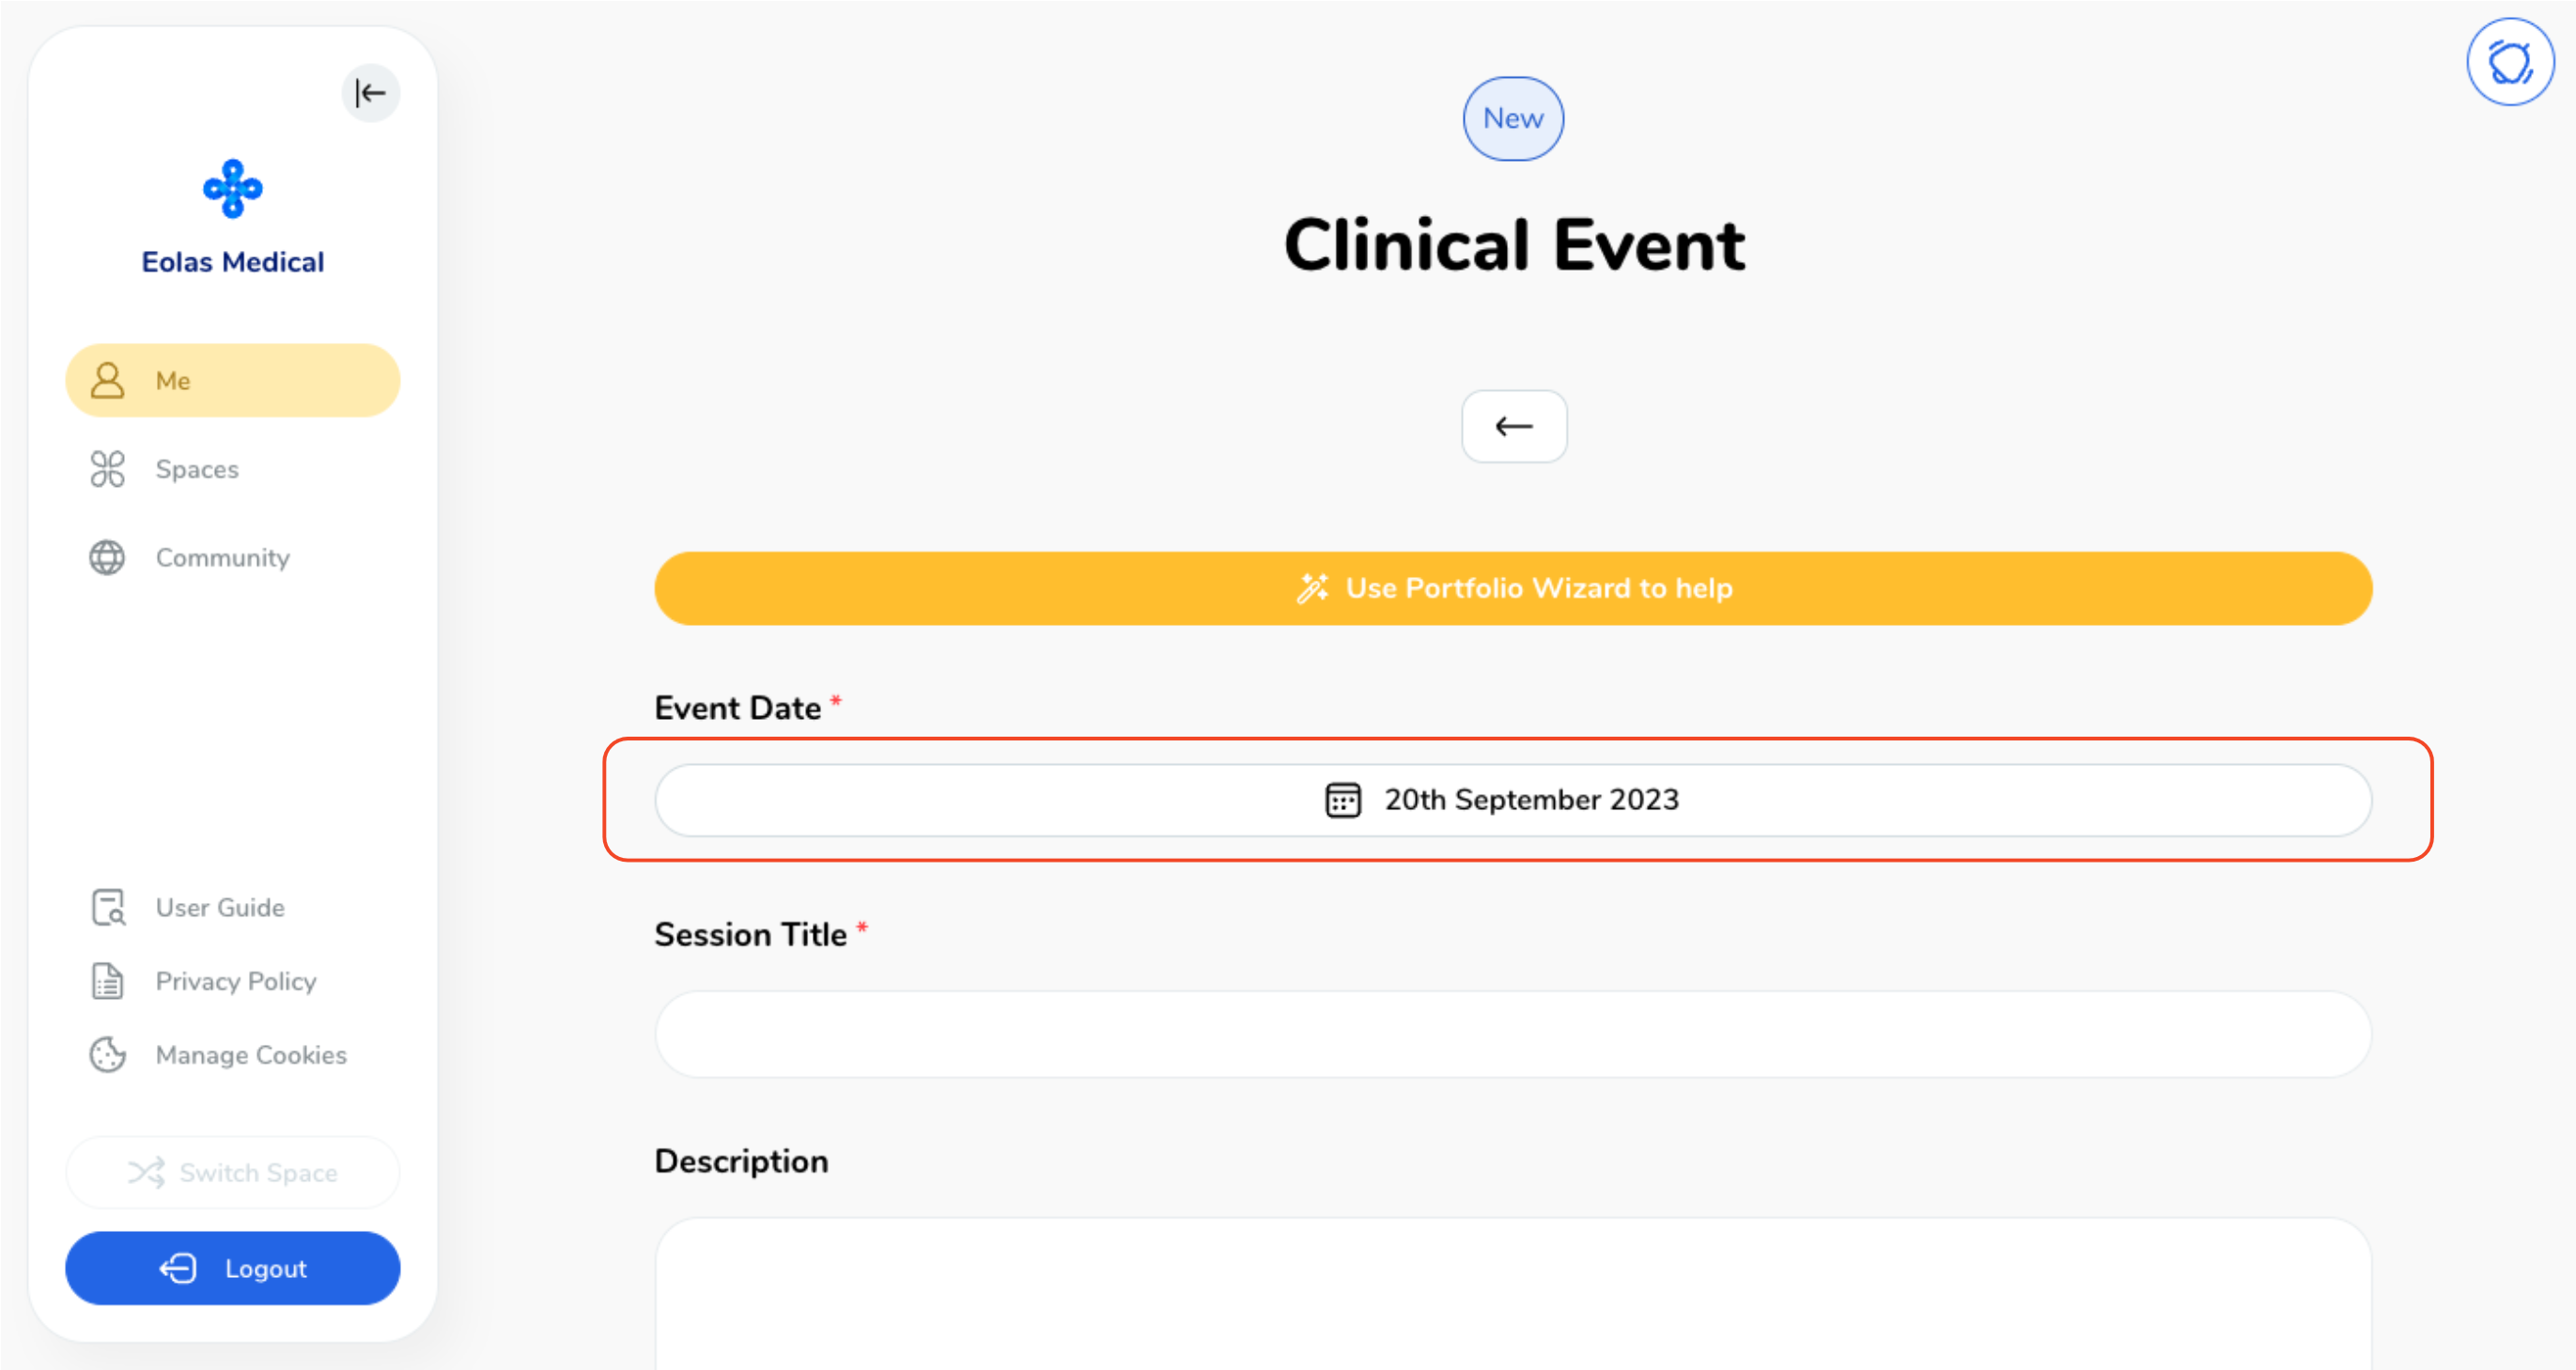
Select the date for your event. By default, the current date will be shown, but if you want to make changes, just click the "Date" button and select your desired date.
-
Title your case with a captivating and informative headline.
-
Compose a detailed description, providing all the relevant information and insights.
-
Feel free to include any additional comments or pertinent details that you believe are important.
-
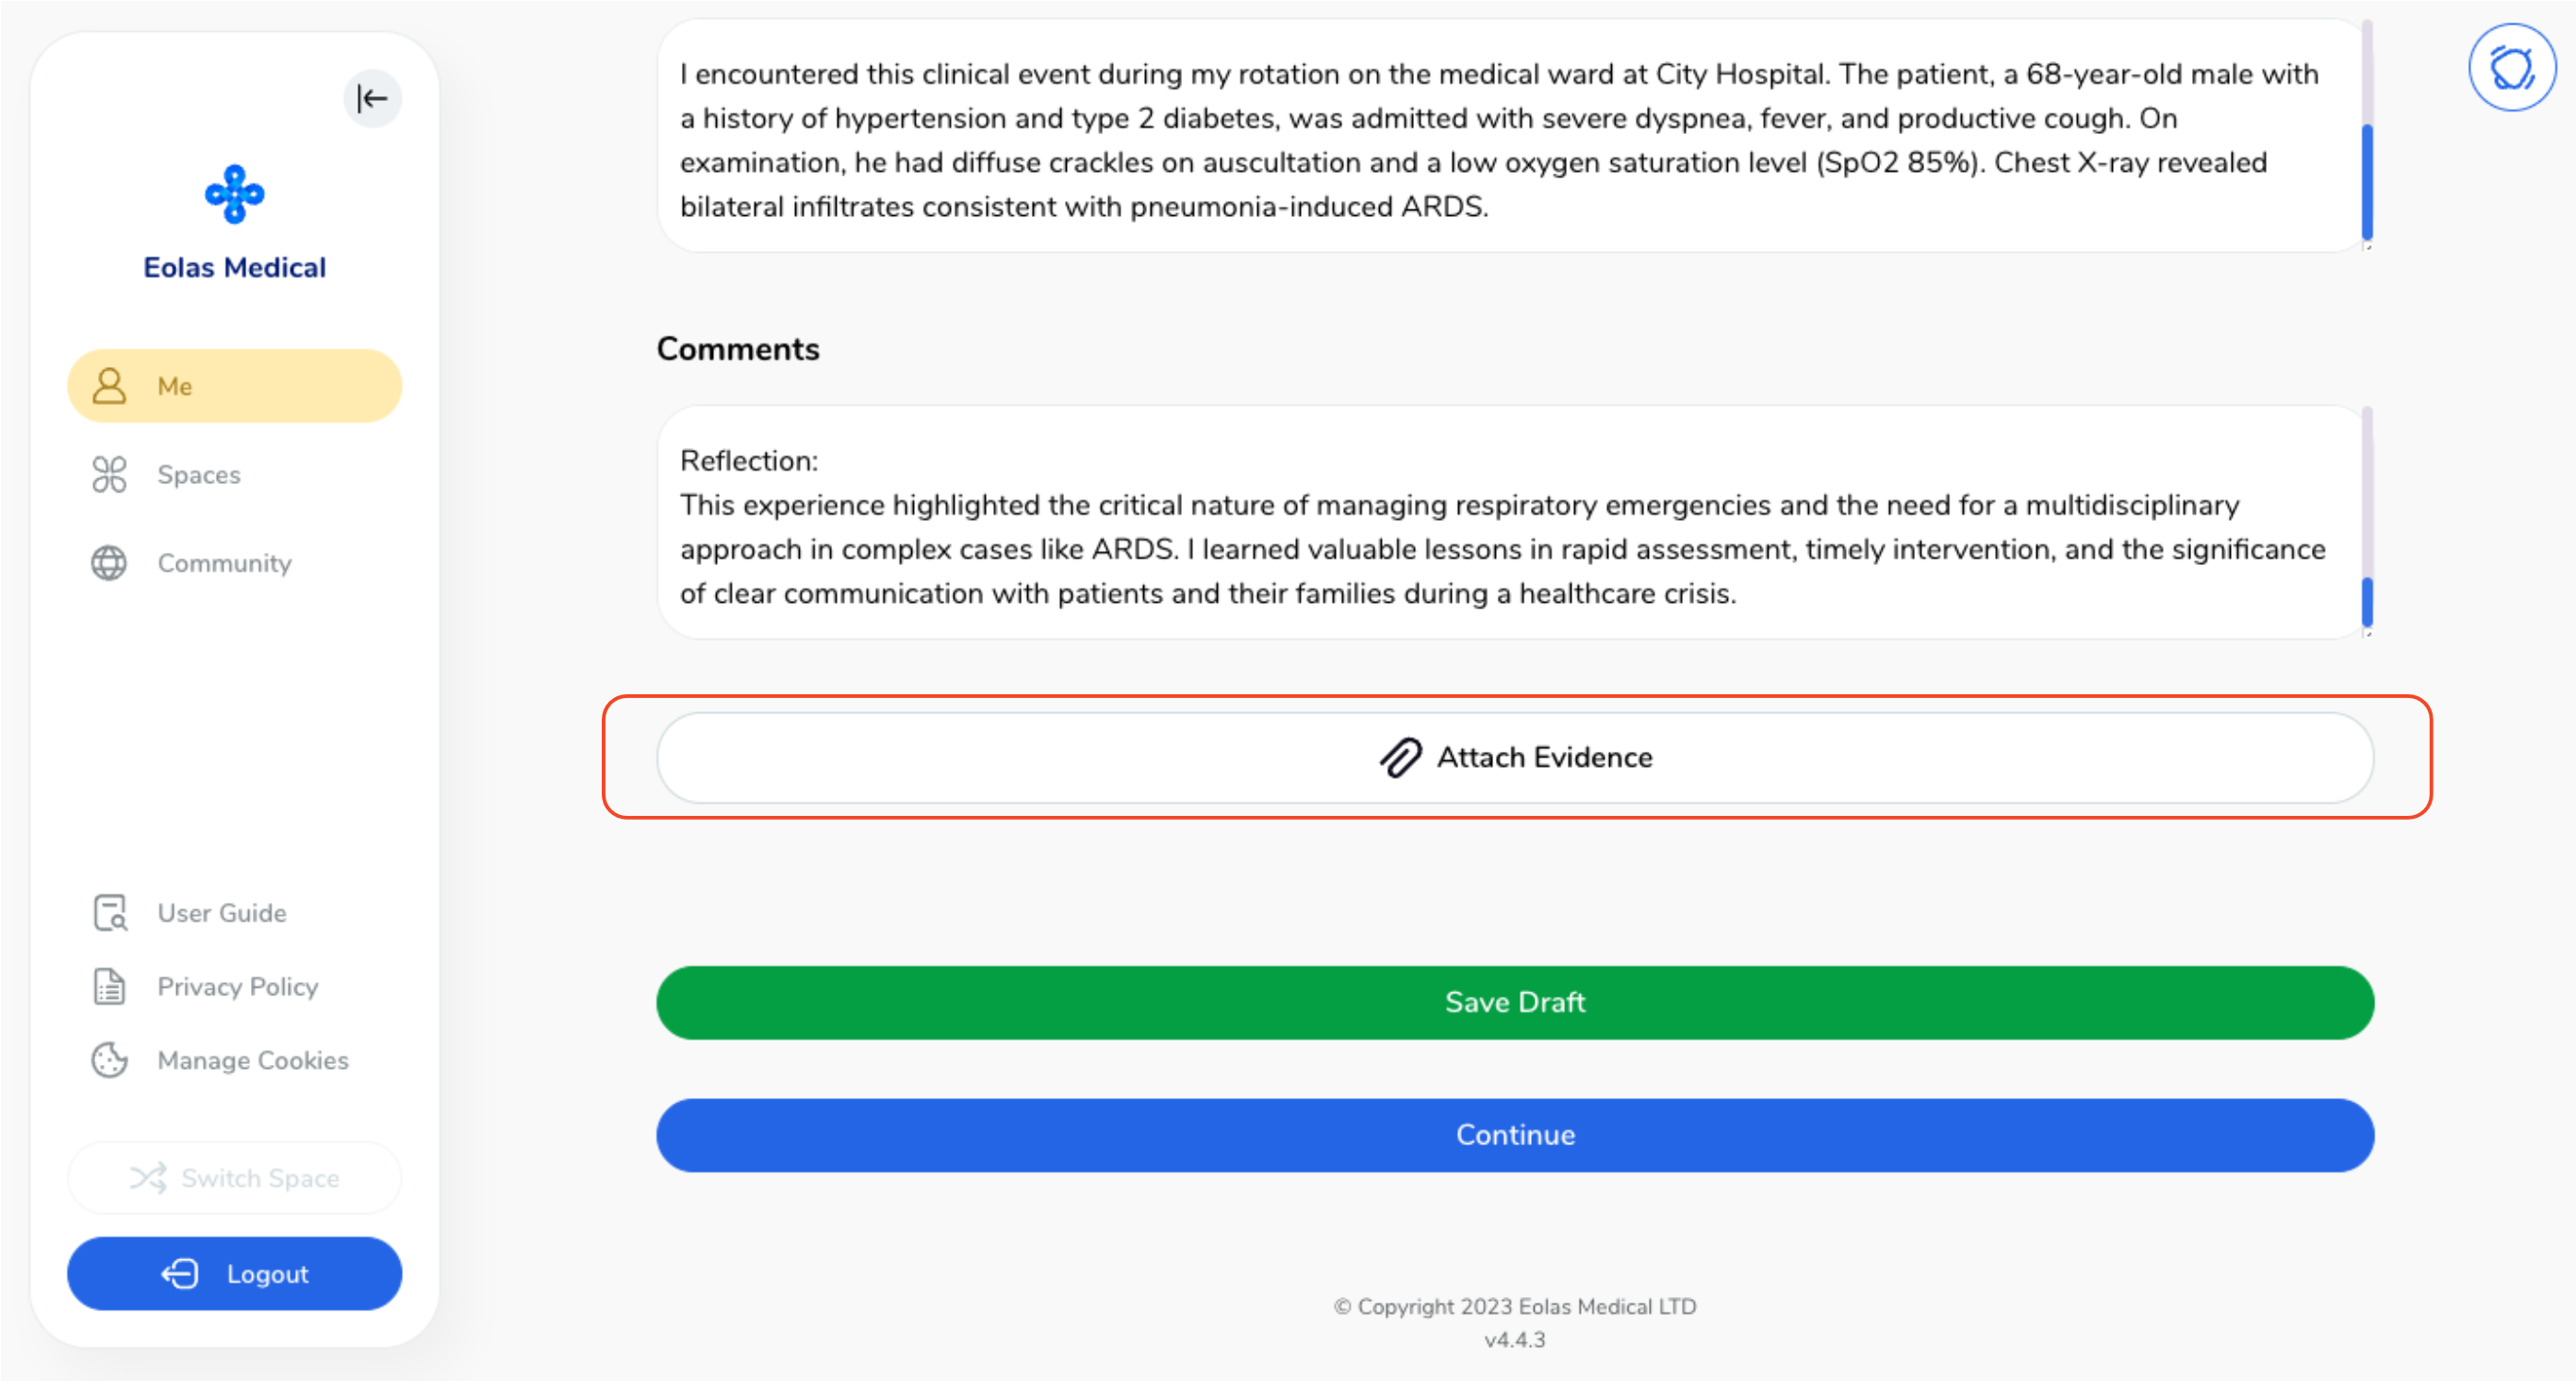
If you want to go above and beyond and document your session, click on the "Attach Evidence" option to include supporting materials.
-
A pop-up window will appear. You can either choose from your existing files or upload a new one from your device.
-
To upload a new file, select "Add New File".
-
Depending on your needs, you can upload various file types like MS Office documents, PDFs, images, videos and web links.
-
To upload a new file,
-
To add a weblink,
-
Your file will now be attached, If you wish to add multiple files, simply click on "Attach Evidence" once more and follow the same process again.
-
By clicking on the "toggle" button, you have the option to decide whether to share the attachment with your assessor or not.
-
When you're ready, you have two options:
-
Once you've chosen "Continue", a pop-up window will surface, offering you the option to assign an assessor and gather feedback.
Start by choosing "Clinical Event" from the list of available options.
Select the date for your event. By default, the current date will be shown, but if you want to make changes, just click the "Date" button and select your desired date.
Title your case with a captivating and informative headline.
Compose a detailed description, providing all the relevant information and insights.
Feel free to include any additional comments or pertinent details that you believe are important.
If you want to go above and beyond and document your session, click on the "Attach Evidence" option to include supporting materials.
A pop-up window will appear. You can either choose from your existing files or upload a new one from your device.
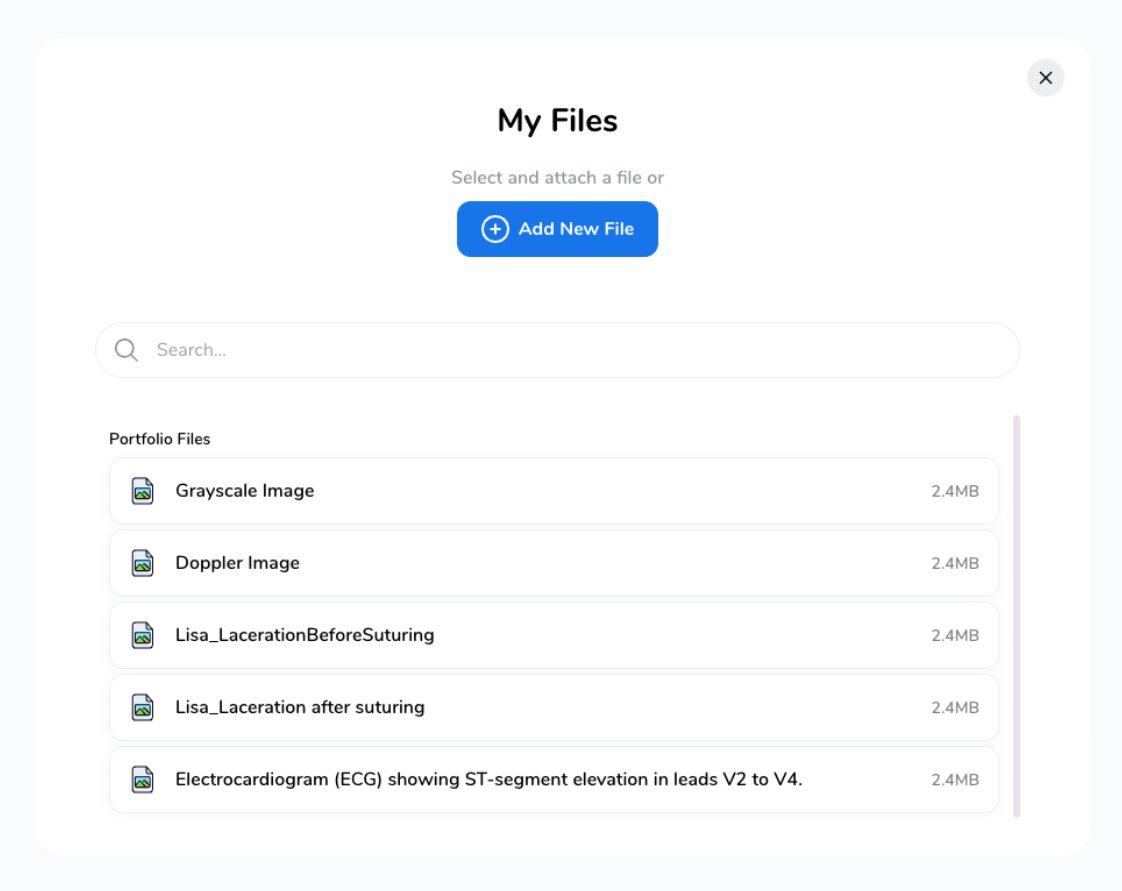
To upload a new file, select "Add New File".
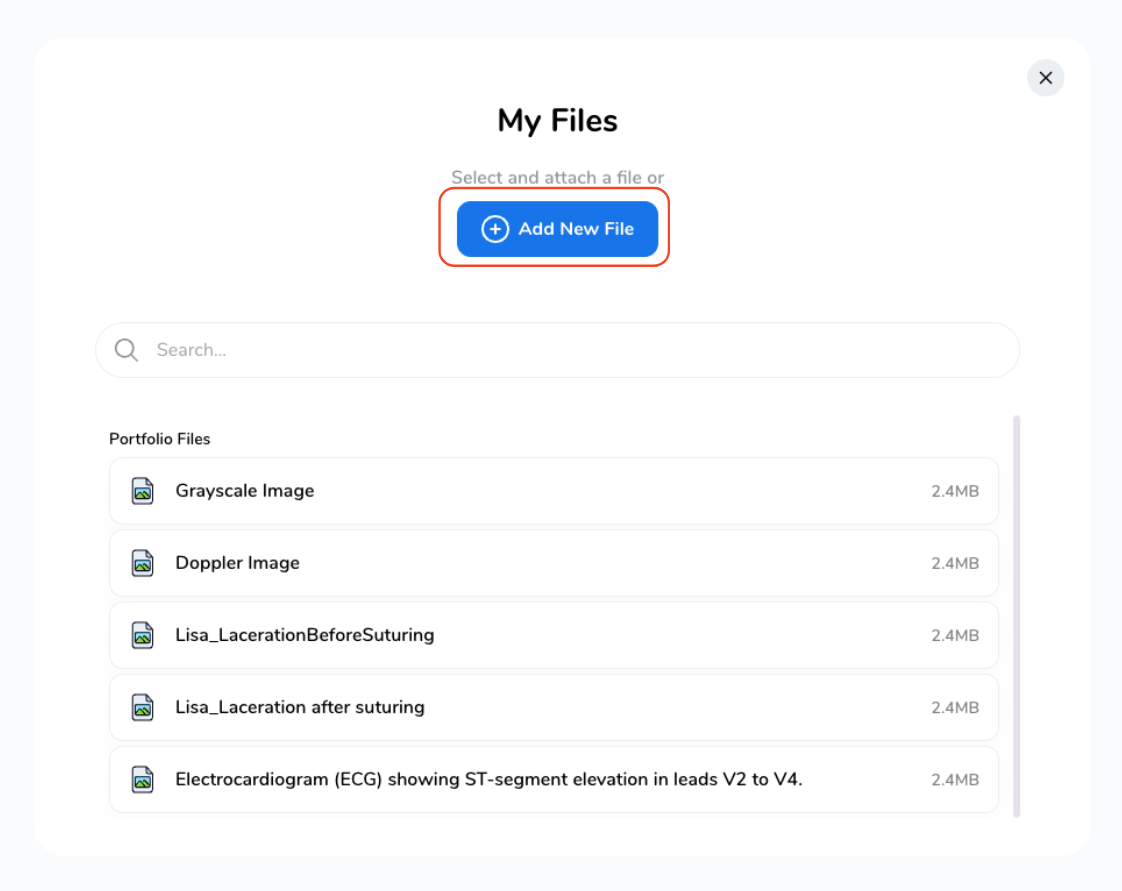
Depending on your needs, you can upload various file types like MS Office documents, PDFs, images, videos and web links.
To upload a new file,
-
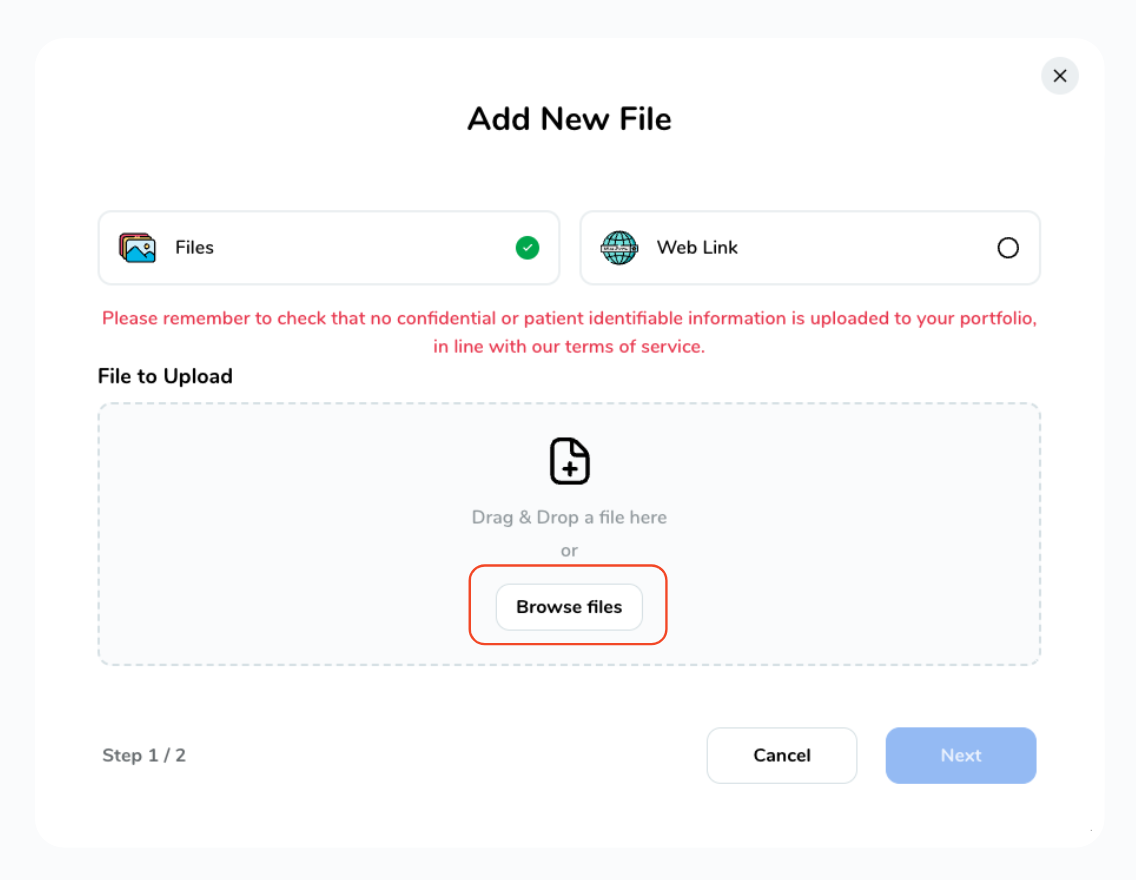
Select "Files", click on "Browse Files".
Select "Files", click on "Browse Files".
-
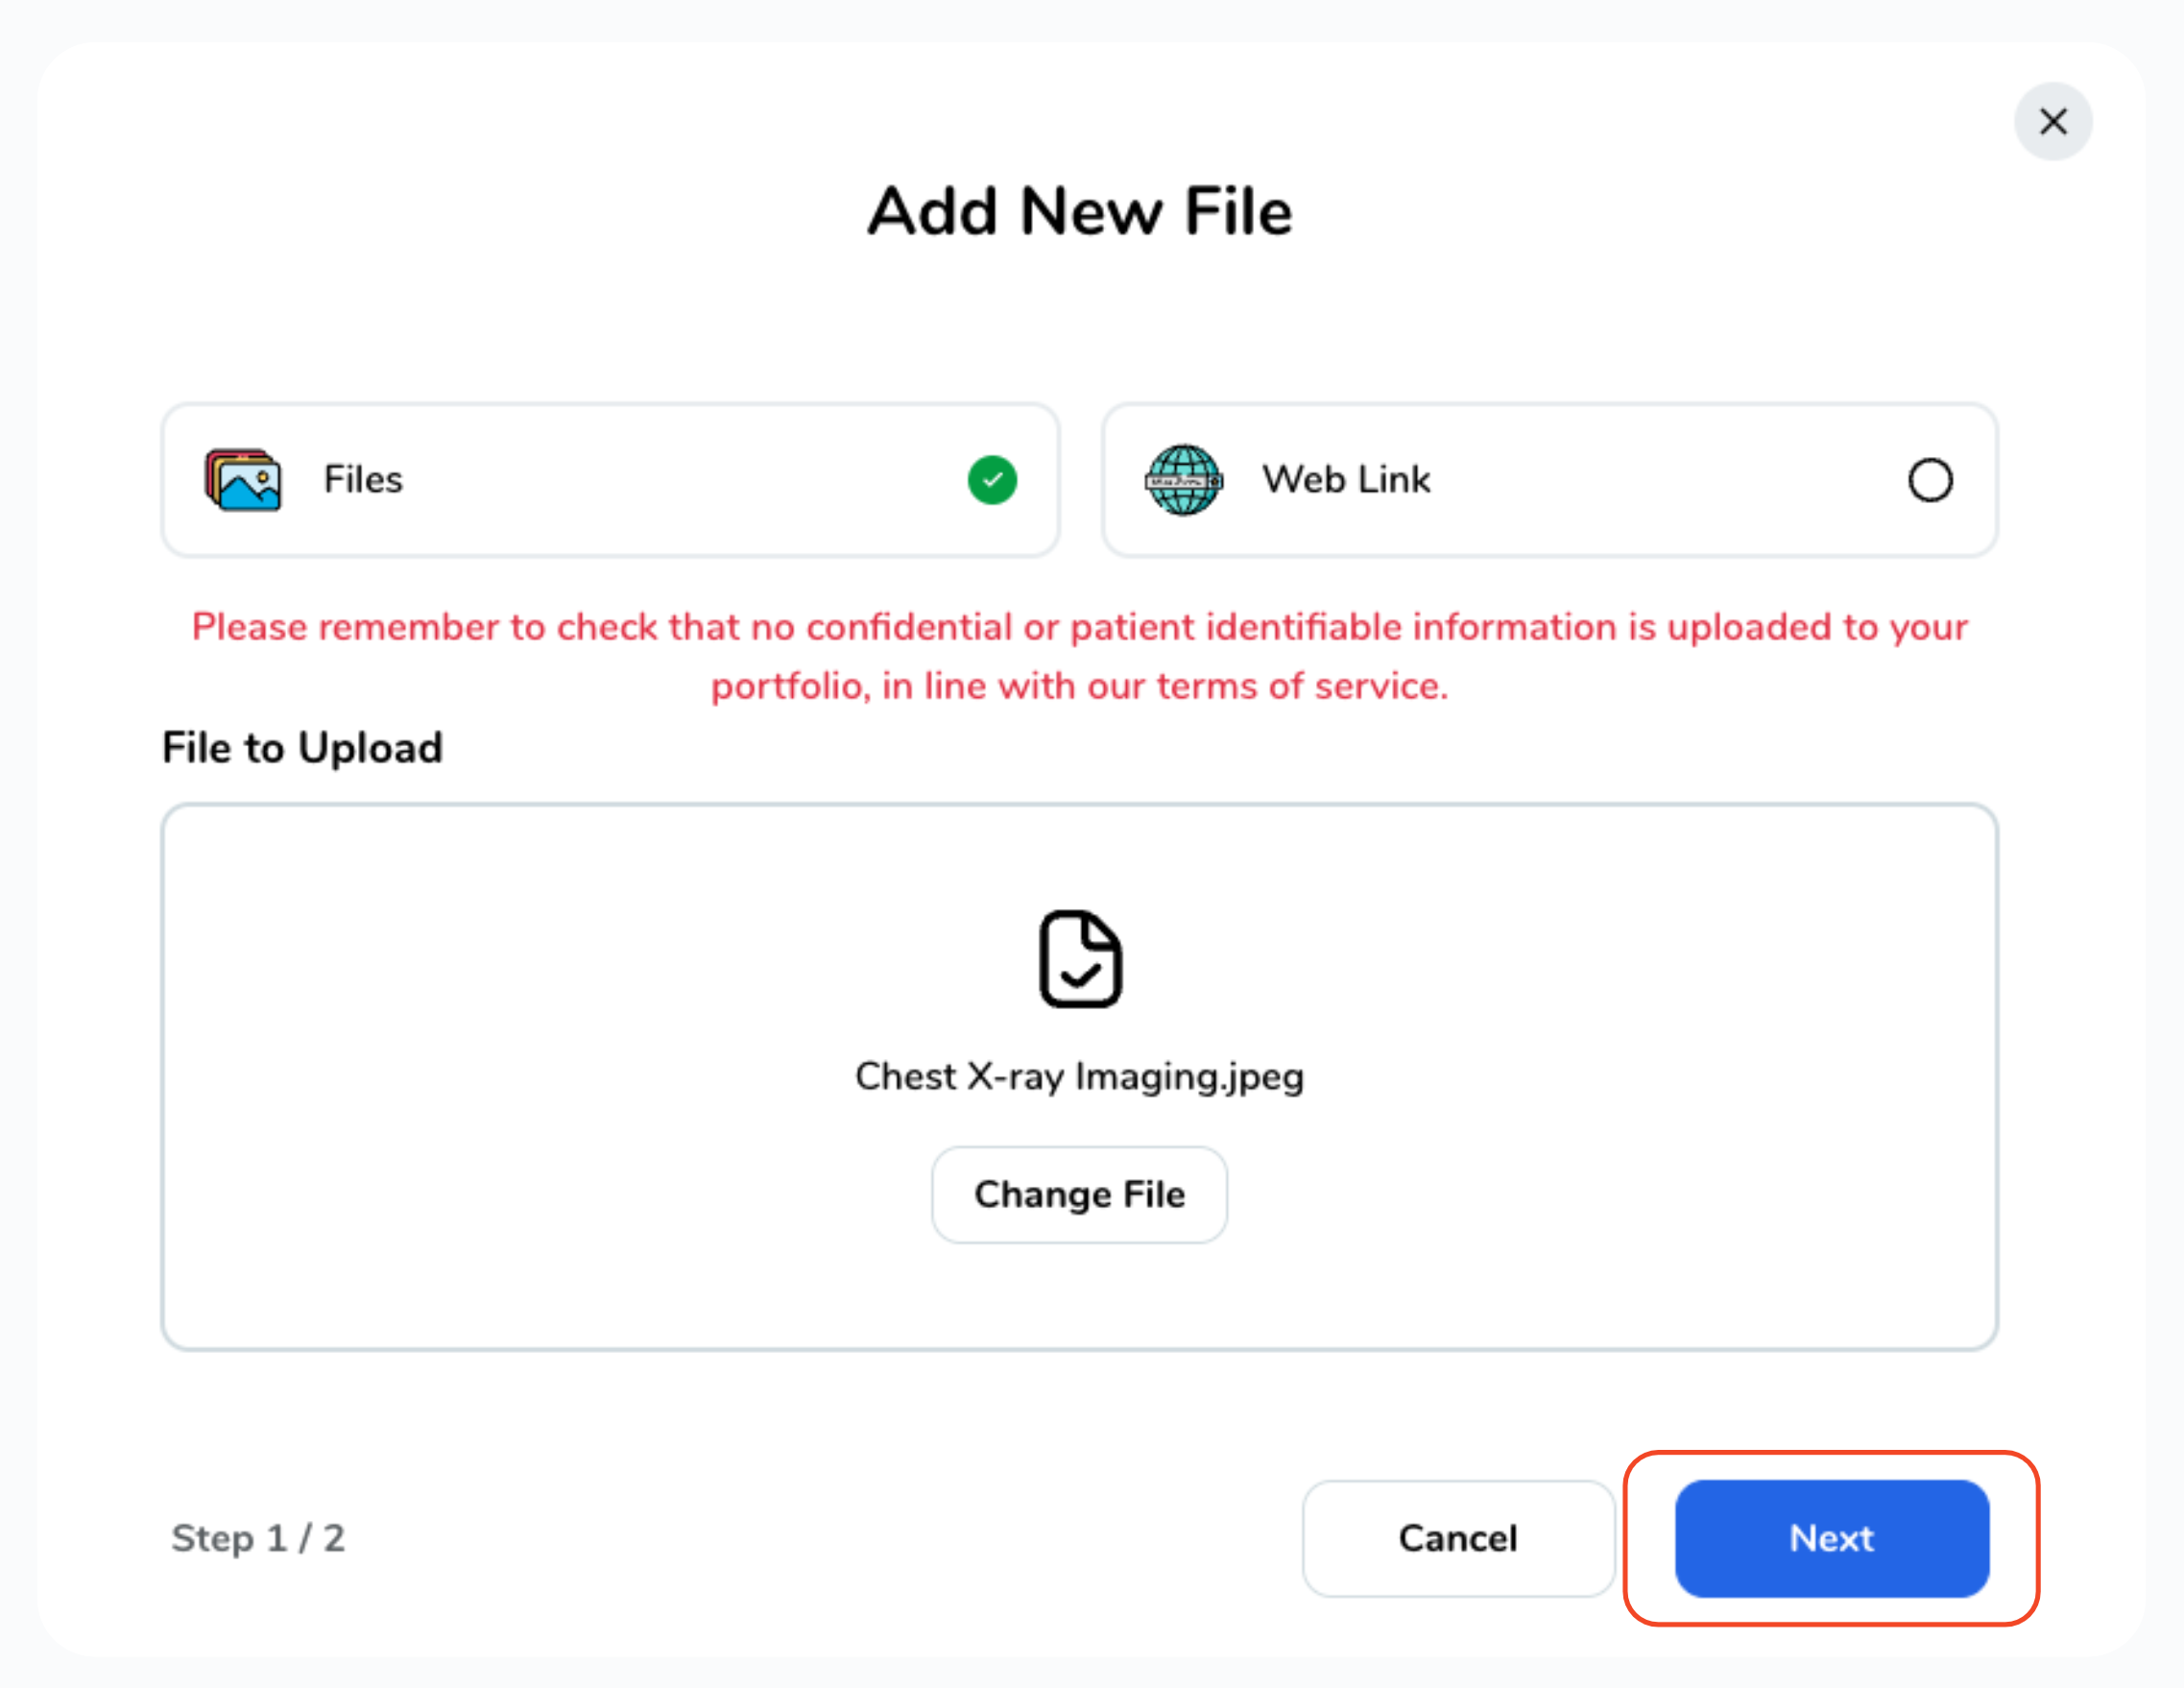
Select a file from your device, then click "Next".
Select a file from your device, then click "Next".
-
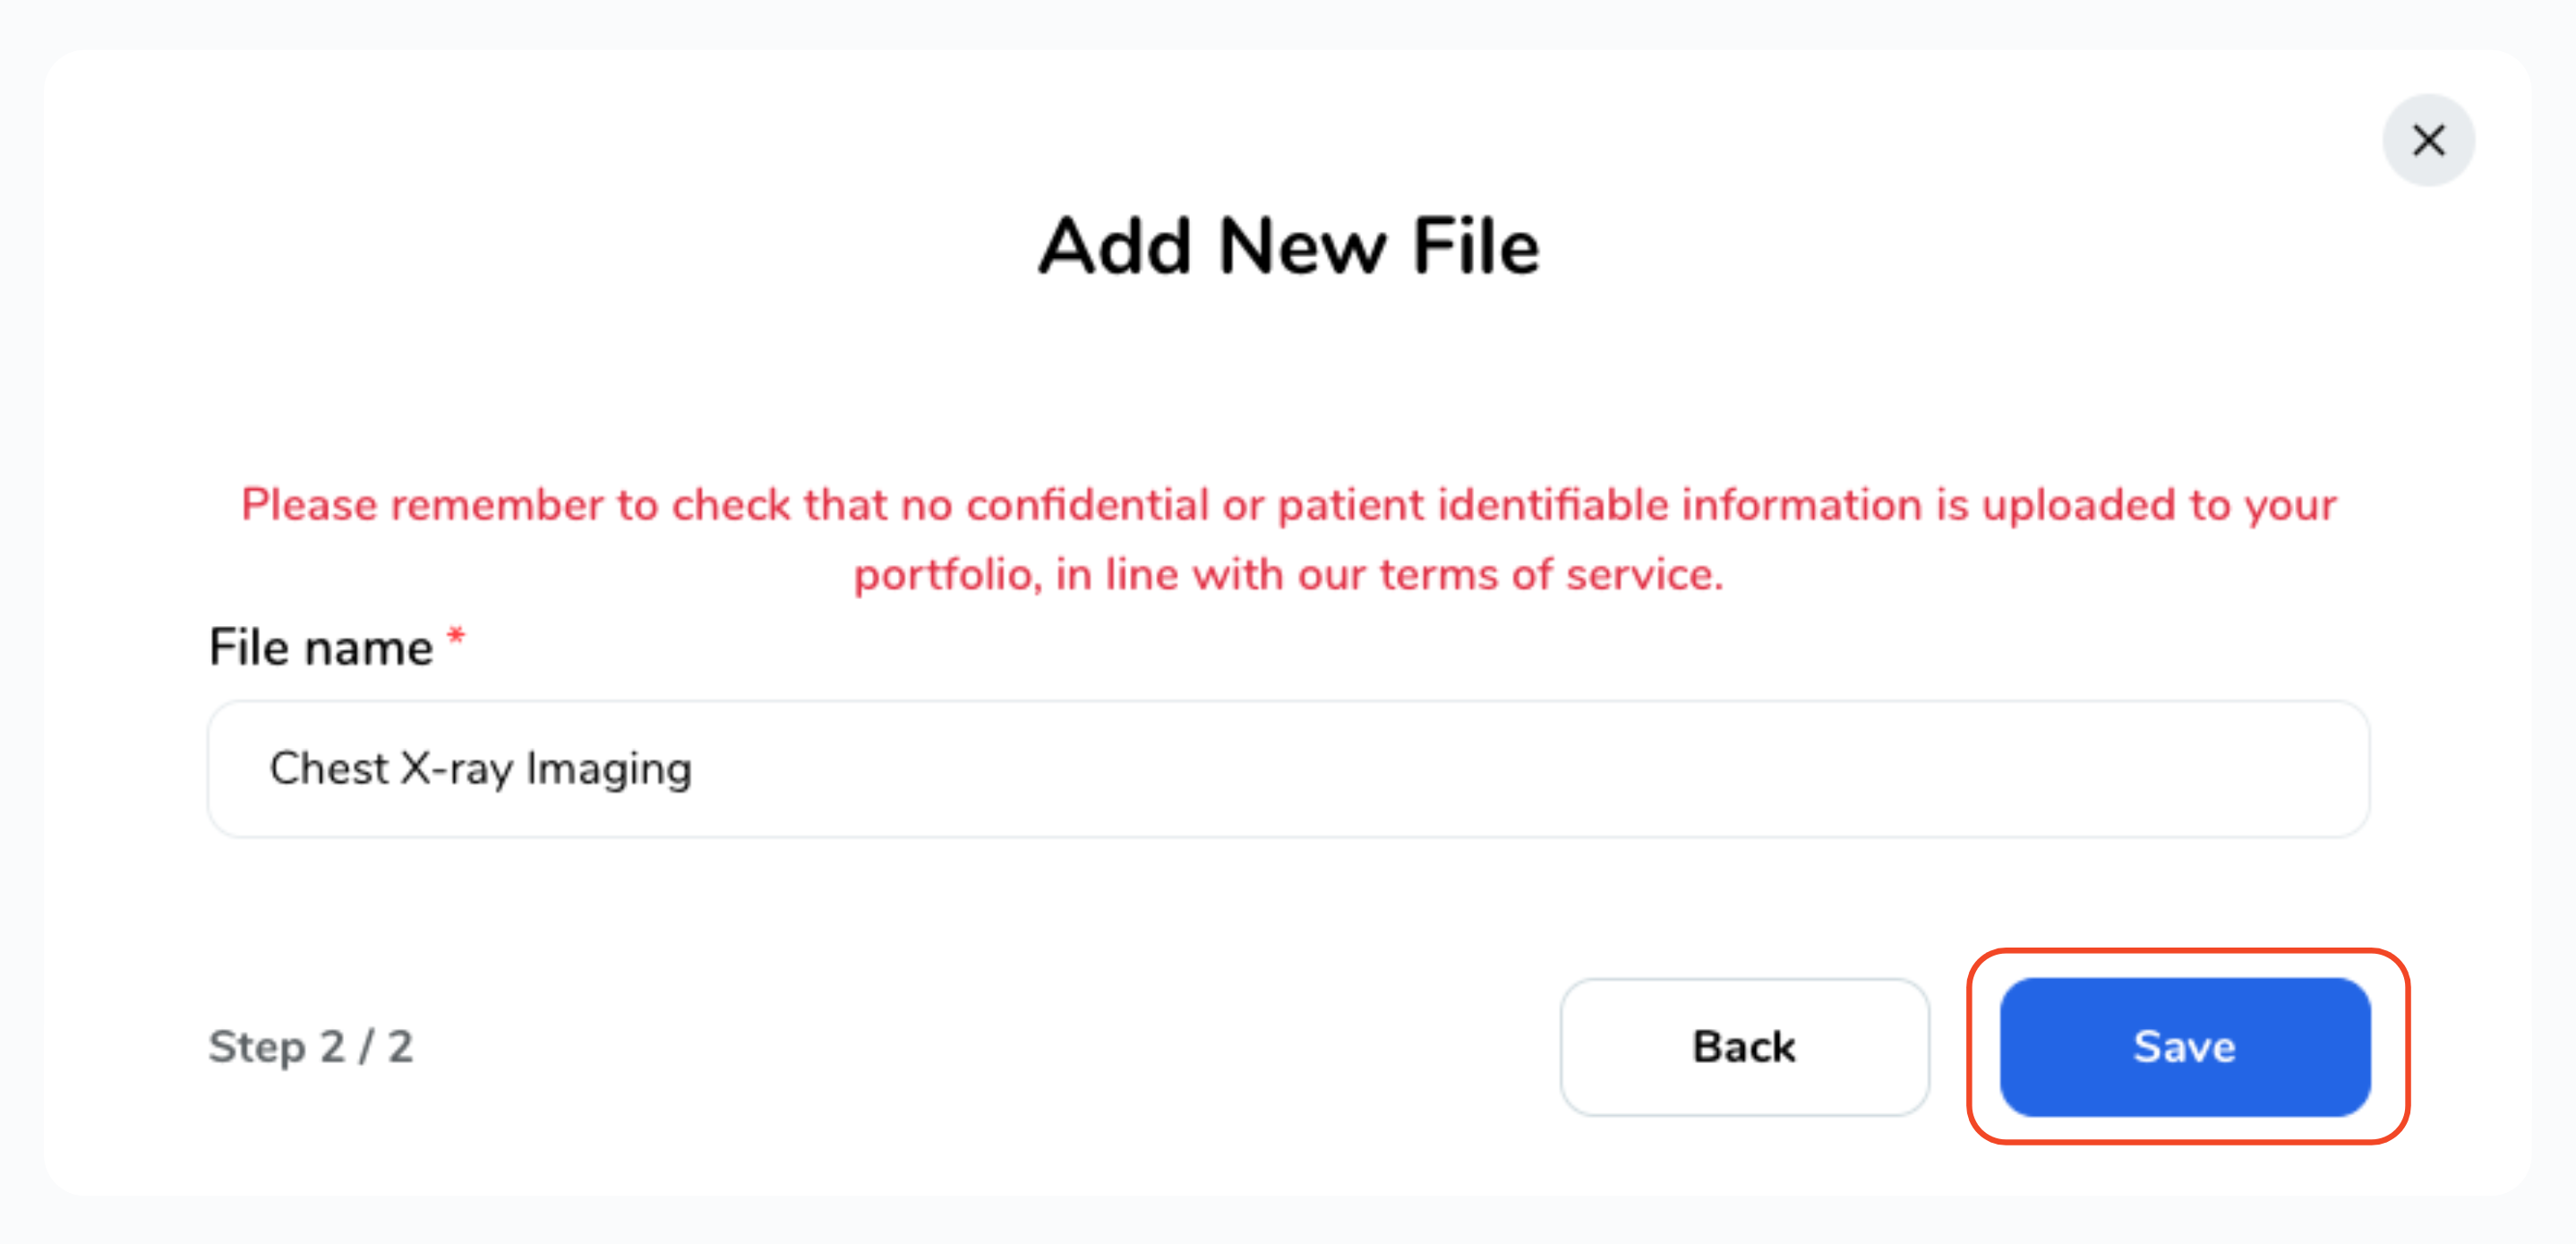
Finally, give your file a name and click "Save".
Finally, give your file a name and click "Save".
To add a weblink,
-
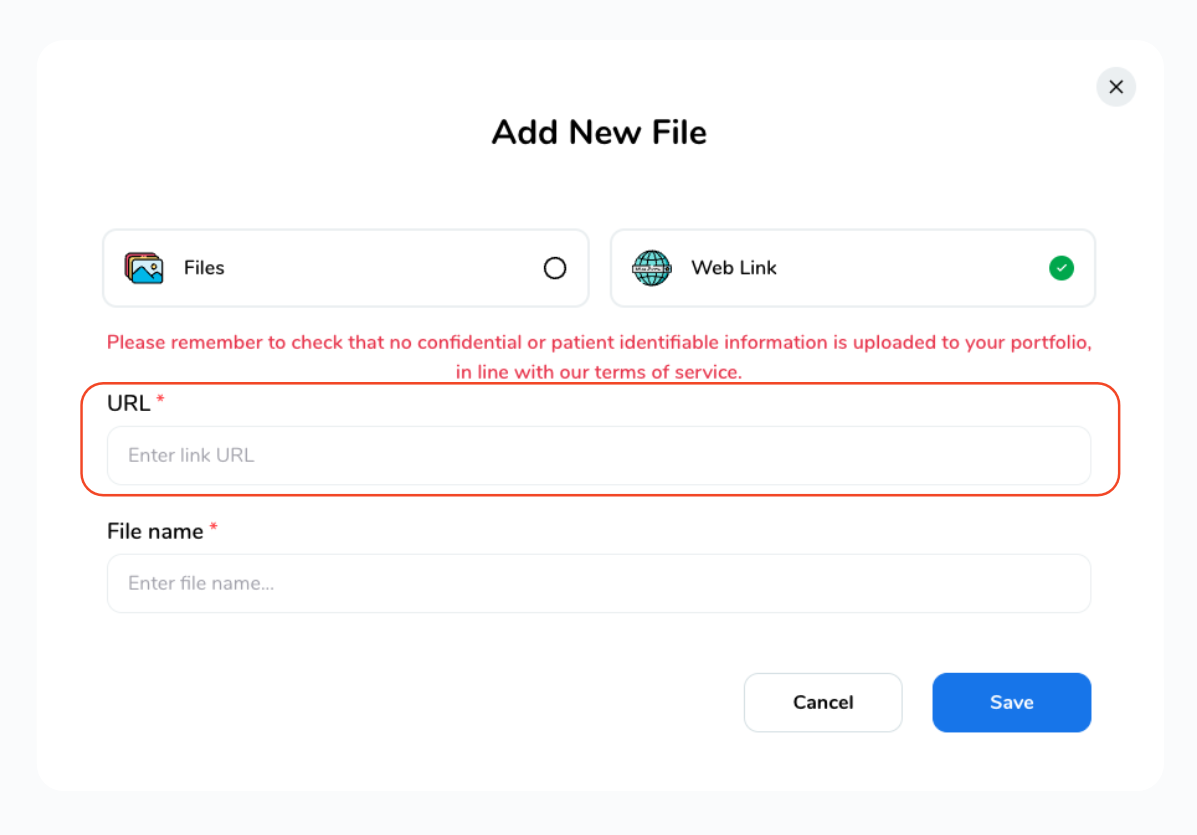
Select "Web Link", enter the URL link and a File Name, then click "Save"
Select "Web Link", enter the URL link and a File Name, then click "Save"
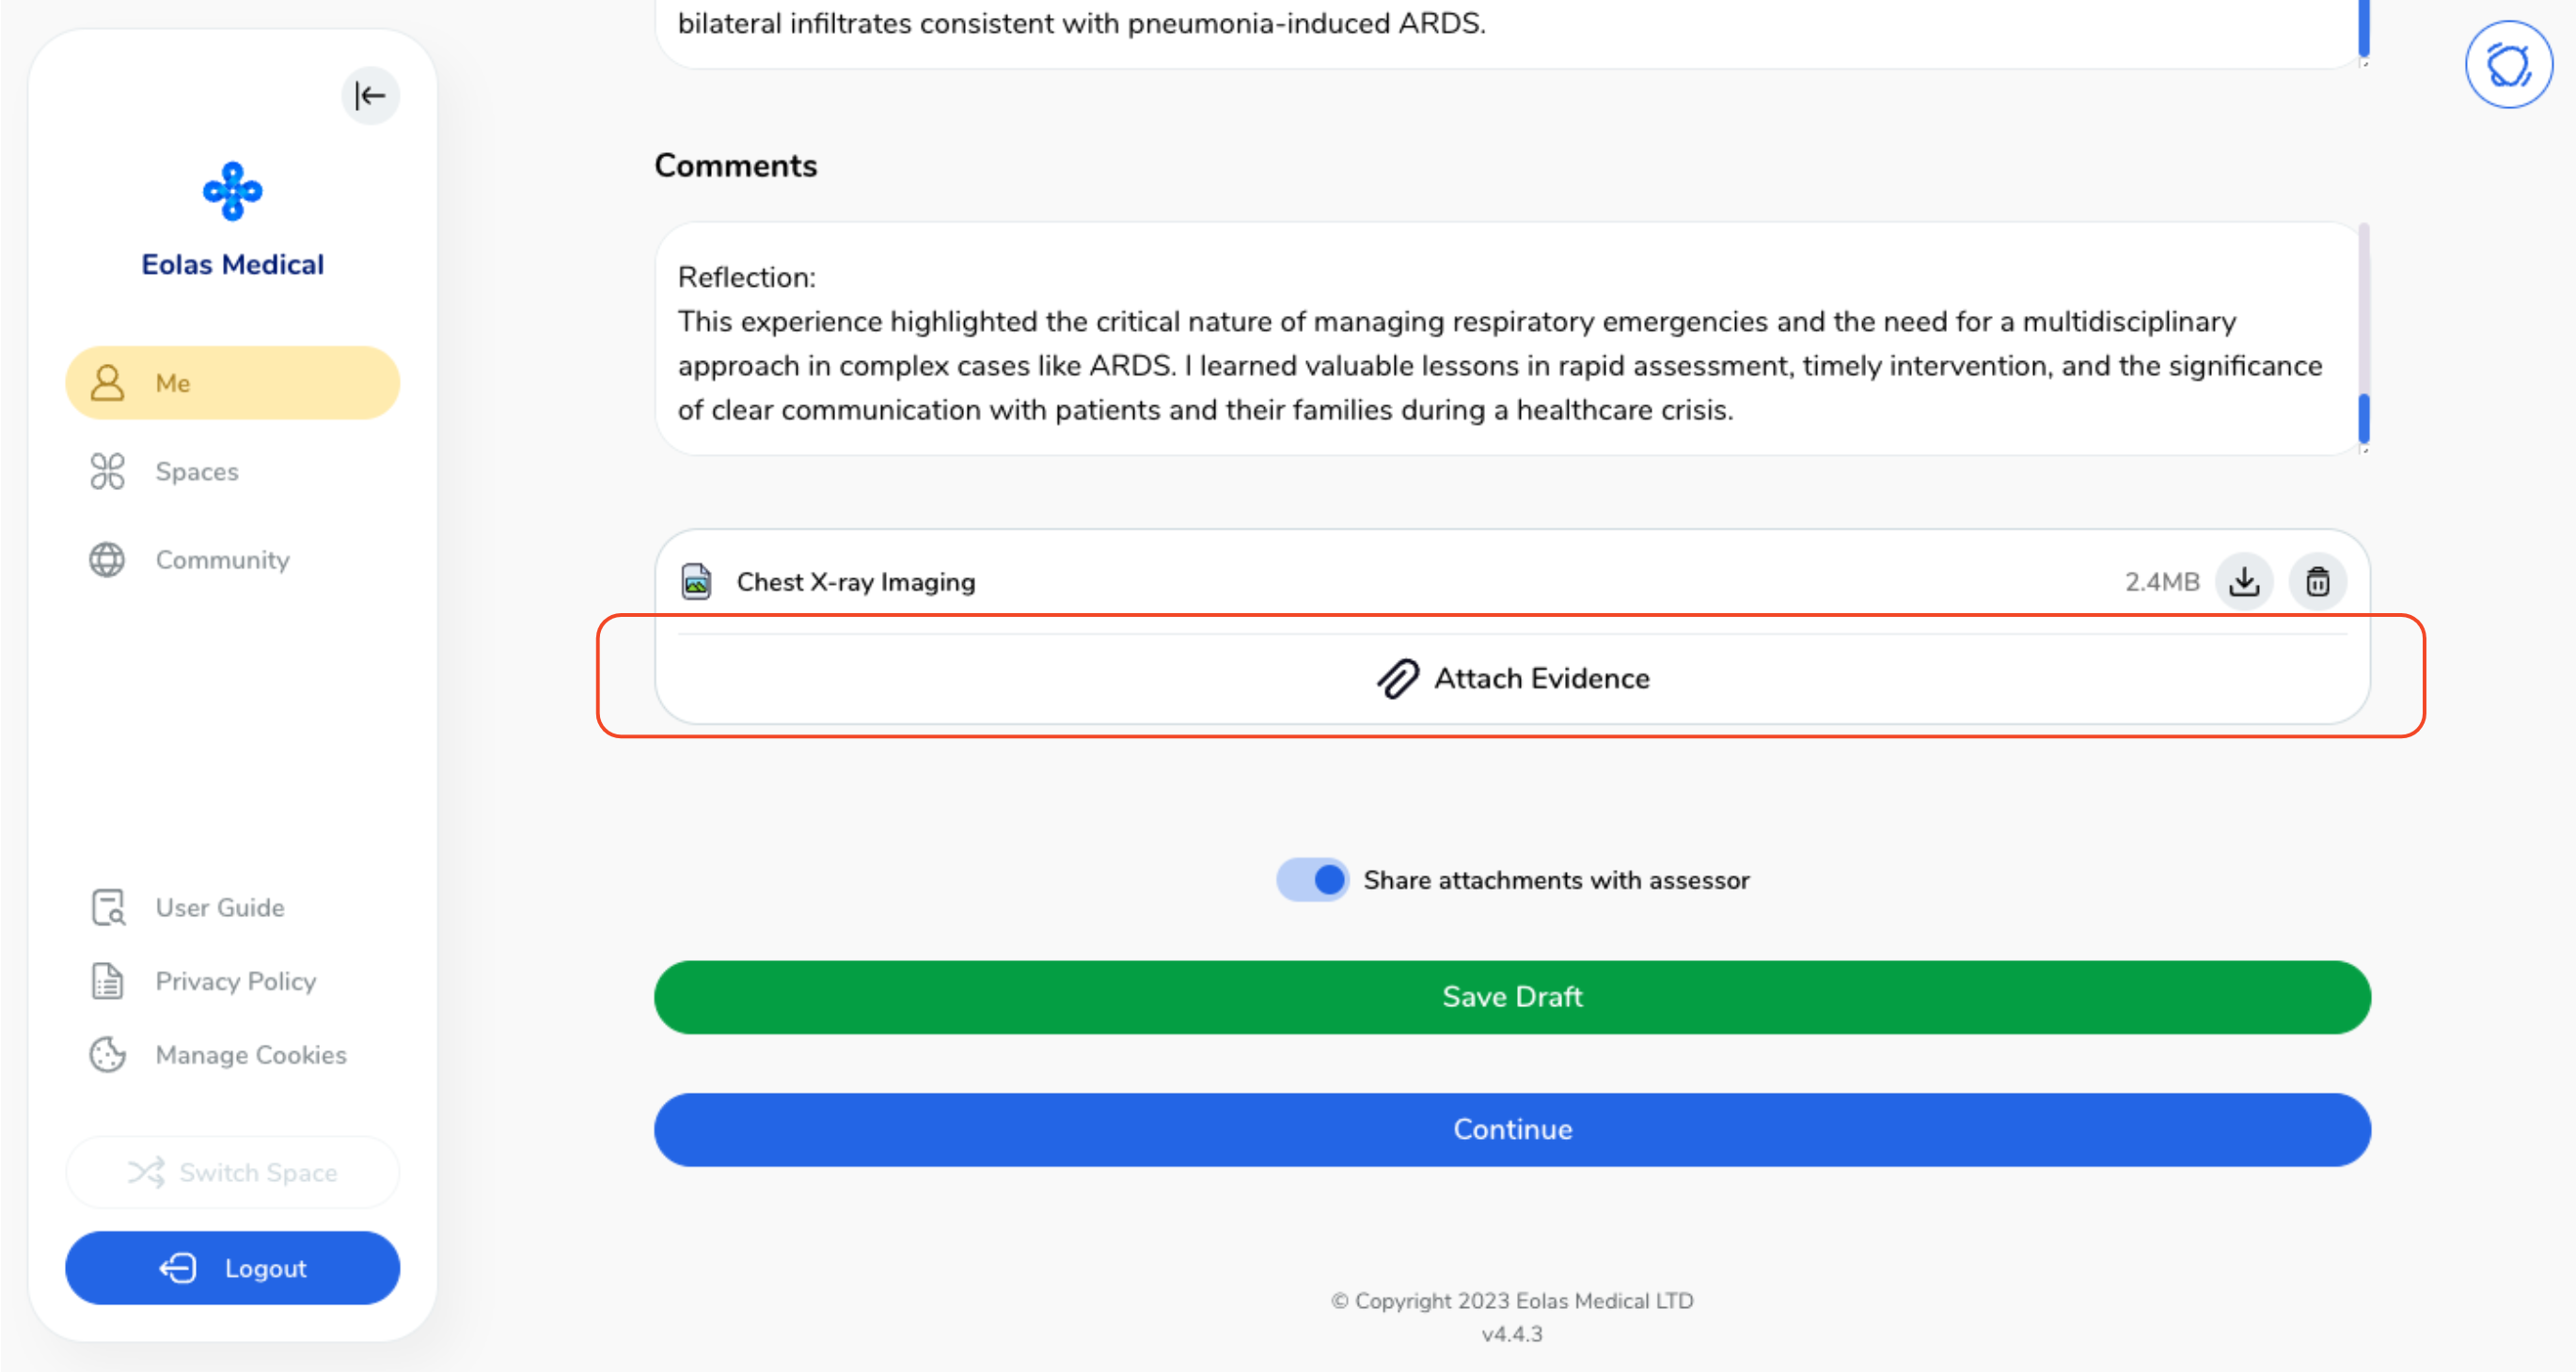
Your file will now be attached, If you wish to add multiple files, simply click on "Attach Evidence" once more and follow the same process again.
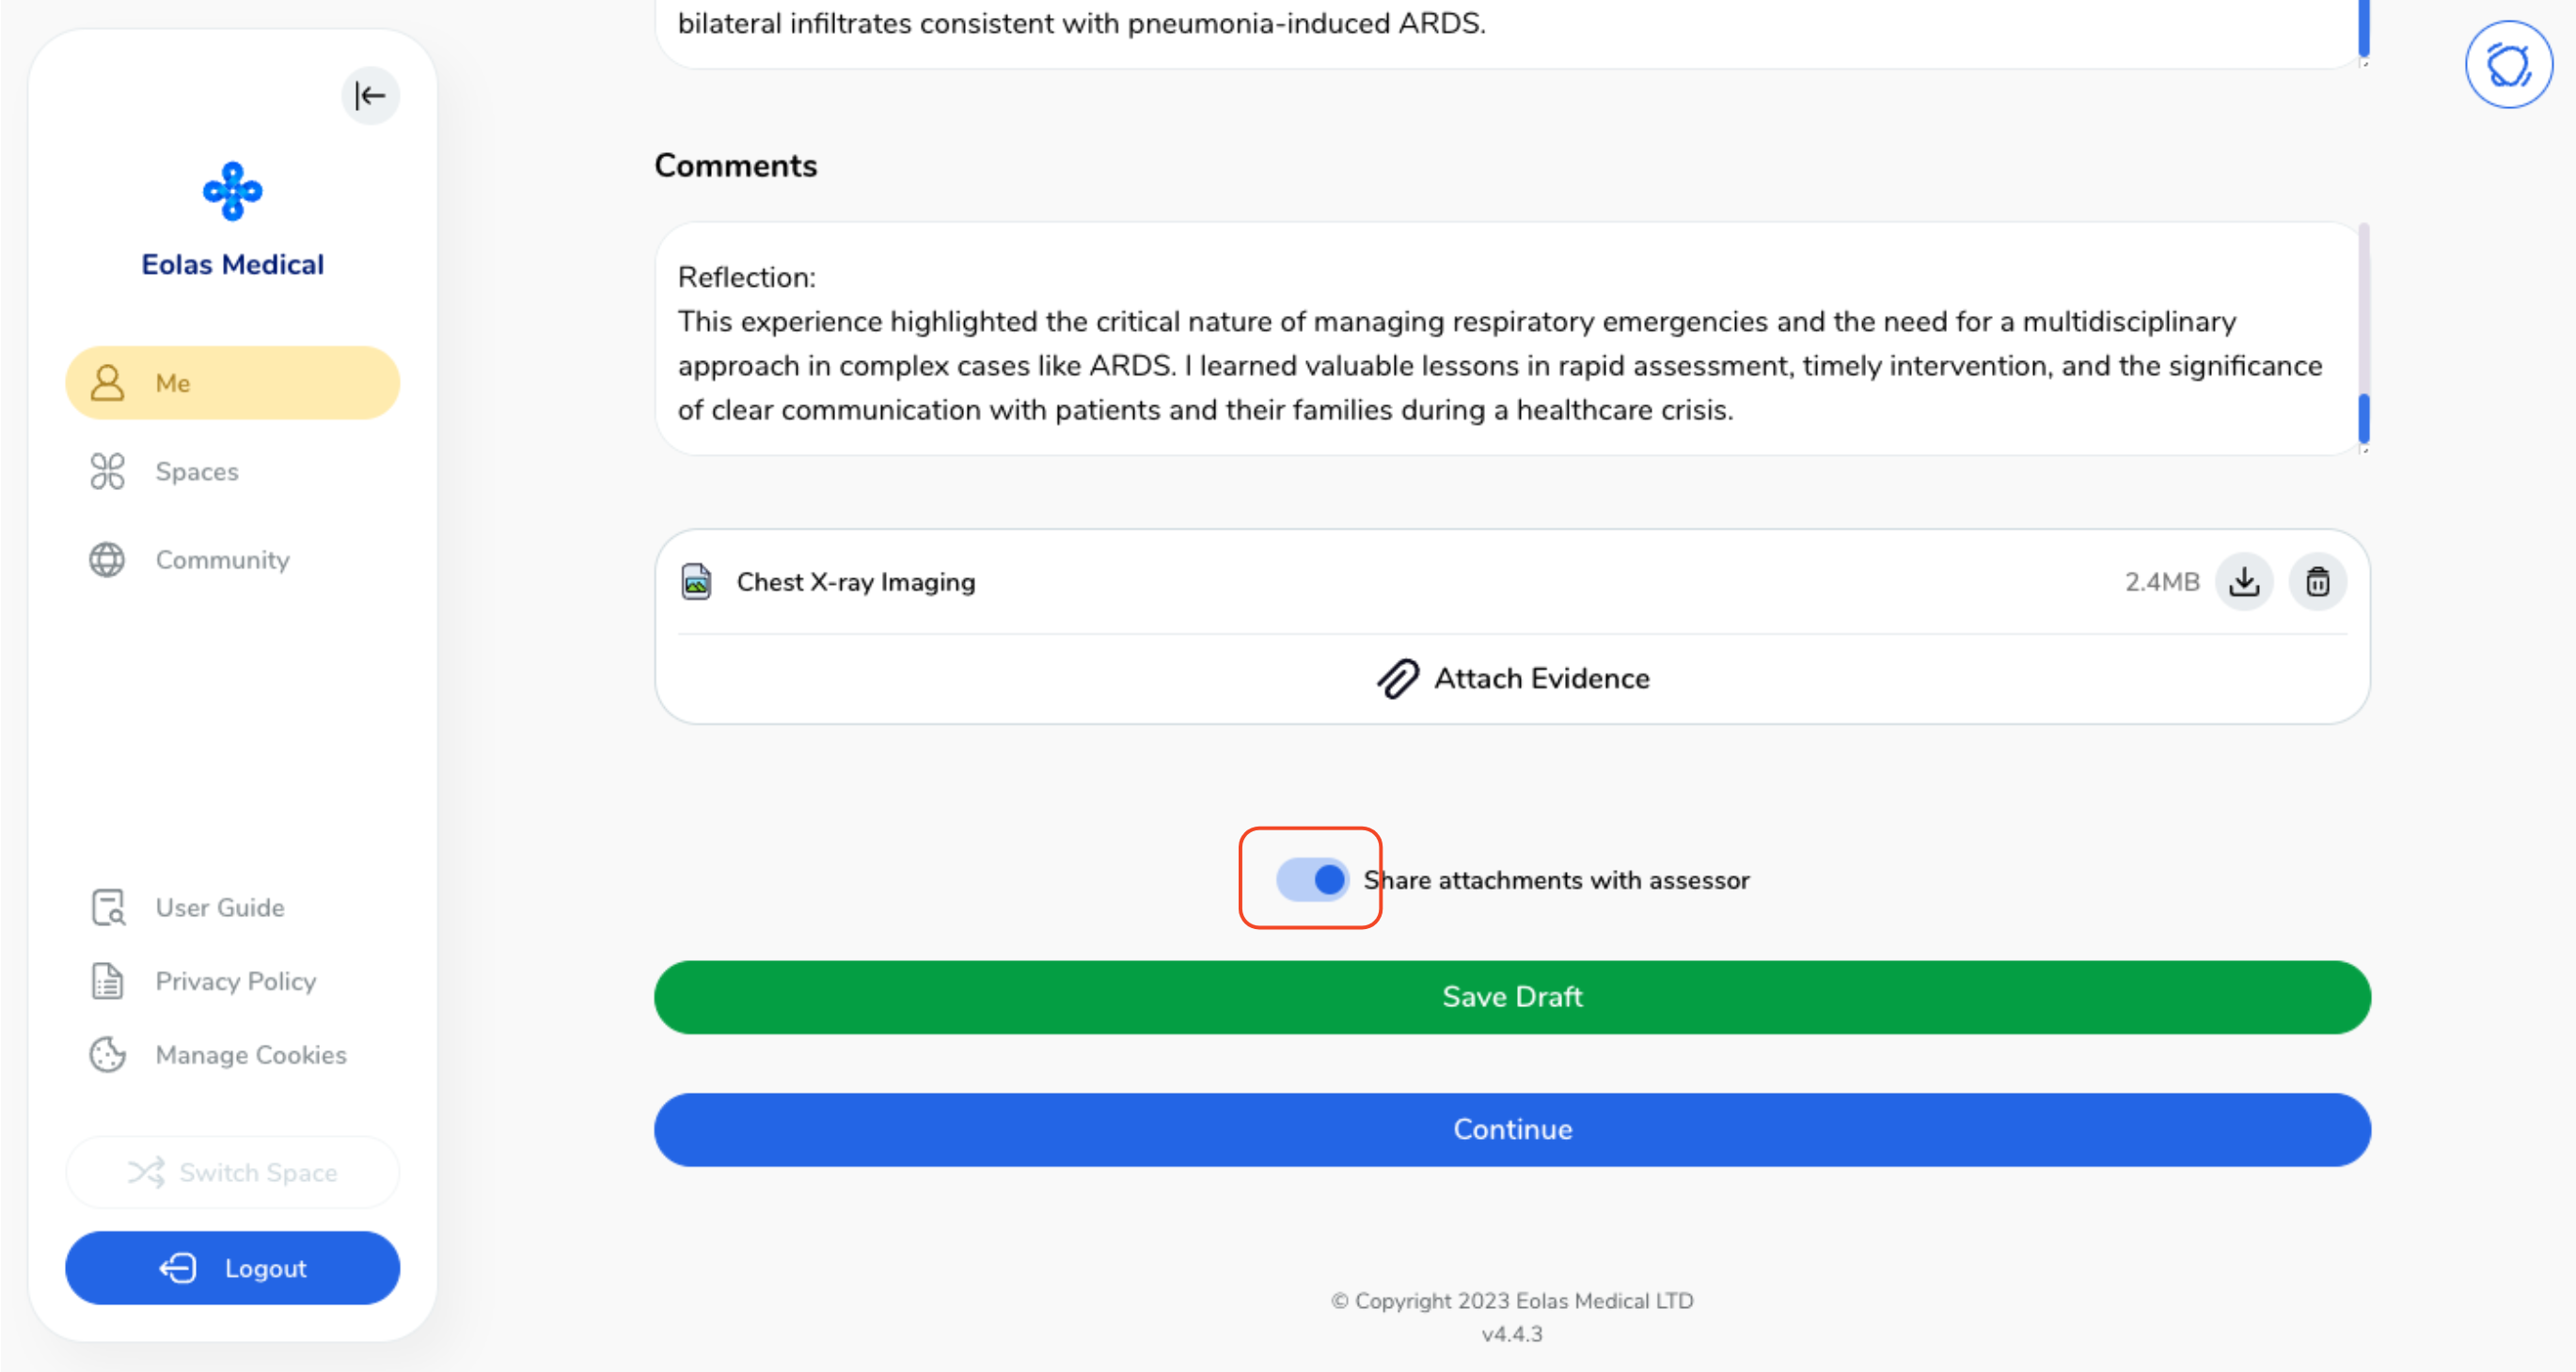
By clicking on the "toggle" button, you have the option to decide whether to share the attachment with your assessor or not.
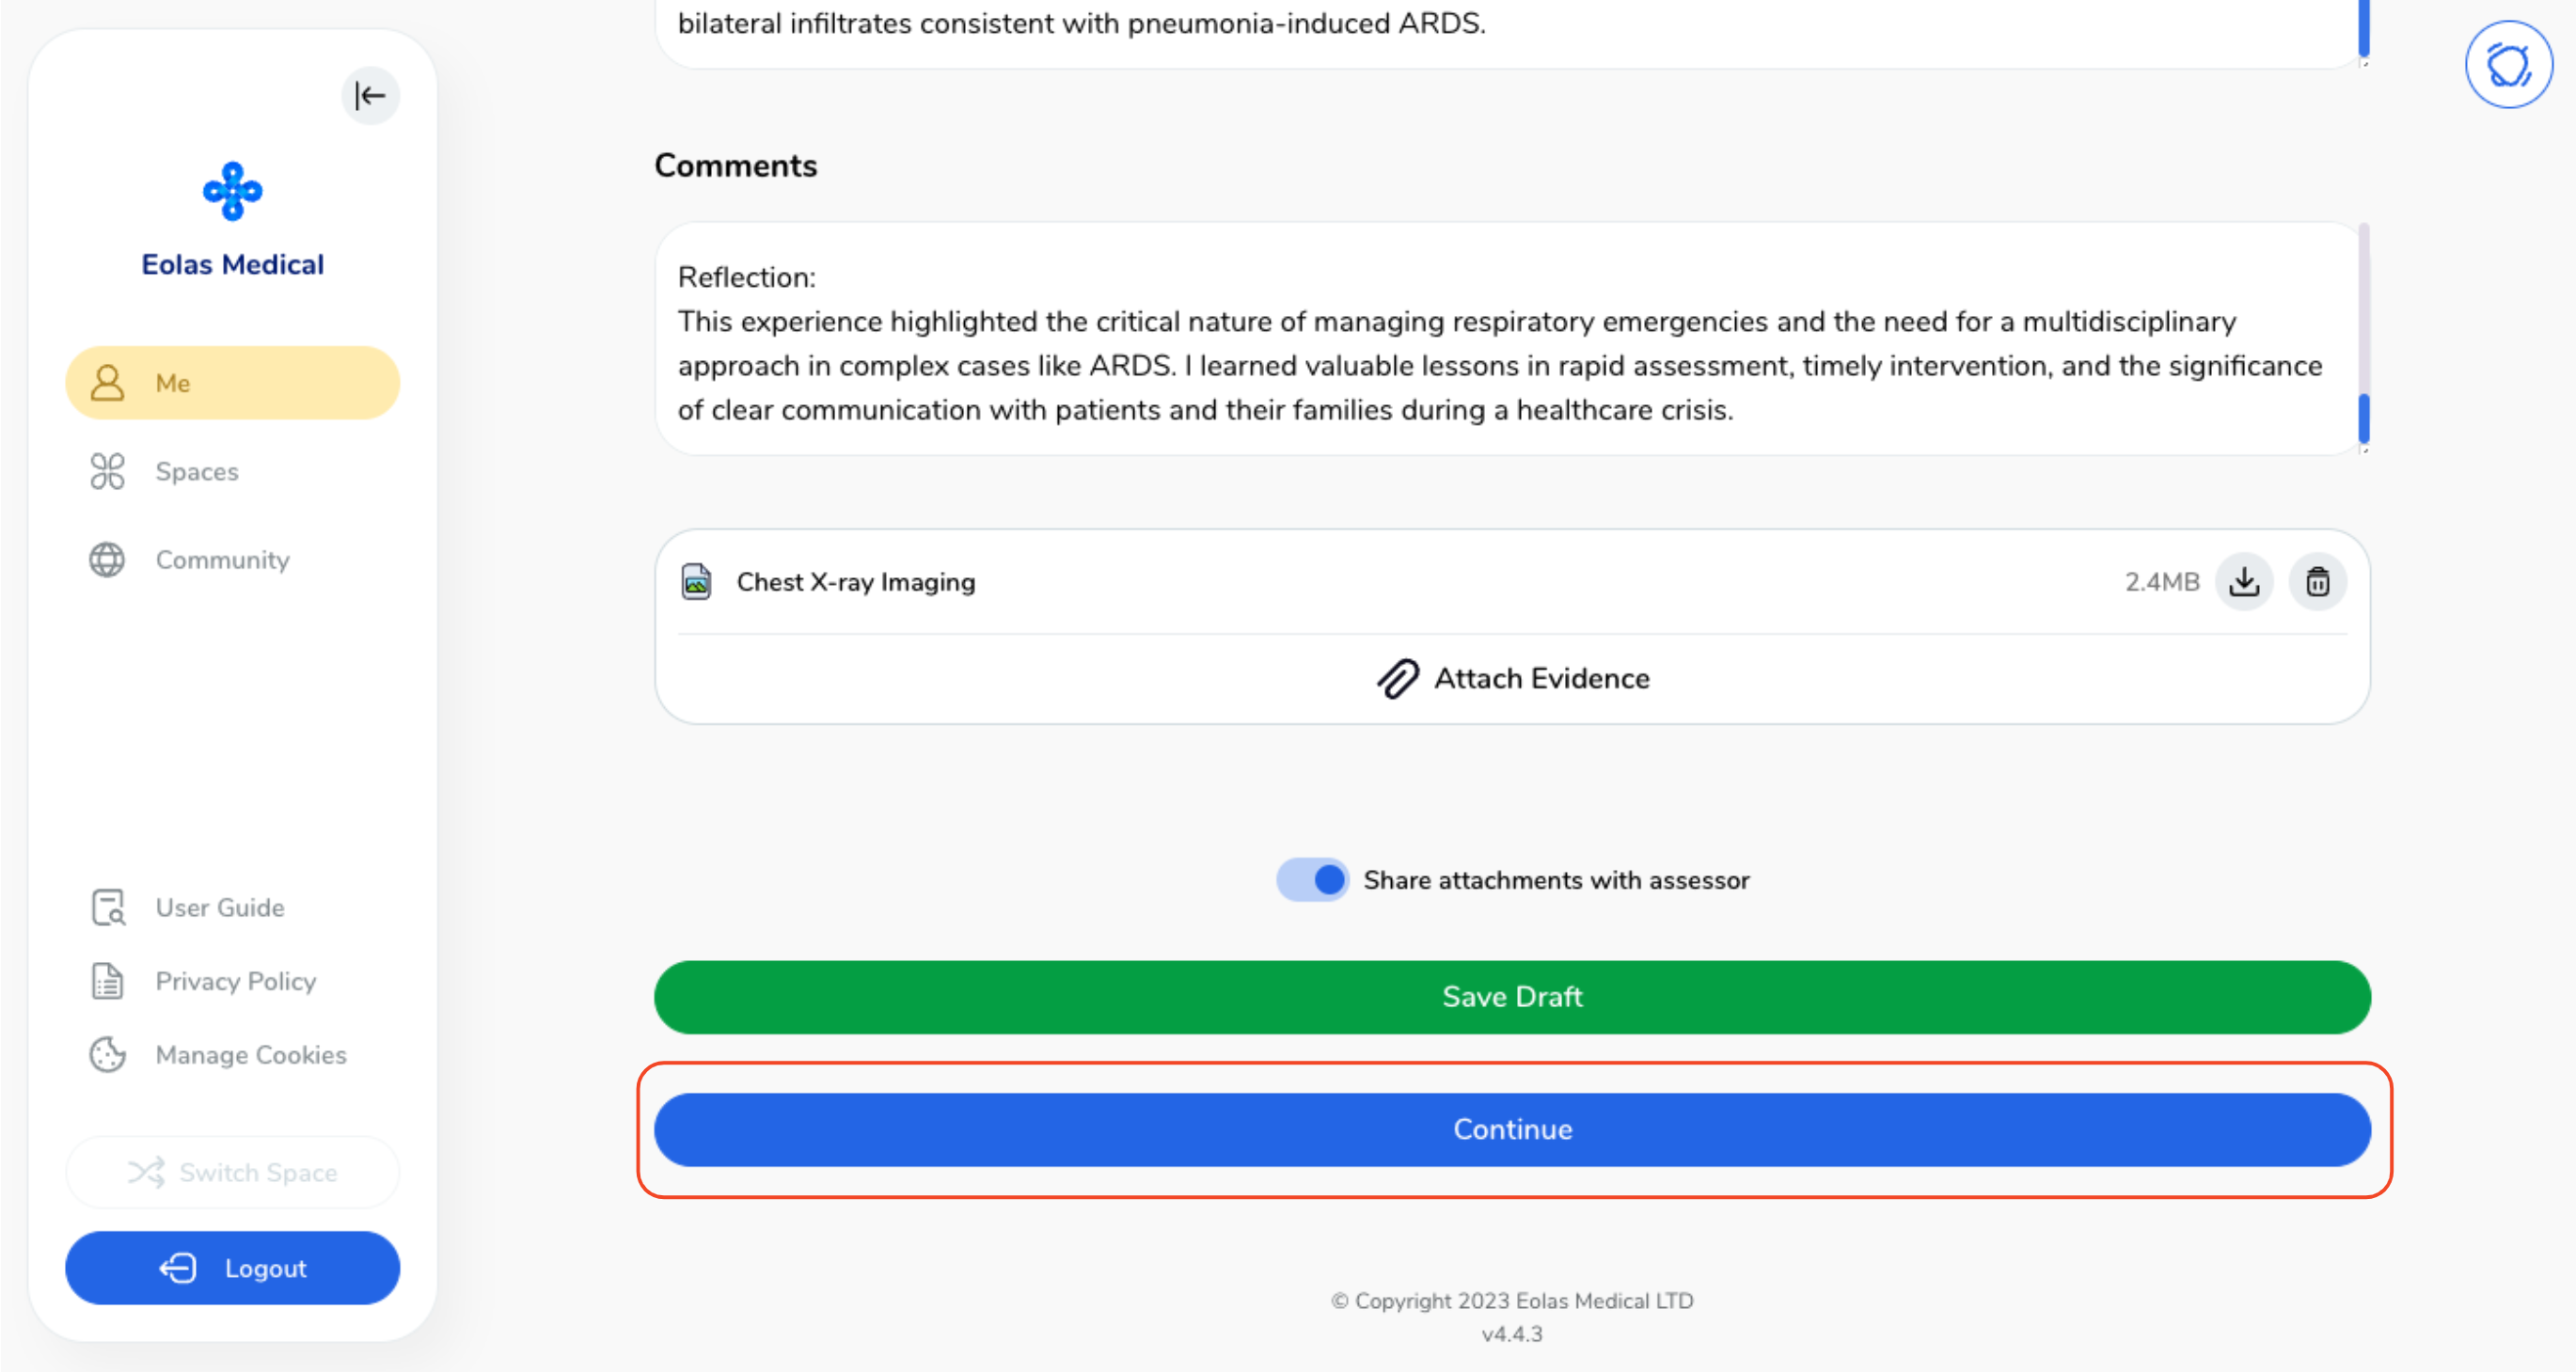
When you're ready, you have two options:
-
Save your session as a draft for future reference and make any necessary adjustments, or
Save your session as a draft for future reference and make any necessary adjustments, or
-
Alternatively, click the "Continue" button to proceed with the submission.
Alternatively, click the "Continue" button to proceed with the submission.
Once you've chosen "Continue", a pop-up window will surface, offering you the option to assign an assessor and gather feedback.
Assigning an assessor to your Clinical Event.
-
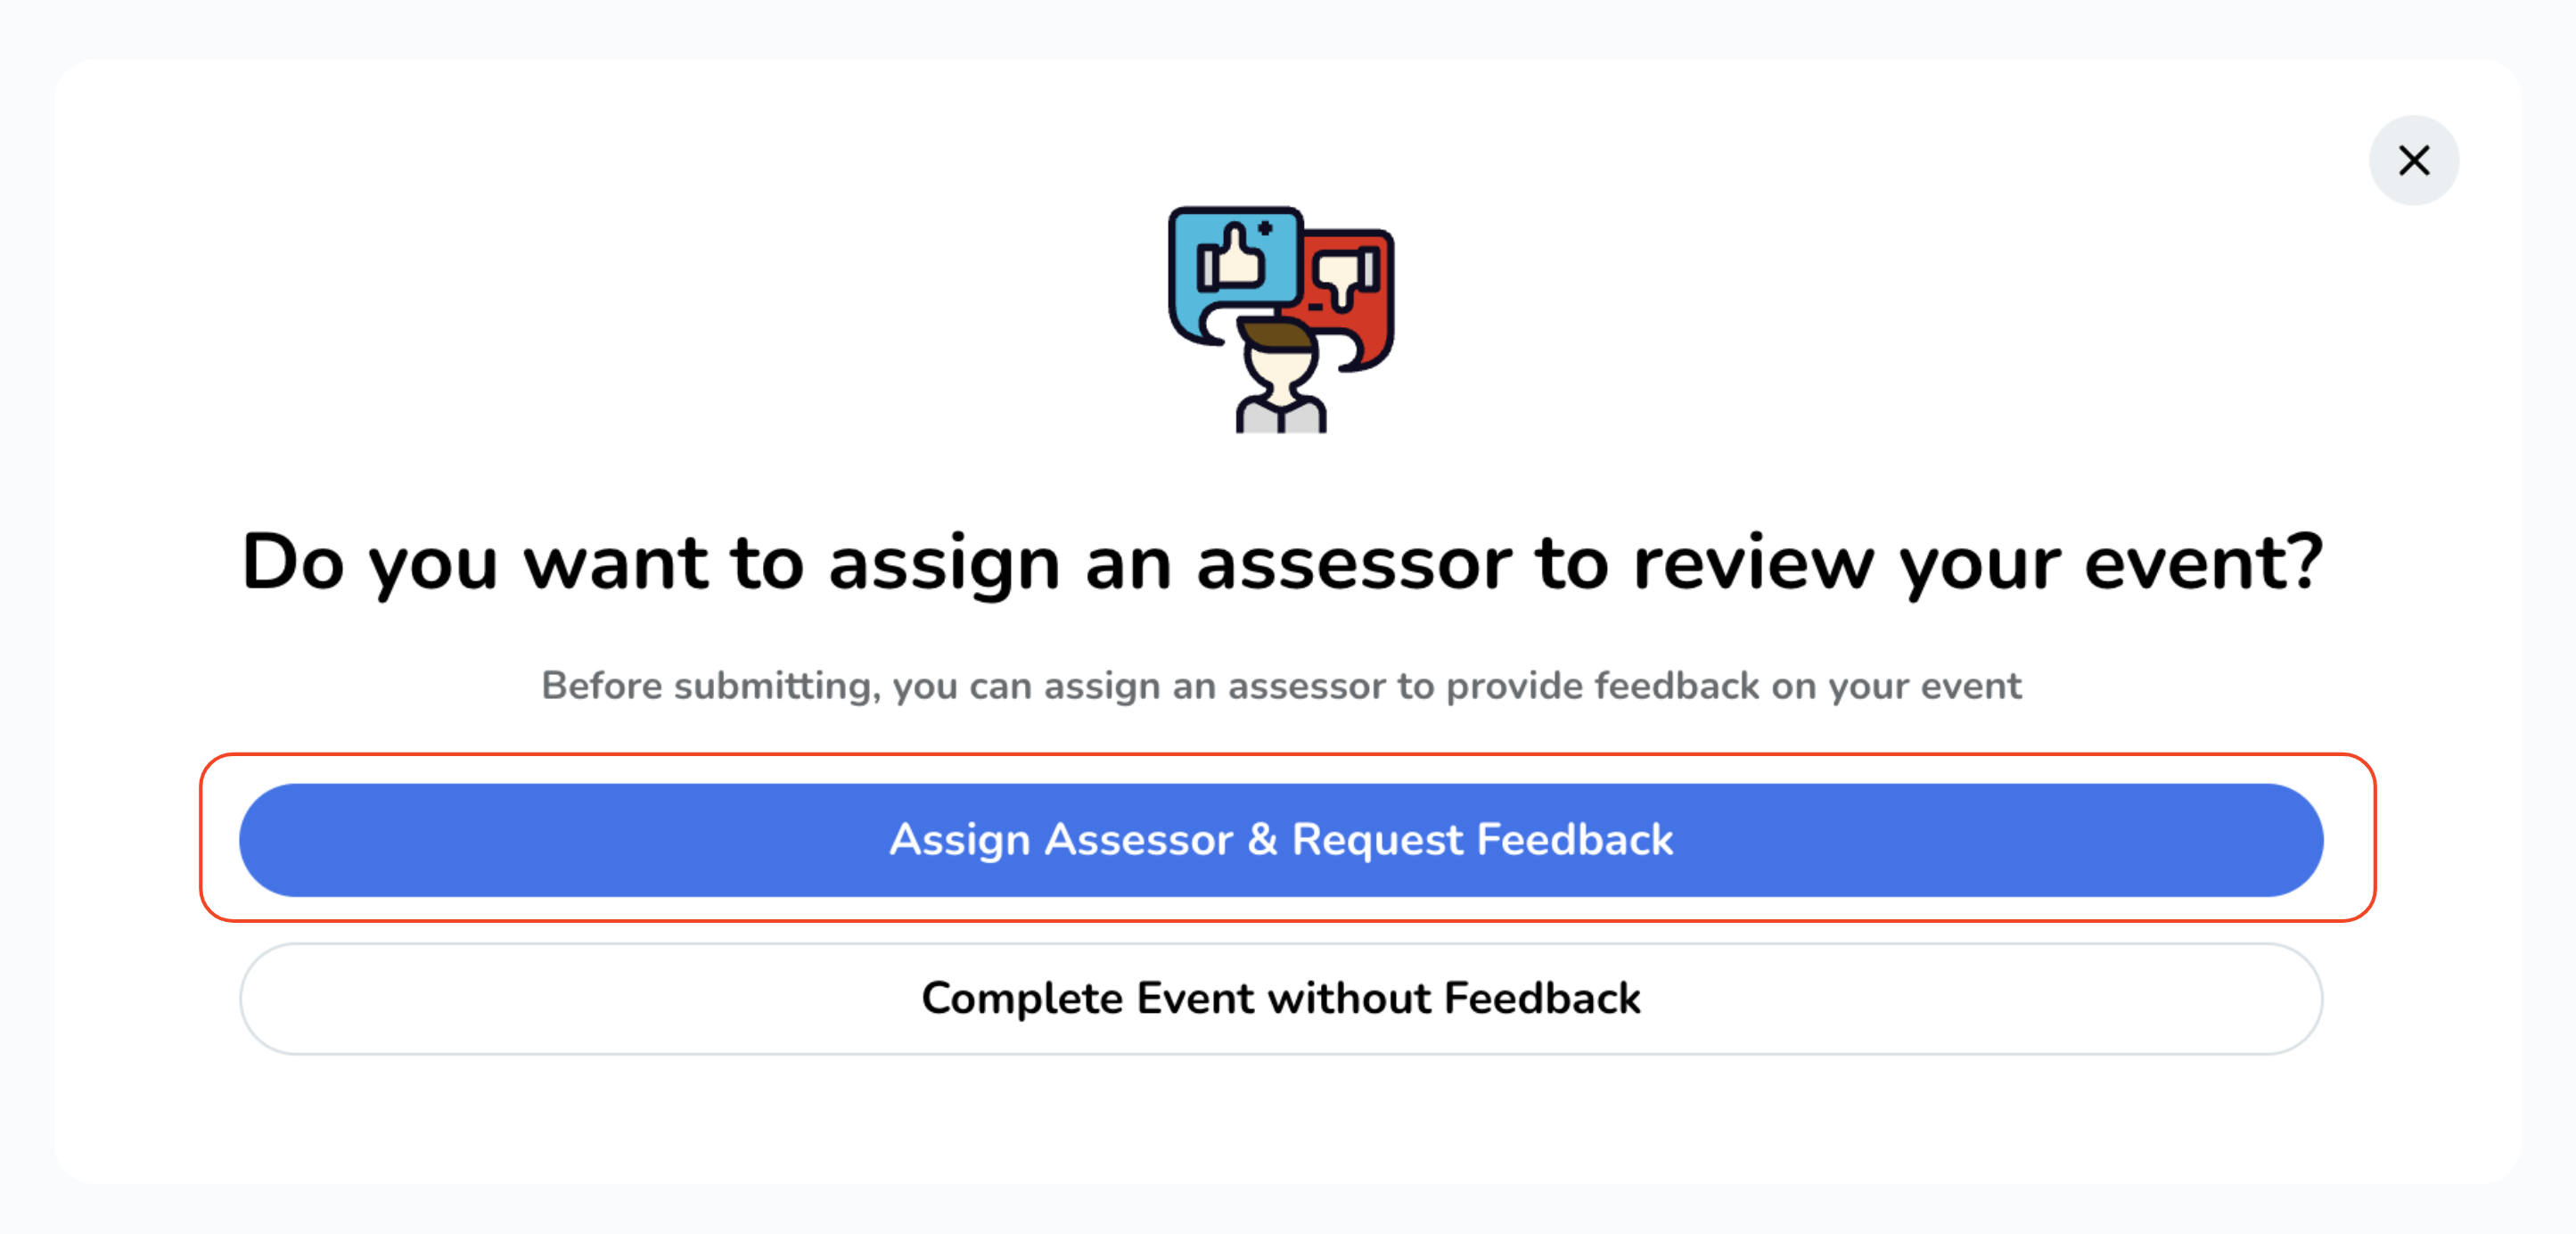
To designate an assessor for your Clinical Event, click the "Assign Assessor & Request Feedback" button. If you prefer to complete the event without feedback, choose the appropriate option accordingly
-
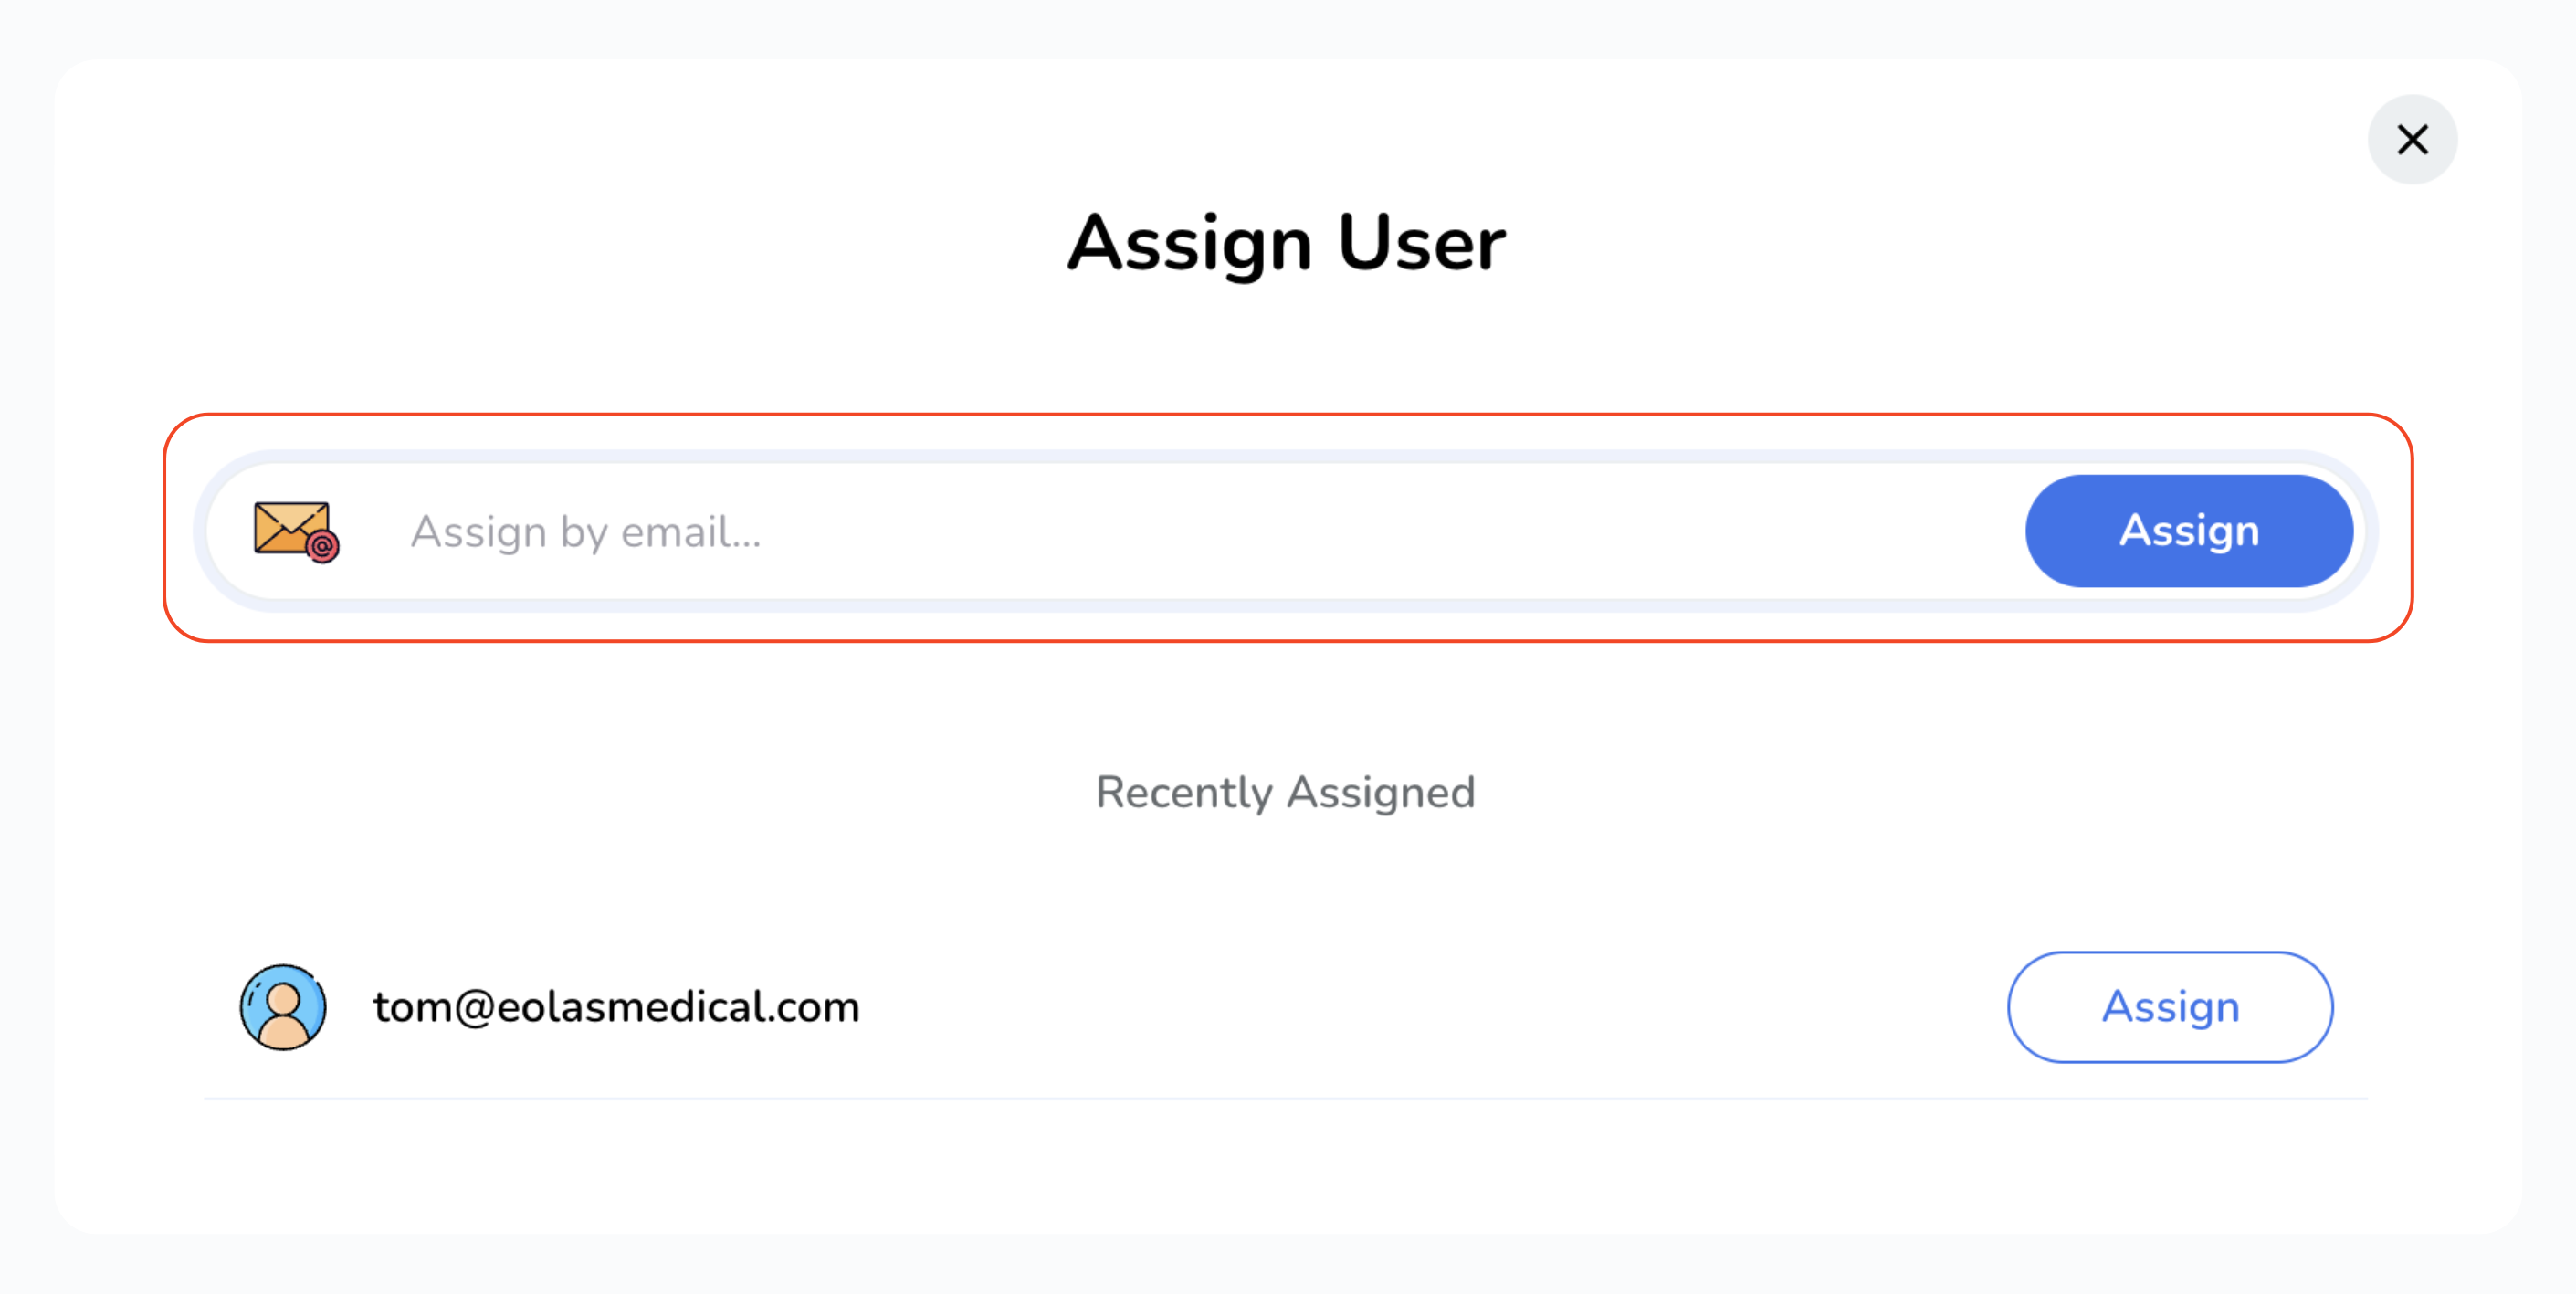
Upon clicking, another pop-up will emerge. Input the assessor's email address and tap the "Assign" button. Alternatively, you can opt for an assessor from the list of recent assessors (if available).
-
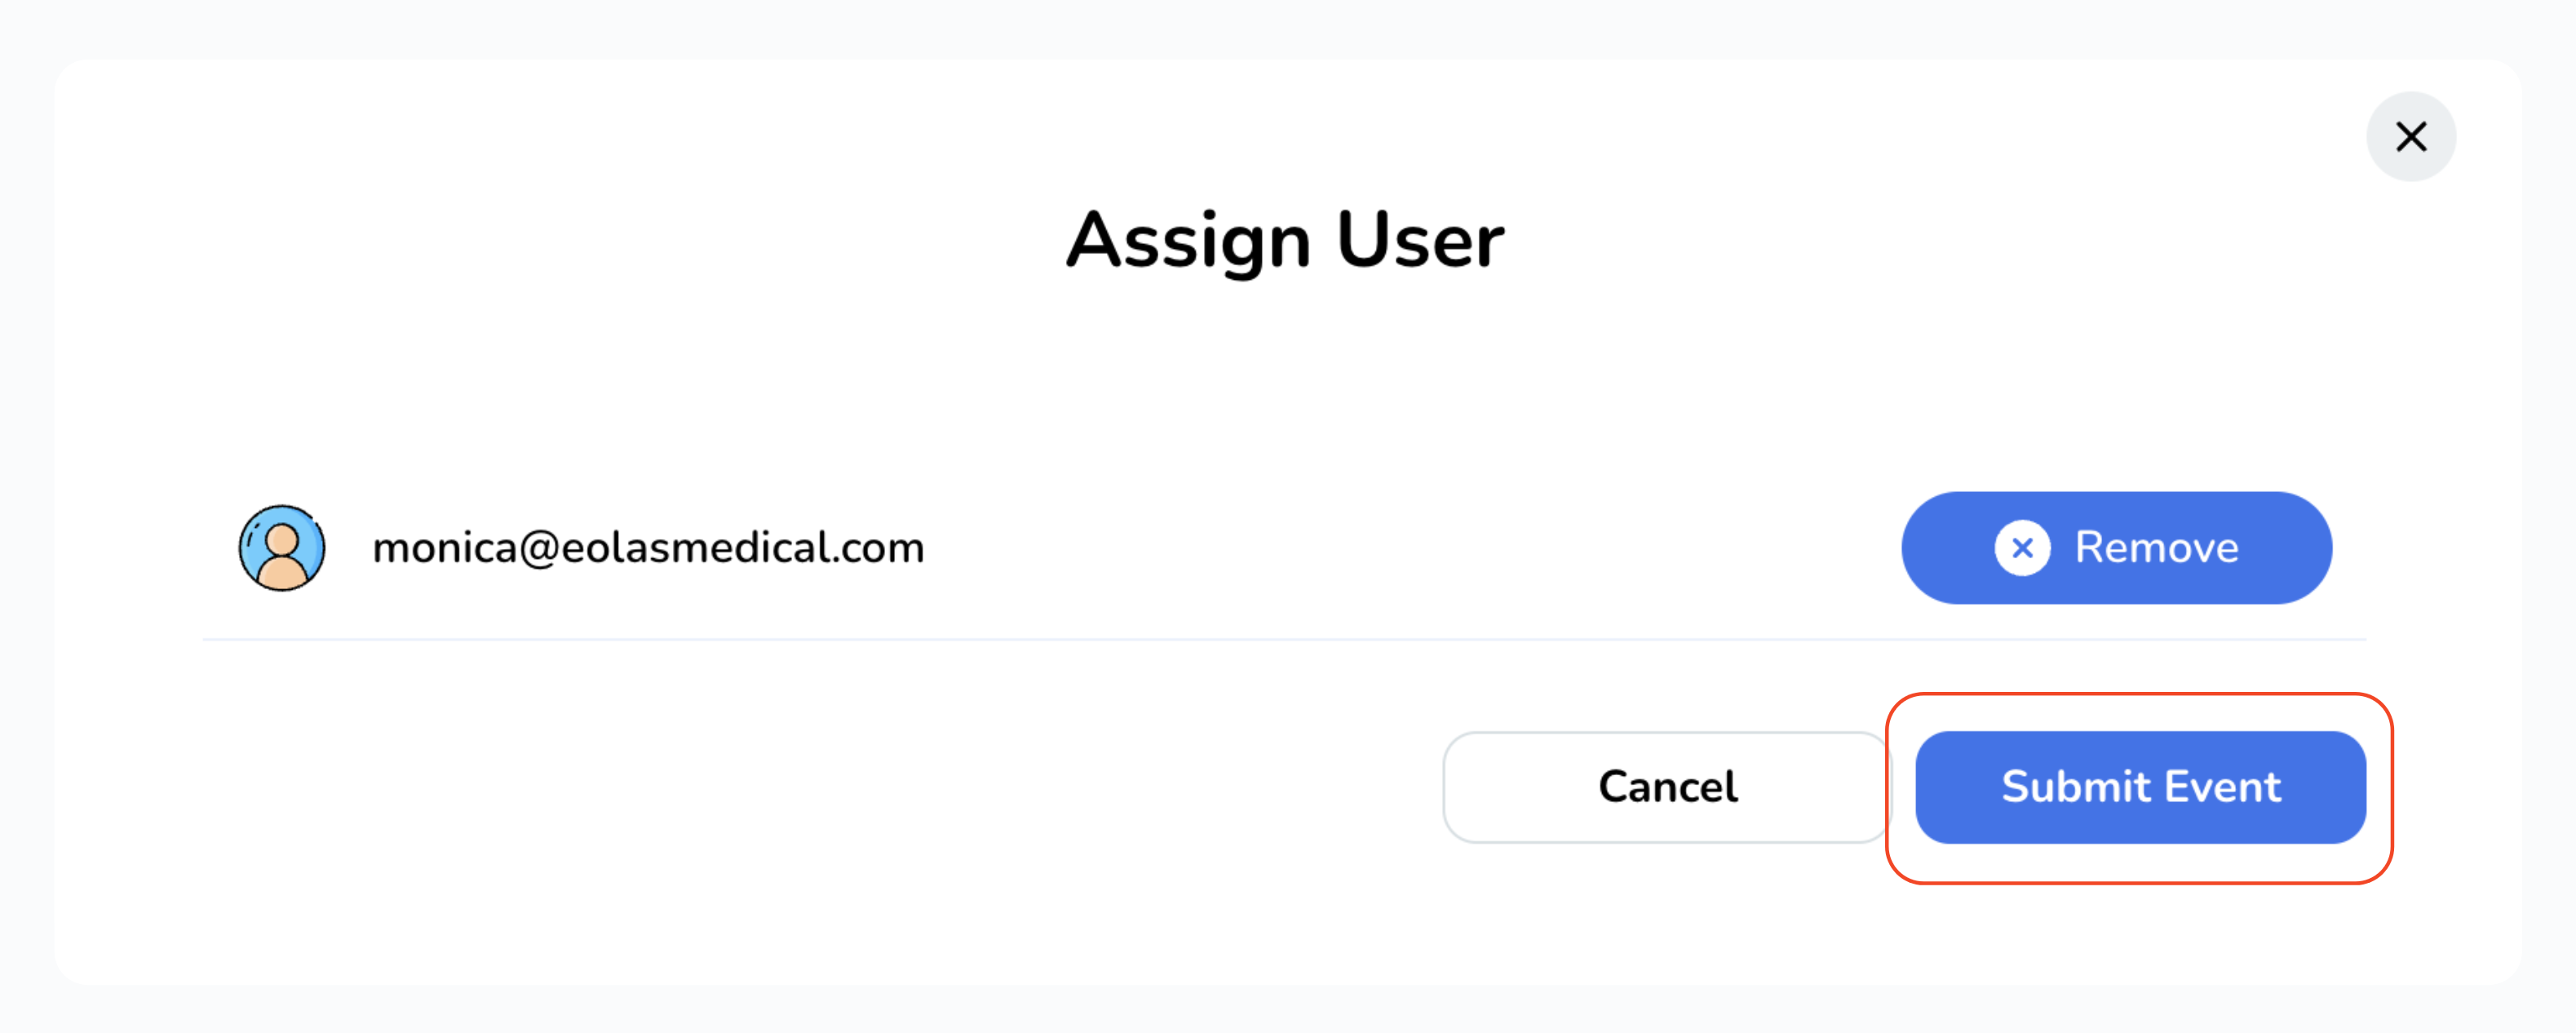
Finally, confirm your selection by clicking on "Submit Event." An email notification will be sent to your assigned assessor.
To designate an assessor for your Clinical Event, click the "Assign Assessor & Request Feedback" button. If you prefer to complete the event without feedback, choose the appropriate option accordingly
Upon clicking, another pop-up will emerge. Input the assessor's email address and tap the "Assign" button. Alternatively, you can opt for an assessor from the list of recent assessors (if available).
Finally, confirm your selection by clicking on "Submit Event." An email notification will be sent to your assigned assessor.
What happens after assigning an assessor?
-
Upon submitting, you will be directed to the event's page. Here, you can view important details such as the assigned assessor and the feedback status. At this point your event page will display a yellow label indicating "Pending".
-
In addition, you have the flexibility to:
-
Send a reminder to your assessor.
-
Reassign your assessor.
-
Delete it completely.
-
Or, choose to complete the case without feedback.
-
Upon submitting, you will be directed to the event's page. Here, you can view important details such as the assigned assessor and the feedback status. At this point your event page will display a yellow label indicating "Pending".
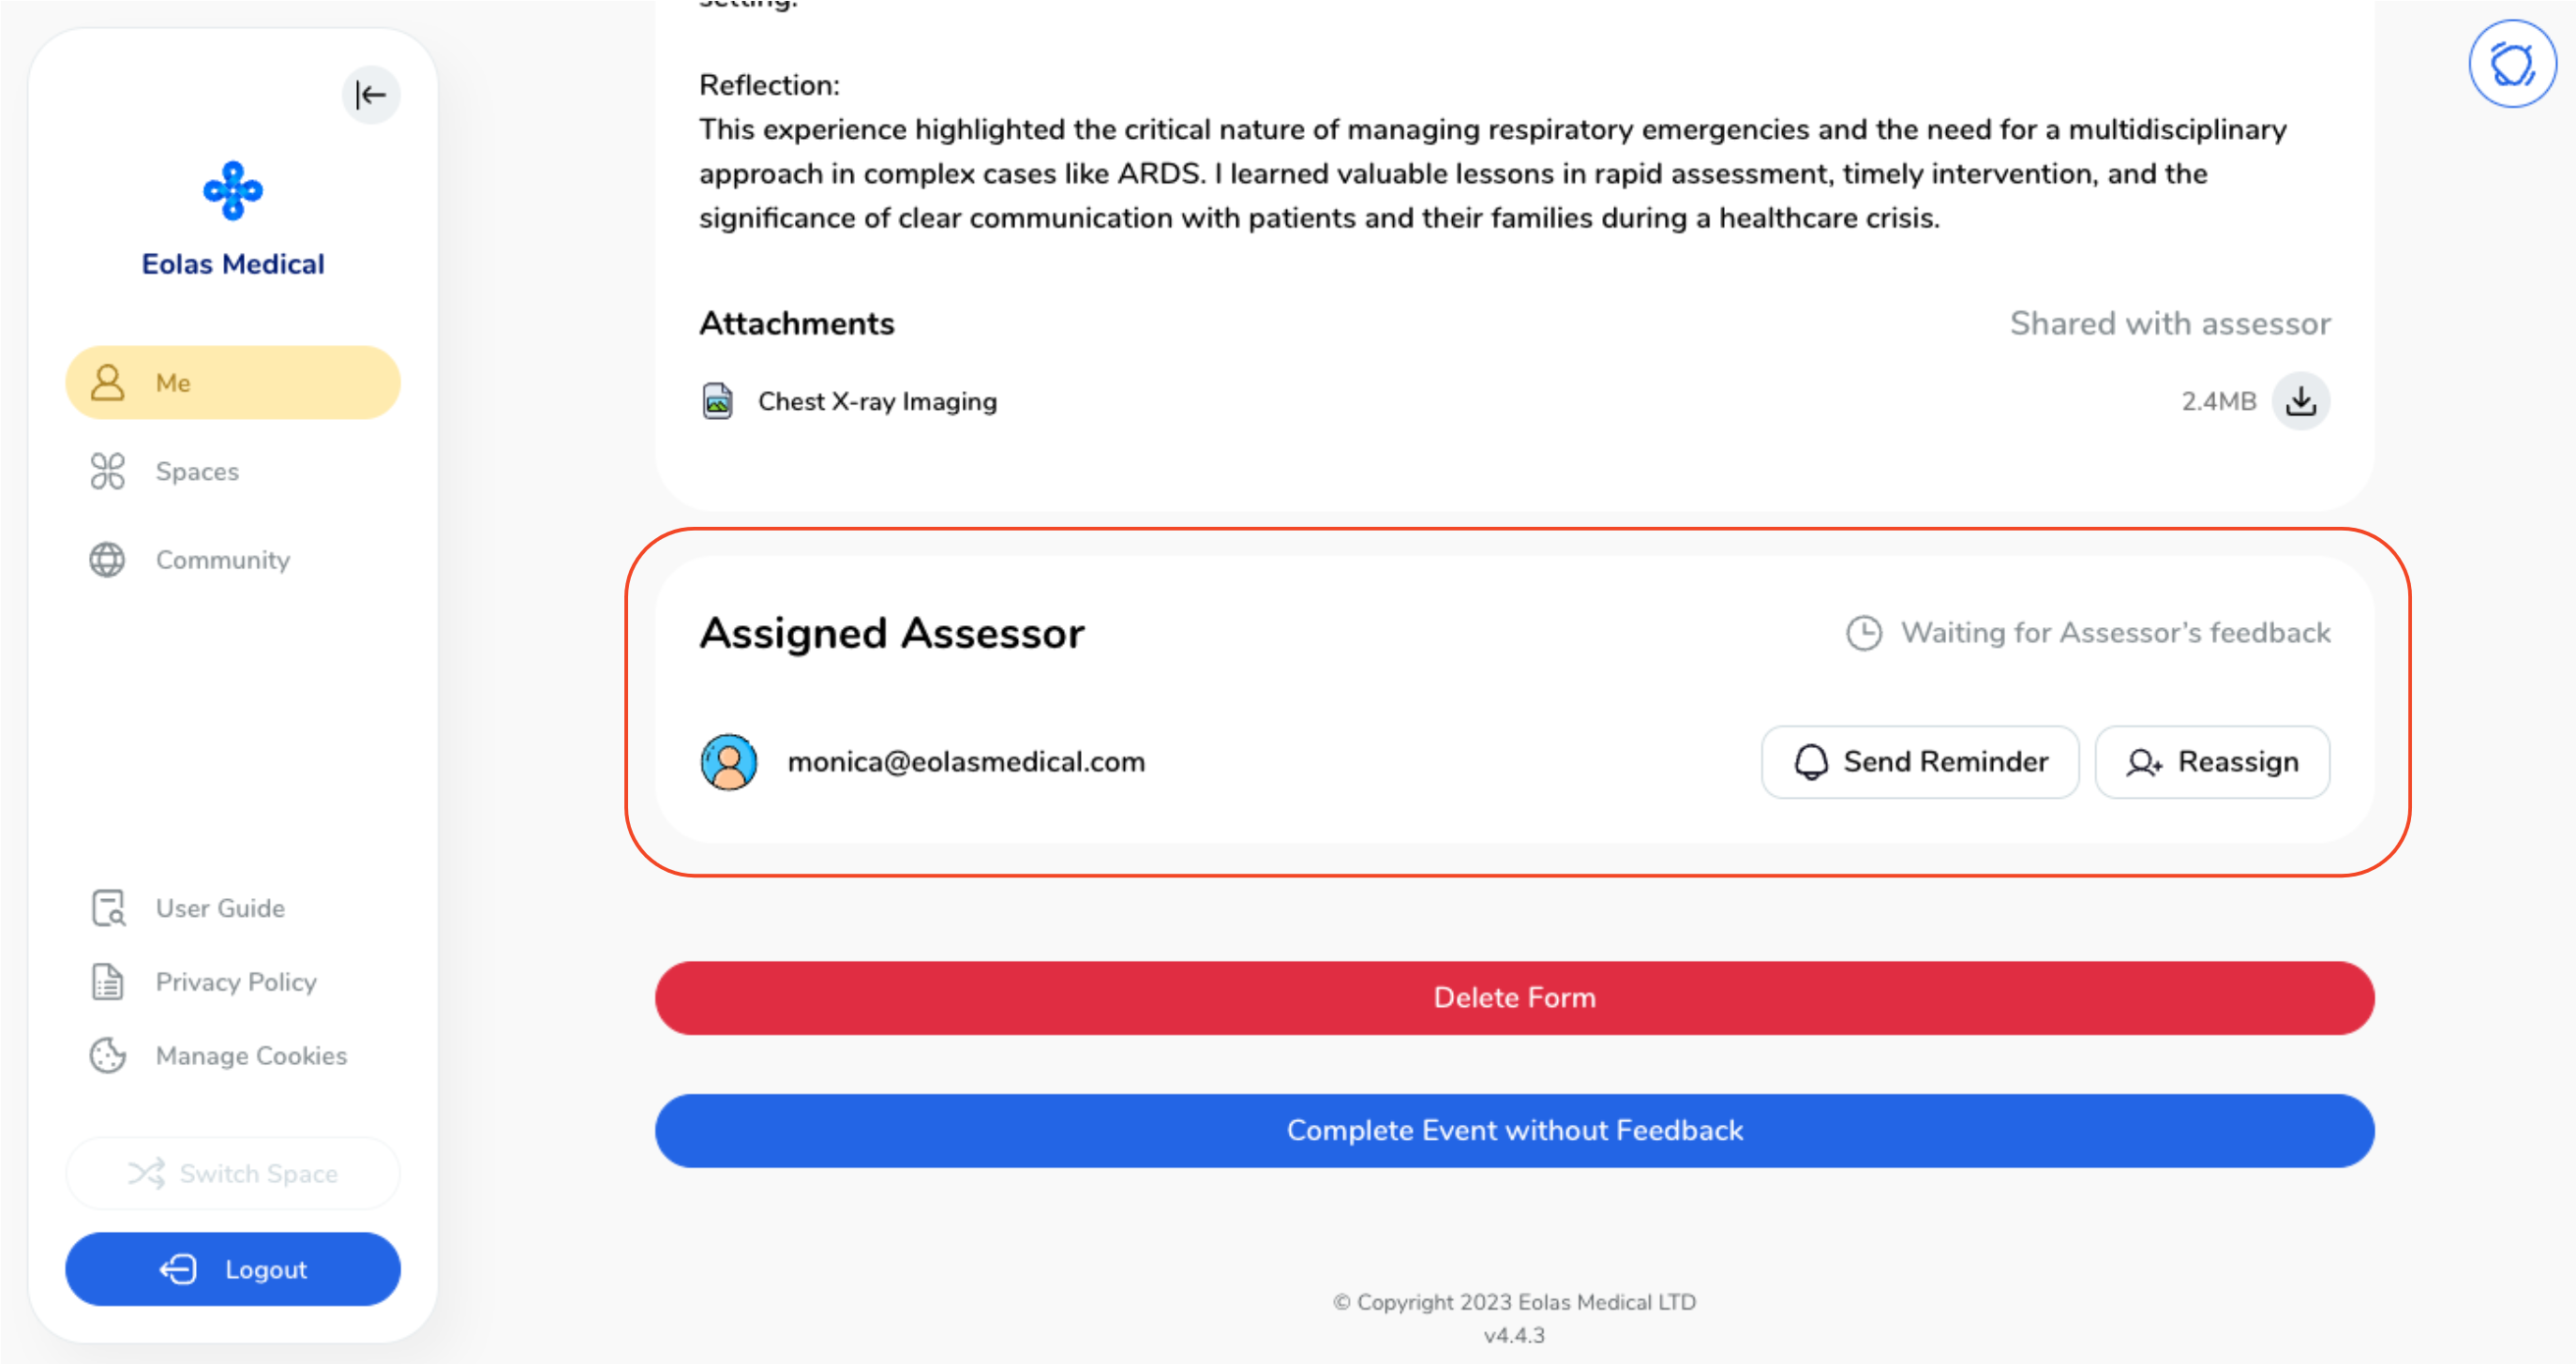
In addition, you have the flexibility to:
-
Send a reminder to your assessor.
Send a reminder to your assessor.
-
Reassign your assessor.
Reassign your assessor.
-
Delete it completely.
Delete it completely.
-
Or, choose to complete the case without feedback.
Or, choose to complete the case without feedback.
Receiving feedback from an assessor.
-
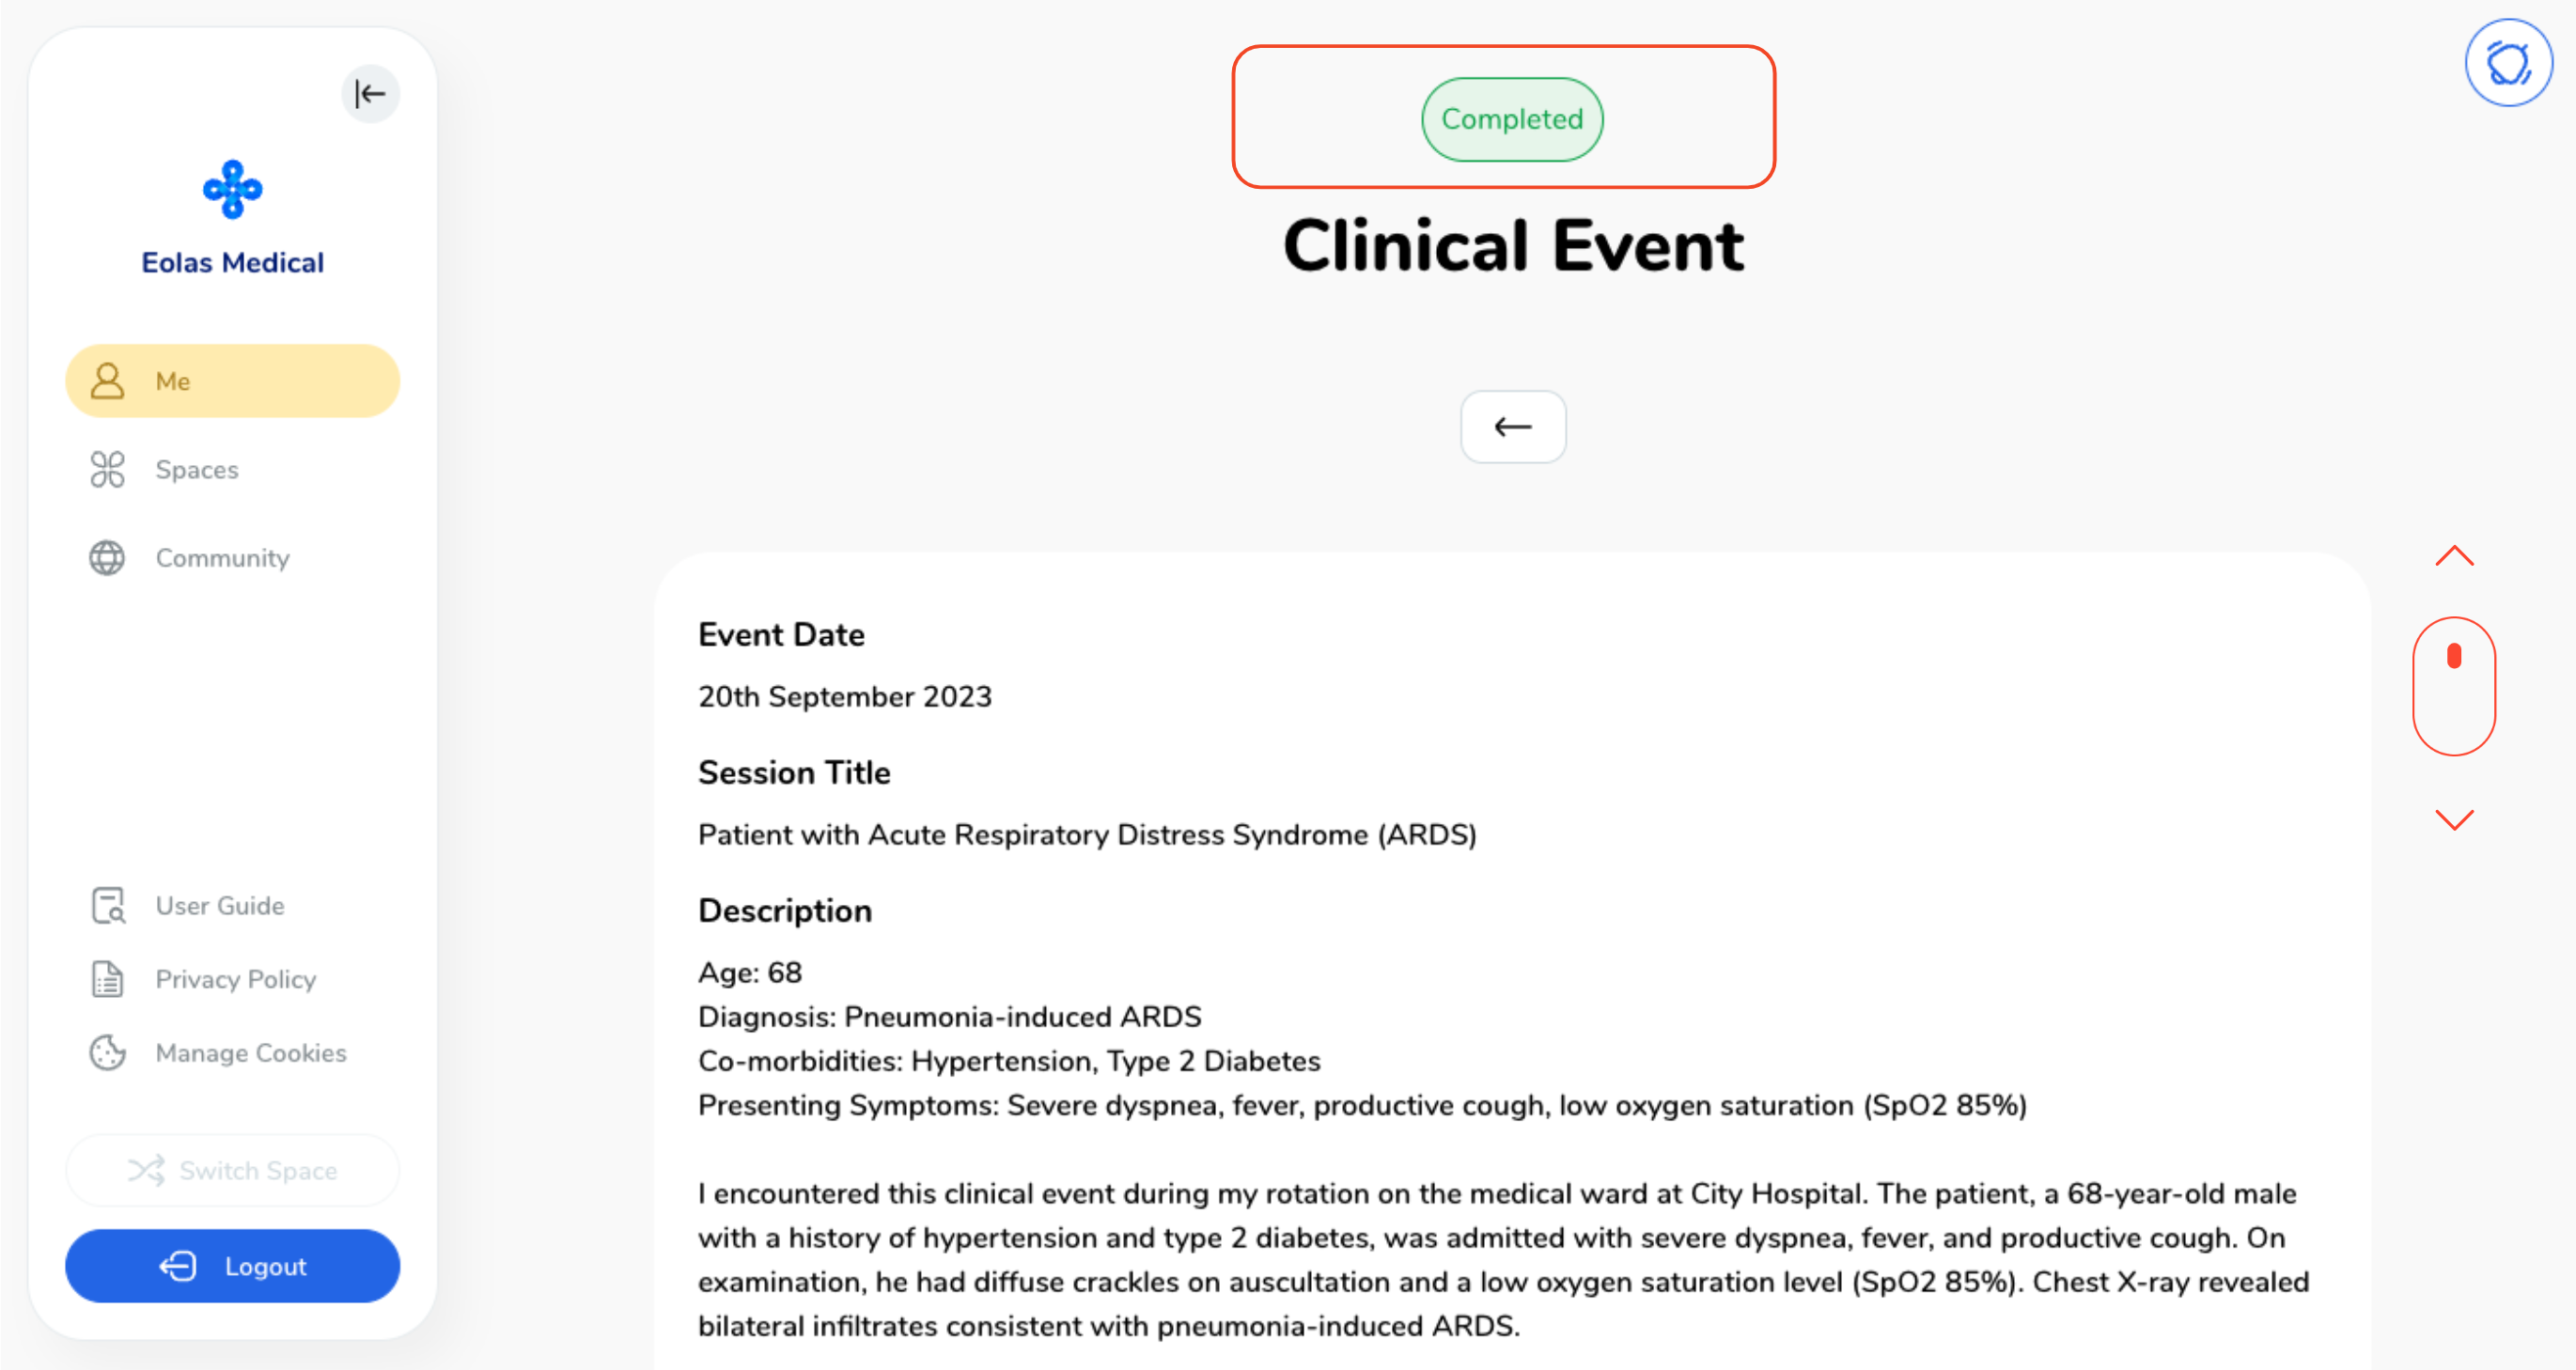
After receiving feedback from your assessor, the event's page will display a green label indicating "Completed." To review the feedback, simply scroll down on the page.
-
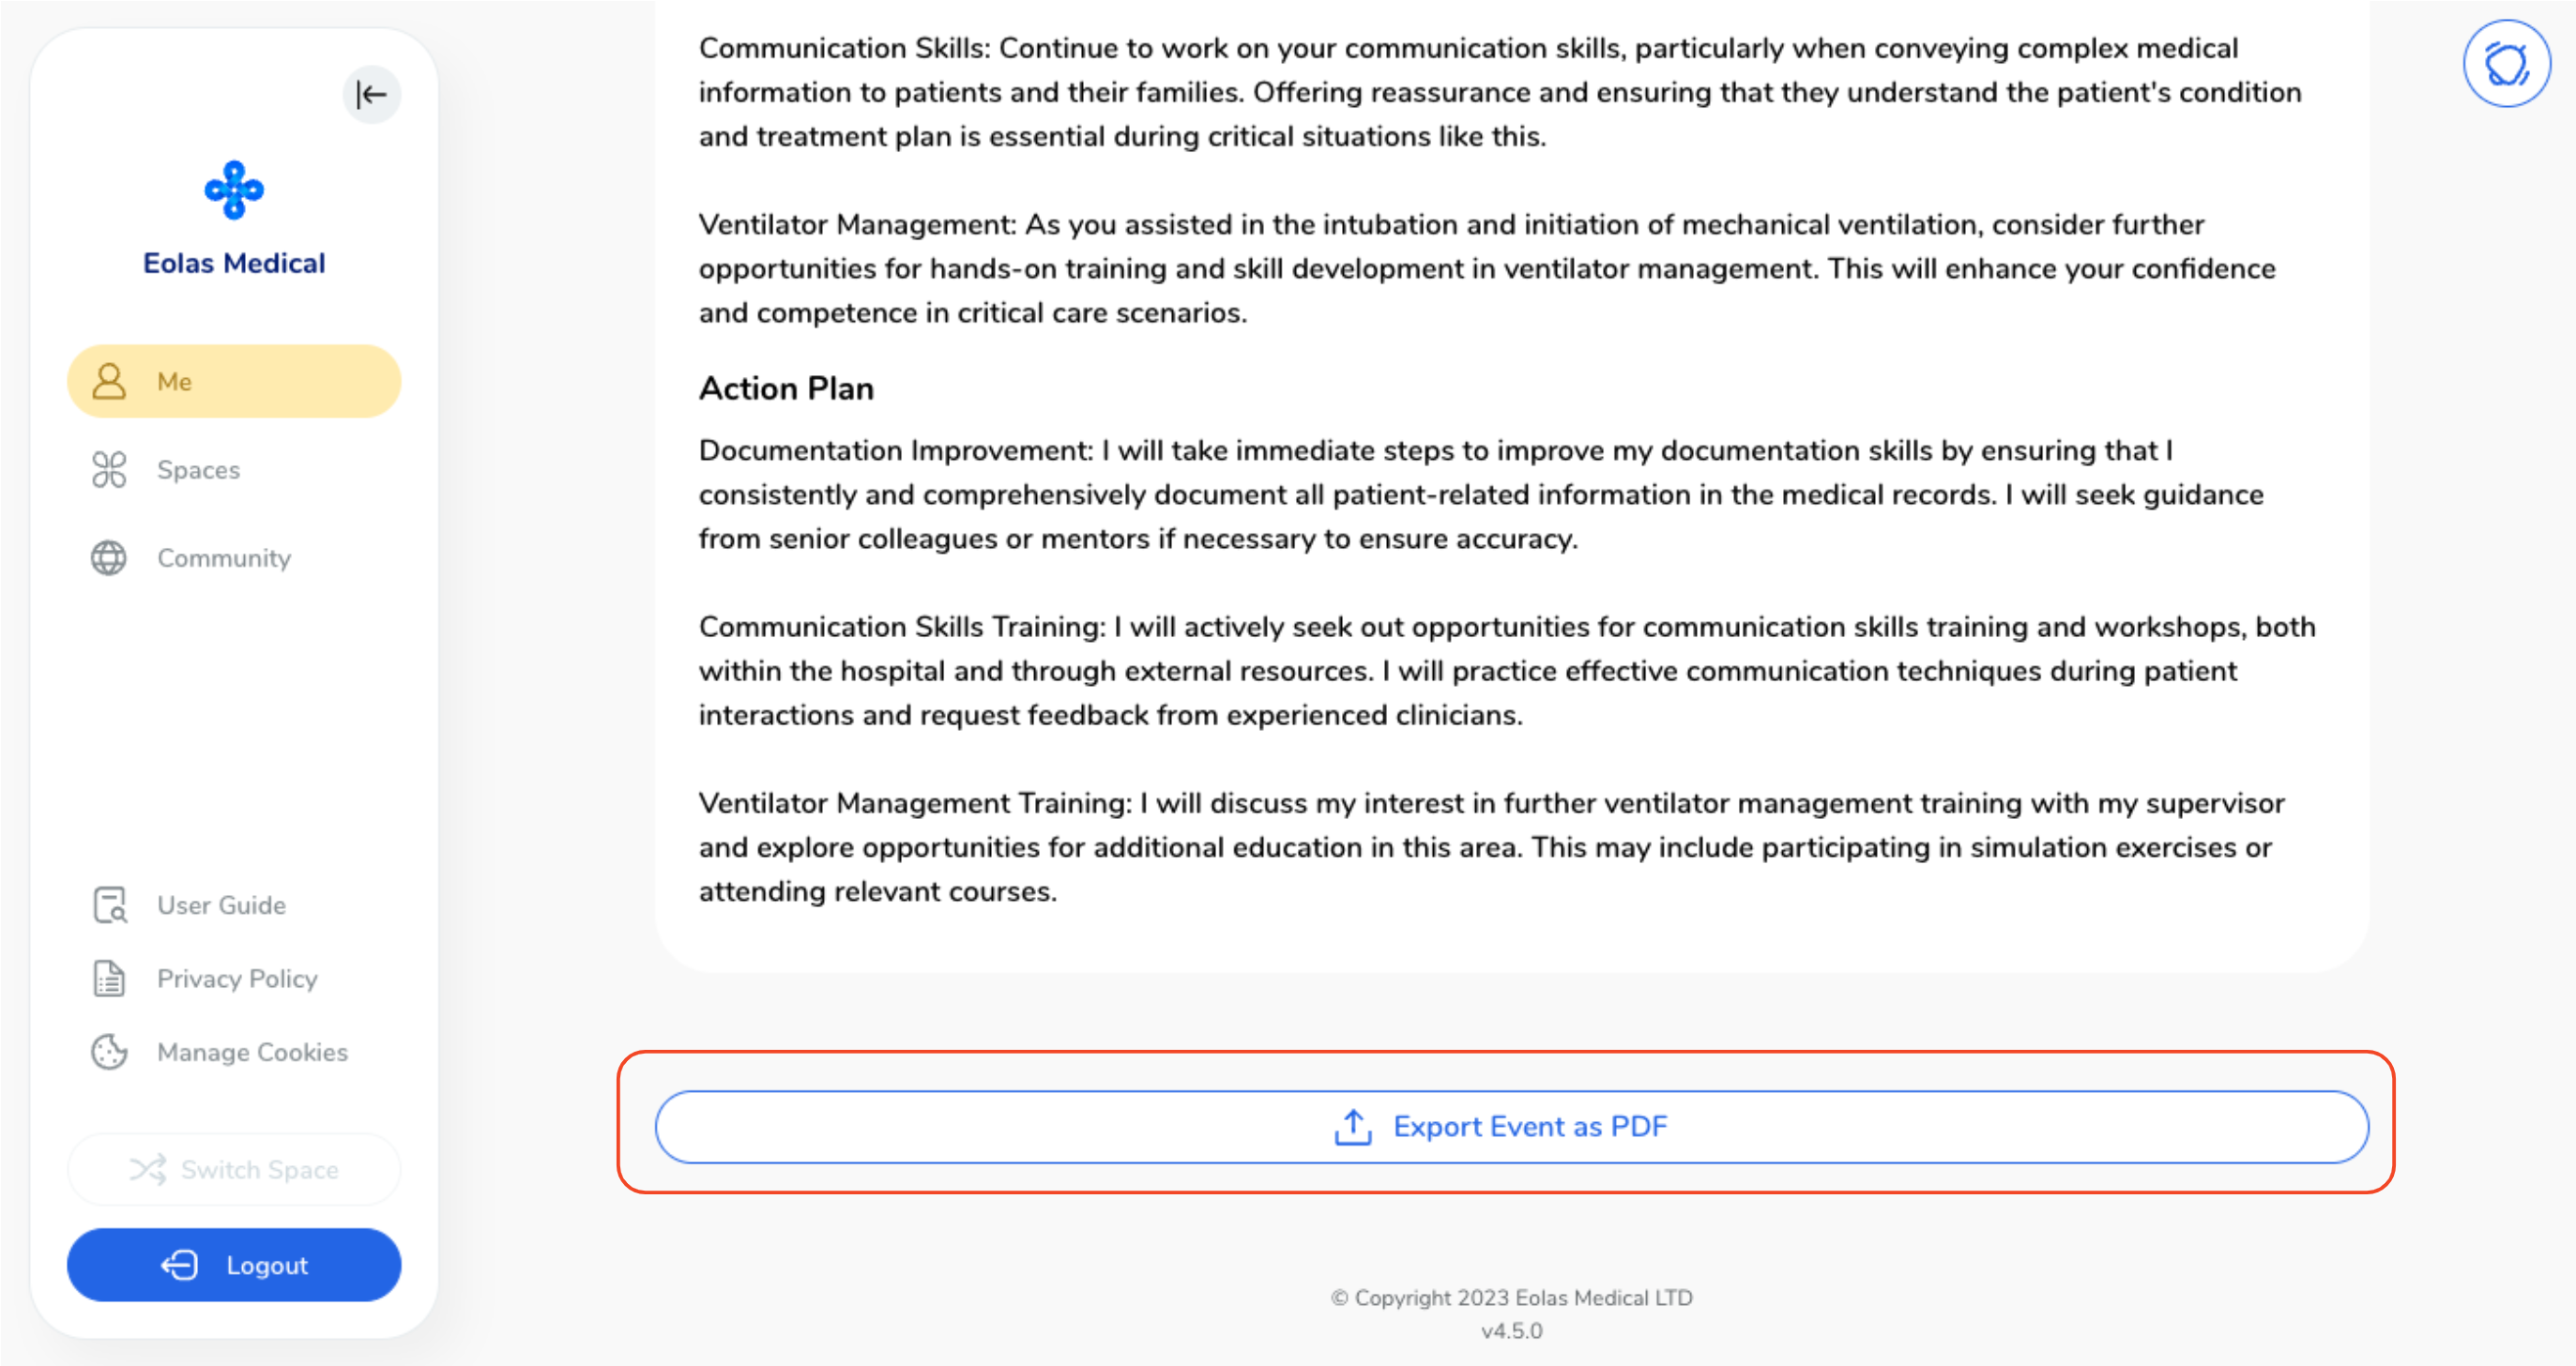
Additionally, if desired, you have the option to export the feedback as a PDF.
After receiving feedback from your assessor, the event's page will display a green label indicating "Completed." To review the feedback, simply scroll down on the page.
Additionally, if desired, you have the option to export the feedback as a PDF.
So, take charge of your Clinical Event using the insights gained here, and enjoy the benefits of an organised and reliable record-keeping system
Mobile - Add a Clinical Event.
-
When adding a new portfolio event, select "Clinical Event" from the results list.
-
Select the date for your event. By default, the current date will be displayed, but if you wish to modify it, simply tap on the "Date" button and choose your preferred date.
-
Enter a captivating and informative title for your case.
-
Compose your description.
-
Feel free to include any additional comments or details that you consider significant. This is your opportunity to provide further context or share specific instructions.
-
If you desire to go the extra mile and document your session, tap on the "Add Attachments" option. This will allow you to maintain a record of your Clinical Event, ensuring its documentation and accessibility for future reference.
-
A pop-up window will appear, offering you the choice to either select from your existing files or upload a new one from your device.
-
To upload a new file, select "Add New File".
-
Depending on your needs, you can upload various file types like MS Office documents, PDFs, images, videos, and web links. Choose the relevant option.
-
To upload a new file,
-
Select "Files" and then tap on "Browse Files",
-
Select the desired file from your device, give it a name and then tap "Done".
-
The recently added file will join your personal storage files. Simply tap "Attach File" to incorporate it into your event.
-
-
To add a weblink, select "Web Link"
-
Your file will now be attached, If you wish to add multiple files, simply click on "Add Attachments" once more and follow the same process again.
-
To access the recently uploaded file, download it or to remove it in case of an error, just click on the "file" box.
-
By tapping on the "toggle" button, you have the option to decide whether to share the attachment with your assessor or not.
-
When you're ready, you have few options:
-
Once you've chosen "Continue", a pop-up window will surface, offering you the option to assign an assessor and gather feedback.
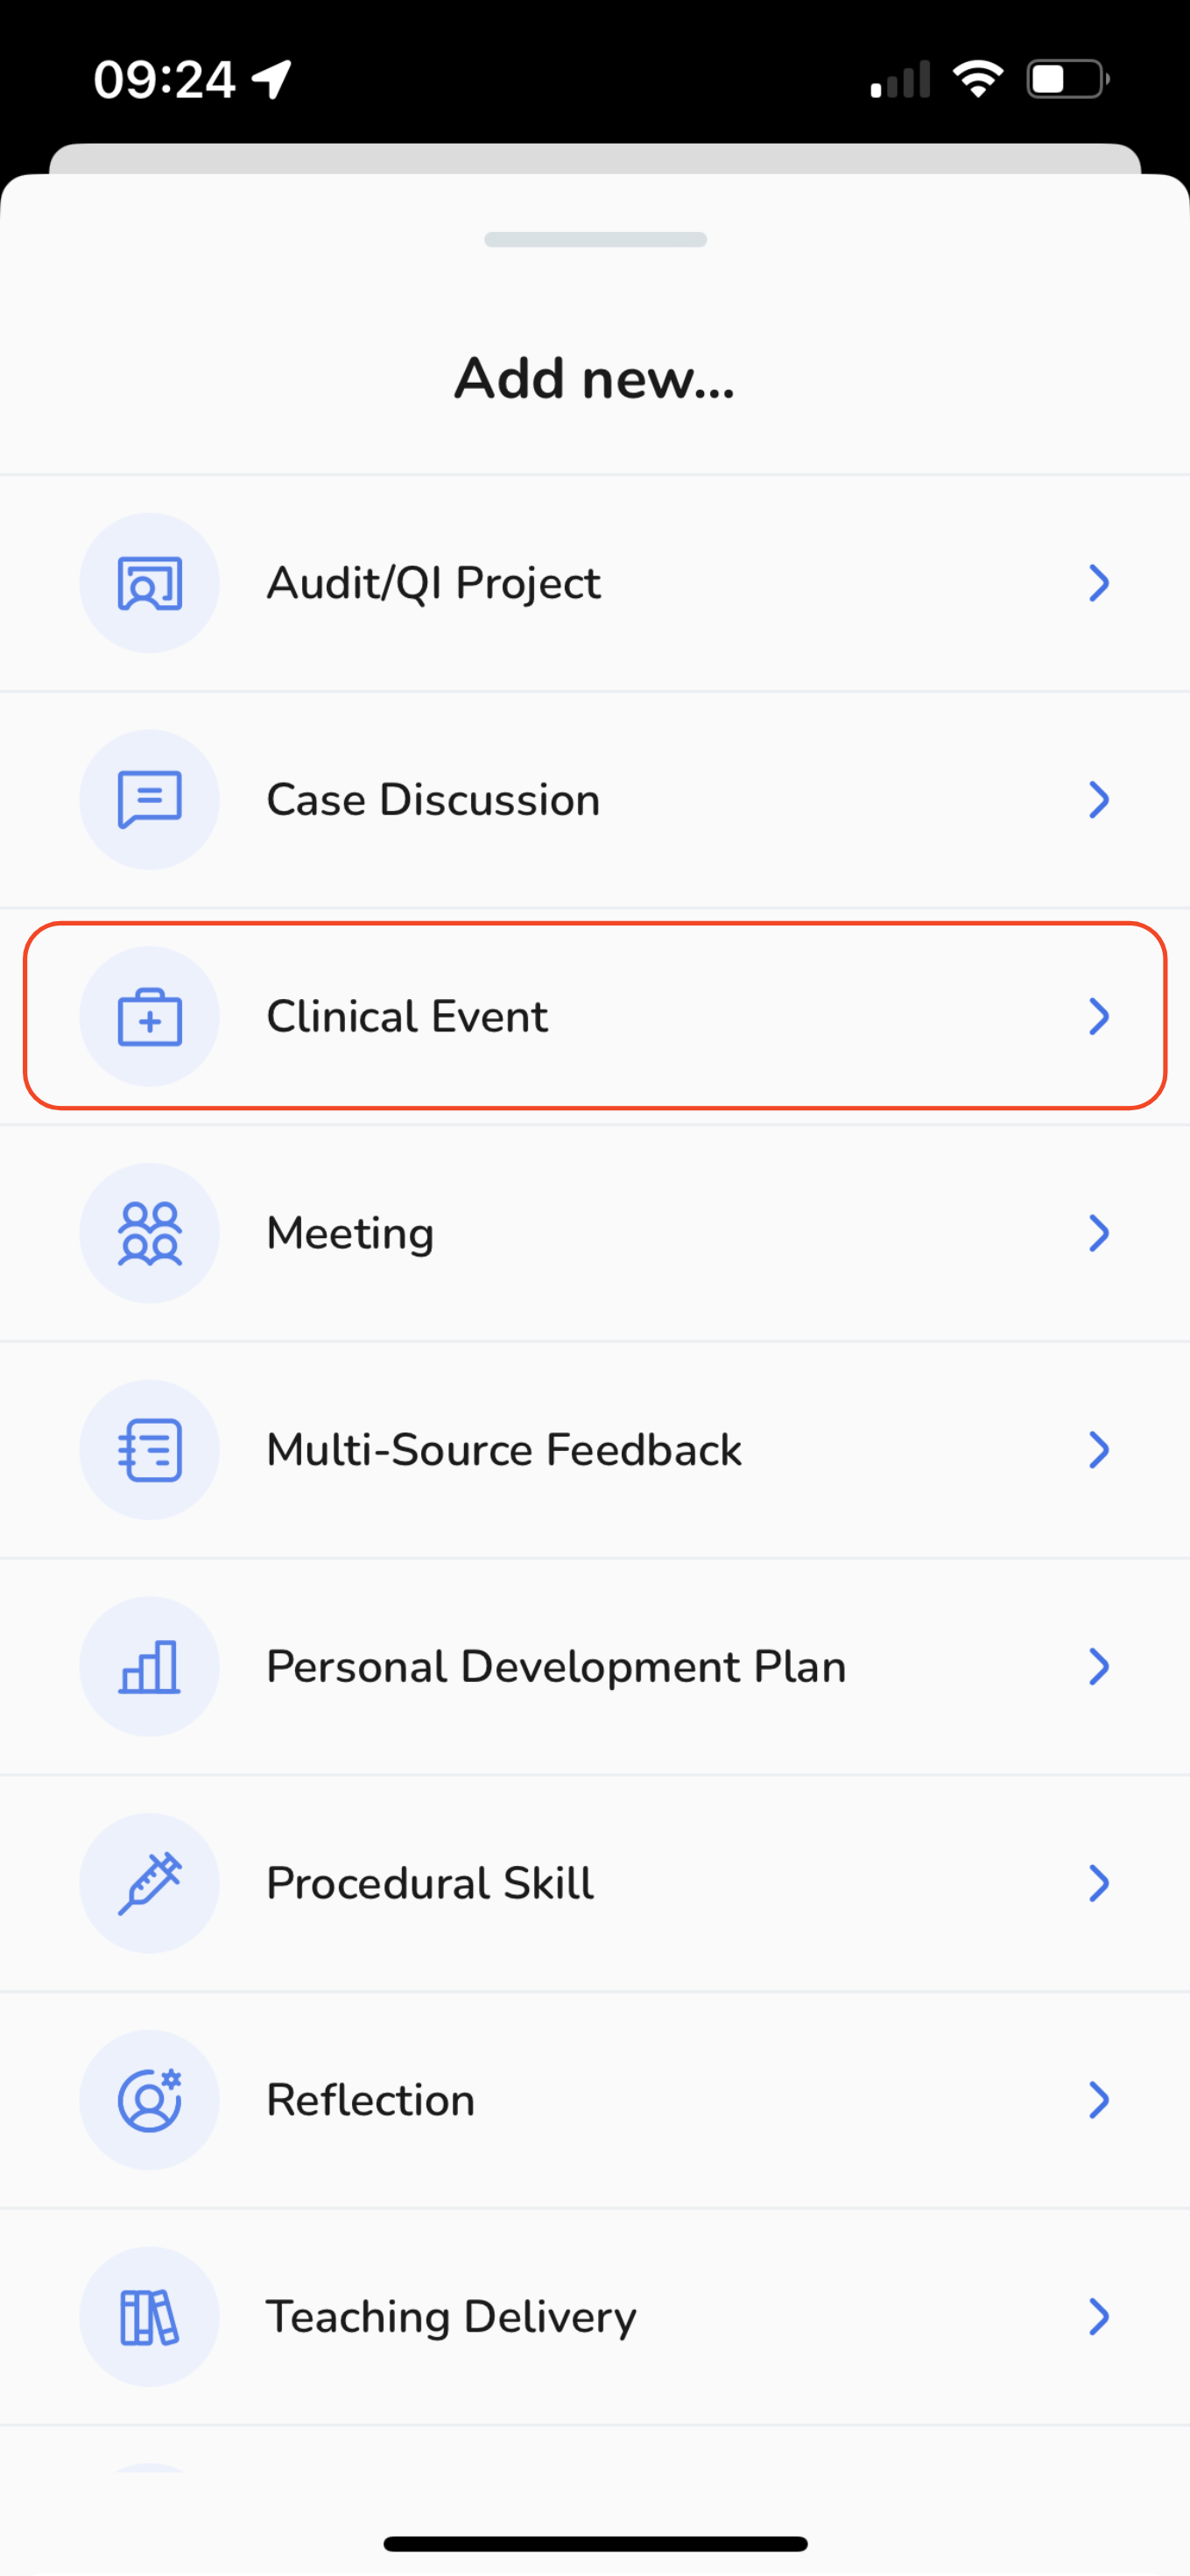
When adding a new portfolio event, select "Clinical Event" from the results list.
Select the date for your event. By default, the current date will be displayed, but if you wish to modify it, simply tap on the "Date" button and choose your preferred date.
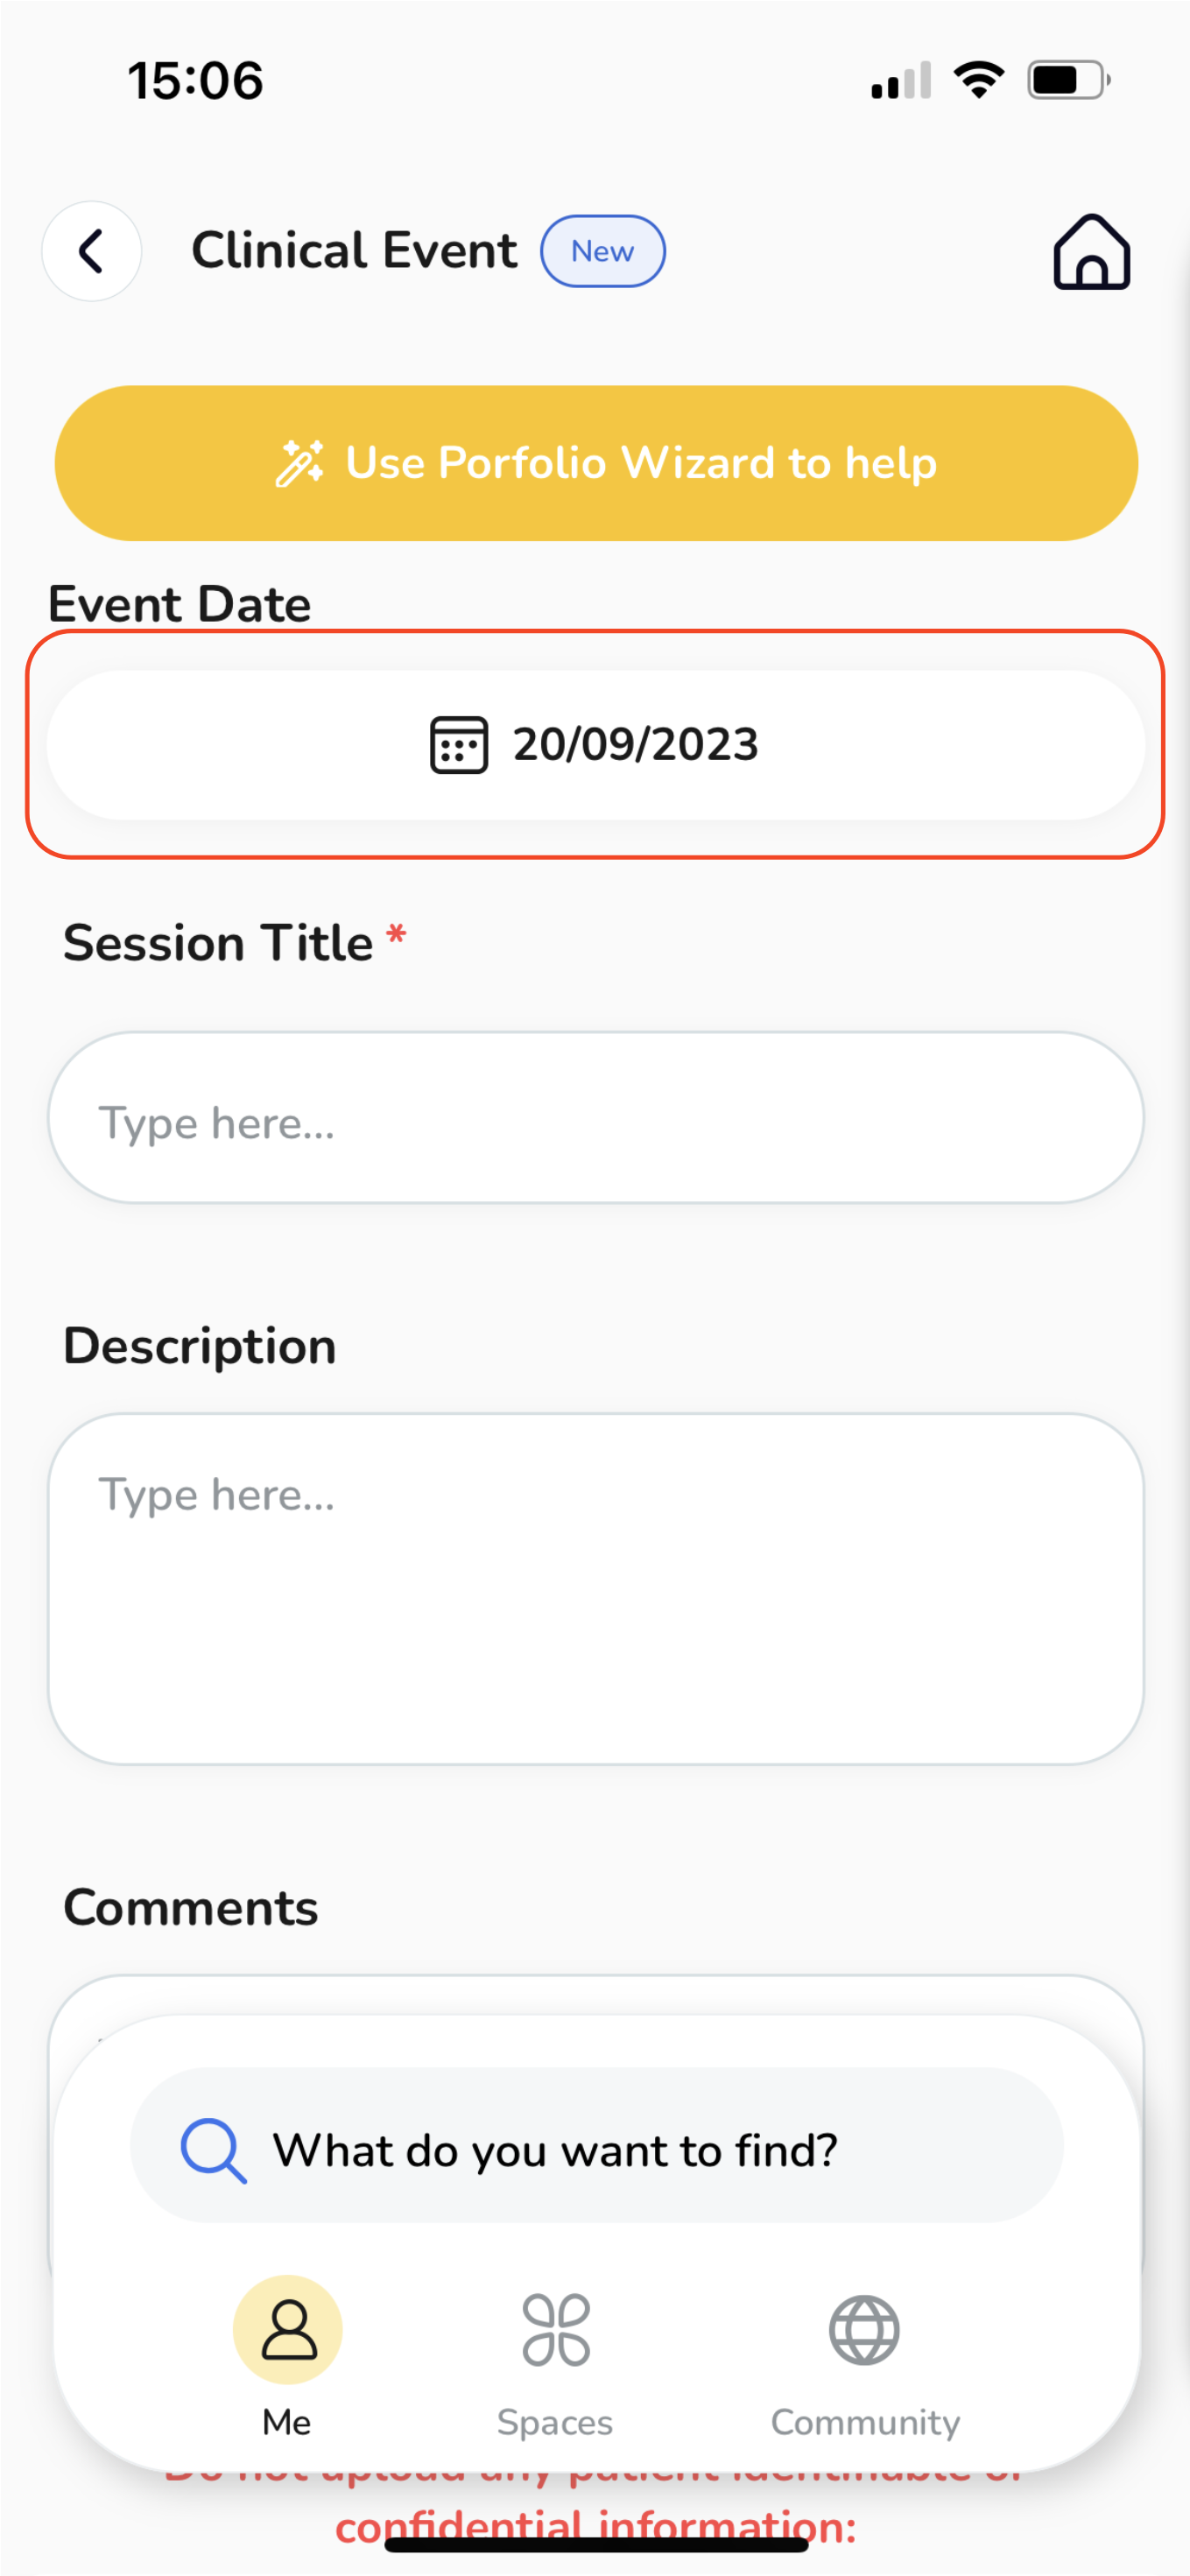
Enter a captivating and informative title for your case.
Compose your description.
Feel free to include any additional comments or details that you consider significant. This is your opportunity to provide further context or share specific instructions.
If you desire to go the extra mile and document your session, tap on the "Add Attachments" option. This will allow you to maintain a record of your Clinical Event, ensuring its documentation and accessibility for future reference.
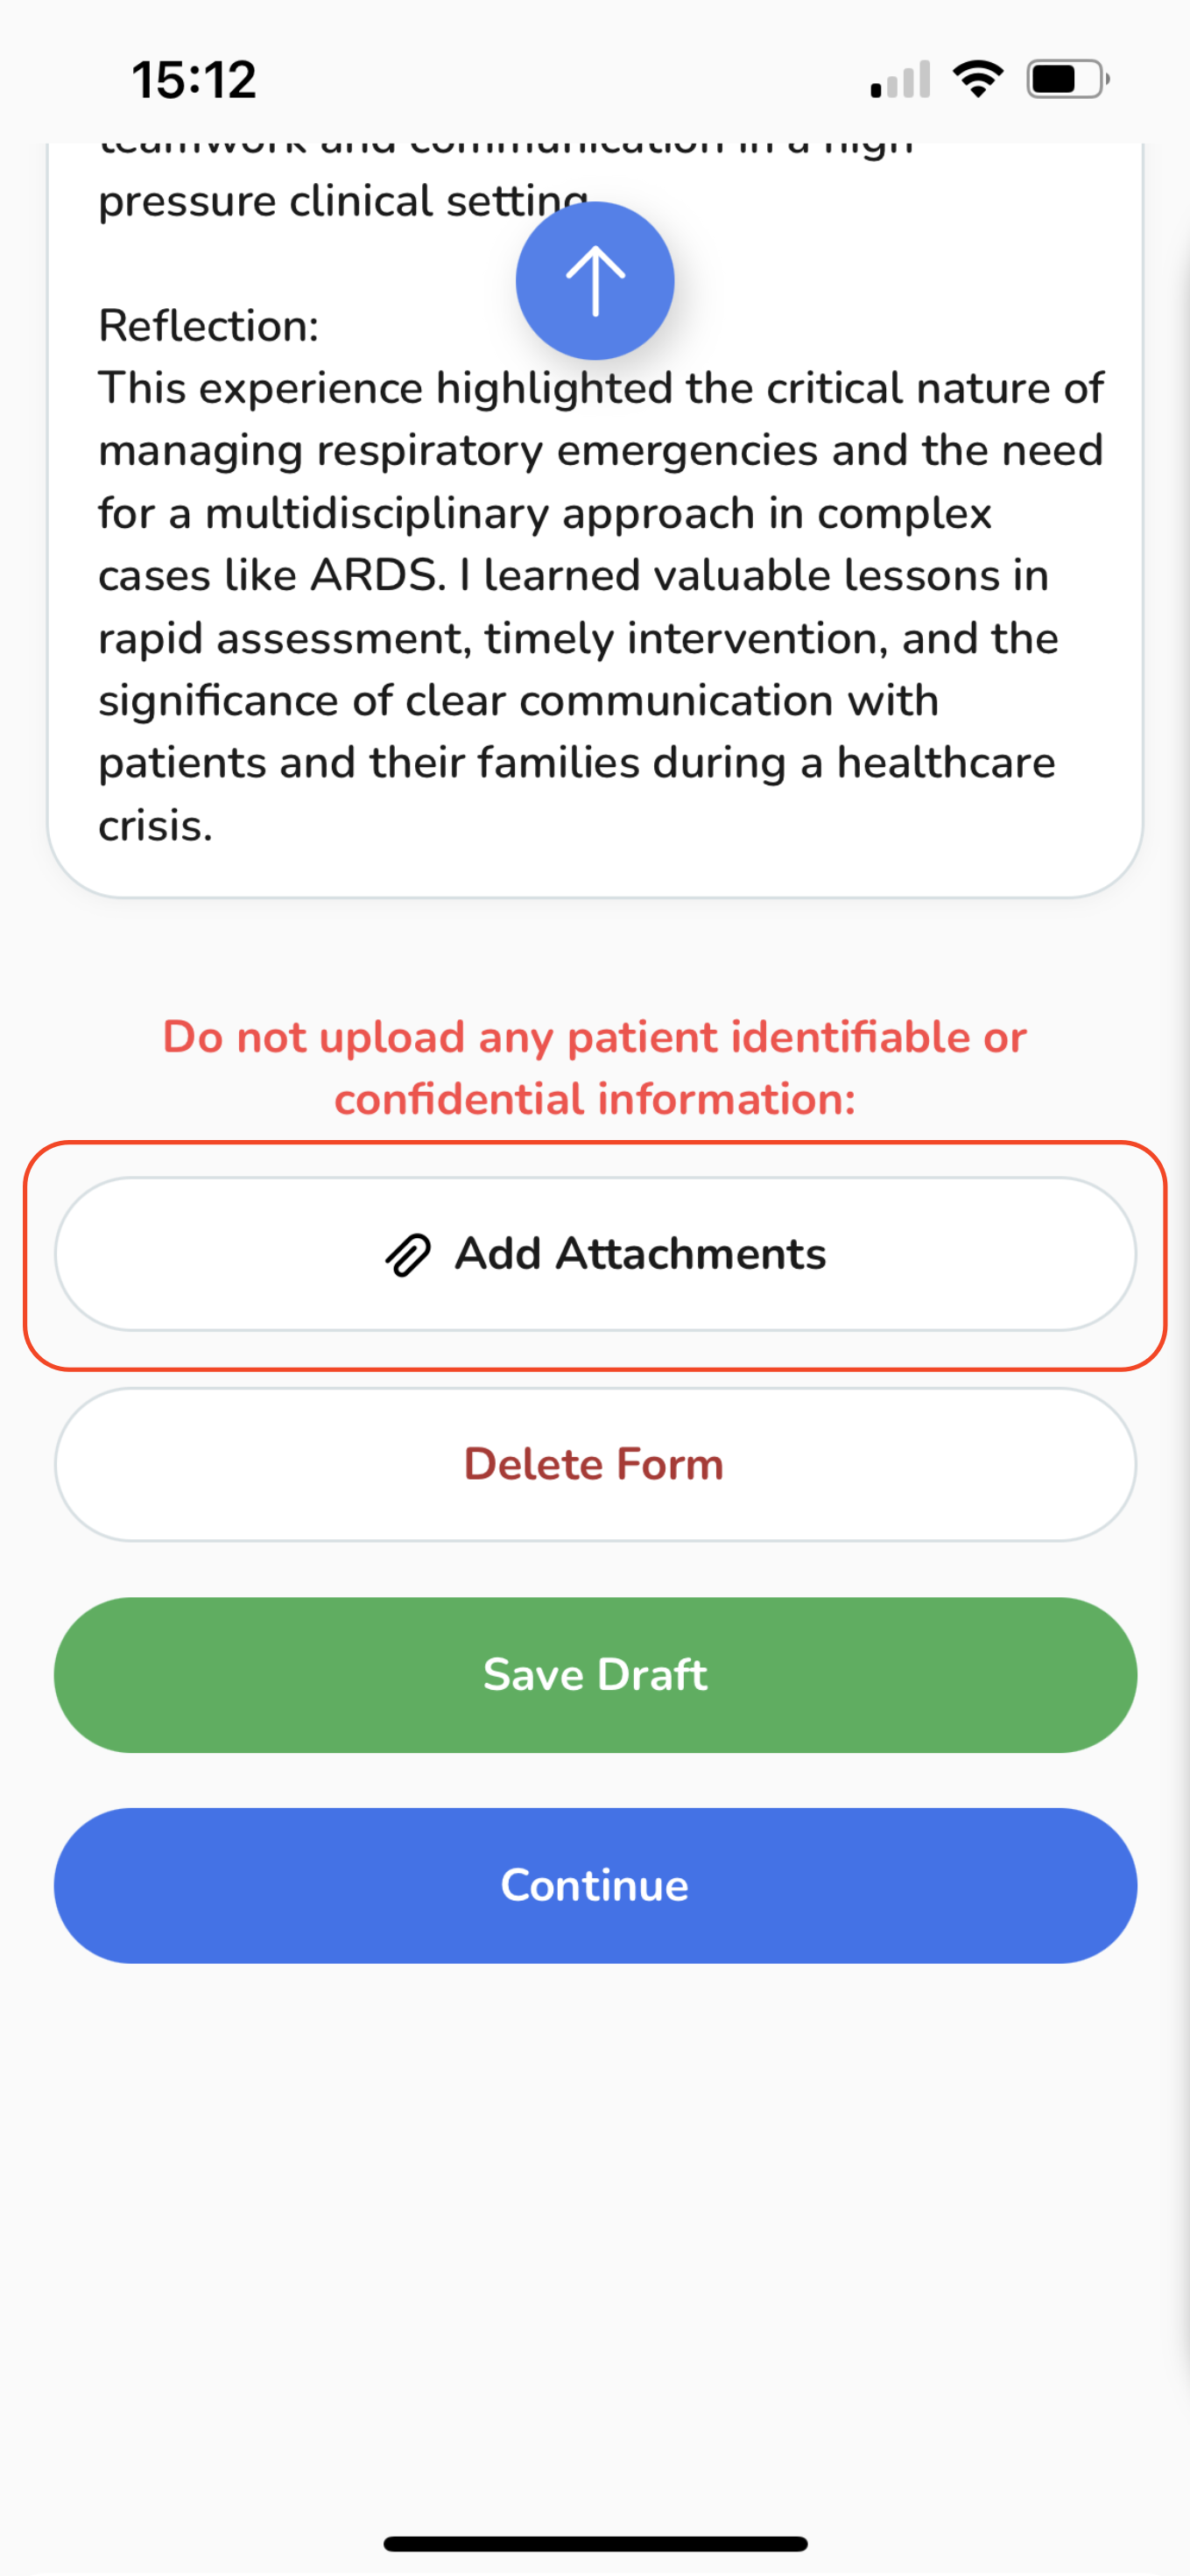
A pop-up window will appear, offering you the choice to either select from your existing files or upload a new one from your device.
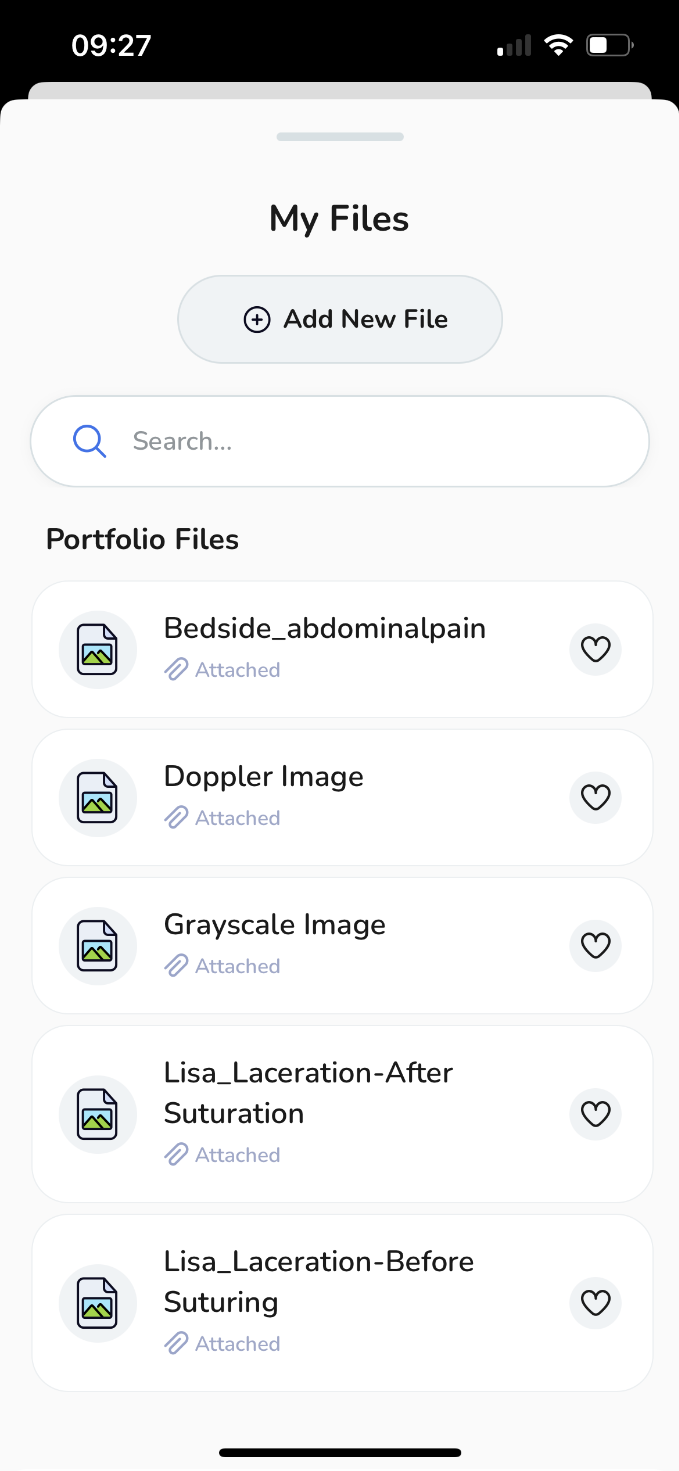
To upload a new file, select "Add New File".
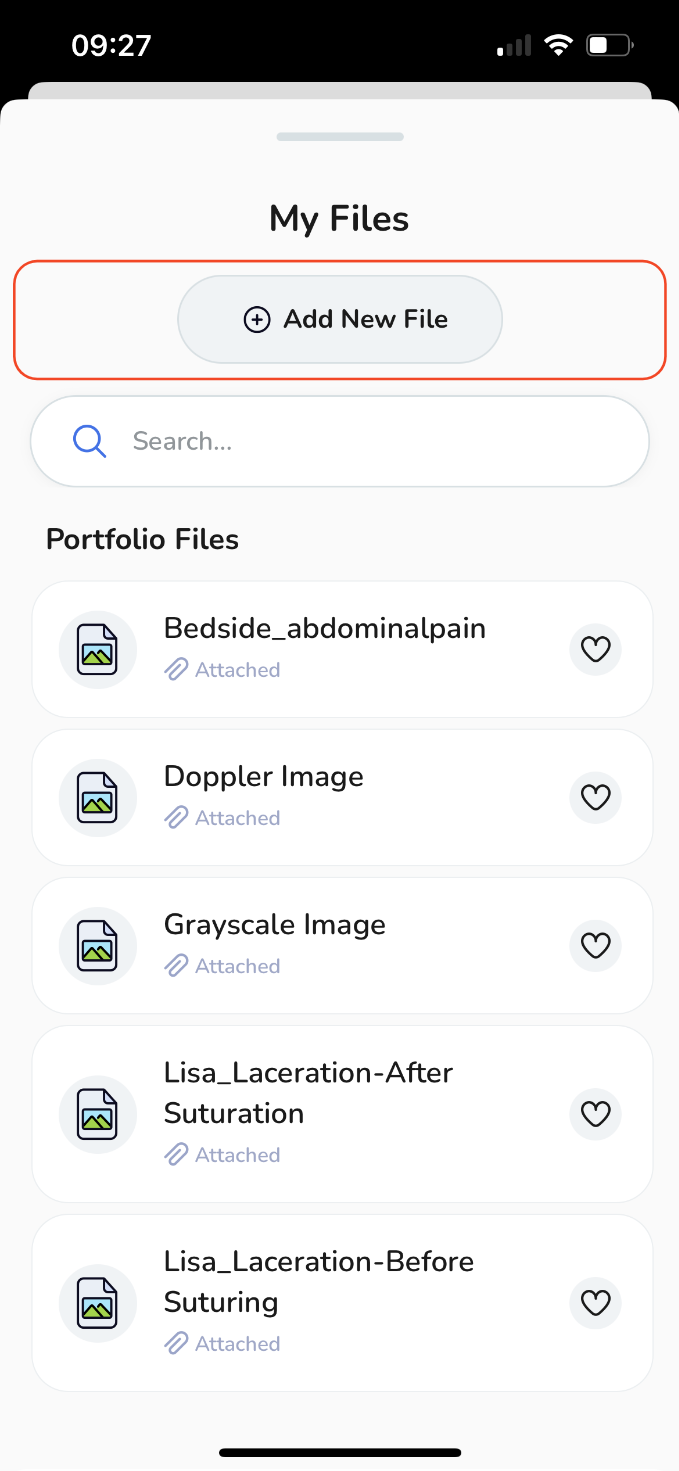
Depending on your needs, you can upload various file types like MS Office documents, PDFs, images, videos, and web links. Choose the relevant option.
To upload a new file,
-
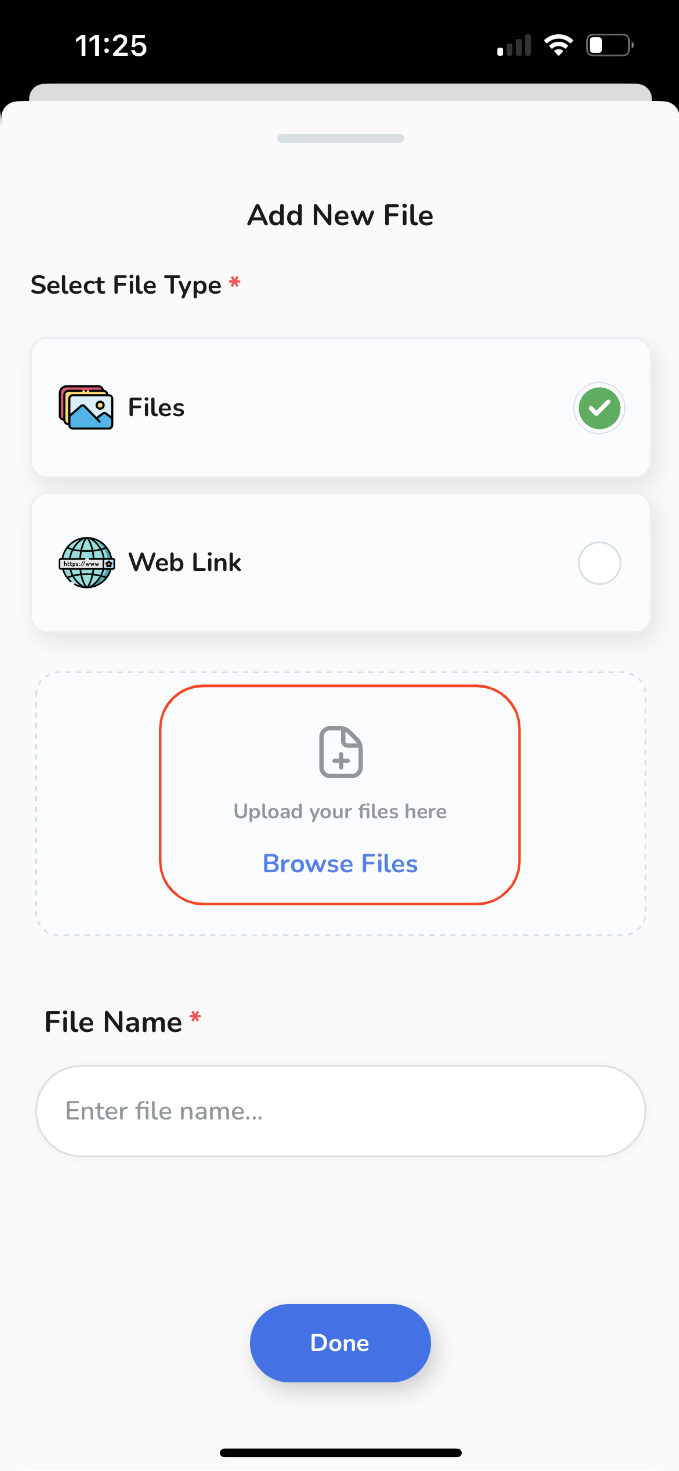
Select "Files" and then tap on "Browse Files",
Select "Files" and then tap on "Browse Files",
-
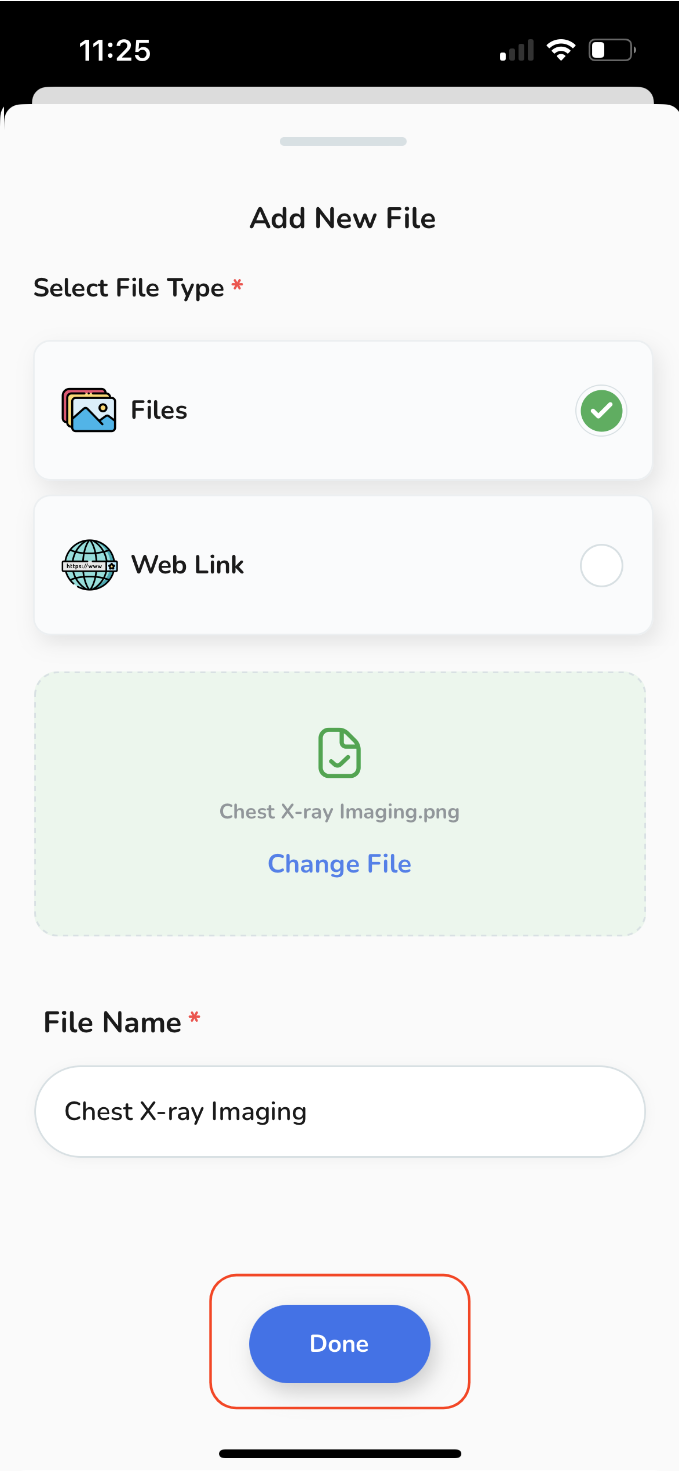
Select the desired file from your device, give it a name and then tap "Done".
Select the desired file from your device, give it a name and then tap "Done".
-
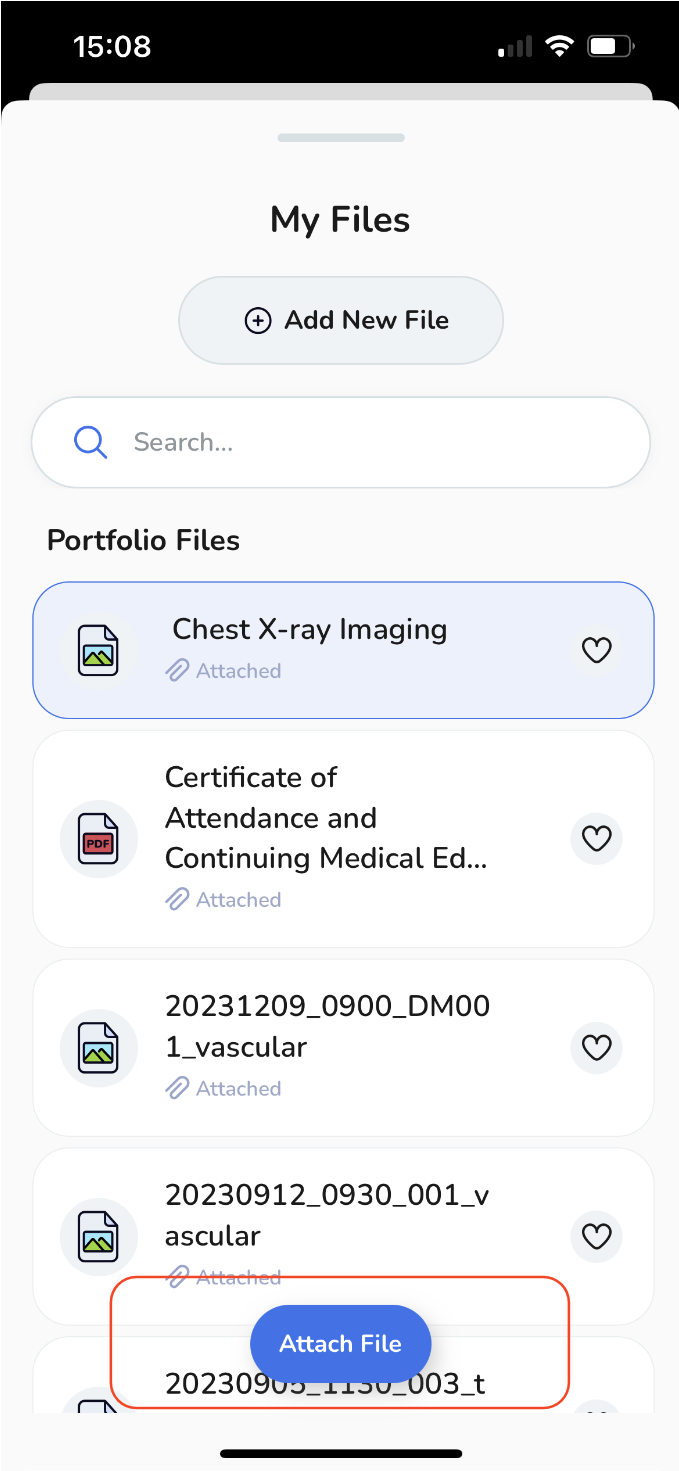
The recently added file will join your personal storage files. Simply tap "Attach File" to incorporate it into your event.
The recently added file will join your personal storage files. Simply tap "Attach File" to incorporate it into your event.
To add a weblink, select "Web Link"
-
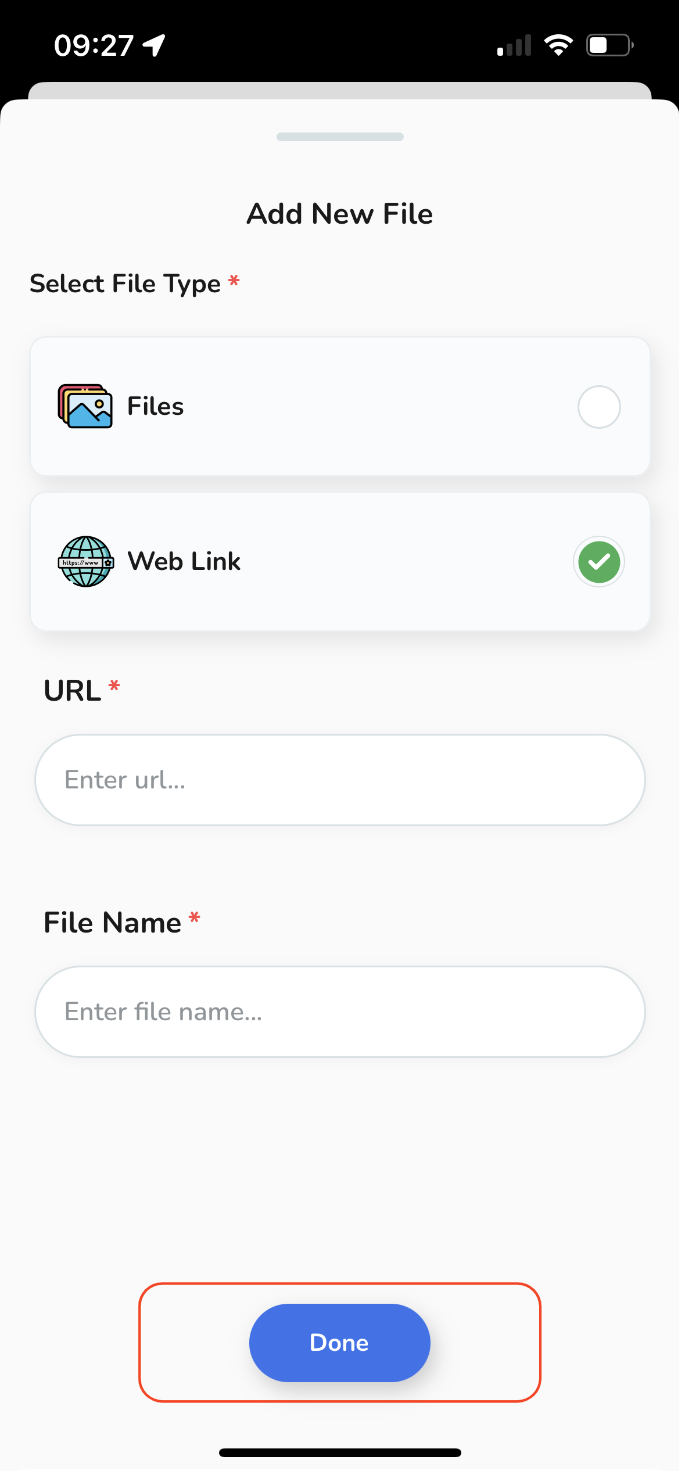
Provide the URL link along with a File Name, and then tap "Done".
Provide the URL link along with a File Name, and then tap "Done".
Your file will now be attached, If you wish to add multiple files, simply click on "Add Attachments" once more and follow the same process again.
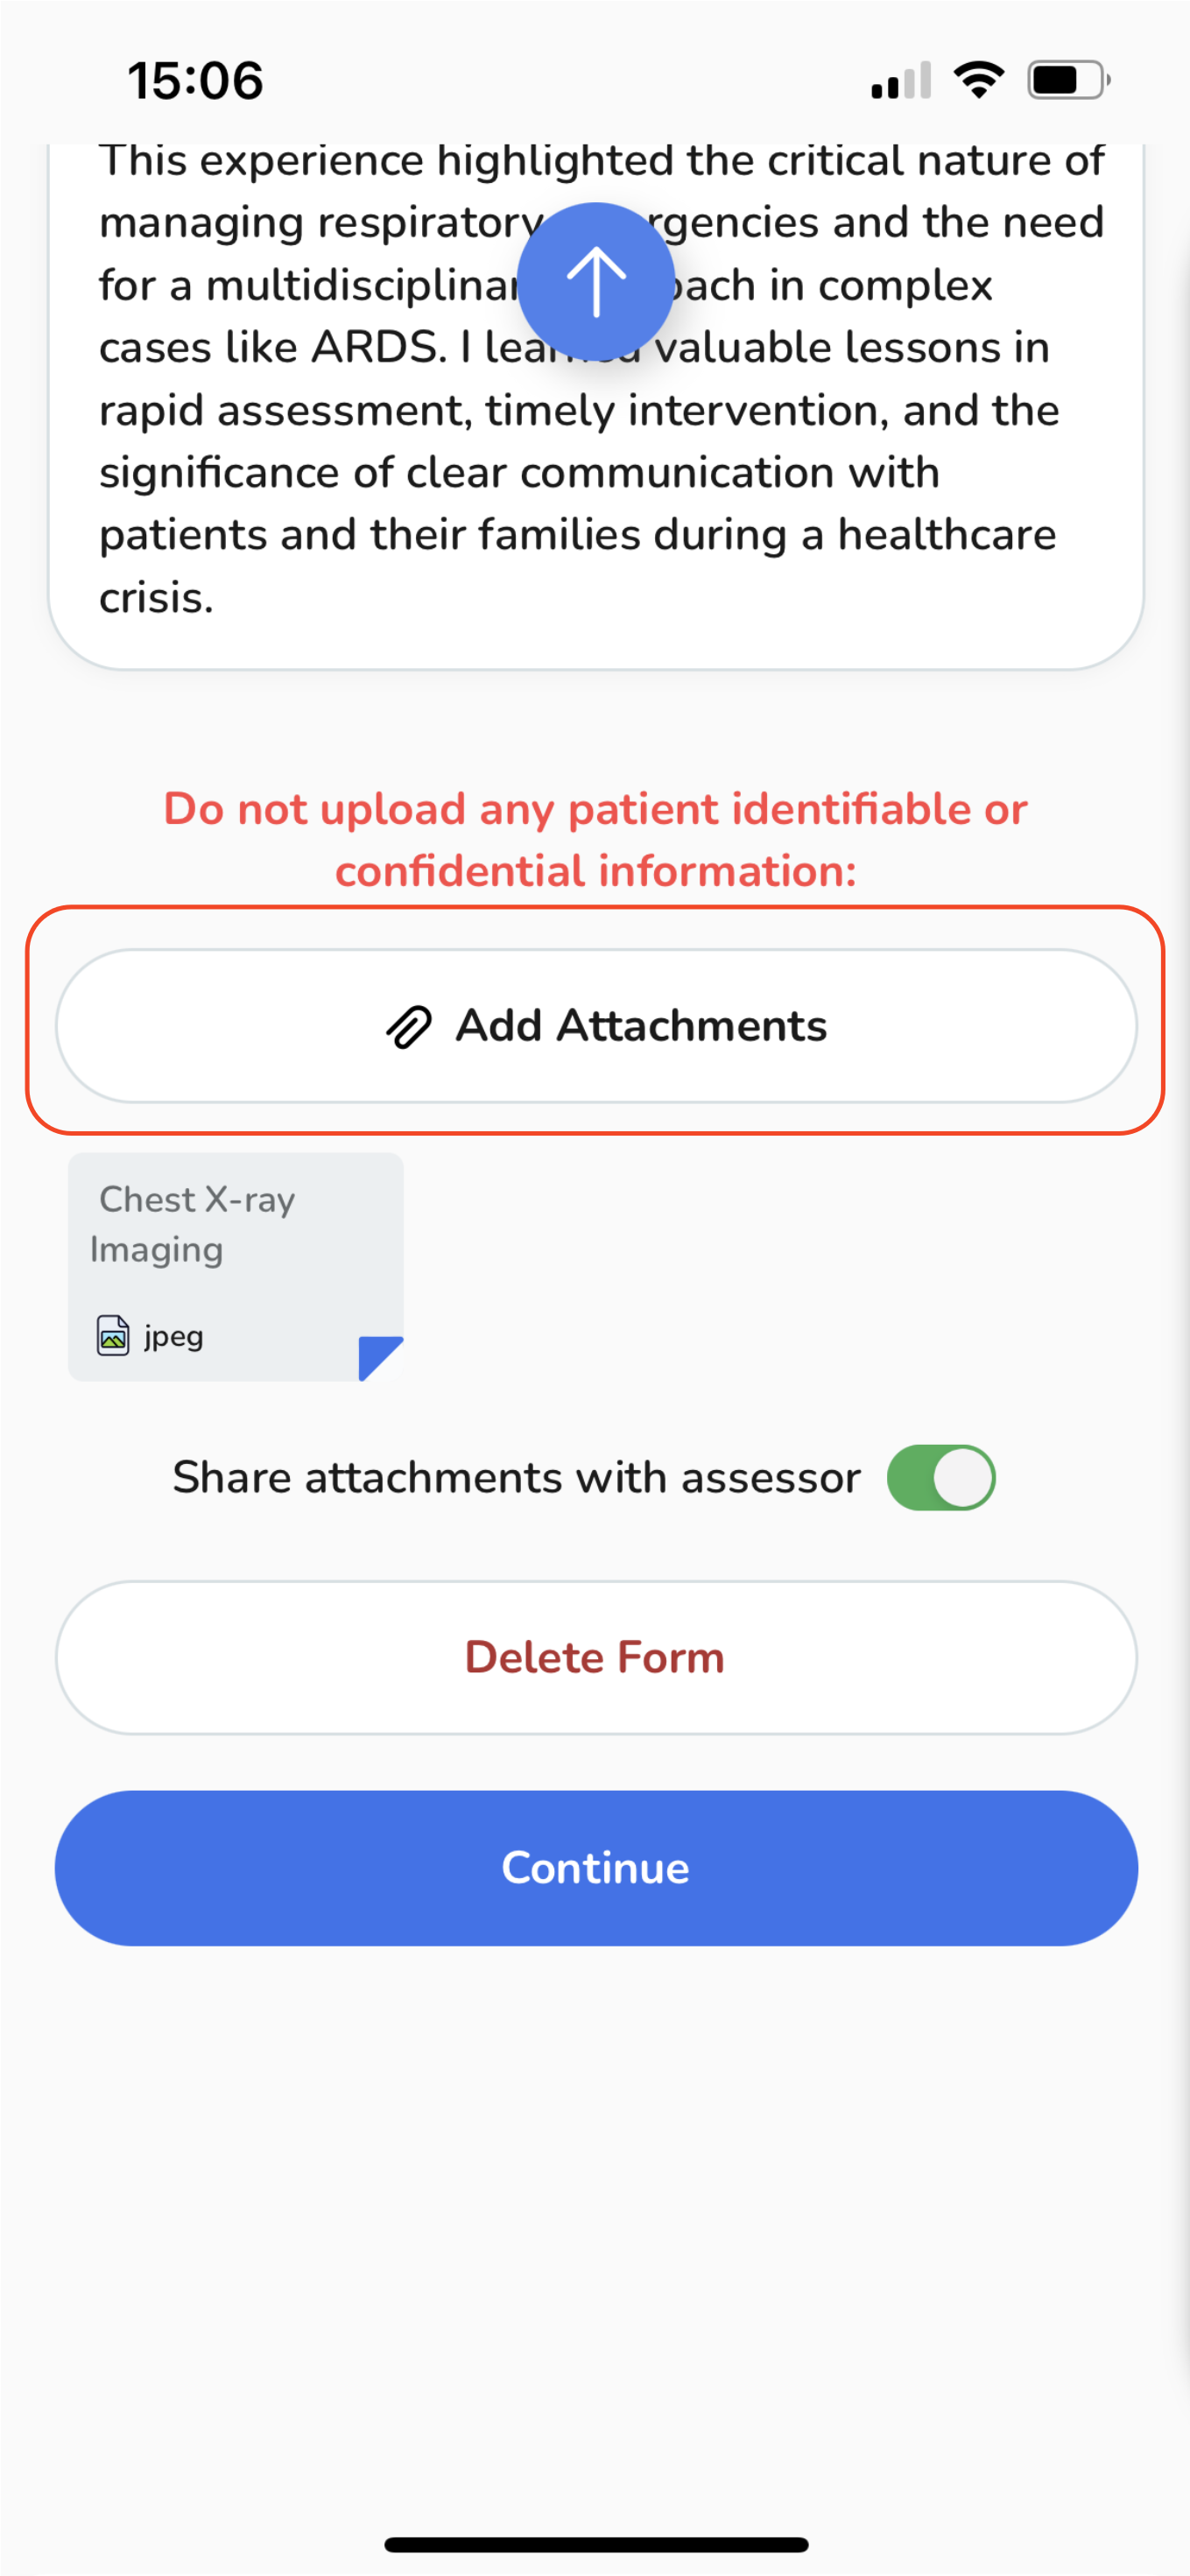
To access the recently uploaded file, download it or to remove it in case of an error, just click on the "file" box.
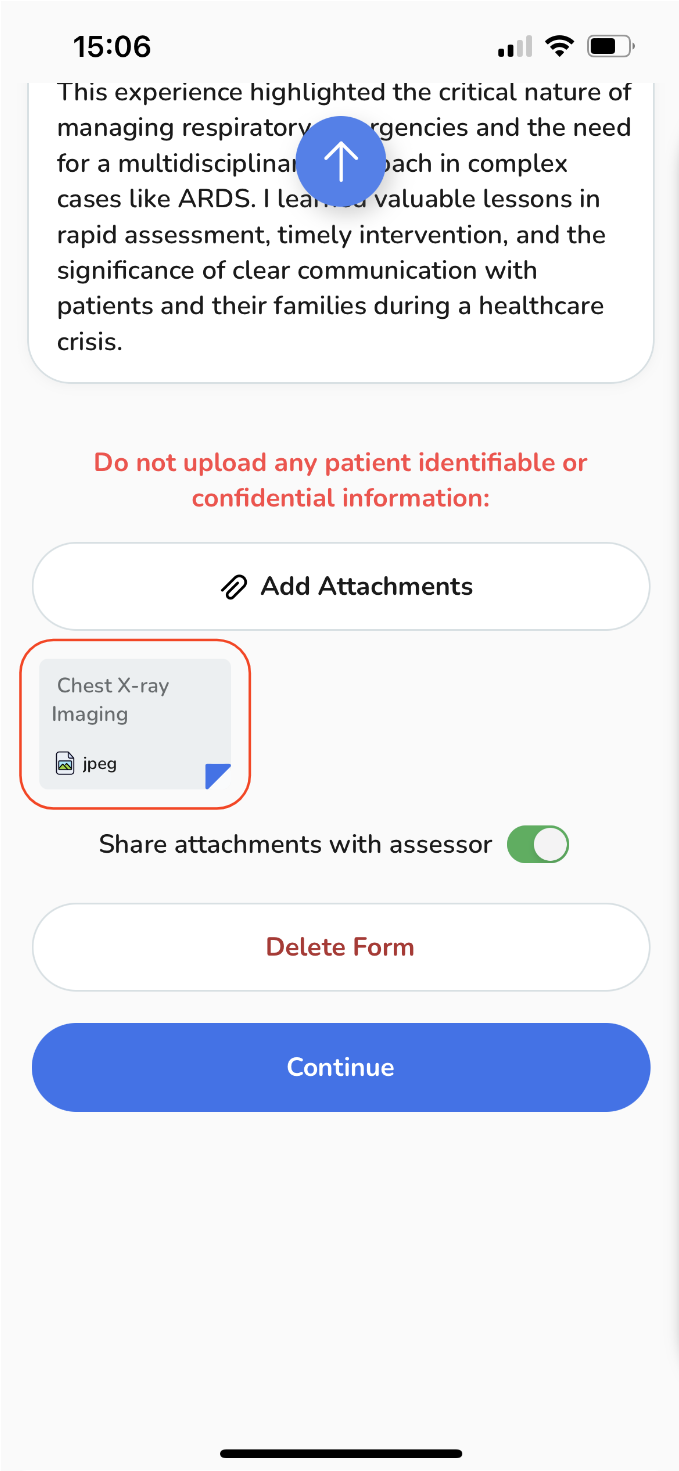
By tapping on the "toggle" button, you have the option to decide whether to share the attachment with your assessor or not.
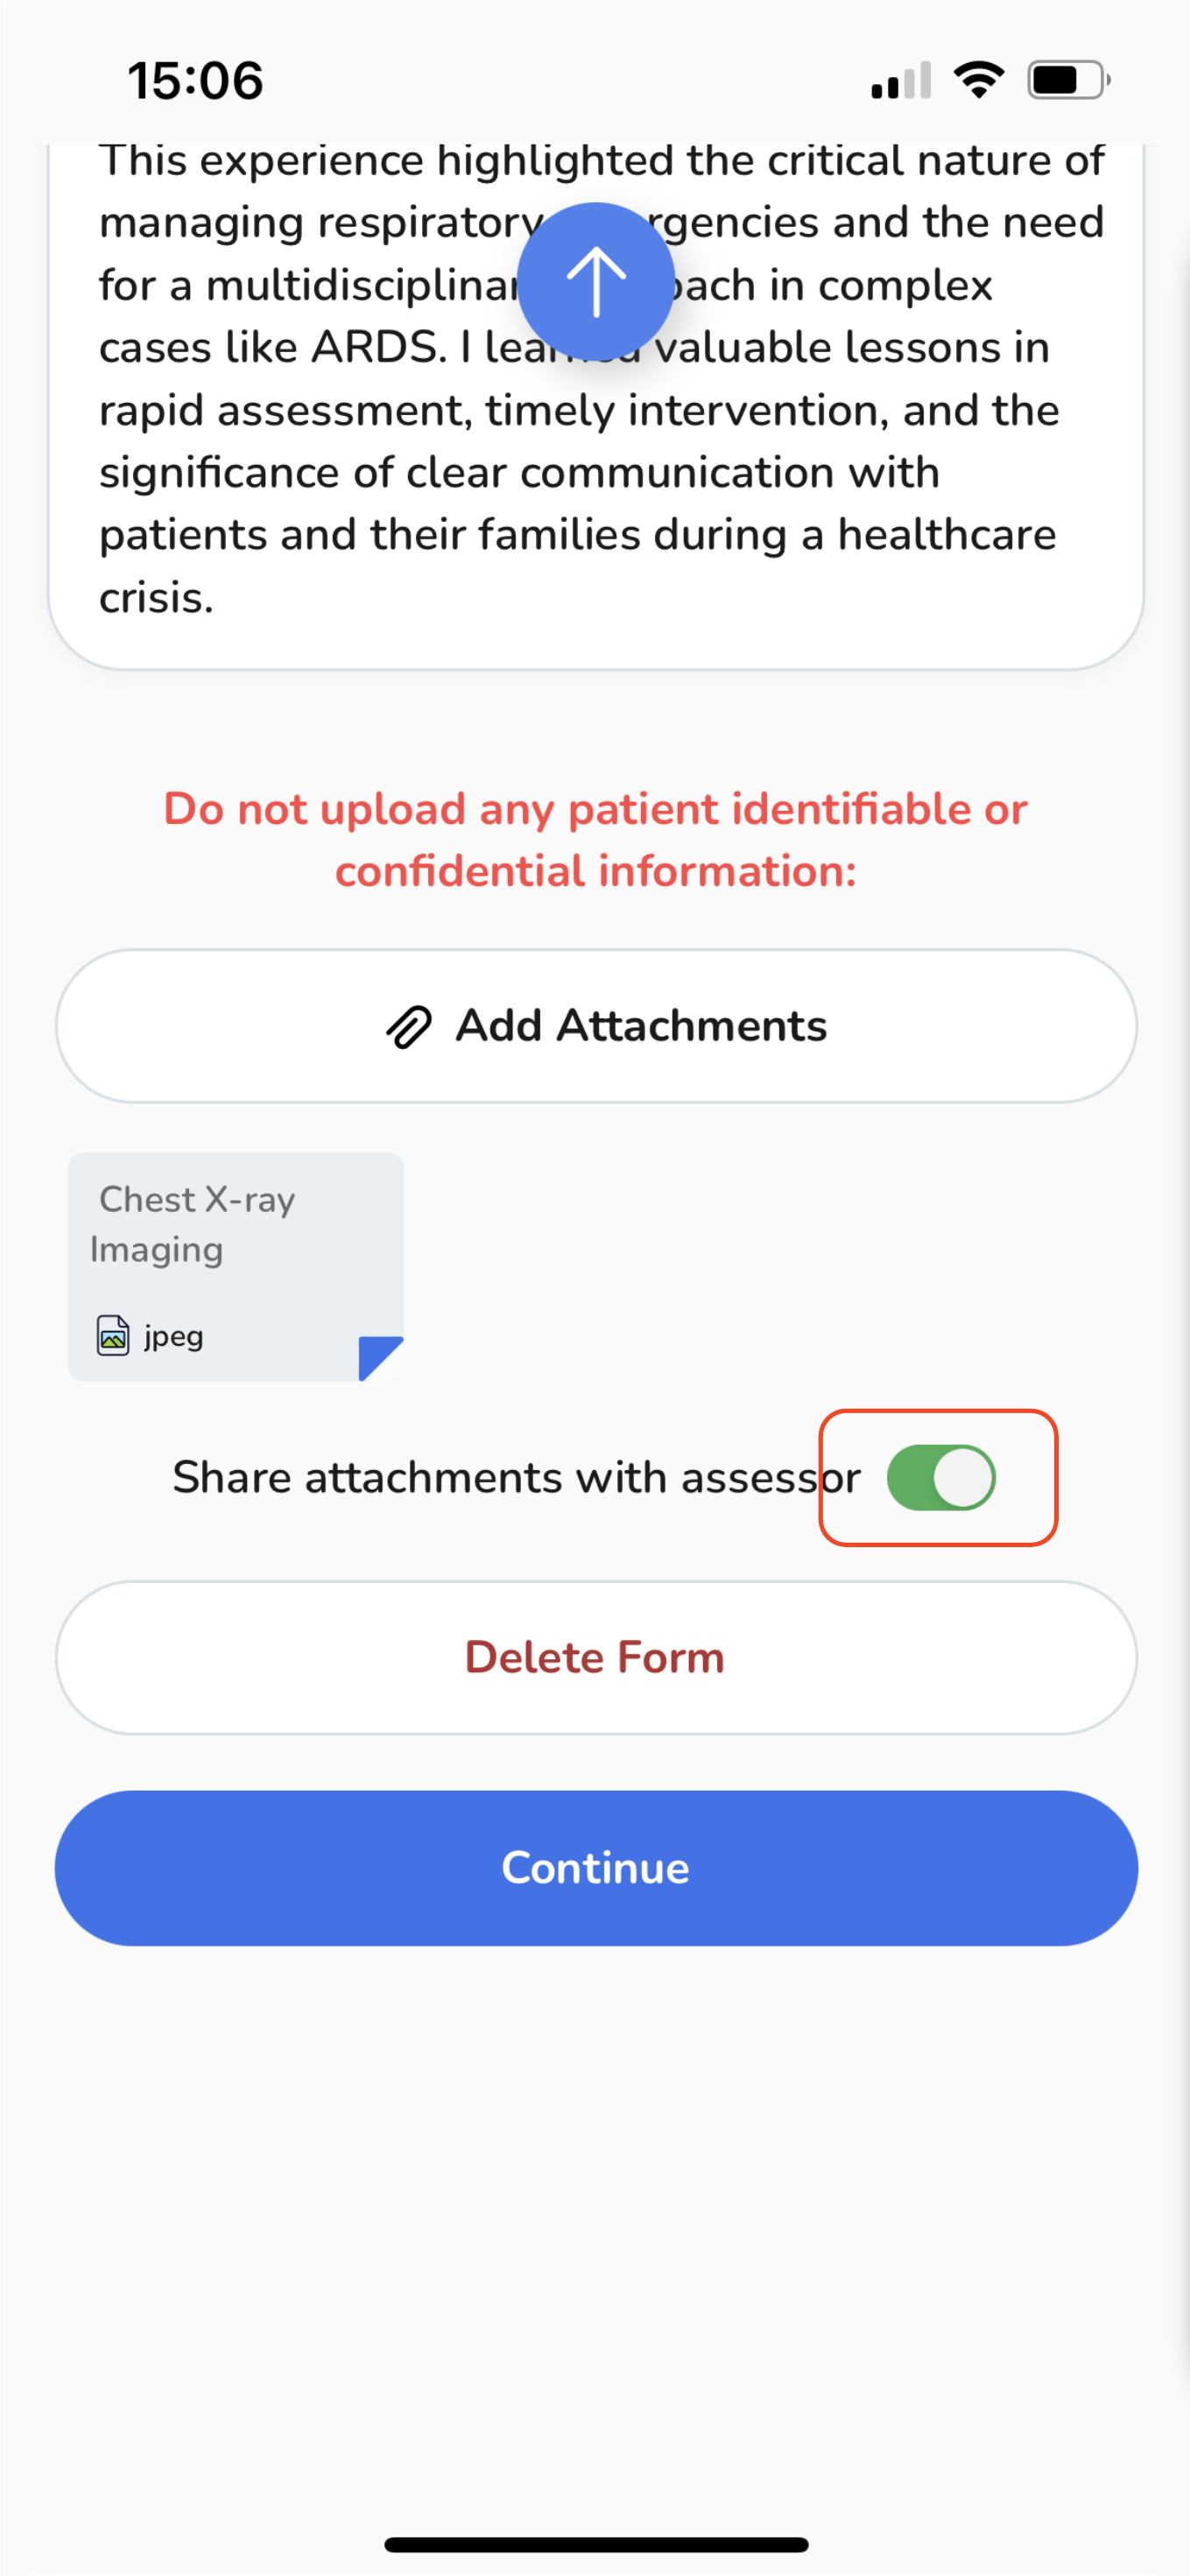
When you're ready, you have few options:
-
Delete your event completely.
Delete your event completely.
-
Save your session as a draft for future reference and make any necessary adjustments.
Save your session as a draft for future reference and make any necessary adjustments.
-
Alternatively, tap the "Continue" button to proceed with the submission.
Alternatively, tap the "Continue" button to proceed with the submission.
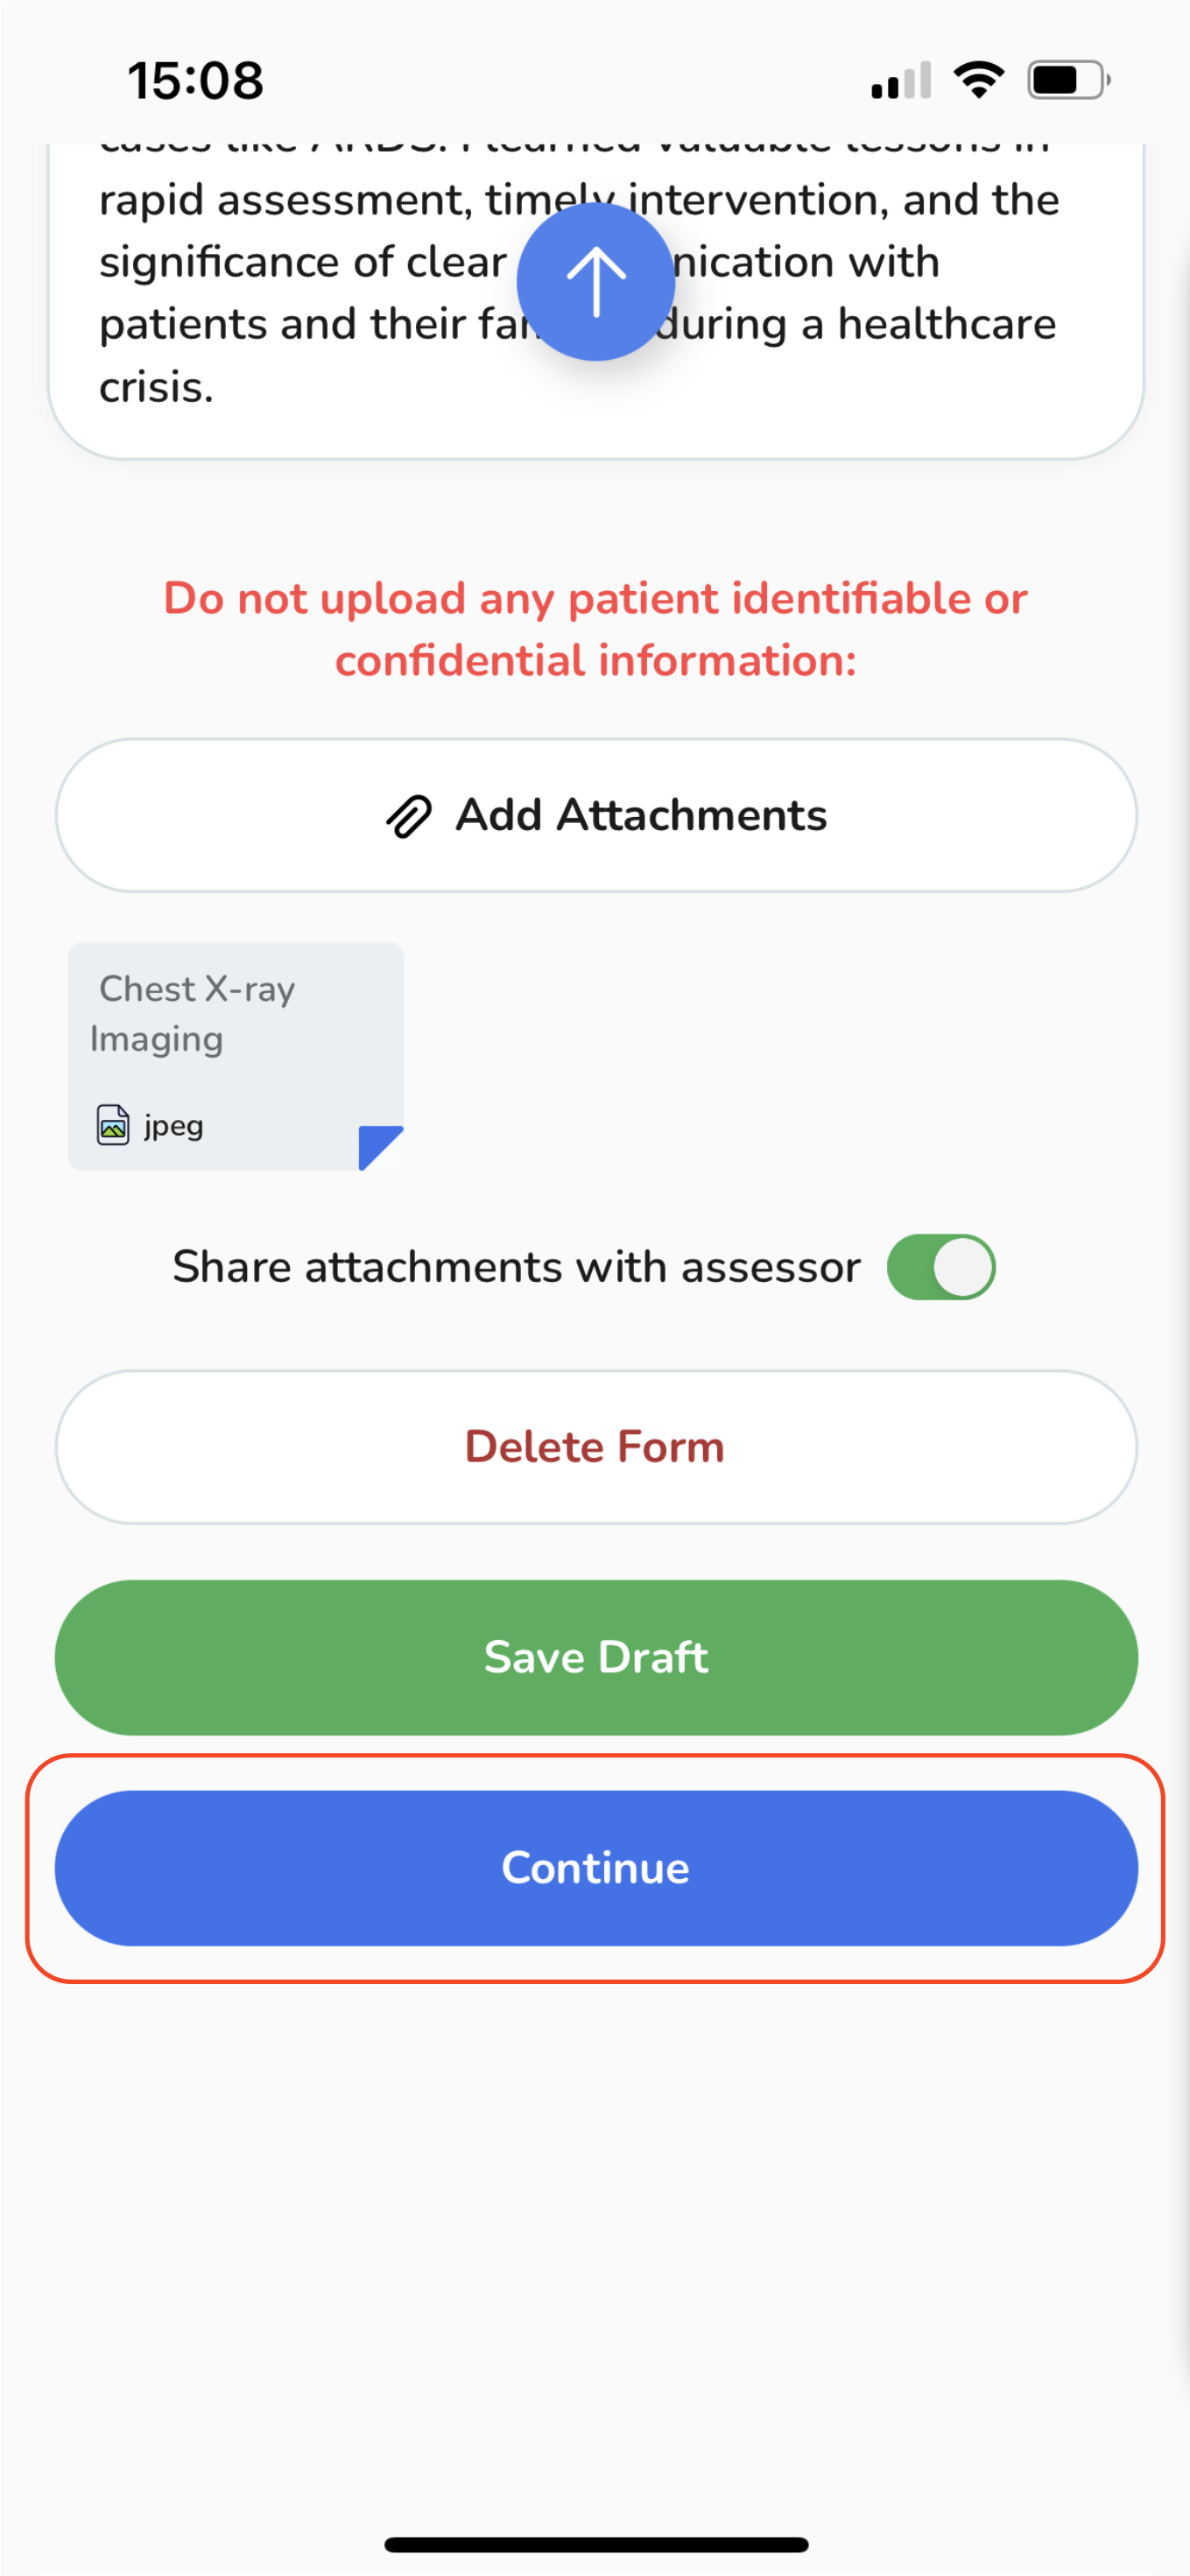
Once you've chosen "Continue", a pop-up window will surface, offering you the option to assign an assessor and gather feedback.
Assigning an assessor to your Clinical Event.
-
To designate an assessor for your event, click the "Assign Assessor & Request Feedback" button. If you prefer to complete the event without feedback, select the appropriate option.
-
Then tap in "Submit Event" on the second pop-up.
-
After tapping, enter the assessor's email address. Alternatively, if available, you can select an assessor from the list of recent assessors.
-
Then tap on the "Assign" button.
To designate an assessor for your event, click the "Assign Assessor & Request Feedback" button. If you prefer to complete the event without feedback, select the appropriate option.
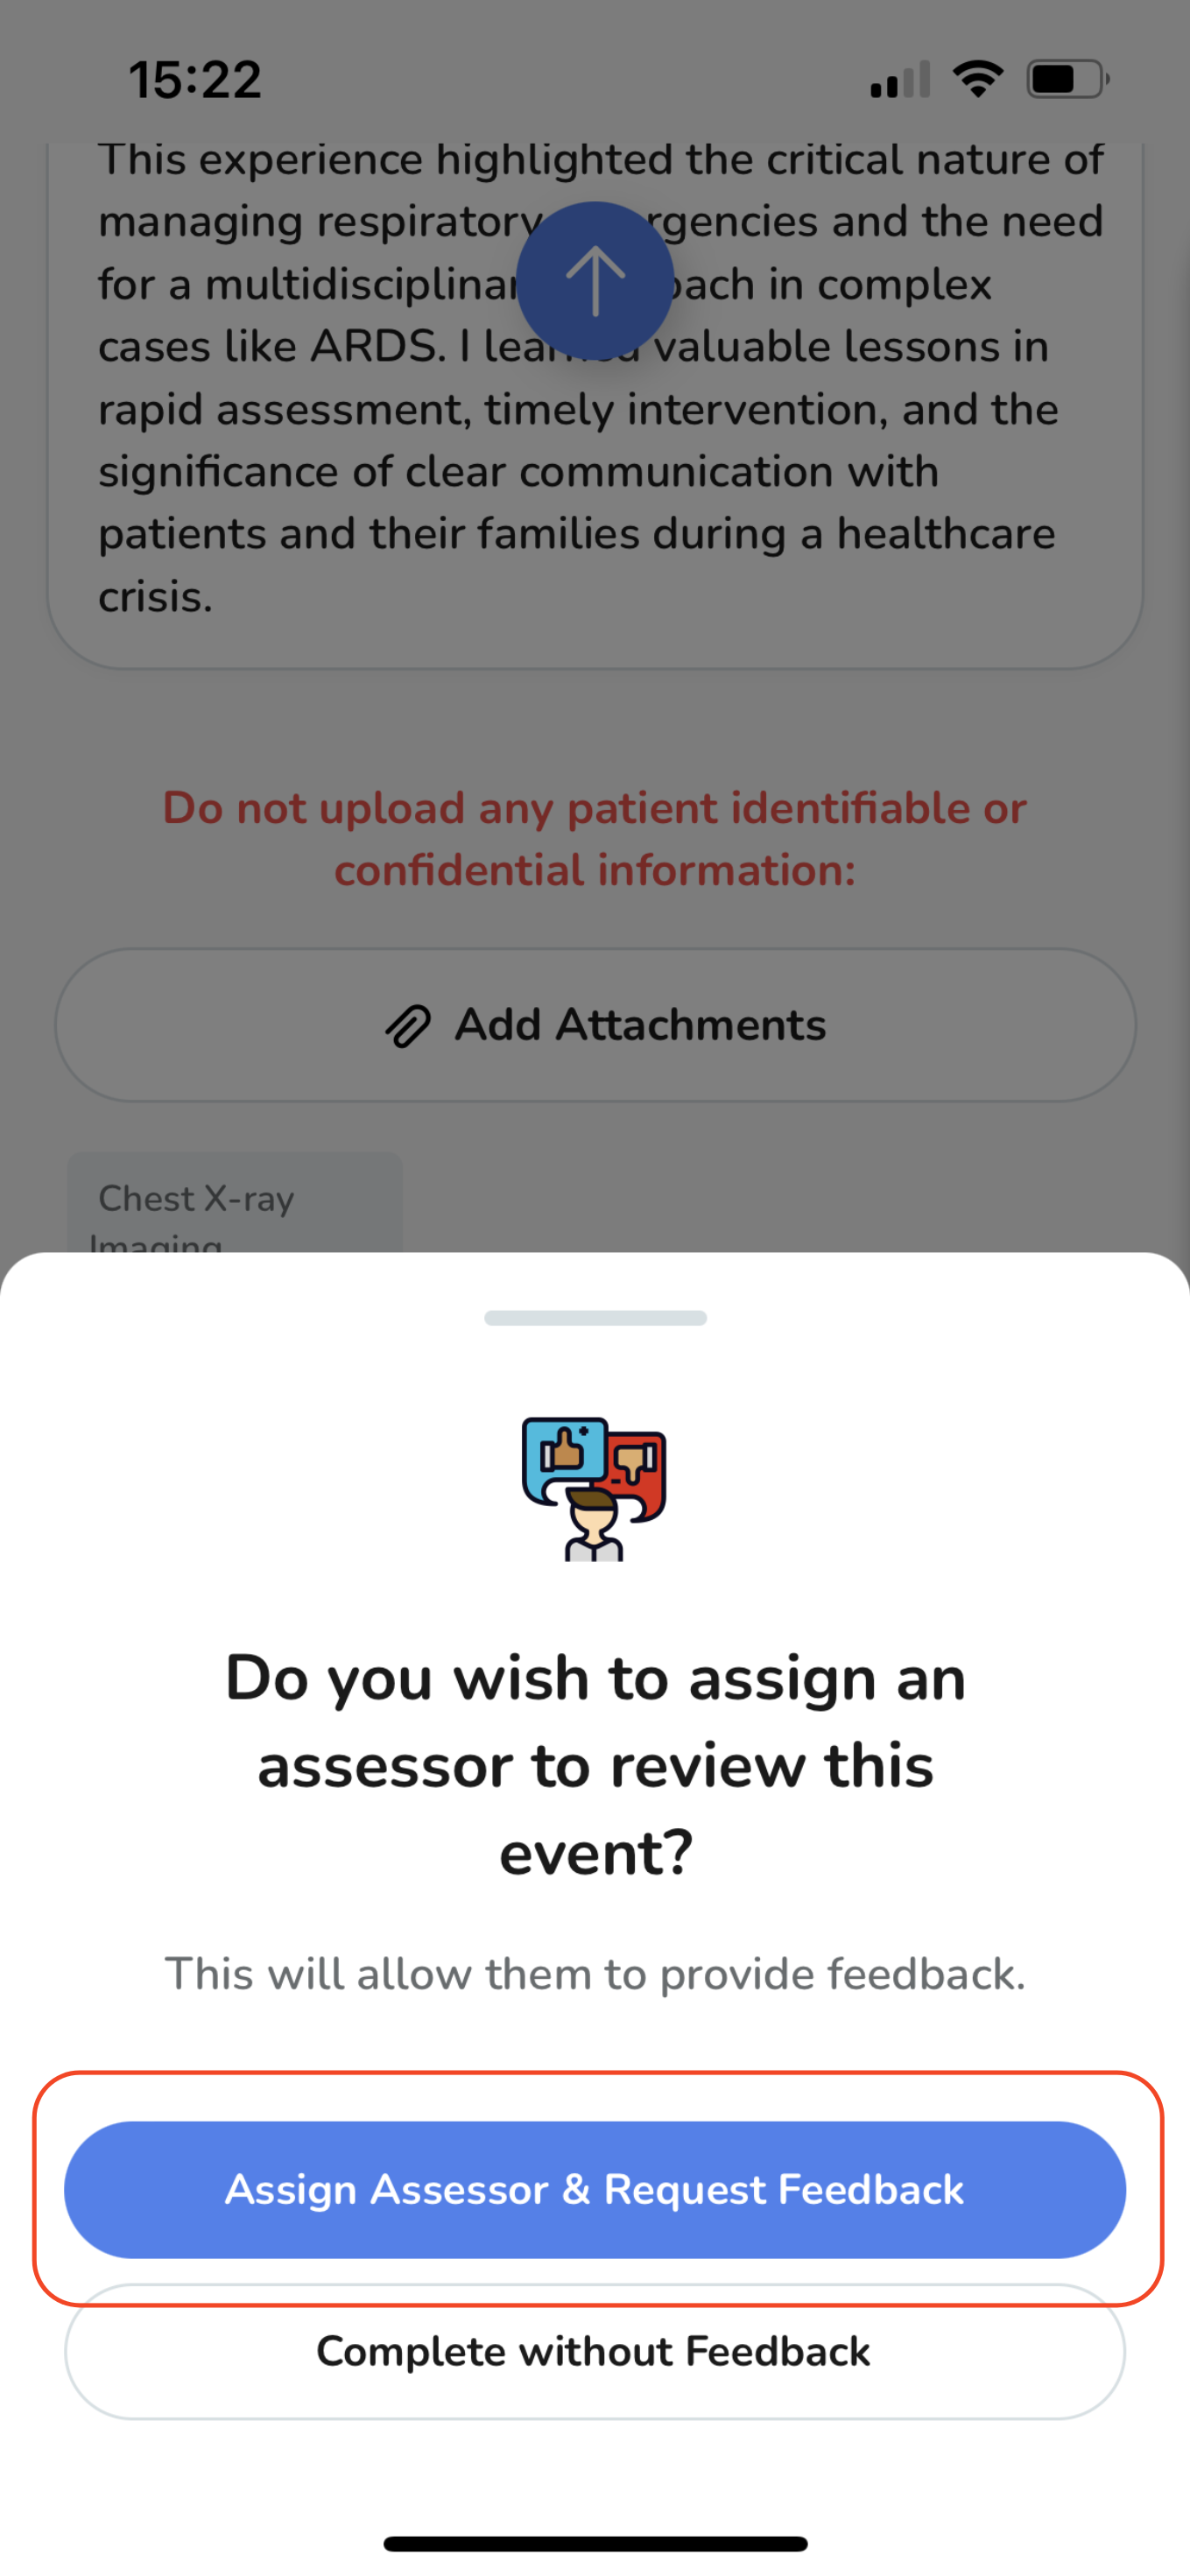
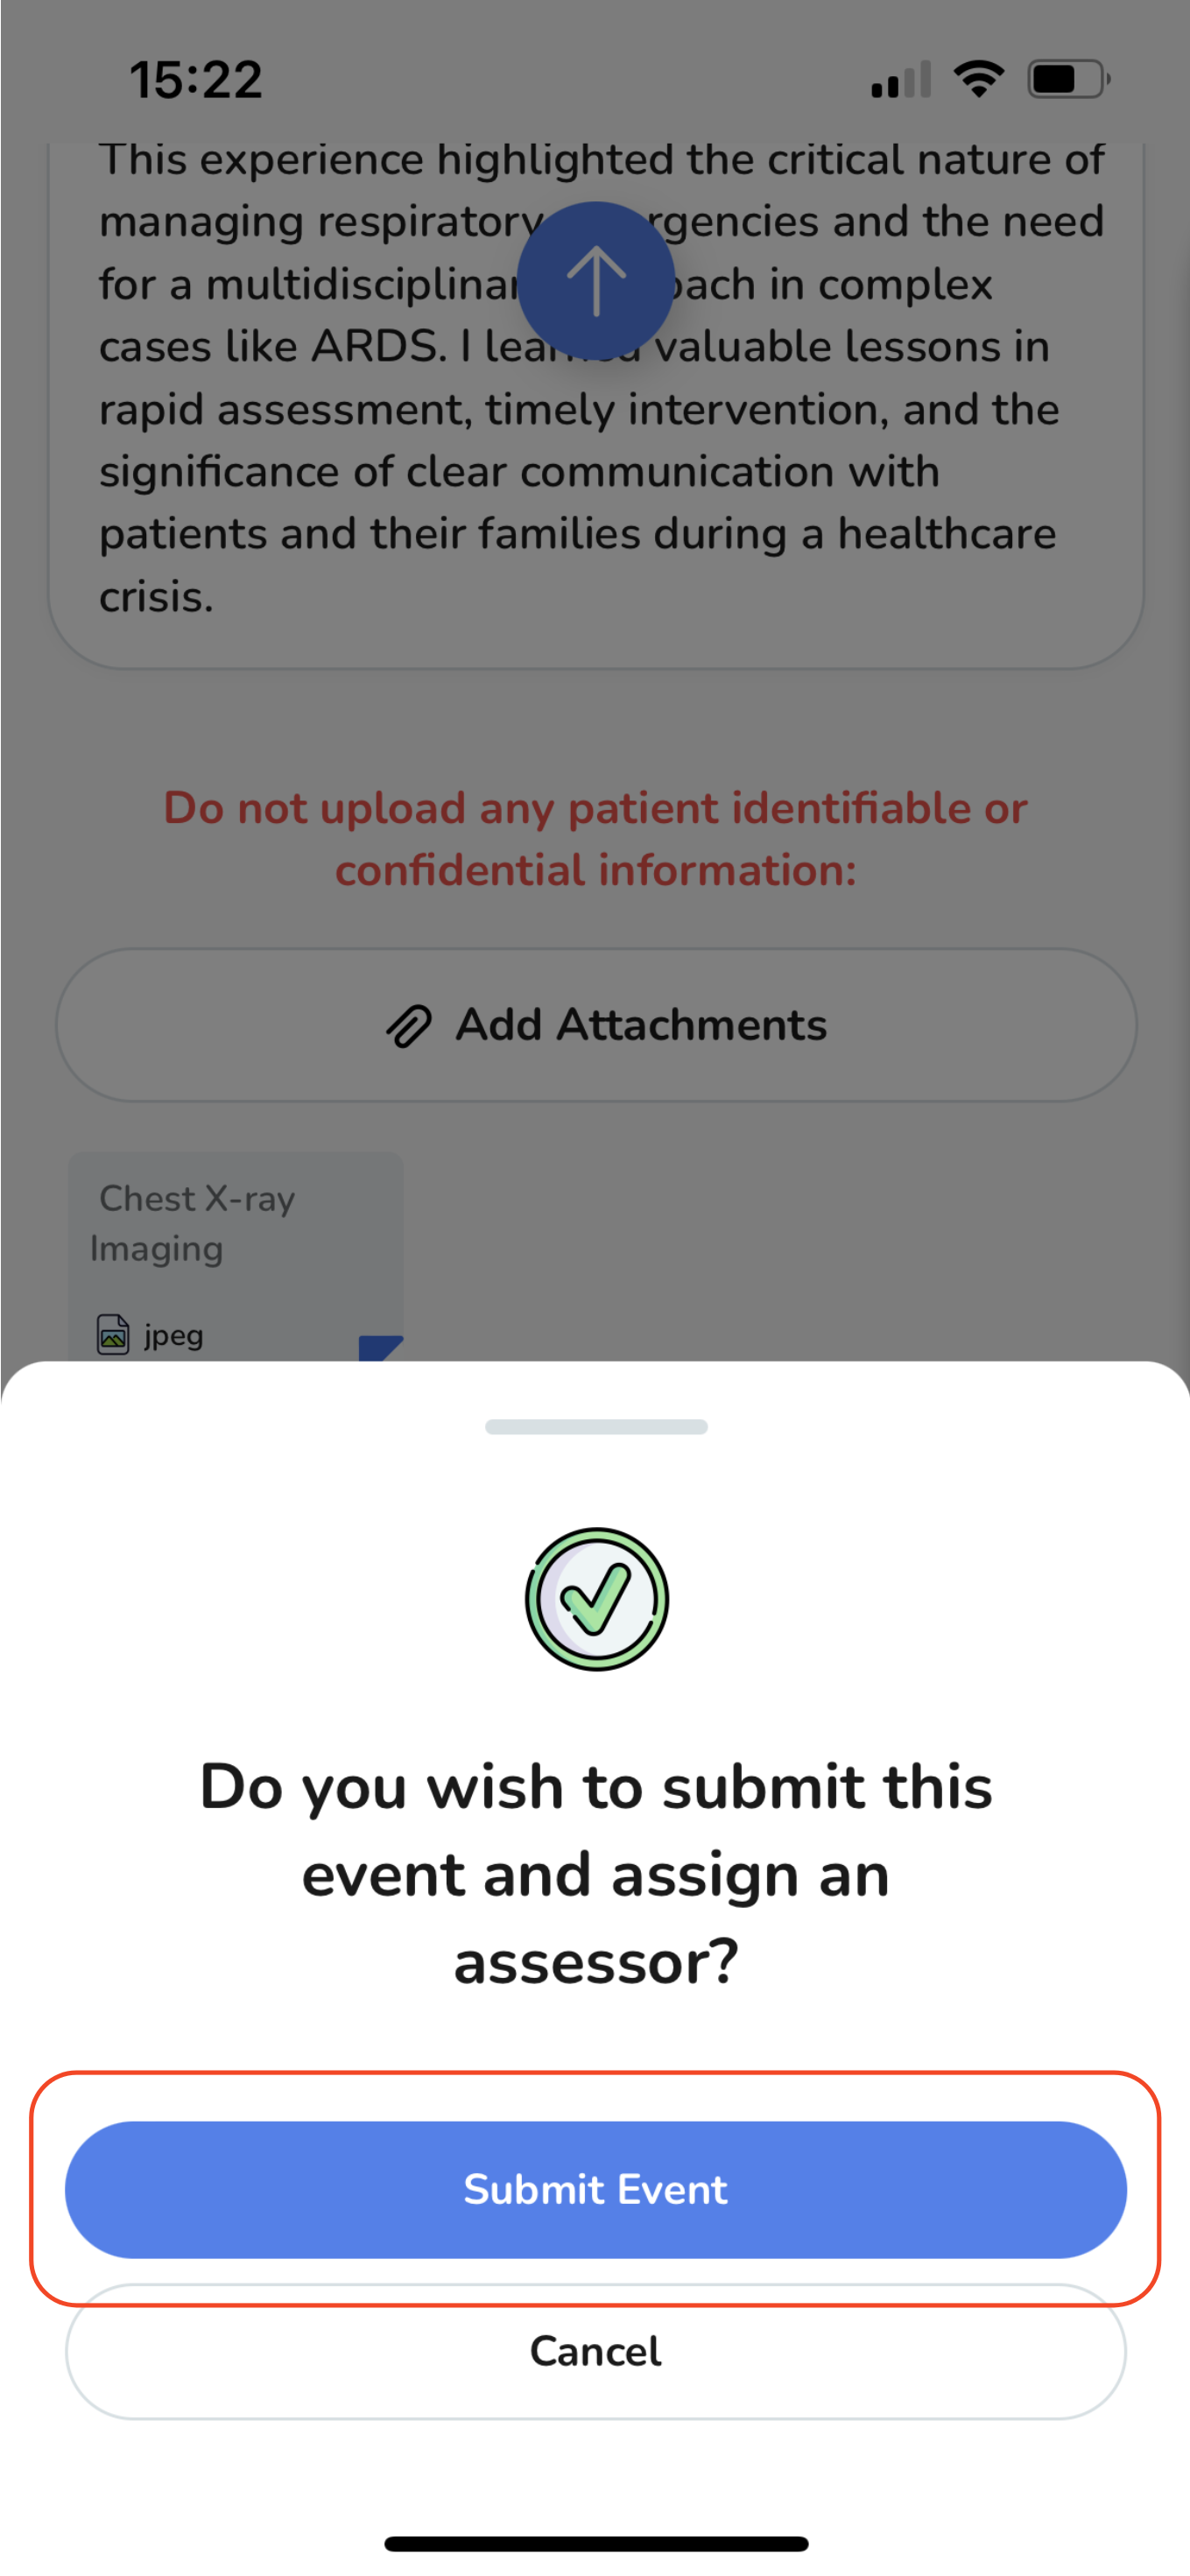
Then tap in "Submit Event" on the second pop-up.
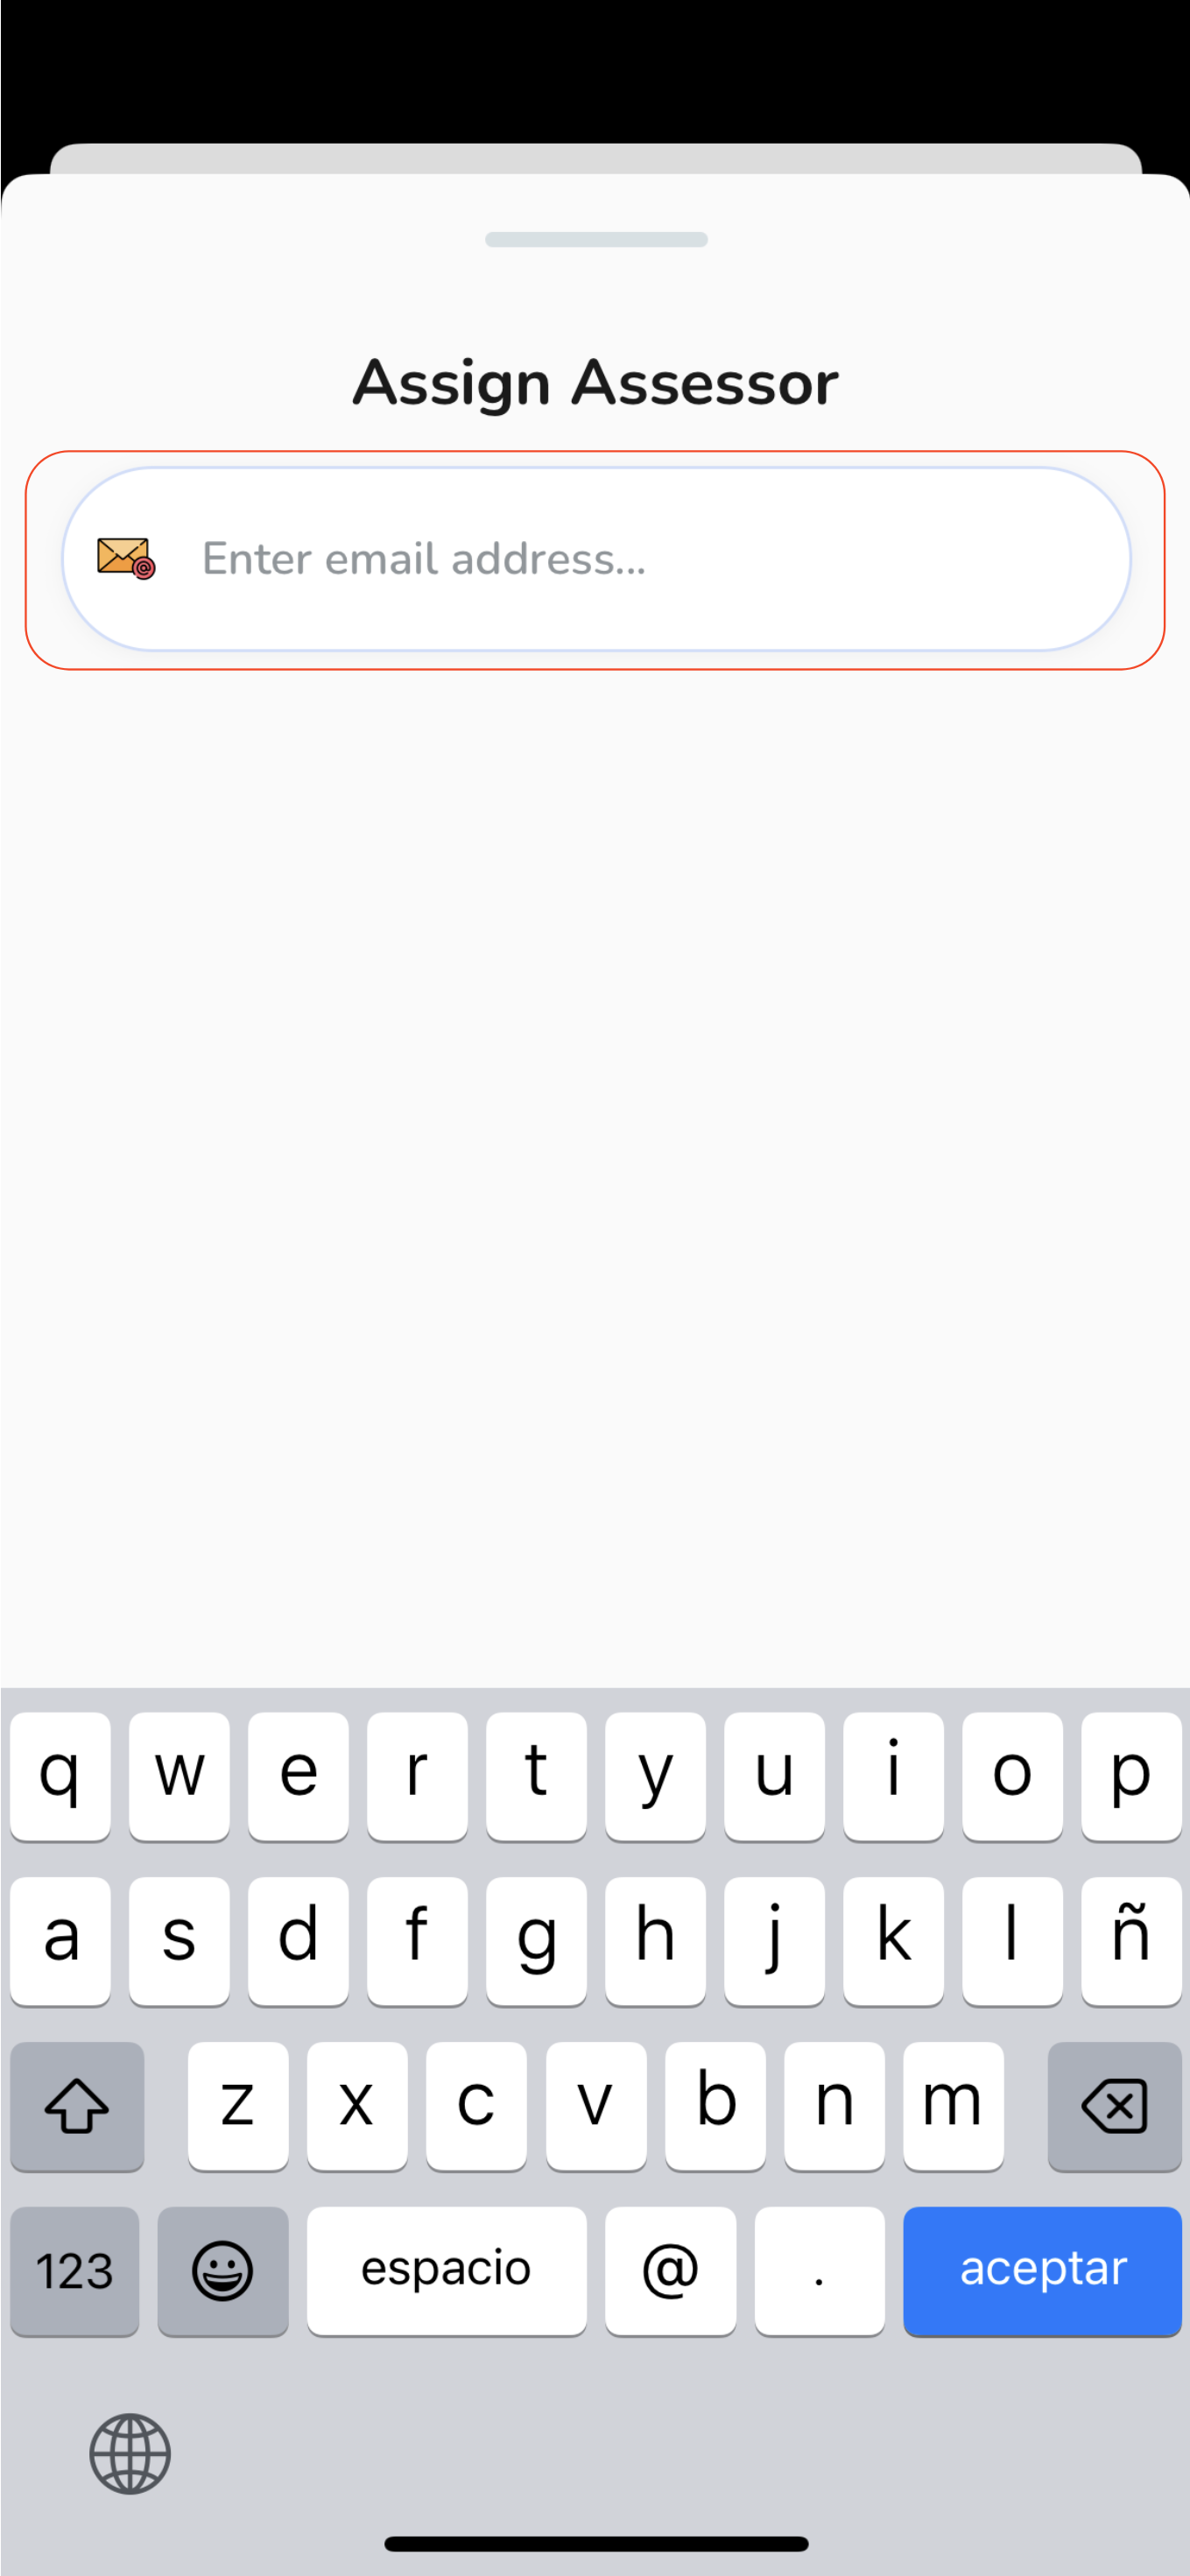
After tapping, enter the assessor's email address. Alternatively, if available, you can select an assessor from the list of recent assessors.
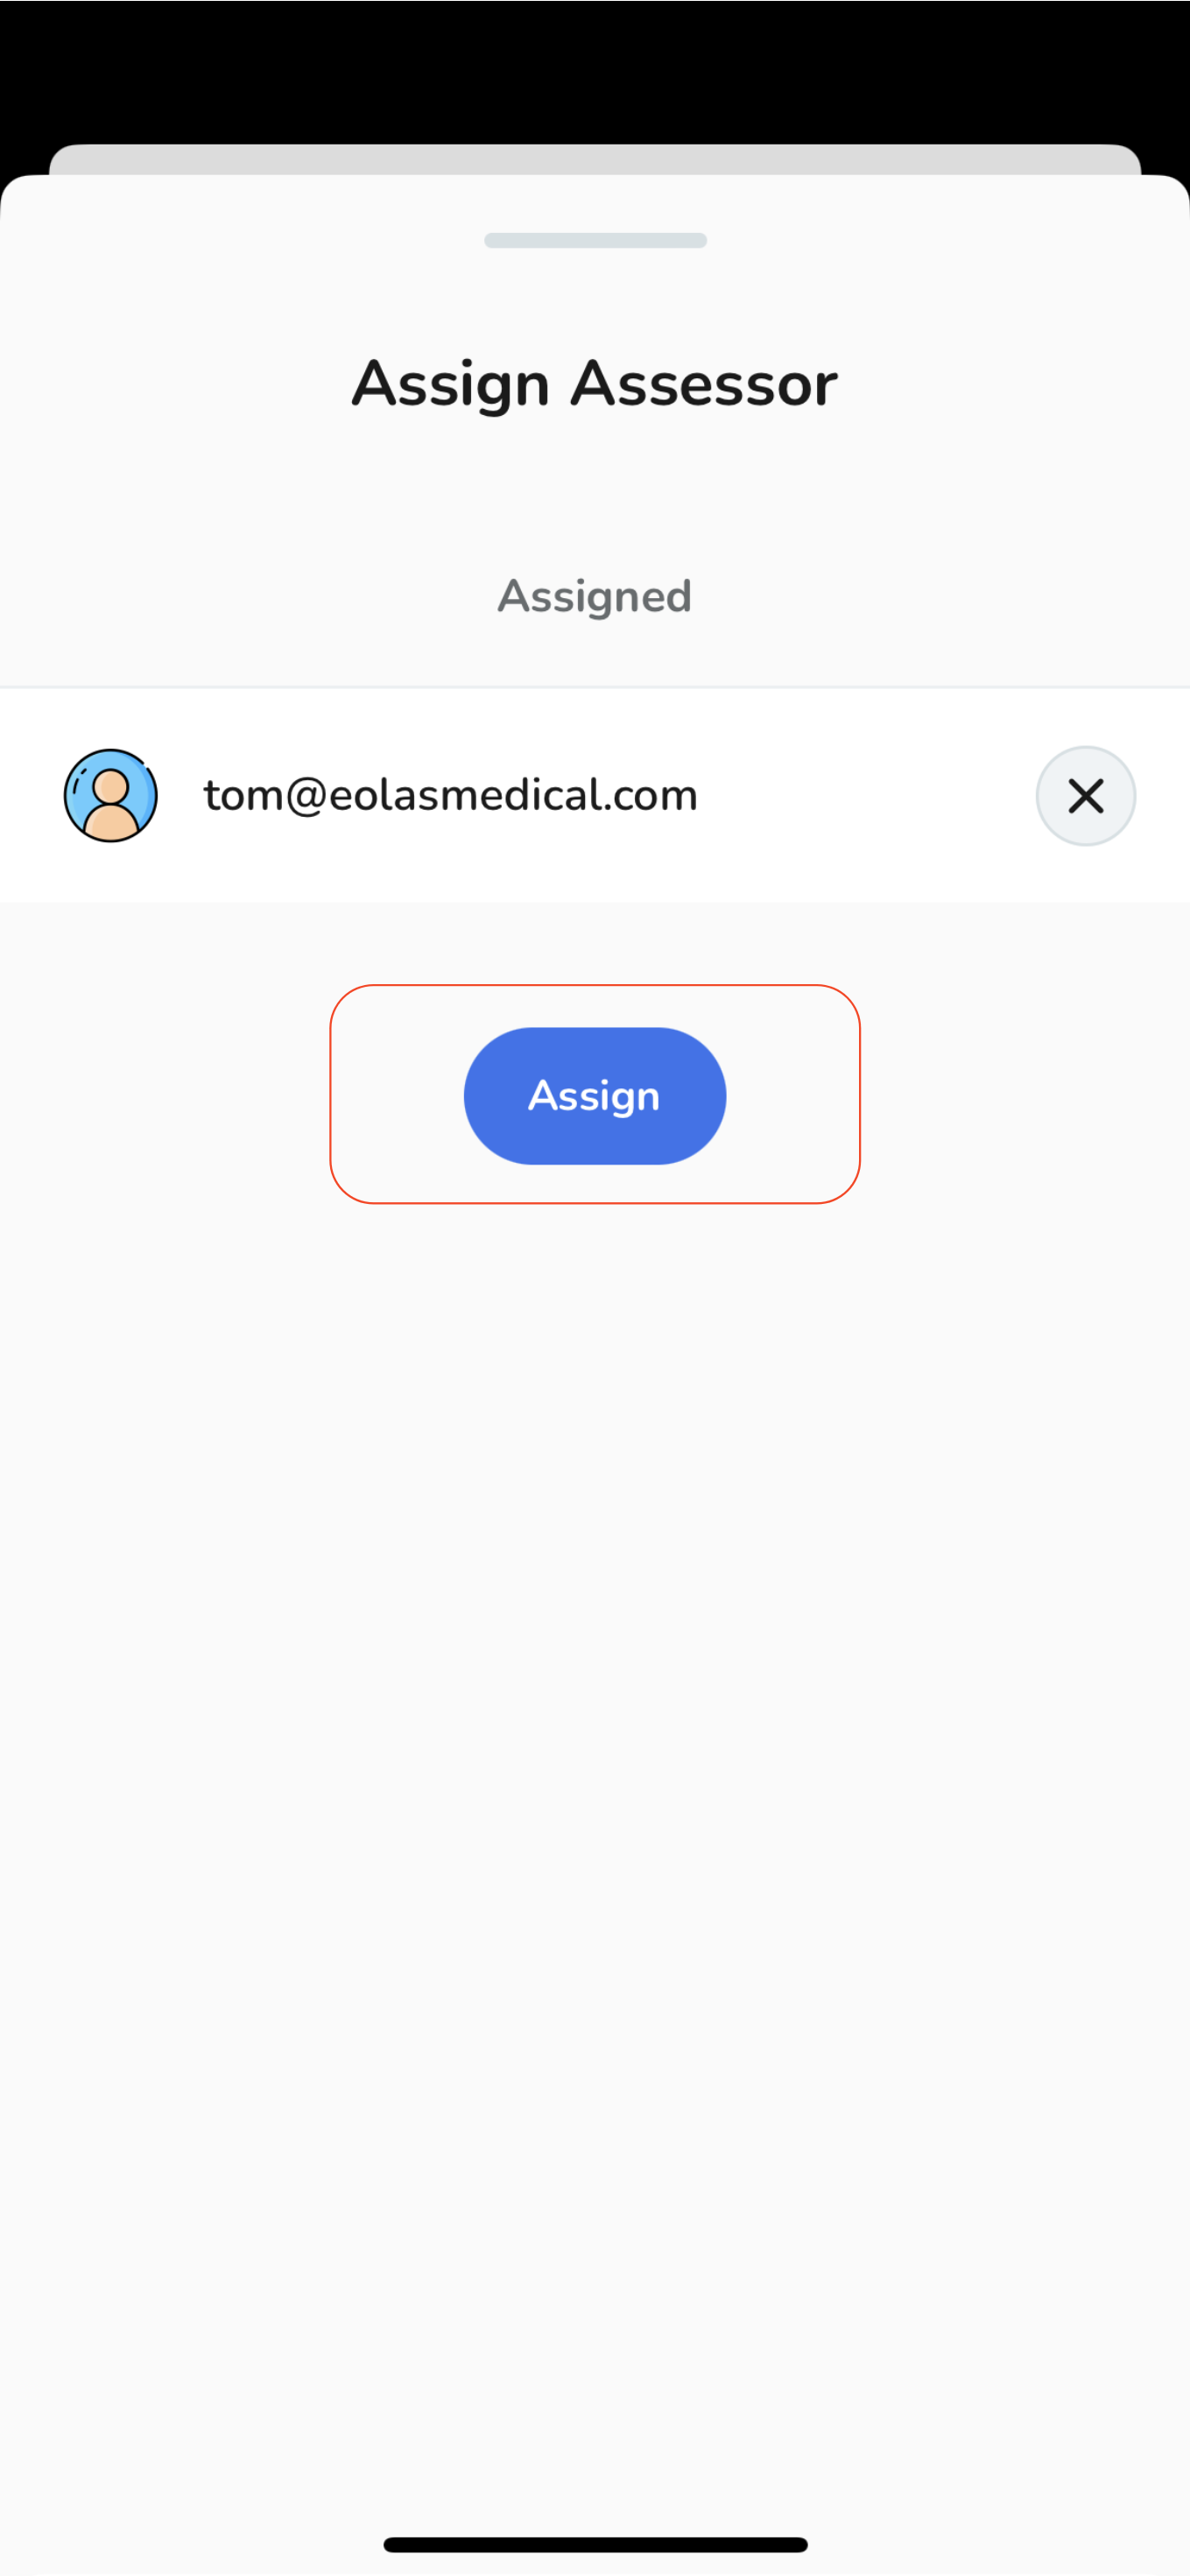
Then tap on the "Assign" button.
What happens after assigning an assessor?
-
Upon submitting, you will be directed to the event's page. Here, you can view important details such as the assigned assessor and the feedback status. At this point your event page will display a yellow label indicating "Pending".
-
To send a reminder to the assessor or reassign the event, simply tap the "Three Dots" button next to the assessor's email and choose the appropriate action.
-
Additionally, you have the flexibility to:
-
Delete the event entirely.
-
Opt to complete the event without feedback.
-
Upon submitting, you will be directed to the event's page. Here, you can view important details such as the assigned assessor and the feedback status. At this point your event page will display a yellow label indicating "Pending".
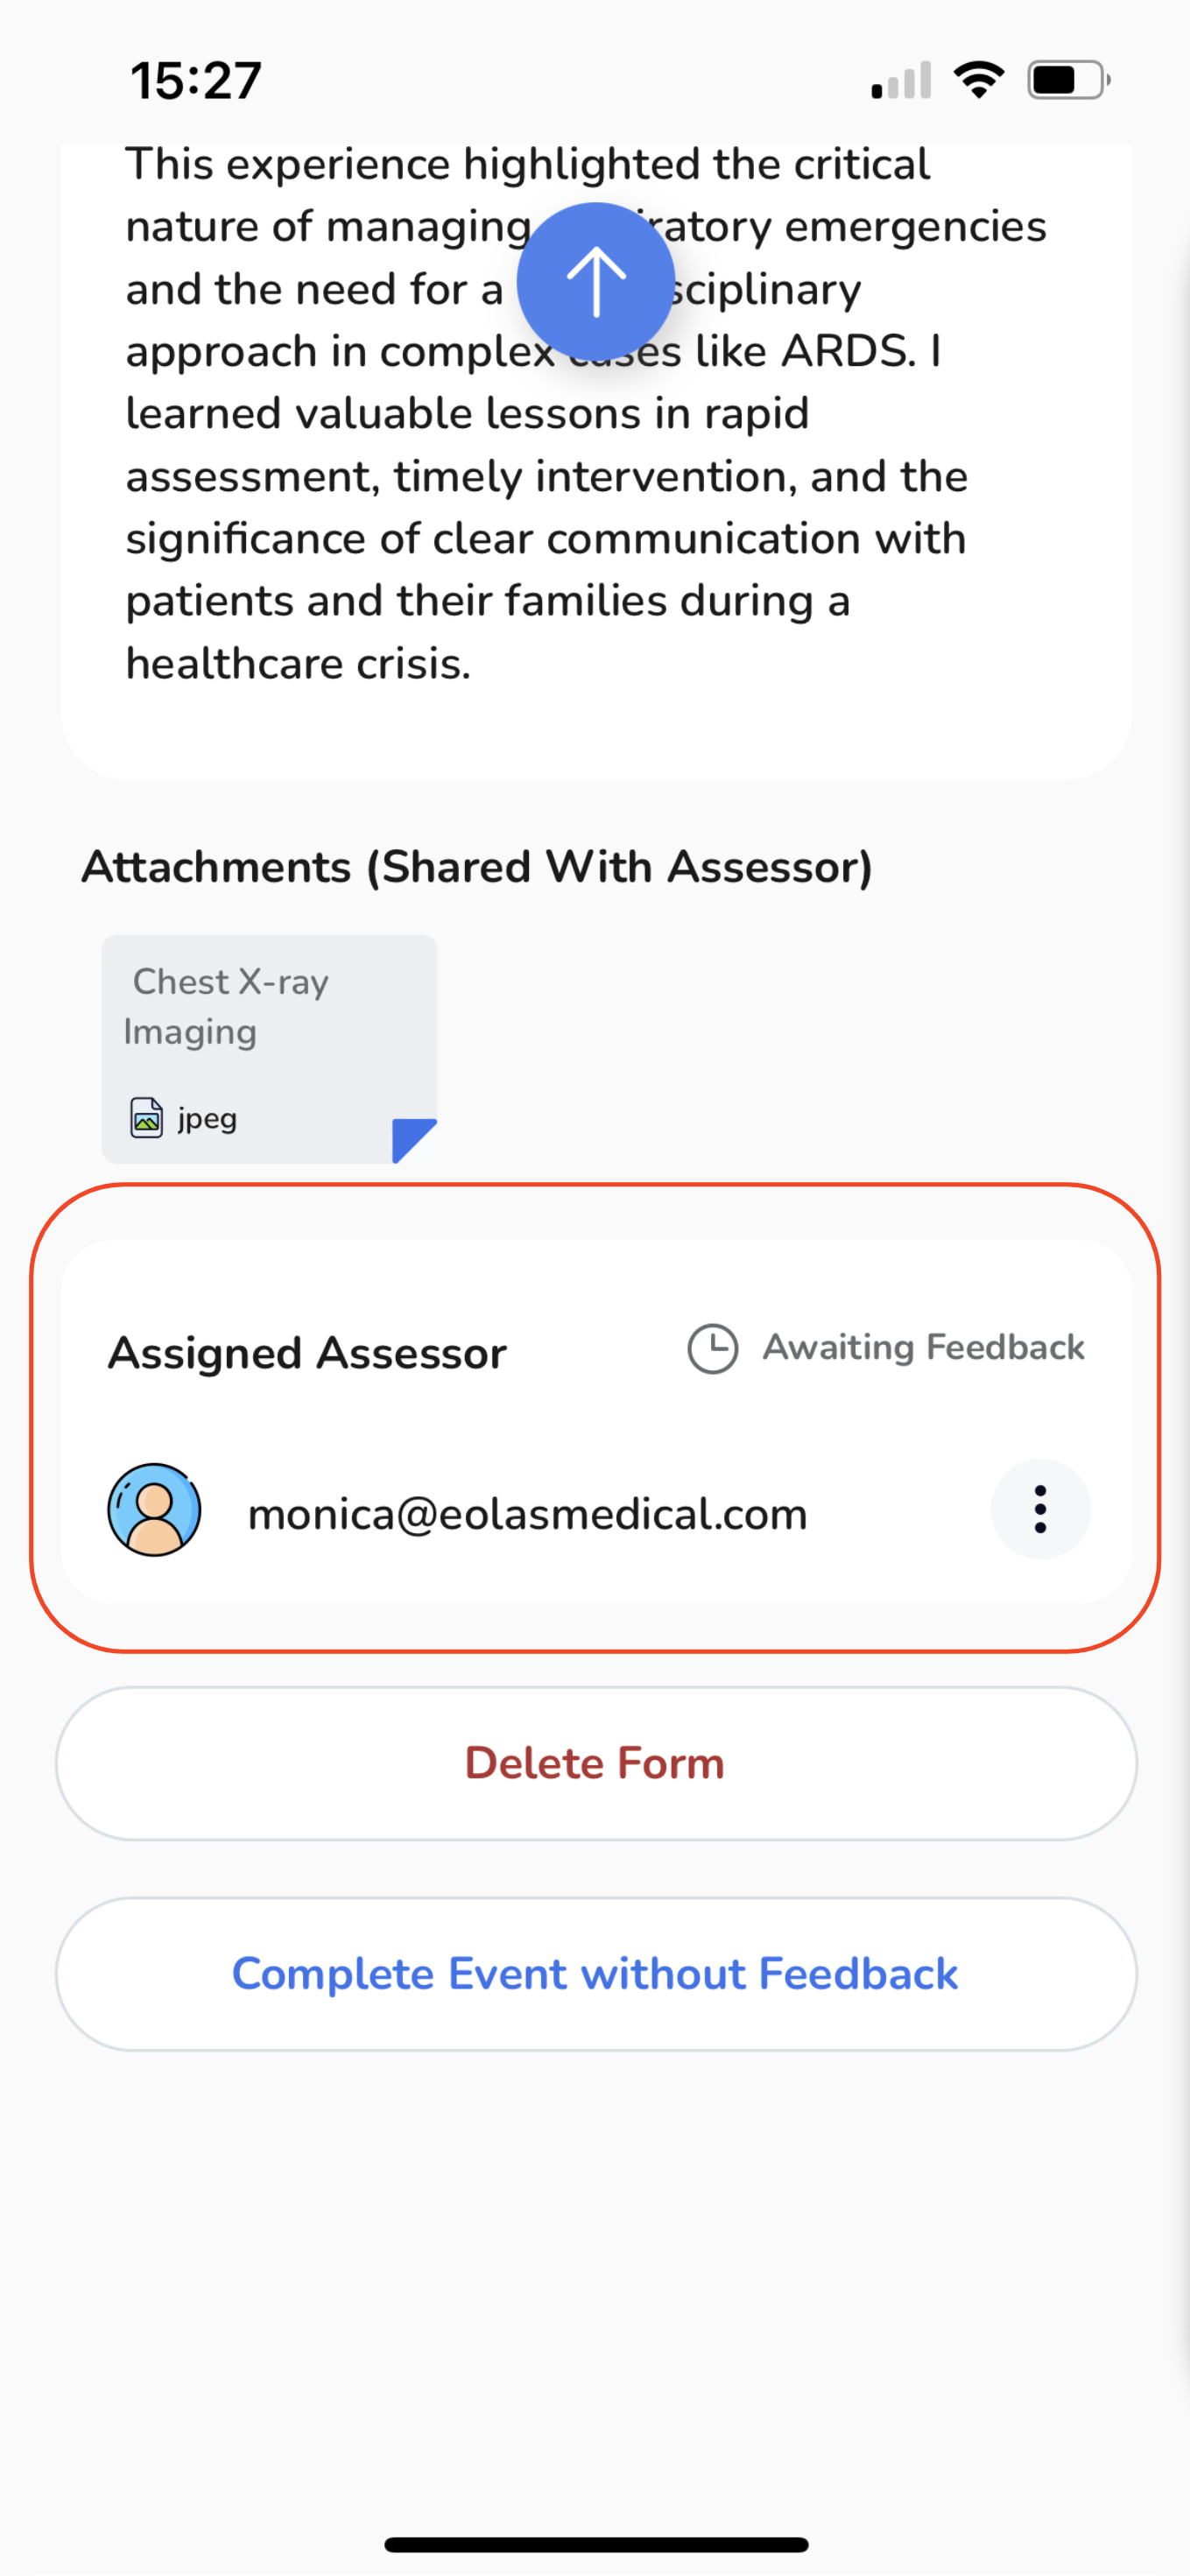
To send a reminder to the assessor or reassign the event, simply tap the "Three Dots" button next to the assessor's email and choose the appropriate action.
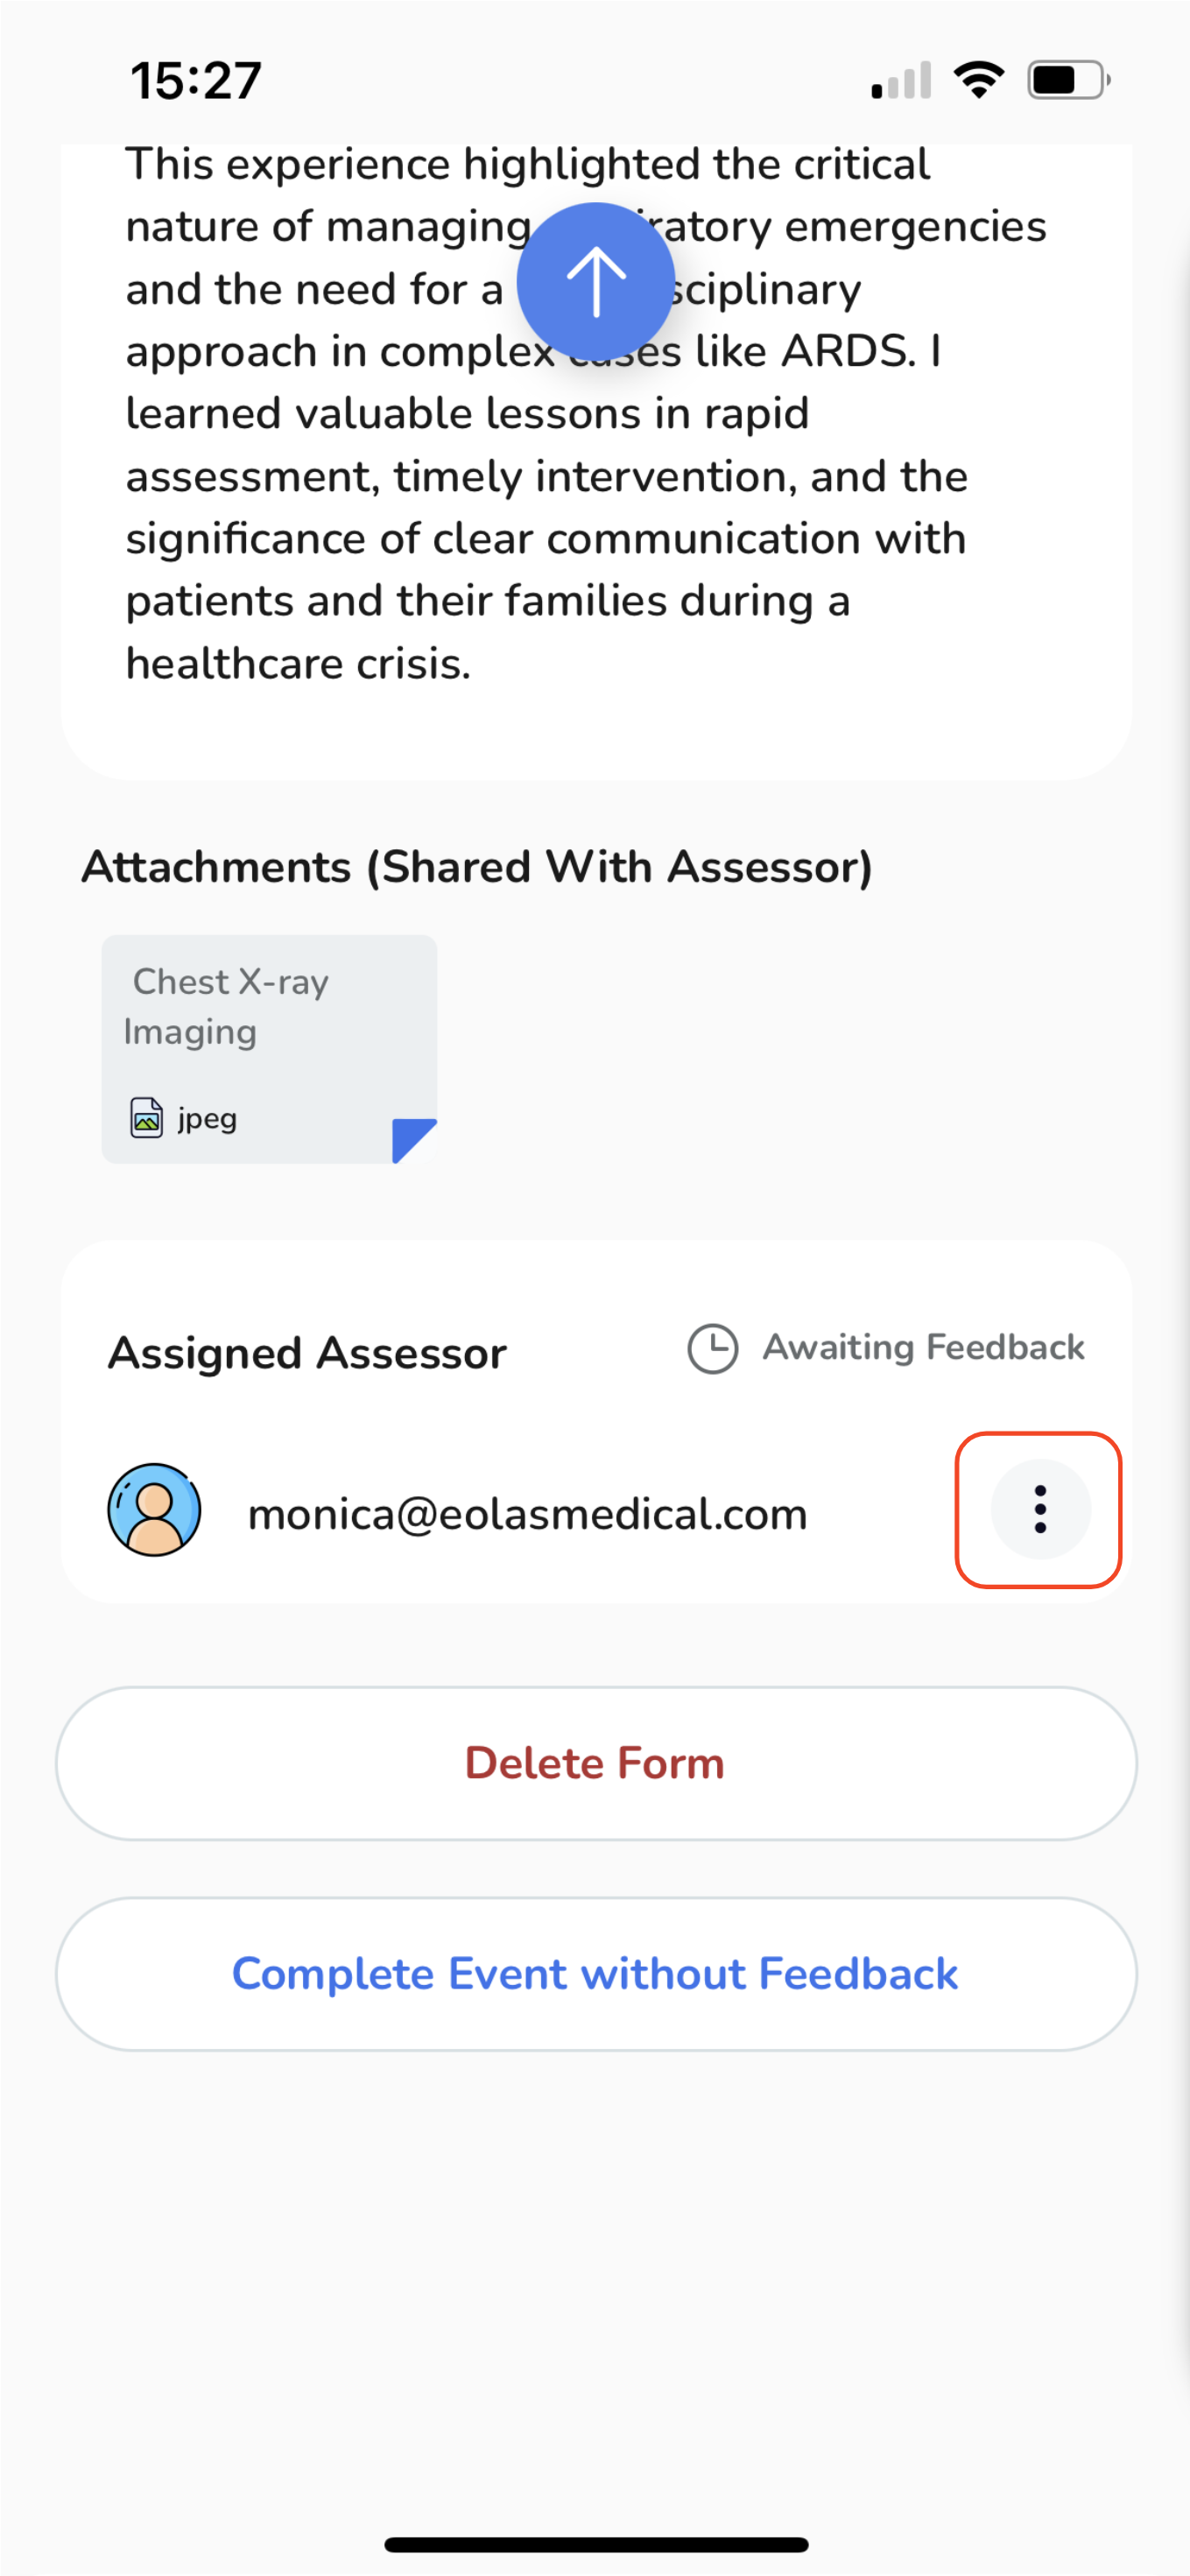
Additionally, you have the flexibility to:
-
Delete the event entirely.
Delete the event entirely.
-
Opt to complete the event without feedback.
Opt to complete the event without feedback.
Receiving feedback from an assessor.
-
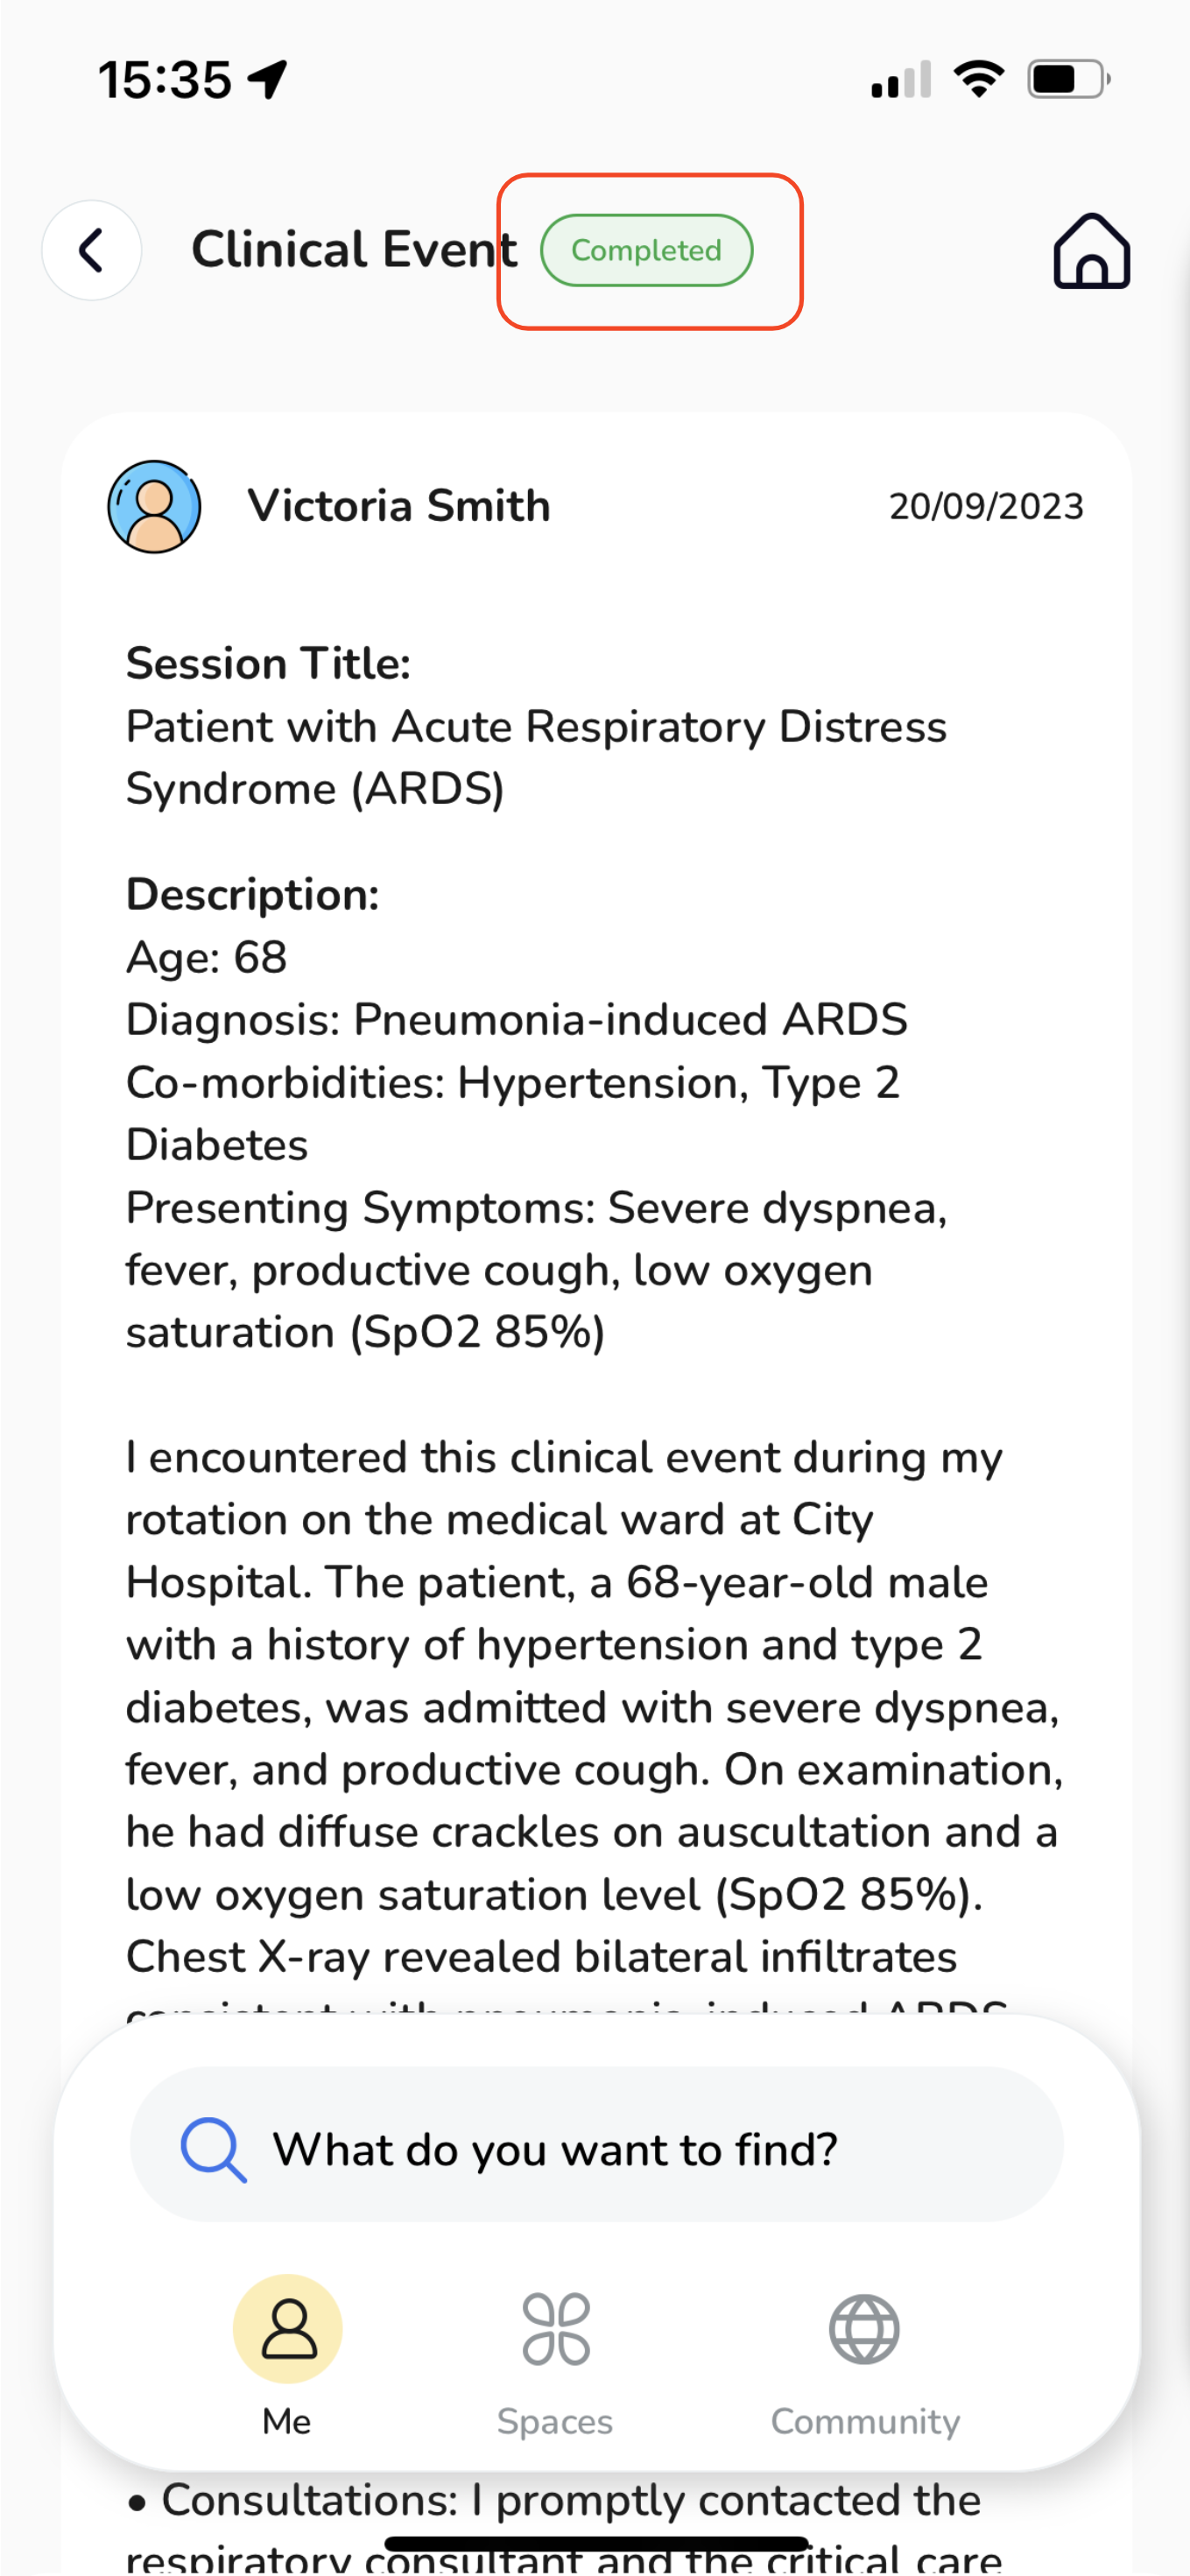
Once feedback is received from your assessor, the event's page will display a green label indicating "Completed". For feedback review, just scroll down on the page.
-
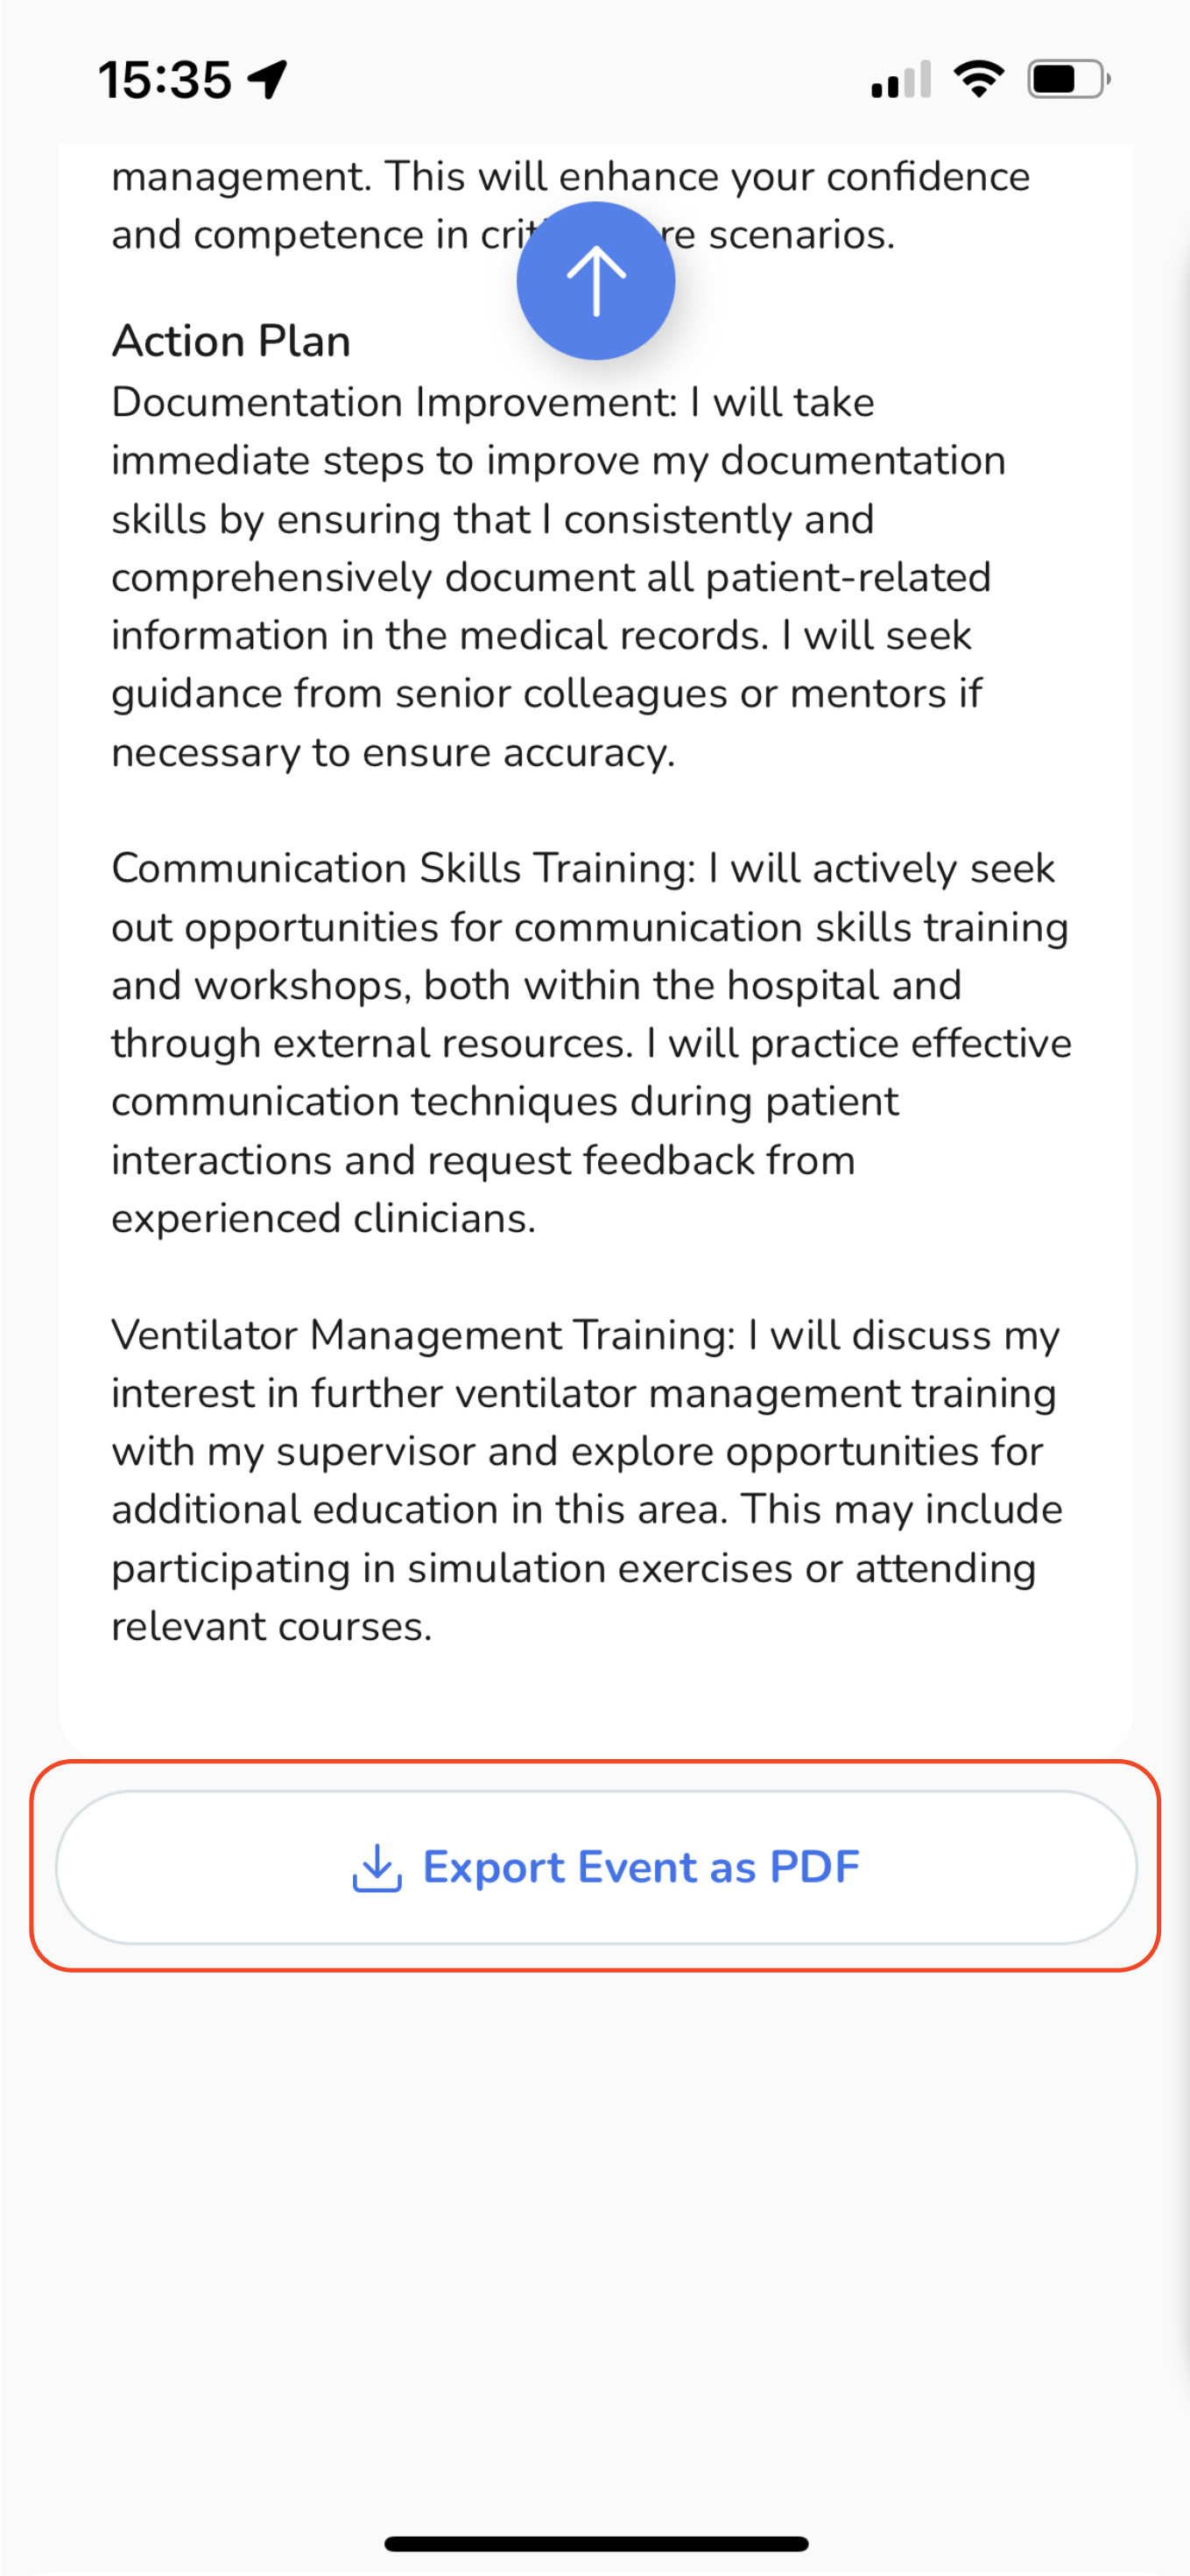
Moreover, if desired, you can export the feedback as a PDF.
Once feedback is received from your assessor, the event's page will display a green label indicating "Completed". For feedback review, just scroll down on the page.
Moreover, if desired, you can export the feedback as a PDF.
So, take charge of your Clinical Event using the insights gained here, and enjoy the benefits of an organised and reliable record-keeping system.


